Today’s recipe is by Kathryn Bamford from The Wholefoods Refillery. This beautiful salad is so easy to make; with no cooking required, just whip it up the day before serving for quick and easy entertaining! Get 20% off your first order of ingredients with the code JEN20.
The best broccoli salad
The perfect crunchy and refreshing salad next time you're asked to bring a plate!
3 raw broccoli (stalks and florets, chopped)
1.5 cups sunflower seeds
1.5 cups dried cranberries
1 small red onion (finely chopped)
1 cup Grana Padano or Parmigiano Reggiano cheese (grated (optional))
DRESSING
1/2 cup extra virgin olive oil
3 tbs apple cider vinegar
2 tbs French wholegrain mustard
2 tbs honey
1 clove garlic (minced)
1/2 tsp pink Himalayan fine salt
1/4 tsp pepper
In a large mixing bowl, add all your salad ingredients and set aside.
In a liquid measuring jug, add all of the dressing ingredients and whisk well until combined.
Pour the dressing over the salad and stir until the broccoli is lightly coated in the dressing. Let marinate for about 20 mins – overnight before serving.
Serve and enjoy!
Make the night before to save you time on the day.
Leftovers keep well for three days refrigerated.
Don’t be fooled! The broccoli doesn’t need to be cooked; once it’s soaked in the dressing, it’s good to go!
Dinner, Lunch, Salad, Side Dish
Modern Australian
Australian summer, broccoli, easy dinner, easy lunch, fresh, salad, sides
A few weeks into term and parents’ lunchbox enthusiasm may be waning! Give these delicious and nutritious donuts a try, and your kids will beg for more! This week’s recipe comes from Mavella Superfoods.
Healthy banana & quinoa baked doughnuts
Treat your kids with this fun and wholesome doughnut recipe!
3 ripe bananas
1/2 cup dry quinoa
1 cup of whole wheat flour
1/2 cup organic or brown sugar
1 tsp baking powder
1/2 cup rolled oats
1/4 cup coconut oil
2 eggs
1 tbsp Mavella Superfoods Brain Boost
1/2 cup walnuts, raisins, chocolate chips mix
Rinse the quinoa in water thoroughly. In a pan, or rice cooker, add the quinoa and 1 cup water. Bring to a boil, then cover with a lid and cook until the water is completely absorbed.
Preheat the oven to 180c and grease the doughnut mould.
In a food processor, blend the oats until powdered.
Mash the bananas with a fork until smooth. Add the eggs, coconut oil and sugar. Mix well.
Add the flour, baking powder and Mavella Superfoods Brain Boost to the mixture.
Fold in the cooked quinoa, chopped nuts, raisins and chocolate chips.
Fill the doughnut mould and bake for 20 – 25 minutes.
Allow to cool for 5 minutes before taking them out to a wire rack, then cool completely before serving.
Foodie Friday: Buttermilk doughnuts
Perfect for a weekend treat, these old-fashioned cake doughnuts and doughnut holes from Williams-Sonoma are beautifully aromatic with cinnamon and…
Foodie Friday: Cinnamon donut apple rings – The Interiors Addict
Today’s recipe is cinnamon donut apple rings by Kathryn Bamford from The Wholefoods Refillery. They’re the perfect after-school snack for your…
The beautiful rich swirls of sweet dark chocolate, buttery layers of biscoff spread and crunchy almonds are the perfect delicious treat to enjoy with those you love this Valentine’s weekend!
Third cup slivered almonds (toasted, plus 1 tbsp extra)
50 gm additional dark chocolate (melted )
To make the dough, pour milk into a jug; add yeast and a pinch of the sugar; mix well and set aside for 5 minutes or until foamy.
Place flour, remaining sugar, salt and cinnamon in the bowl of an electric mixer fitted with a dough hook. Mix on low speed to combine; add yeast mixture, eggs and vanilla and mix on medium low speed until combined. Increase speed to medium, then add butter in 5 stages mixing well after each addition. Mix for 10 minutes or until smooth, elastic and the dough comes from the sides of the bowl. Transfer dough to a lightly greased mixing bowl.
Preheat the steam oven to ‘steam function’, set at 30°C. Transfer dough to the oven and prove for 1 hour or until doubled in size.
Knock back dough and shape into a rectangle; cover with cling wrap and refrigerate overnight.
To make the filling, in a medium saucepan over medium heat, combine sugar and cream; bring to a simmer, stirring occasionally, until sugar completely dissolves.
Place chocolate, biscoff spread, butter and vanilla in a large bowl and pour over cream, mix until smooth; cool completely, then refrigerate for 10 minutes or until thick.
Grease and line a 22cm loaf pan with baking paper.
Remove dough from the refrigerator and place on a 60cm long piece of baking paper. Using a rolling pin, roll dough into a 20cm x 40cm rectangle. Spread with the filling to the edge of the dough except for one of the long sides, leaving 3cm of dough with no filling. This will help to enclose the filling; scatter with almonds.
Starting with the long side, roll into a tight roll using the baking paper to assist then twist the ends of the baking paper like a bon bon. Transfer to the freezer for 15 minutes – this will make the filling firm and easier to work with.
Slice the dough in half lengthwise to expose the filling. Twist the halves together as if you were braiding them. Place into the prepared pan. Place in the steam oven set at 40°C for 1 hour.
Preheat the oven to 180°C fan forced, with 30% steam. Place babka in the oven and bake for 35 minutes or until golden brown. Set aside to cool slightly.
Drizzle with melted chocolate and sprinkle with extra almonds.
Filling can be made in advance and kept in the fridge, ensuring you take it out 1 hour before using.
A great way to see if your bread is ready is to knock on the bottom of the bread – if it sounds hollow it is ready to go!
The Miele combi steam oven offers flexibility for best baking and roasting results: combine humidity and dry heat as you wish. To ensure the best results, you can adjust both the temperature (30°C to 225°C) and moisture content (0% to 100%) in combination mode. This ensures the food is cooked just the way you like it.
Using a mixture of high temperature and steam is perfect for bread baking! This gives you a golden crust and moist middle.
This week’s recipe comes from Tropic Co and is an easy and healthy way to enjoy the popular Thai dish.
Healthy tiger prawn pad Thai
Recreate this takeout favourite with a healthy version which is no less tasty.
20 extra large whole cooked tiger prawns (head and shell removed and deveined, tail on)
300 g rice noodles (cooked as per packet instructions)
1 tbsp olive oil
Quarter cup pad thai paste
2 tsp soy sauce
1 egg (lightly whisked )
1 bunch broccolini (ends trimmed and cut into 3cm lengths)
Half cup beansprouts
4 spring onions (finely sliced )
2 tbsp crushed peanuts (toasted)
Additional beansprouts lime wedges and chilli (for serving )
Heat oil in a large frying pan or wok over medium-high heat.
Add paste and soy sauce, cook for 1 to 2 minutes. Stir in broccolini, cook whilst tossing for a further 3 minutes.
Push broccolini to the side of the wok and pour in the egg, chopping it up as it is cooking.
Add prawns, cooked noodles, beansprouts and spring opinions to the wok, toss for 1 to 2 minutes
Serve with chopped peanuts, additional beansprouts, lime wedges and chilli.
Avoid mushy noodles by not over cooking and draining right away.
It is easy to get involved in National Prawn Day on 18 March 2023. Simply head to a participating venue, get your mates over and host a Tiger Prawn Feast, or simply pick up some Aussie tiger prawns from your local fishmonger or supermarket to enjoy at home. National Prawn Day was initiated by Tropic Co to celebrate all the delicious reasons to enjoy Australian prawns, special occasion or not.
This week’s fish recipe is from celebrity chef and Tassal ambassador, Guy Turland.
300 gm Tassel Fresh Tassie Salmon (skin on fillet)
Half cup preserved lemon juice (from jar)
2 tbsp sugar
1 tbsp fennel seeds
300 ml olive oil
1 lemon
1 tsp peppercorns
1 chilli
2 garlic cloves (pressed)
Salsa
1 preserved lemon (roughly chopped)
Seeds from one pomegranate
1 avocado (diced)
juice and rind of one lemon
Quarter cup parsley (roughly chopped)
Quarter cup mint (roughly chopped )
Preheat oven to 150°C and place salmon portions on a wide shallow plate. Combine preserved lemon juice, sugar and fennel seeds in a separate bowl. Pour mixture over the salmon and rub generously into each fillet.
Refrigerate the salmon for at least 30 minutes. Remove from the fridge, rinse your salmon with water and pat dry with a paper towel.
Place your salmon on a clean baking tray or in a large pot. Top salmon with lemon rind, chilli, peppercorn and garlic cloves. Cover with olive oil to completely submerge the salmon.
Place in oven and lower heat to 90°C. Bake for 10-15 minutes until cooked through or to your liking.
Meanwhile, prepare your salsa by combining preserved lemon, avocado, pomegranate, mint, parsley, lemon juice and lemon rind in a bowl.
Gently remove the salmon from the oven, liing each fillet from the tray with a large slotted spatula. Allow excess oil to drip off and place on a serving platter. Scatter salmon with salsa and serve.
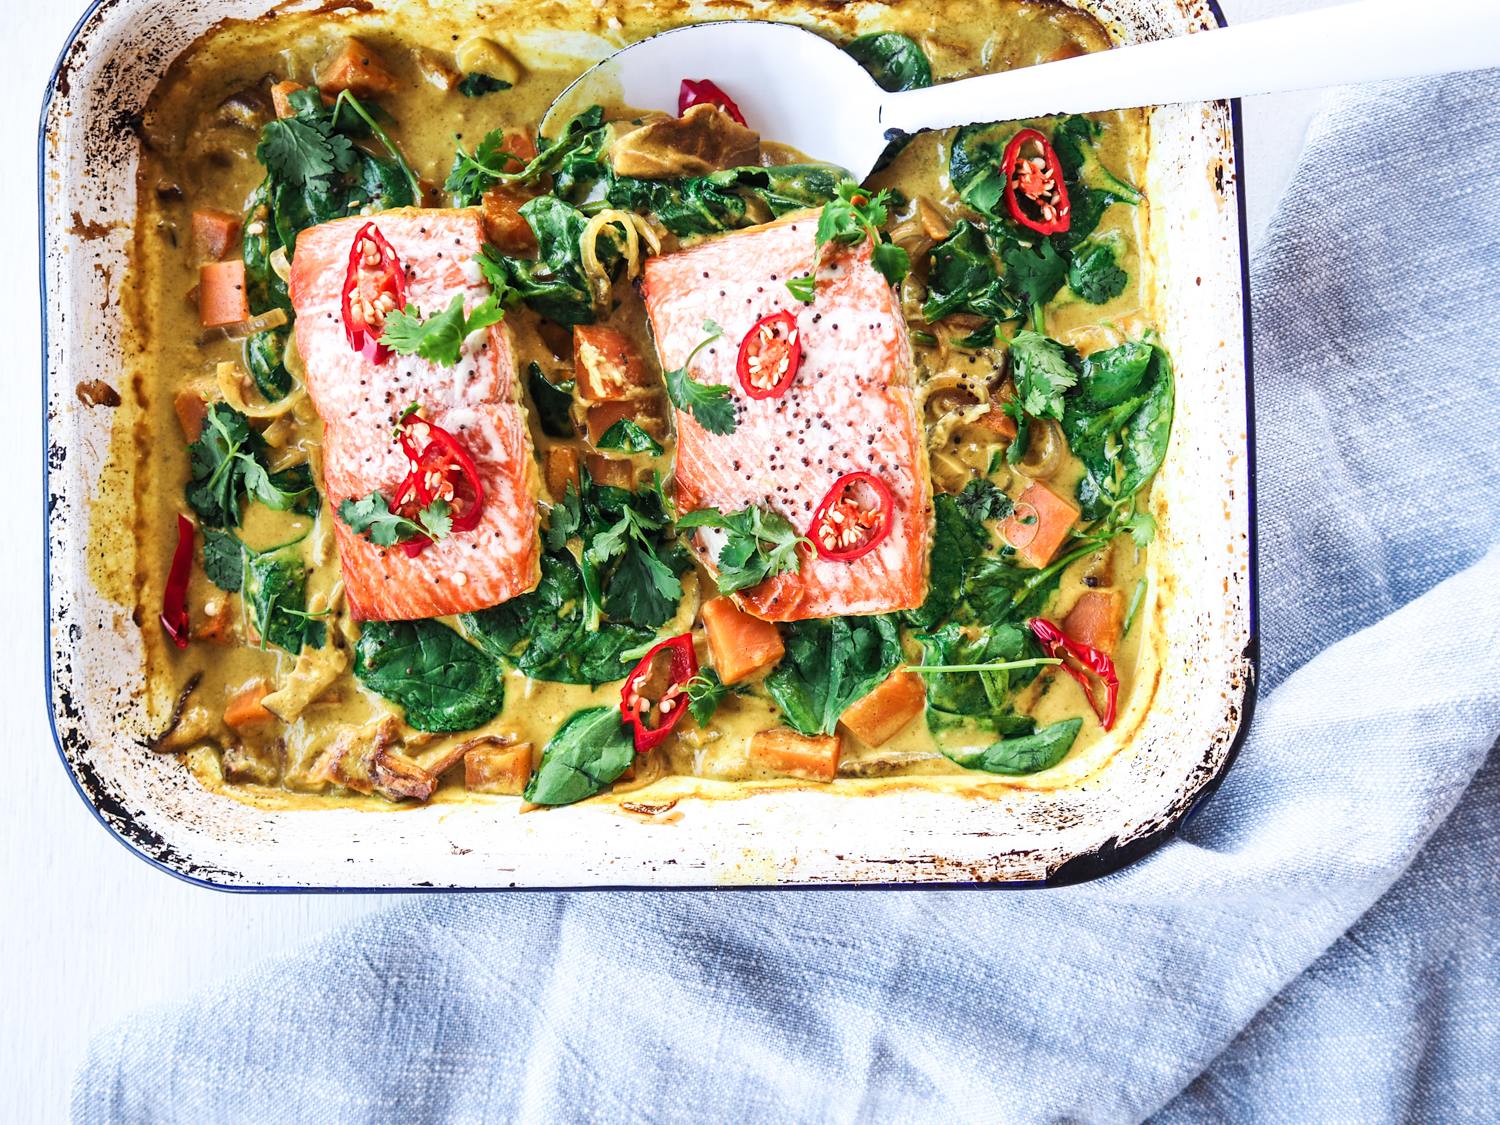
Foodie Friday: Asian spiced salmon and coconut tray bake
Today’s recipe from our favourite clinical nutritionist and new mum Rosie Eyre (congratulations!), comes with a good dose of information…
Foodie Friday: Guy Turlandʼs salt, nori and ginger crusted salmon
A succulent salmon dish from Guy Turland to celebrate World Salmon Day earlier this month with Tassal Salmon.
3 spring onions (white part sliced in rounds, green part sliced on an angle, separated)
2 carrots (peeled, diced )
1 bunch broccolini (sliced )
3 cups cooked long grain rice (chilled )
1 cup frozen peas
1 large handful beansprouts
4 free range eggs
1 tbsp toasted sesame seeds
Toss the chicken thigh with half the Birch & Waite Teriyaki Miso Stir Fry Sauce then place into a baking dish. Leave this to marinate for 20 minutes or longer in the fridge.
Preheat an oven to 220C and roast the chicken for 15-20 minutes, until nicely caramelised and cooked through. You can use the top grill function in the oven for the last 3-4 minutes of cooking if needed to get it nice and golden.
Meanwhile, place a large frying pan or wok over a high heat and add the oil and white part of shallot, carrot and broccolini. Stir fry for 2 minutes then add the rice and stir fry that for 2 more minutes before adding the peas and remaining Birch & Waite Teriyaki Miso Stir Fry Sauce.Stir fry for 1 minute then add the bean sprouts and ¾ of remaining green shallots.
Place another non-stick pan over a high heat. Add the remaining olive oil and fry the eggs to your liking.
Slice the cooked chicken thighs. Spoon the fried rice into serving dishes and top with the chickenandfried egg, spooning any cooking juices from the chicken over the top.
Finish with remaining shallots and sesame seeds.
Foodie Friday: Teriyaki salmon bowl
In celebration of World Salmon Day last Tuesday, we’re sharing this delicious recipe from Tassal. Serves: 2 Ingredients 2 x…
Foodie Friday: Nasu Dengaku (miso eggplant)
This recipe was created by Chef Gianni Carrieri, culinary expert at Appliances Online.
A quick and easy dessert recipe to impress guests at your next summer barbecue!
Grilled pineapple with smoked salted caramel
This recipe is by Appliances Online culinary expert, Russell Crosdale.
1 large pineapple skin removed and cut into rings or one large can of pineapple rings
1 cup caramel topping
1 tsp salt
4 wafer ice cream cones
3 tbsp shredded coconut
vanilla ice cream (to serve)
Preheat your BBQ to high.
Combine the caramel topping with the salt and whisk to combine. Put in the fridge to set.
If using fresh pineapple, remove the top, remove the skin and cut into slices of about 2.5cm. If using canned pineapple, remove from the juice and set aside.
Grill the rings on the BBQ for 2-3 minutes each side until darkened to your liking. Remove from the heat and place in the fridge to cool down as this dish is served cold.
Once the pineapple is cold, remove from the fridge.
Layer the base of a plate with the crushed wafer cone.
Place the pineapple ring on top of the wafer and top with a scoop of ice cream.
Drizzle liberally with the caramel and salt mixture.
Half cup fresh lychees, peeled and seeded (plus extra for decoration)
Half a shallot (finely diced)
1 cup fresh basil leaves (finely chopped)
1 cup fresh coriander leaves (finely chopped)
1 tbsp lemon juice
Quarter cup olive oil
salt and pepper (to taste)
lime wedges (to serve)
sliced avocado (to serve)
To make the lychee salsa verde, roughly chop the lychees and drain any excess liquid.Add chopped lychees to a medium bowl together with the remaining salsa verde ingredients and season generously with salt and pepper. Stir to combine then set asideto allow flavours to meld.
Pat each fish fillet dry with a paper towel. Sprinkle evenly with Cajun seasoning, gently pressing into the fillets to coat. Set aside.
Heat 1 tbsp of olive oil in the grill or frying pan over medium-high heat. Once hot, add the fish fillets and cook for 3 minutes on each side, or until fish is fully opaque and flakes apart easily.
To serve, gently flake apart the Cajun fish with two forks and serve over warm tortillas with lychee salsa verde, fresh lychees, avocado and lime.
Foodie Friday: Guy Turlandʼs salt, nori and ginger crusted salmon
A succulent salmon dish from Guy Turland to celebrate World Salmon Day earlier this month with Tassal Salmon.
This easy pasta recipe from Winning Appliances is fresh and filling. If you haven’t made your own pesto before, time to realise how simple it is!
This recipe is by Winning Appliances culinary expert, Gianni Carrieri.
Half cup light olive oil
200 gm rocket
60 gm blanched almonds
1 clove garlic (thinly sliced)
1 tbsp lemon juice
1 tsp lemon rind
130 gm grated parmesan
1 tsp sea salt flakes
Quarter tsp pepper
3 tbsp extra virgin olive oil
400 gm cherry tomatoes (halved)
4 basil leaves
100 gm green beans (trimmed)
1 500gm pack fusilli pasta
200 gm bocconcini mozzarella (cut into quarters)
toasted, flaked almonds (to serve)
Pour the olive oil and rocket into a food processor, blend for about 30 seconds until the ingredients are combined but not totally smooth. Scrape down the side and continue blending, add almond, half the garlic, lemon juice, parmesan cheese and rind, half of the salt and pepper. Gradually add the remaining olive oil and blend until all the ingredients are just combined.
In a bowl, let tomatoes infuse with extra virgin olive oil, the other half of the garlic, the remaining salt, fresh basil leaves and lemon rind for 20 minutes.
Bring some water to a boil and blanch the green beans for 4 min, drain and soak them in iced water for 5 min, then cut in 2 cm pcs.
Cook the pasta according to the package instructions, reserving a third of the cooking water. Toss cooked pasta with pesto and reserved cooking water, add the tomatoes, green beans, bocconcini, toasted almond flakes and the remaining grated parmesan. Serve immediately.
Pesto can be kept into the fridge for up to 5 days. Pesto can also been frozen and used when necessary.
Foodie Friday: Cashew Alfredo pasta
This recipe for cashew Alfredo pasta with rosemary mushrooms was developed by Minako Umehara @365cleaneats for Naked Foods. Prep time: 30 minutes |…
600 gm Kipfler potatoes (scrubbed, washed and cut into 1-inch rounds)
1 bottle Barker's of New Zealand Really Useful Chipotle Sauce
1 tbsp olive oil
2 thick slices fresh pineapple
1 corn on the cob (husk removed)
Half cup capsicum (finely diced)
Half cup red onion (finely diced)
1 medium tomato (deseeded and finely diced)
Half small jalapeño (deseeded and finely sliced )
2 cups rocket (roughly chopped)
Quarter cup fresh coriander leaves (chopped)
1 small avocado (flesh finely diced)
Parmesan cheese and lime wedges (to serve)
Add potatoes to a medium bowl. Add half a bottle of the Barker's of New Zealand Really Useful Chipotle Sauce (or other chipotle sauce) to the potatoes and mix well.
Preheat your barbeque to high heat. Place your Grillman (or other brand) hot plate liner onto your barbeque, and add olive oil. Add the marinated potatoes and grill for 10 minutes, turning occasionally with your Grillman (or other brand) spatula until browned and crispy all over. Reduce heat to medium, cover and continue roasting for another 8-10 minutes until potatoes are tender.
Remove the potatoes from the heat and add to a large mixing bowl. Place pineapple rounds on the grill or hot plate and roast for 4-6 minutes on each side until caramelised and slightly tender. Remove from heat, and cut off the skin and core. Dice the grilled pineapple flesh and add to the mixing bowl.
Roast the whole corn on an open flame for a couple of minutes until evenly browned all over. Using a sharp knife, remove the grilled kernels into the mixing bowl.
Add finely diced capsicum, red onion, tomato, jalapeno and roughly chopped rocket and coriander to the bowl.
Add the remaining chipotle sauce to the salad and toss gently. Mix well until everything is evenly coated in the sauce.
Top with diced avocado, fresh coriander and a wedge of lime and grated parmesan cheese.
A gluten and dairy free dessert from Amanda at The Cordony Kitchen, this one is so easy to make!
Mango, coconut and ginger trifle
Amanda from The Cordony Kitchen brings us the quickest and easiest dairy and gluten-free crowdpleaser dessert you'll ever make, from her gorgeous new Christmas Recipe eBook 2022!
2 400ml tins coconut cream (refrigerated overnight)
4 mangoes
350 grams gluten-free ginger biscuits
Half cup flaked coconut (toasted)
1 lime (zested)
In a food processor blend 3 mangoes. Place the solid white part of the coconut cream into the food processor. Blend until smooth, about 2 minutes on high.
In a 20cm glass trifle stand add 3 ladles of mango mixture to the base followed by a layer of ginger biscuits. Repeat with another layer of mango mixture and biscuits, save 1 biscuit to crumble on top of the trifle.
Spread the last of the mango mixture on top.
Slice the remaining mango on top of the trifle and set it in the fridge for at least 2 hours.
When ready to serve, add one crumbled ginger biscuit, toasted coconut and lime zest.
Foodie Friday: Tropical macadamia bark
This recipe was developed by Jacqueline Alwill @brownpapernutrition for Naked Foods. What tastes like white chocolate and pina colada, but packed…
Foodie Friday: Make your own Christmas Pudding SmashCake
Claudia Abrahams from Sydney Smash Cakes shares how to make her Christmas Pudding SmashCake. If this is a bit ‘too hard basket’…
Festive and full of flavour, this cream cheese olive Christmas tree from Chef Ness is the perfect crowd pleaser. Served it with classic Arnott’s Jatz and Arnott’s Cheds.
Cream cheese olive Christmas tree
Festive and full of flavour, the Arnott’s Cream Cheese Olive Christmas Tree is the perfect Christmas crowd pleaser.
1 cheese slice (1 cm thick)
1 kg cream cheese
2 tsp smoked paprika
2 tsp garlic powder
11/2 cups grated cheddar
2 tbsp chives (finely chopped)
2 x 120 g green olives (marinated, pitted, halved)
80 g pitted kalamata olives (halved)
120 g semi dried tomatoes (sliced)
5 rosemary sprigs
Arnott’s Jatz and Cheds to serve
Using a 5cm star cutter, cut a star from the cheese slice and set aside.
Combine cream cheese, paprika, onion and garlic in large mixing bowl and beat with an electric mixer until smooth.
Mix in grated cheese and chives.
If your mixture is quite soft, chill for 1 hour or until firm enough to shape. If your mixture is already firm, you can skip this step.
To assemble, place a large piece of plastic wrap on a flat surface, then turn cheese mixture onto plastic wrap.
Using plastic wrap, form mixture into a cone shape (base will need to be about 13cm diameter). Place on a serving platter.Push olives, semi dried tomatoes, and rosemary into the cream cheese to decorate. Top with cheese star.
From chef Tom Walton, this one is sure to steal the show this summer. Fresh, vibrant and zesty, it’s the summer salad you’ve been waiting for. A gorgeous dish that’s easy to whip up, it makes a festive side plate for entertaining, Christmas parties or taking along to summer BBQs. This recipe is made with Delcado avocados.
Tom Walton’s green goddess pasta salad
4 Delcado avocados
Zest and juice of 1 large lemon
1 cup natural yoghurt
Pinch of dried chili flakes
2 handfuls of basil leaves
2 handfuls of flat leaf parsley leaves
Salt and pepper (to taste)
2 cobs of corn
500 g spiral pasta
200 g diced bacon
2 tbsp tiny capers
1 punnet grape tomatoes (halved)
2 tbsp extra virgin olive oil
1/3 cup semi-dried cherry tomatoes
To make the Green Goddess sauce, scoop the flesh of 2 Delcados, the lemon zest, juice, yoghurt, chili flakes, and half the basil and parsley into a blender with some salt and pepper to taste. Blend to a smooth sauce. Taste and adjust if needed, and set aside.
Bring a large pot of lightly salted water to the boil and cook the corn cobs for 5 minutes, then remove (but do not drain the water). Set the corn aside and allow to cool.
Add the pasta to the boiling water and cook for 9 minutes (or according to pack instructions). Drain, then refresh under cold water and drain again.
Meanwhile once the corn has cooled, cut it off the cob and set aside.
Cook the bacon in a frying pan until crispy. Add the caper for 2 minutes toward the end to become slightly crisp and fragrant.
Roughly chop the remaining parsley and combine in a large mixing bowl with the cooked pasta, corn, tomatoes, bacon, and capers. Pour in the avocado sauce and olive oil. Toss gently to combine and season to taste.
Scoop the remaining 2 Delcados from their skin and cut into large wedges. Add to the salad, tossing a couple times more to mix.
Serve the salad scattered with the semi dried tomatoes and remaining basil leaves.
TIPS:
Delcados are the ideal choice for this dish thanks to their smooth, buttery texture, making for a perfectly creamy Green Goddess sauce. Delcados are slow grown, left on the tree for nearly twice as long as other avocados to let their rich, unique flavour develop.
For effortless entertaining, you can prep the Delcado Green Goddess sauce, pasta and corn ahead of time and keep them separately in the fridge. Simply mix everything together and add the final touches when you’re ready to serve.
Dinner, Lunch
Australian summer, avocado, pasta, salad, summer lunch
A sweet dessert using Barker's of New Zealand's Marmalade
1 1/2 cups Whole wheat flour
3 tsp Baking powder
1/2 cup Shredded coconut
1 cup Sugar
2 tbsp Barker’s Breakfast Marmalade
1 tbsp Lemon zest
1 cups Milk
125 mg Butter (melted)
2 Egg
2 tbsp Icing sugar
2 tbsp Lemon juice
1/4 cup Water
Preheat oven to 180°C (160°C fan forced, 350°F, gas mark 4).
CAKE MIX: grease a 20cm round cake tin. Mix all ingredients in a bowl until well combined. Pour batter into the tin. Bake for 40 minutes. When cooled, remove the rim and transfer cake to a cooling rack
SYRUP: combine all ingredients in a small saucepan. Bring to a boil then simmer for about 5 minutes, stirring, until the mixture is reduced and syrupy. Allow to cool to room temperature before serving.
To serve, drizzle syrup over individual cake slices when serving
Dessert
breakfast cake, cake, coconut, marmalde
Foodie Friday: Ed Halmagyi’s cheesy mac-o-lanterns
With Halloween fast approaching, we thought we’d share a sugar-free but no less fun treat with these cheesy mac-o-lanterns by…
Foodie Friday: Vegan dark chocolate, nutmeg & Oreo cheesecake
This week’s delicious desert is from Winning Appliances’ culinary expert Reece Hignell. “This beautifully rich baked cheesecake with a hint…
This week’s delicious desert is from Winning Appliances’ culinary expert Reece Hignell. “This beautifully rich baked cheesecake with a hint of nutmeg is light, smooth and so decadent – and vegan too.”
Vegan dark chocolate, nutmeg & Oreo cheesecake with rich chocolate ganache
1 packet (133g Oreo Original biscuits)
40 g margarine (melted)
600 g vegan cream cheese (at room temperature)
200 g vegan dark chocolate (melted ½ cup (110g) caster sugar)
¹⁄ ³ cup (80ml coconut cream Fresh berries, to serve)
Preheat oven on top and bottom heat set to 160°C with low steam. Grease and line the base and sides of a 20cm round springform pan with baking paper.
To make the base, place biscuits in a food processor bowl and pulse just until fine crumbs are formed. Add margarine and process until just combined. Press firmly and evenly into the base of the prepared cake pan. Refrigerate while preparing the filling.
For the filling, place cream cheese into a stand mixer bowl; beat on a low speed until smooth; gradually add chocolate. Add caster and brown sugar, sifted cornflour, cocoa powder and nutmeg and vanilla; mix until smooth. Pour over the biscuit base and smooth the surface.
Place cheesecake on a universal tray on level 1 and bake for 55 minutes. Transfer to a cooling rack to cool for 30 minutes before transferring to the refrigerator to cool completely, about 2 hours.
To make the ganache, place chocolate and coconut cream into a heatproof bowl; heat in the microwave oven on 600W for 1 minute; stir, then continue to heat, stirring every 15 seconds, until the chocolate is fully melted. Set aside to cool and thicken slightly.
To assemble, remove cheesecake from the pan and place onto a serving plate; spread with chocolate ganache. Serve with berries. Recipe notes Vegan cream cheese is quite soft and smooth, so it doesn’t need much beating to make it smooth. It’s available in most local supermarkets. Store refrigerated in an airtight container for up to 3 days. You can substitute cinnamon for nutmeg and add grated orange rind for a lovely jaffa flavour.
A quick, easy, creative and kid friendly dish for this halloween
75 g unsalted butter
50 g plain flour
2 cups warm milk
2½ cups boiling water
250 g dried macaroni pasta
1½ tsp garlic powder
1½ tsp onion powder
1½ tsp mustard powder
1½ tsp dried sage
sea salt flakes and freshly-ground white pepper
1 cup grated mozzarella
1½ cups grated Colby cheese
8 small orange or red capsicums
Combine the butter and flour in a large saucepan set over a moderate heat and cook for 1 minute, until it resembles wet sand. Whisk in the milk and bring to a simmer, whisking constantly. Add the water and simmer again.
Mix in the paste and spices, then season generously with salt and pepper. Stirring well. Boil rapidly for 5 minutes, stirring often, then reduce the heat to moderate and simmer for a further 15 minutes, until the pasta is al dente.
Stir in the cheeses, then set aside for 5 minutes.
Use a small sharp knife to carve a ghoul face into the side of each capsicum, then remove the lid and seeds. Fill with macaroni mixture, then set the lid back on again.
Foodie Friday: Guy Turlandʼs salt, nori and ginger crusted salmon
A succulent salmon dish from Guy Turland to celebrate World Salmon Day earlier this month with Tassal Salmon.
Foodie Friday: Pear, chocolate & hazelnut tart
Bake this pear, chocolate & hazelnut tart for your next dinner party to send the guests home happy. This recipe…