Categories
Recipes

Foodie Friday: Spicy roasted cauliflower soup

Foodie Friday

Today, our favourite nutritionist Rosie Eyre is sharing a warming soup recipe that’s as good for us as it is delicious!

Serves 2

Ingredients

1/2 cauliflower (200-300g), cut into florets, include stalks

1 garlic clove, peeled and roughly chopped

Olive oil

Sea salt & pepper (for cauliflower)

1 tsp mustard powder

1/4 tsp cayenne pepper (optional if you don’t like spice, leave out)

1 tsp garam masala

1 white onion, finely diced

500ml bone broth

3 tsp apple cider vinegar

Salt & pepper, to season

To serve: 1 tbsp yoghurt (can be Greek or coconut), a large handful of parsley, roughly chopped and a handful of seeds (pumpkin, sesame seeds).

Method

Pre-heat oven to 180°C. In a medium roasting tin, add the cauliflower florets, a good drizzle of olive oil, garlic, dust in curry powder, cayenne and garam masala, a pinch of sea salt and pepper. Toss to ensure all is covered.

Place in the oven for 25 minutes until cauliflower is browned. Remove tray from oven.

Heat a large saucepan, medium heat. Once hot, drizzle a splash of olive oil. Add onion and fry until soft and fragrant. Add cauliflower, apple cider vinegar and broth. Let it simmer for 15 minutes then take off heat, add some extra water if too thick.

Blitz soup until smooth with a whizz stick.

Serve with a dollop of yoghurt, fresh parsley and a handful of seeds.

If you love this recipe, check out Rosie’s eBook: Warm Your Cockles: 10 Healing Broths & Soups.

Categories
Recipes

Foodie Friday: Sweet potato crusted Shepherd’s Pie

Foodie Friday

Winter is coming and we are all looking for comforting recipes that are not only delicious, but will also provide us with plenty of nutrients to keep us healthy through the cooler months. Sweet potatoes are an easy (and tasty!) addition to so many home-cooked meals, plus one serve provides 100% of your daily vitamin C intake.

Ingredients

  • 1kg sweet potato, peeled, diced
  • 150g butter
  • Salt Black pepper
  • 3 tbsp olive oil
  • 1 onion, finely sliced
  • 1 carrot, finely diced
  • 1 stick celery, finely diced
  • 2 cloves of garlic, finely chopped
  • 500g lamb mince
  • 2 tbsp tomato paste
  • 2 tbsp Worcestershire sauce
  • ½ cup red wine, optional
  • 1 cup chicken stock
  • 1 x 400g tin tomato
  • 1 cup frozen peas
  • ½ cup grated cheddar cheese
  • Green leaf salad, to serve

Method

Steam or boil the sweet potato until cooked and soft then drain, mash and mix with the butter, salt and pepper to taste. Set aside.

Heat a medium saucepan over a high heat, add the olive oil, onion, carrot, celery, garlic and lamb.

Season with a little salt and cook over a medium to high heat to colour the lamb and cook the vegetables, stirring to break up with a spoon as it is cooking.

Add the tomato paste and continue to cook for another minute then add the Worcestershire sauce, red wine, chicken stock and tinned tomato and cook over a low heat, stirring occasionally, for approx. 30 minutes.

Preheat the oven to 190C. Adjust the seasoning of the lamb ragu then spoon the lamb mix into a baking dish, stir through the peas and top evenly with the mash sweet potato. Cover with the cheddar then bake for 15-to-20 minutes before serving with a green salad.

For more recipes from Australian Sweet Potatoes

Our other recipes

Categories
Recipes

Foodie Friday: IKEA’s Swedish meatballs

IKEA has released a six-step recipe for its famous Swedish meatballs so Aussies can recreate their own version using staple ingredients. Hooray!

Foodie Friday

Ingredients

Meatballs:

  • 250g pork mince
  • 500g beef mince
  • 1 onion finely chopped
  • 1 clove of garlic (crushed or minced)
  • 100g breadcrumbs
  • 1 egg
  • 5 tablespoons of milk
  • Salt and pepper to taste      

Cream sauce:

  • dash of oil
  •  40g butter
  • 40g plain flour
  •  150ml vegetable stock
  • 150ml beef stock
  • 150ml thick double cream
  • 2 teaspoons soy sauce
  •  1 teaspoon Dijon mustard       

METHOD

For the meatballs

  • Combine beef and pork mince until all lumps are smoothed. Add finely chopped onion, garlic, breadcrumbs, egg and mix. Then add milk and salt and pepper to taste.
  • Grab small handfuls and roll into a ball shape. Cover with cling wrap and refrigerate for 2 hours, this helps them firm up and hold their shape.
  • Heat oil on medium in a frying pan.  Once hot, add your meatballs and fry until brown on all sides.
  • Add to an ovenproof dish and cover with aluminium. Place in an oven (180°C or 160°C fan) and cook for a further 30 minutes.

Swedish cream sauce

  • Melt 40g of butter in a frying pan.
  • Whisk in 40g of plain flour stirring continuously for 2 minutes. Stir in 150ml of vegetable stock + 150ml of beef stock.
  • Stir in 150ml thick double cream, 2 teaspoons of soy sauce and 1 teaspoon of Dijon mustard. Bring to a simmer and allow the sauce to thicken. 
  • Recommended to be served with potatoes!

IKEA Australia has released a series of podcast episodes focused on happiness within the home, as Australians spend more time in them than ever before. They feature Christine Gough, Country Home Furnishing and Retail Design Manager, who provides advice and tips on how we can enhance how we use the spaces in our home for different purposes. Find them by searching the IKEA Australia Podcast Series on Apple Podcasts and Spotify.  

Categories
Recipes

Foodie Friday: Stuffed eggplant 3 ways

Foodie Friday

This week’s recipe comes from Maxwell & Williams. Maybe give meat-free Monday a go?

Ingredients

3 medium eggplants
1 1/2 cups (300g) mixed rice and quinoa, cooked
1 tin chopped tomatoes
1/4 cup fresh dill, coriander and parsley, chopped
1 tsp salt
1 tsp pepper
3 tbsp Greek yoghurt
1/4 tsp dried mint
1 small avocado
1/3 cup (40g) peas, mashed 1/4 cup (50g) fetta, crumbled 2 tbsp lemon juice
2 falafels, halved
1 tbsp pomegranate seeds
1 radish, finely sliced Sumac and mint, to garnish 3 tbsp hummus
6 cherry tomatoes, chopped 3 baby bocconcini, torn

Method

1. Pre-heat oven to 180°C (160°C fan-forced).

2. Cut lengthways to remove the top third of the eggplants and place cut side up into a baking tray. Using a dessert spoon, scoop out the flesh leaving a half centimetre intact around the eggplant.

3. Place excess flesh into a medium sized bowl and break up using the spoon. Add brown rice and quinoa, chopped tomatoes, mixed fresh herbs, salt and pepper. Stir to combine and transfer into eggplant shells.

4. Bake in oven for 40-45 minutes or until eggplant skin is tender.

5. In the meantime, combine Greek yogurt in a small bowl with the dried mint and set aside. In another small bowl mash avocado and stir through peas, fetta and lemon juice.

6. Remove eggplants from oven and allow to cool for 10 minutes.

7. Top one eggplant with minted yoghurt, falafels, pomegranate seeds and micro herbs. Spread avocado mixture over the second eggplant and top with radishes, sumac and fresh mint. Dress the final eggplant with hummus, cherry tomatoes, bocconcini and micro herbs. Serve immediately.

Go straight from oven to table with Maxwell & Williams’ Epicurious range.

More Recipes

Categories
Recipes

Foodie Friday: tempura tacos with fresh avocado

Foodie Friday

Chef and cookbook author Luke Hines is encouraging Aussies to embrace the arrival of the misunderstood Shepard avocado by learning how to use and choose them correctly! New YouGov Galaxy research shows 20% of Millennials struggled to identify when Shepard avocados are ripe – which means the avocado-loving generation could be leaving ripe ones on the supermarket shelf.

Ingredients

-2 Shepard avocados, skin and seed removed, and flesh cut into quarters (the skin of a Shepard avocado always stays green. To pick a ripe one, press gently near the top, if it gives a little, it is good to go).
-1 teaspoon sea salt
-Coconut oil, for deep frying
-70 g (1⁄2 cup) arrowroot or tapioca flour, for dusting

TORTILLAS
-100 g (1 cup) almond meal
-125 g (1 cup) arrowroot or tapioca flour
-180 ml coconut milk
-1⁄2 teaspoon sea salt
-125 ml (1⁄2 cup) filtered water
-pinch of ground turmeric
-2–3 tablespoons coconut oil

TEMPURA BATTER
-200 ml filtered water
-200 g arrowroot or tapioca flour
-1 teaspoon sea salt

AVOCADO CREAM
-2 Shepard avocados
-1⁄4 iceberg lettuce, shredded
-140 g (1⁄2 cup) Mayo
-juice of 1 lime
-1 handful of coriander leaves, roughly torn

SLAW
-1⁄4 red cabbage, shredded
-juice of 1 lemon or lime
-1 tablespoon apple cider vinegar
-1 handful of coriander leaves, roughly torn or chopped, to garnish

Method

Prepare the slaw by combining the red cabbage, lemon juice, apple cider vinegar in a bowl and mix well to combine. Set aside in the dirge for the cabbage to soften into a zesty slaw. This is a good time to also prepare the avocado cream. Combine all listed ingredients in a food processor and blitz until well combined, smith and creamy, set aside in the fridge ready for serving.

To make the tortillas, blitz together all the ingredients except the coconut oil in a food processor or high-speed blender to form a smooth batter. Melt a little of the coconut oil in a large frying pan over medium–low heat. Pour in 60 ml (1⁄4 cup) of the batter and smooth out into a thin round shape with a spatula or spoon. Cook for 1–2 minutes until sturdy enough to flip, then cook for a further 1–2 minutes on the other side until cooked through, puffed up and golden. Transfer the cooked taco to a plate in the oven to keep warm. Repeat this process with the remaining batter, adding a little more oil each time, to make 8 tortillas.

To make the tempura batter, whisk all the ingredients together in a large bowl until smooth.

Half-fill a large, heavy-based saucepan with coconut oil and place over medium heat. Heat the oil to 180°C. (To test if the oil is hot enough, simply drop a small piece of bread into it – if it sizzles and bubbles, you’re good to go.)

Add the arrowroot flour to a shallow bowl. Working in batches of 4–5, lightly coat the avocado wedges first in the arrowroot or tapioca flour and then in the batter. Immediately lower the coated wedges, one at a time, into the hot oil and deep-fry for 4 minutes, or until lightly golden around the edges and very crispy. Remove from the pan using a slotted spoon and transfer to a plate lined with paper towel to drain. Repeat with the remaining avocado wedges strips, being sure to bring the oil back up to heat between batches.

To serve, divide the tortillas among plates and top each with some red cabbage slaw, avocado tempura, avocado cream and fresh coriander. Season with salt and enjoy!

For more on Australian AvocadosMore recipes

Categories
Recipes

Foodie Friday: Pear and ginger cheesecake

Foodie Friday

Brought to us by Australian Pears, this unique ginger and pear cheesecake combination makes for an impressive entertaining choice. How good do the pears look piled up on top? This recipe works well with Beurre Bosc or Packham pears.

Pear and ginger cheesecake

Makes an 8 inch round cheesecake serving 8-10 people | Prep time: 30 mins | Cook time: 60 mins

Ingredients

  • 2 pears, peeled, cored and chopped into small cubes
  • 20 Digestive biscuits (approx. 1⁄2 a pack)
  • 75g unsalted butter, melted
  • 2 tubs (750g) smooth ricotta
  • 1⁄2 cup castor sugar
  • 1 tsp powdered ginger
  • 4 medium eggs, lightly beaten
  • Crystallised ginger (optional)

Caramel Poached Pears

  • 5 pears, peeled, halved or quartered and cores removed
  • 4 cups water
  • 3⁄4 cup brown sugar
  • 1 tsp lemon juice
  • 1⁄2 cup heavy cream
  • 40g salted butter

Method

  1. Preheat oven to 170 degrees celsius (150 degrees celsius for fan-forced ovens). Grease the base and sides of an 8 inch spring form pan.
  2. Process the biscuits in a food processor until they form a fine crumb. Add the melted butter and mix. Pour the mixture onto the base of the pan and press with your fingers to form an even crust. Refrigerate until set.
  3. Beat the ricotta, sugar and powdered ginger together until smooth. Add the eggs, a little at a time and continue to beat till fully blended. Fold in the chopped pears.
  4. Pour the mixture into the prepared pan and smooth the top. Bake in the oven for approx. 50-60 minutes.
  5. While the cheesecake is baking, poach the pears. In a large pot, combine the water and sugar over medium-high heat. Add the lemon juice. Once sugar has dissolved, reduce the heat to maintain a gentle simmer. Submerge pears in the simmering liquid, adding more water if necessary to just cover the pears. Cut a piece of parchment paper into a circle large enough to cover the pot. Ease the paper down into the pot until it is touching the surface of the liquid.
  6. Simmer the pears until a knife inserted directly into a pear meets little resistance (about 30 minutes). Remove the pot from the heat and cool the pears completely in the poaching liquid.
  7. To make the caramel sauce to drizzle over the pears, reduce the poaching liquid to about 1⁄2 a cup. Add the cream and butter and simmer until the mixture is thick and glossy.
  8. When the cheesecake has baked and a crust starts to form all over the cheesecake (the top will become light golden brown) and a skewer inserted into the centre comes out clean, turn off oven, leave the door ajar and let the cheesecake cool completely before releasing the sides. Refrigerate until ready to serve. The cheesecake can be refrigerated and stored covered up to 3 days in the fridge.
  9. When ready to serve, top with caramel poached pears and crystallised ginger (optional).

More recipes
Categories
Recipes

Foodie Friday: Pavlova with rosé strawberry syrup

Foodie Friday

Brought to us by Jacob’s Creek, today’s recipe combines a classic Australian pavlova with a strawberry rosé syrup for a contemporary update. You can also pair the dessert with a glass of the wine label’s new Le Petit Rosé which is currently housed in a gorgeous limited edition bottle designed by Australian artist Heidi Willis.

Pavlova

Prep: 15 mins (+ cooling time) | Cooking: 1 1/2 hours | Serves: 8-10

Ingredients

Pavlova:

  • 6 egg whites, at room temperature
  • Pinch of salt
  • 1½ cups (330g) caster sugar
  • 1 tbs cornflour
  • 1 tsp white vinegar
  • 2 tsp vanilla bean paste
  • 300ml thickened cream
  • Mixed berries, to serve
  • Fresh cherries, to serve

Strawberry Syrup: 

  • 1 cup (250ml) orange juice*
  • ½ cup (110g) caster sugar
  • 100g strawberries, hulled, chopped

Method

  1. Preheat oven to 140˚C (120˚C fan-forced). Line a baking tray with baking paper. Draw a 20cm circle on the paper and turn over. Lightly spray with olive oil spray.
  2. Use an electric mixer to whisk the egg whites and salt in a clean, dry bowl until soft peaks form. Gradually add the sugar, 1 tbs at a time, whisking well after each addition until sugar dissolves and the mixture is thick and glossy. Add the cornflour, vinegar and half the vanilla. Stir until just combined. Use a large metal spoon to spoon the mixture onto the lined tray. Use a palette knife to shape into a disc, using the circle as a guide, and smooth the sides in an upwards motion to make a crown.
  3. Reduce oven temperature to 120˚C (100˚C fan-forced). Bake for 1.5 hours or until pavlova is dry to the touch. Turn oven off. Leave the pavlova in the oven, with the door ajar, for 2 hours to cool completely.
  4. Meanwhile, use an electric mixer to whisk the cream and remaining vanilla until soft peaks form. Cover and refrigerate until needed.
  5. To make the strawberry syrup, place the wine or orange juice, sugar and strawberry in a small saucepan over medium heat. Cook, stirring, for 5 mins or until the sugar dissolves. Reduce heat to low and simmer for 5 mins or until the syrup thickens and reduces by about half. Set aside to cool slightly. Strain the syrup through a sieve into a jug. Discard solids.
  6. Place the pavlova on a serving plate. Spoon over the cream and top with mixed berries and cherries. Drizzle with strawberry syrup to serve.

*You can swap the orange juice with Le Petit Rosé to add the perfect shade to pink to your pavlova.

Jacob's Creek bottle
Illustrated by Australian artist Heidi Willis, Jacob’s Creek’s Le Petite Rosé bottle is just too pretty!

More recipes

Categories
Recipes

Foodie Friday: Pear and brie focaccia

Foodie Friday

This week’s recipe is brought to us by Australian Pears and it’s a beauty. A great combination of salty and sweet, pears are the perfect complement to the recipe’s melted brie and honey balsamic vinegar. Beurre Bosc or Packham pears will work best and ideally, the pears should be slightly firm.

Pear and brie focaccia

Serves 4 | Prep time: 20 minutes (plus 1.5 hours proofing time) | Cook time: 20 minutes

Ingredients

  • 200ml water
  • 1 tsp instant yeast
  • 1 tsp caster sugar
  • 320g plain flour
  • 2 tbsp extra virgin olive oil
  • 1⁄2 tsp salt

Toppings

  • 1-2 pears, sliced into 3mm thick slices with mandolin
  • 65g brie, cut into thin slices
  • 1⁄4 cup walnuts, roughly chopped
  • Olive oil for drizzling
  • 1 tbsp honey
  • 1⁄2 tbsp balsamic vinegar
  • Salt
  • Pepper

Method

  1. Prepare the dough by first mixing together water, yeast and sugar in a stand mixer bowl and allow to sit for 5 minutes. Add the flour, olive oil and salt and knead with the dough hook attachment for 5 minutes. Shape into a ball and put in a lightly greased bowl and cover with cling film. Proof the dough for an hour or till doubled in size
  2. When the dough has finished proofing, lightly grease a baking tray with olive oil and press the dough out on the baking tray to a rectangular shape, approximately 0.5-1cm thickness. Cover loosely with a tea towel and set aside to proof for 30 minutes. Preheat the oven to 200 degrees Celsius.
  3. When ready to bake, place the pear slices, brie and walnuts all over the dough. Drizzle with a little olive oil and bake in the oven for 20 minutes or till the edges of the dough start to become golden.
  4. As the focaccia is baking, mix the honey and balsamic vinegar together.
  5. Lightly season the focaccia with salt and pepper before drizzling the honey and balsamic vinegar over the top. Serve it warm.

More recipes

Categories
Recipes

Foodie Friday: Almond croissants

Foodie Friday

A fabulous way to jazz up store bought croissants for an easy Sunday morning brunch, this simple recipe is brought to us by Laurent Bakery founder Laurent Boillon who has generously shared his secrets to achieving that classic creamy almond filling. Mmm…

Almond croissant

Ingredients

  • 200g quality butter (at room temperature)
  • 260g icing sugar
  • 260g almond meal
  • 100g custard
  • 2 small eggs (50g each)
  • 25g corn flour
  • 100g caster sugar
  • 100g flaked almonds
  • 50g icing sugar (for decoration)
  • 6 croissants (one day old)

Method

Sugar syrup

  • Dilute 100g of sugar in 100ml of water. Bring it to the boil in a pot and then set aside to cool.

Almond cream

  • In a large bowl with a spatula, generously mix 200g butter (at room temperature) with 260g icing sugar until it’s a pale creamy texture without lumps.
  • Add eggs, 100g custard, 260g almond meal, 25g corn flour all at once and mix gently until smooth.

Assembling the croissants

  • Carefully cut the croissants horizontally with a bread knife and place them open sided on a baking tray lined with baking paper.
  • Turn the oven onto fan at 180˚c.
  • Fill up the water bottle spray with the sugar syrup (still warm) and spray evenly all over the cut croissants.
  • Spread some almond cream on the bottom halves of the croissants.
  • Place the tops halves on and spread the remaining almond cream on them.
  • Scatter some flaked almond on top of the croissants to stick to the cream.
  • Put them in the oven at 170˚c and bake for 17 minutes depending on the oven setting (on fan around 160˚c to 170˚c or conventional heating around 170˚c to 180˚c)
  • Check after 10 minutes and turn down the temperature if the croissants start to take too much colour on top.
  • When ready, leave them to cool and dust them with icing sugar for decoration.

Tips: Be aware that every oven is different and you will need to adjust the oven temperature to allow time for the croissant to bake inside. Also, you can substitute plain croissants with brioche buns or chocolate croissants.

More recipes

Categories
Recipes

Foodie Friday: Buche de Noel (Christmas Log)

Foodie Friday

Buche de what you say? Also known as a Yule or Christmas Log, this is a traditional dessert served at Christmas in Europe. Brought to us by Beko, if you’re looking for something a little bit different to the standard fruit cake, trifle or pavlova to serve on Christmas Day, this dessert is it!

Christmas Log

Ingredients

Cake

  • 240ml milk
  • 3 eggs
  • 250g whole wheat flour
  • 200g honey
  • 20g cornstarch
  • 1 teaspoon baking soda
  • Pinch of salt
  • 60g coconut oil
  • 1 teaspoon vanilla extract
  • 1⁄4 cup of desiccated coconut

Filling

  • 240g cream cheese
  • 1 teaspoon vanilla extract
  • 50g Greek yoghurt
  • 80g honey
  • 20mL milk

Frosting

  • 240g chocolate
  • 1 teaspoon vanilla extra
  • 55g coconut oil
  • Pinch of salt

Method

Step 1: Preheat oven to 180C.

Step 2: Grease a rimmed 35 x 45cm pan with coconut oil. Line with non-stick baking paper and grease lightly again.

Step 3: Sprinkle a clean rectangular tea towel approximately 10 x 15 inches with desiccated coconut and set side.

Step 4: In a bowl, whisk the eggs with vanilla, coconut oil, honey and milk. Add flour, cornstarch, salt, baking powder and baking soda into the egg mixture and whisk until smooth.

Step 5: Transfer the batter into the prepared pan and smooth out. Bake in the oven for 15-18 minutes.

Step 6: While the cake mixture is baking, blend the filling ingredients together in a food processor.

Step 7: Once the cake is cooked, allow it to cool in the pan for 3 minutes and then invert onto the prepared tea towel dusted with coconut. Carefully peel off the parchment paper and with a sharp knife, trim 1⁄2 cm of the cake from all the edges.

Step 8: Working from the long side, fold the excess inch of the tea towel over the edge of the cake and carefully roll up and then unroll. This will help the cake become flexible and less likely to break. Gently and evenly spread the cream cheese filling onto the cake.

Step 9: Re-roll and place seam side down on a serving platter. Cut both ends off for a smooth finish and cut the roll in half diagonally.

Step 10: Place chocolate in a saucepan, add milk, coconut oil, vanilla extract and salt and stir until the mixture is melted and has a smooth, shiny consistency.

Step 11: Frost the cake logs and garnish with desiccated coconut or cherries as desired.

*Don’t be afraid to add your own Aussie flair by including mangoes in the cream, or garnishing the cake with macadamias.

Categories
Recipes

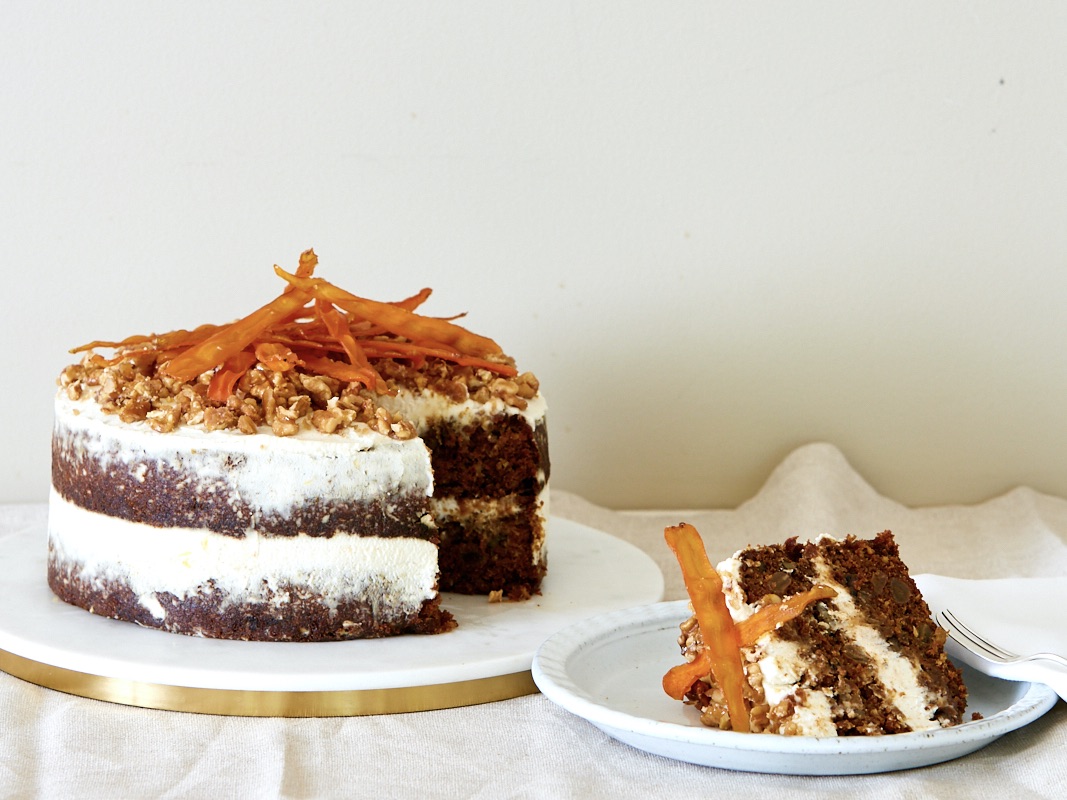
Foodie Friday: Spiced carrot cake with cardamom cream

Foodie Friday

Today’s delicious recipe is by Sam Batchelor from Sydney’s Eat & Co. and comes from the new 2020 Williams-Sonoma calendar. Filled with recipes from leading chefs, cooks, makers and bakers, entire proceeds from the calendar will go to the Starlight Children’s Foundation.

Spiced carrot cake
Image: Jacqui Turk

Ingredients (makes 1 x two-layer cake)

Batter

  • 400g (3C) self-raising flour
  • 340g dark muscovado sugar (dark brown sugar)
  • 2 generous tbsp of mixed spice
  • 1.5 tsp (7.5g) bicarb soda
  • 160g sultanas or golden raisins
  • 100g walnuts, toasted
  • 100g desiccated coconut
  • 300ml vegetable oil
  • 4 eggs
  • 4 large or 6 medium sized carrots, peeled and grated (approx. 400g)
  • Zest of 2 blood oranges (or plain orange if blood orange not in season)

Syrup

  • 150g golden caster sugar
  • Juice of 2 oranges/blood oranges (from above zested fruit)
  • 1 tsp ground cardamom
  • 1 tbsp lemon juice

Cardamom cream

  • 1kg mascarpone
  • 5 tbsp orange juice
  • 3 tbsp golden caster sugar
  • 2 heaped tsp ground cardamom

Candied carrots and walnuts – optional

  • 2 large peeled carrots
  • 1C water
  • 1C golden caster sugar
  • 6 cardamom pods
  • 1 cinnamon stick
  • 100g walnuts

Method

If you’re decorating with candied carrot and walnuts, prepare these ahead of time (the day before) and store in airtight containers or, at a minimum, prior to mixing the cake. The syrup and cardamom cream can also be made ahead of time.

  1. To do the carrots, pre-heat the oven to 110C. Combine water, sugar and spices in a medium pan. Heat over medium heat until the sugar is dissolved. Use a peeler to create long ribbons of carrot. Place ribbons in syrup and simmer for 10 mins before removing (retaining the syrup for the walnuts). Lay each ribbon flat on a wire rack and ‘dry’ in the oven for 30 mins.
  2. For the walnuts, continue to simmer the syrup until reduced by half. Remove whole spices and toss in the walnuts to coat. Spread the nuts on a lined baking tray. Once the carrots are done, increase the oven temperature to 170C and roast the coated walnuts for 10-15 mins. You can also toast 100g walnuts in a separate tray at the same time, ready for the cake batter.
  3. For the cake batter, grease and line two springform tins. Pre-heat the oven to 170C if you have not already used for candied carrots and nuts. Whisk eggs, oil, sugar and zest together in a large bowl until smooth and the sugar granules dissolved. Sift the flour, spice and bicarb soda into the wet ingredients, then fold to combine. Add the remaining batter ingredients; carrot, sultanas, coconut and the pre-toasted walnuts. Gently fold until just combined. Pour mixture evenly into the two prepared springform tins. Bake for 40mins or until just cooked in the centre.
  4. Whilst the cakes are cooking, prepare the syrup and cardamom cream. For the syrup, simply whisk all ingredients in a small jug and set aside.
  5. For the cardamom cream, soften mascarpone in a large bowl by working with a spatula. Add the remaining ingredients, mixing until smooth. Set aside in the fridge until needed.
  6. Once the cakes are cooked, use a skewer to prick a few holes in each cake (leave the cakes in the tin). Divide and pour the syrup over cakes and leave to cool completely.
  7. To assemble, remove cakes from the tins. Place one cake layer on the serving plate. Use 1/3 of the cardamom cream and spread to cover the top of the cake. Place the second layer on top and use remaining cream to cover the top and sides of the cake. If using, break up the candied walnuts and sprinkle over the top of the cake, followed by the carrot ribbons.

The Williams-Sonoma Starlight calendar, $20, is available in store
The Williams-Sonoma Starlight calendar, $20, is available in Williams-Sonoma stores

More recipes

Categories
Recipes

Foodie Friday: Sticky pear pudding

Foodie Friday

This week’s recipe comes to us courtesy of Australian Pears and Masterchef winner Larissa Takchi. Known for her original and striking desserts, Larissa has created this pear-driven version of the classic sticky date pudding, just in time for the entertaining season. “Pears work wonderfully with the spices in the pudding!” says Larissa.

Sticky pear pudding

Serves: 8 | Preparation: 15 minutes | Cooking: 30 minutes for individual puddings

Ingredients

Pear and Ginger Cake

  • 3 pears, grated with a box grater or mandolin
  • 165g caster sugar
  • 125g unsalted butter, cubed, softened
  • 2 eggs
  • 60g golden syrup
  • 150g plain flour
  • 1 tbsp. ground ginger
  • 2 tsp. ground cinnamon
  • 3/4 tsp. bicarb soda
  • Pinch of salt

Caramel Sauce

  • 150g unsalted butter, softened
  • 300g dark muscovado sugar
  • 1 tbsp. golden syrup
  • 200ml double cream

Method

  1. Pre-heat the oven to 180oC fan-forced.
  2. For the pear and ginger cake, lightly spray an 8-cup mini loaf cake tin with canola spray and set aside.
  3. Place the sugar and butter into the bowl of a stand mixer fitted with a paddle attachment and beat until light and fluffy.
  4. Add the eggs one at a time and beat well after each addition. Add the golden syrup and mix to combine. Remove the bowl from the mixer and sift in the flour, spices and bicarb soda. Fold through gently.
  5. Add the pear, a pinch of salt and 160ml hot water and fold through until just combined. Pour into prepared tins and bake until cooked through, about 20 minutes.
  6. Meanwhile, to make the sauce, melt the butter, muscovado sugar and golden syrup over a very low heat in a heavy-based saucepan. Once the butter’s melted, stir gently until everything else is melted too. Now stir in the cream, then turn up the heat and when it’s bubbling and hot, take it off the heat.
  7. Remove from the oven and place the tins on a wire rack for 5 minutes. Invert cakes onto wire rack.
  8. Plate up each cake and serve with sauce on top.

Note: You can serve hot or leave to cool. If you don’t have a mini loaf tin, you can use a muffin tin.

More recipes

Categories
Recipes

Foodie Friday: Salmon with kale & Brussels sprout slaw

Foodie FridayAs a busy working mum, I’m always keen on a fuss-free but healthy dinner option! As part of Coles’ strategy to sustainably feed all Australians and help them lead healthier and happier lives, ‘What’s for Dinner’ is aimed at helping customers get quick, easy and delicious food on the table in 30 minutes or less, using no more than five ingredients.

Chief Marketing Officer Lisa Ronson said the campaign is designed to inspire customers in the kitchen and make life easier. “We have created meal plans to help customers with some of the biggest challenges they face preparing dinner every night – from lack of time to cook from scratch to kids who turn their nose up at healthy options, and boredom with cooking the same handful of dishes every week because it seems too hard to try something new.”

Try the recipe below or find more recipes and inspiration at Whats for Dinner.

Ingredients

  • 750g pkt McCain Sweet Potato Straight Cut Chips
  • 2 tbs Coles Extra Virgin Avocado Oil
  • 4 salmon portions, skin off
  • 350g pkt Coles Kaleslaw Salad Kit
  • 150g brussels sprouts, thinly sliced

Method

  1. Preheat oven to 180°C. Line a large baking tray with baking paper. Arrange the chips in a single layer on the lined tray. Bake for 20-25 mins or until the chips are crisp and heated through.
  2. Meanwhile, heat a chargrill on medium. Drizzle salmon with 1 tbs of oil. Season and cook on grill for 2-3 mins each side or until cooked to your liking.
  3. Prepare the salad kit in a large bowl following packet directions. Add the brussels sprout and remaining oil and toss to combine.
  4. Divide the brussels sprout mixture and chips among serving plates. Top the brussels sprout mixture with salmon and serve immediately.

More recipes

Categories
Recipes

Foodie Friday: Peach raspberry ice pops

Foodie Friday

This week’s recipe comes from the new book ‘Ice Tray Treats,’ which is available locally from online homewares purveyor UNTIL. The book is a cookbook with a difference in that there’s no cooking involved! All of the recipes include no-bake desserts and treats made using ice trays and moulds. This simple, fruity confection is perfect for the warmer months.

peach and raspberry ice pops

Makes 12 ice pops

Ingredients

For the peach layer:

  • 1 cup peeled and chopped peaches (from 1 large peach) or 1 cup frozen peaches, thawed
  • 1/2 cup water
  • 1 tablespoon sugar
  • Juice and zest of 1 lime

For the raspberry layer:

  • 1/2 cup raspberries
  • 2 tablespoons water
  • 1 tablespoon sugar
  • 12 lollipop sticks

Method

For the peach layer:

  1. Combine all the peach layer ingredients in a blender and blend until very smooth.
  2. Pour the mixture into a silicone ice tray, dividing evenly among 12 cubes and leaving room for the raspberry layer.
  3. Transfer to the freezer and freeze for three hours until the pops are partially frozen.

For the raspberry layer:

  1. In the same blender (make sure to give it a quick rinse), combine all the raspberry layer ingredients and blend until the mixture is very smooth.
  2. Remove the ice tray from the freezer. Pour the raspberry puree on top of the peach layer, distributing evenly among 12 cubes.
  3. Insert a lollipop stick in the middle of each cube and return the tray to the freezer. Chill until the pops are completely frozen, around five hours, or overnight.

More recipes

Categories
Recipes

Foodie Friday: Broccoli orecchiette

Foodie Friday

This week’s tasty recipe is brought to you by AEG, and it was created by the brand’s three-hatted chef ambassador Mark Best. Orecchiette means ‘little ears’ in Italian, which alludes to the pasta’s unique shape.

Broccoli orecchiette

Serves 4

Ingredients

  • 2 heads of broccoli
  • 400g durum wheat orecchiette
  • 100g salted butter
  • 2 garlic cloves, finely chopped
  • freshly ground black pepper
  • 4 oregano sprigs, leaves picked
  • 100g aged pecorino, finely grated

Method

  1. Peel the stems of the broccoli and remove the dried end.
  2. Thinly slice the broccoli.
  3. Bring three litres of water to the boil in a large saucepan and add a handful of salt.
  4. Add the orecchiette and simmer until al dente (follow the packet instructions).
  5. Heat the butter in a large frying pan over medium heat, until foaming.
  6. Add the garlic and broccoli and season well with pepper. Toss over high heat until the broccoli starts to colour.
  7. Drain the pasta and add it to the pan with the oregano.
  8. Toss well and serve sprinkled with the pecorino.

More recipes

Categories
Recipes

Foodie Friday: Rosa’s spinach & ricotta gnudi

Foodie Friday

This week’s recipe comes from Pasta Grannies, a gorgeous new cookbook from Hardie Grant that’s brimming with traditional Italian recipes straight from the nonne of Italy. Gnudi means nude and alludes to these dumplings being pasta-less; they are ravioli without their coats.

Spinach & ricotta gnudi
Image: Emma Lee

Ingredients

For the gnudi

  • 250 g cow’s milk ricotta, drained weight
  • 600g spinach
  • 25g finely grated Parmigiano Reggiano (or other parmesan cheese)
  • 1  large egg, beaten
  • Plain (all-purpose) flour, for rolling and dusting
  • Salt

For the dressing

  • 30g unsalted butter
  • 5 sage leaves
  • Several scrapes of nutmeg

To serve

  • 2 tablespoons grated Parmigiano Reggiano

Method

  1. Place the ricotta in a sieve over a bowl and leave it to drain for an hour or so, then weigh out 250g.
  2. Meanwhile, place the spinach leaves in a saucepan, turn the heat up to high and add 2 tablespoons of boiling water. Cover the pan with its lid and steam until spinach has collapsed. Drain the spinach through a sieve and leave it to cool. Squeeze out as much water as possible and roughly chop. You should end up with about 300g cooked spinach.
  3. Mix the spinach with the ricotta, Parmigiano Reggiano and beaten egg. Season to taste and make sure the ingredients are playing nicely together.
  4. Pour some flour into a bowl. Pinch off 20g pieces of the mixture (about the size of a large walnut) and toss each on in the flour before rolling it between your palms to create a nice little ball. Dust off any excess flour. Place on a lightly floured board, away from each other so they don’t stick.
  5. Have a frying pan on one side of your stove, and a sauté pan on the other. Melt the butter in the frying pan with the sage and nutmeg and keep it warm while you cook the gnudi.
  6. Fill a sauté pan with salted water and bring to a gentle simmer. Lower the gnudi gently into the pan and let them tremble in the water for 5 minutes, or until they bob to the surface.
  7. Use a slotted spoon to transfer them to the butter in the frying pan. You may have to cook the gnudi in batches.
  8. Spoon the butter over the gnudi, then serve them with a shower of grated cheese over the top.

Pasta Grannies, $39.99, is published by Hardie Grant, and is available now at all good book stores.

More recipes

Categories
Recipes

Foodie Friday: Roasted chicken with root vegetables

Foodie Friday

While temperatures are certainly on the rise, there’s always room for a roast in our book – particularly on a cool spring evening. Brought to us by Beko, this one-tray wonder is a great option if you like to mix and match with different veggies or spices.

Roasted chicken and root vegetables

Ingredients

  • 2 tablespoons of olive oil
  • Pinch of salt
  • 4 whole garlic cloves, crushed
  • 1 onion, diced
  • 1 bunch of carrots, peeled and cut into thirds
  • 1 leek, rinsed and cut into large cubes
  • 700-800g quartered potatoes
  • 4 chicken thighs
  • Fresh thyme

Method

  • Preheat oven to 200oC.
  • In a tray, add olive oil, salt, crushed garlic and onion.
  • Dice the potatoes into small cubes and place them in the tray.
  • Add the carrots, leek and fresh thyme to the tray and mix it around.
  • Add the chicken thighs, skin side down.
  • Reduce oven temperature to 190C and bake for 45 minutes, uncovered. For crispy chicken skin, after 40 minutes of baking, flip the chicken and return to the oven for five minutes.
  • Remove from the oven and rest for five minutes.

More recipes

Categories
Recipes

Foodie Friday: Korean beef bibimbap

Foodie Friday

World Egg Day was last week and, to celebrate, Australian Eggs has shared this interesting recipe. A popular Korean rice dish, bibimbap consists of rice topped with sautéed vegetables, meat, spicy sauce and quite often, a fried egg.

Korean Bibimbap

Prep time: 30 minutes | Cooking time: 20 minutes | Serves: 4

Ingredients

  • 2 tablespoons olive oil
  • 4 garlic cloves, crushed
  • 1½ cups jasmine rice
  • 1 teaspoon sesame oil
  • 180g baby spinach leaves
  • 3 teaspoons toasted sesame seeds
  • 500g lean beef mince
  • 1 tablespoon finely grated fresh ginger
  • 1/4 cup oyster sauce
  • 1½ tablespoons salt-reduced soy sauce
  • 1½ tablespoons brown sugar
  • 4 eggs
  • 2 small carrots, cut into matchsticks
  • 2 small Lebanese cucumbers, halved lengthways, thinly sliced
  • 1 cup bean sprouts, trimmed
  • 1 tablespoon Sriracha (chilli sauce) or gochujang, to serve

Method

  1. Heat 2 teaspoons of olive oil in a medium saucepan over medium heat. Add half the garlic and cook, stirring, for 2 minutes or until fragrant. Add rice and stir to coat. Add 2½ cups water and bring to the boil. Reduce heat to medium-low and simmer, covered, for 12 minutes or until water has been absorbed. Remove from heat. Stand, covered, for 10 minutes.
  2. Heat sesame oil in a large frying pan over medium-high heat. Add spinach and cook, stirring, for 2 minutes or until just wilted. Stir in half the sesame seeds and season with salt and pepper. Transfer to a bowl. Cover to keep warm.
  3. Heat 2 teaspoons olive oil in same pan over high heat. Cook mince, breaking up with a wooden spoon, for 5 minutes or until browned. Add ginger and remaining garlic. Cook, stirring, for 1 minute or until fragrant. Add oyster sauce, soy sauce and sugar. Cook, stirring, for 2 minutes or until beef is coated and sauces are warmed through. Transfer to a bowl. Cover to keep warm.
  4. Heat remaining olive oil in same frying pan over medium-high heat. Crack eggs one at a time into hot pan. Cook for 2 minutes, until the whites are set and crispy around the edges.
  5. Divide rice among serving bowls. Arrange carrot, cucumber, sprouts, spinach and beef over rice. Top with eggs. Sprinkle with remaining sesame seeds and drizzle with Sriracha sauce.

Tip: For a flavour hit, you can quick pickle the carrot and cucumber in about ¼ cup rice wine vinegar, 1 tbsp sugar and ½ tsp salt. Stir to combine and set aside for about 30 minutes. Gochujang is available from the Asian aisle of large supermarkets or Asian grocers.

More recipes