Categories
Expert Tips Kitchens RENO ADDICT

3 ways to transform your benchtop for a few hundred dollars

By Cherie Barber

Kitchen renovating can be wildly expensive, so instead of scrapping the original and starting from scratch, it’s always good to consider if you can apply one of the four Rs: retain, recycle, repair or restore.

Often robust items, like a laminate benchtop, are still in good condition; they’re simply dated and need a contemporary new look. That’s when the specialty resurfacing products on the market come into their own.

There are a couple of different options, depending on the look you’re after. The most straightforward is to use White Knight’s Laminate Paint teamed with its Bench Top Protective Coating for a hardwearing finish. You can tint the laminate paint to virtually any colour, so it’s highly flexible and a great solution for revamping that mustard yellow or orange benchtop.

KITCHEN and lounge Before
BEFORE
Kitchen and lounge After
AFTER: White Knight Laminate Paint and Benchtop Protective Coating

It’s pretty much the same procedure as you’d use for painting any surface: clean, sand, prime, then carefully apply the paint, preferably with a roller to get a really smooth finish, then put your top coat on.Laminate paint can be used for your kitchen cabinetry as well, so you can spruce the whole lot up in a weekend of intensive DIY.

If you want a granite-look benchtop, then Rust-Oleum has a couple of products that come as a total kit. There’s Benchtop Transformations, which is applied similarly to the White Knight products, except you get a granite fleck in the paint. It’s available in either Diamond White or Galaxy Black. This video I’ve recently done takes you through all the steps and the fantastic final look you’ll get.

Then there’s Rust-Oleum Countertop Transformations, which is a little bit more involved, as you actually use the sifter that comes with the kit to sprinkle tiny decorative chips over an adhesive base coat, which then gets sealed. If you’ve got particularly worn or damaged benchtops, this is a great cover-all and it comes in four shades, from a desert sand to a deep charcoal.

Kitchen Before
BEFORE
KITCHEN After
AFTER: Using Rust-Oleum Countertop Transformations in Desert Sand

Here’s a video I made a while ago with some of the girls from my Renovating for Profit team that demonstrates how it’s done.

The really important thing with any of these products is that you meticulously prepare whatever surface you’re treating. All cracks, chips and dents must be repaired, filled and finely sanded before you start and the surface has to be completely cleaned of grease and dust. The smoother and cleaner your base, the better quality your finish. And be sure you use masking tape and plastic to keep surrounding surfaces cordoned off.

Resurfacing your benchtops can be a little tricky, but you’ll be rewarded with striking benchtops that only cost you a few hundred dollars at most and look as good as new.

–Cherie Barber is the director of Renovating for Profit, a company that teaches everyday people how to buy and renovate properties for a profit.

Categories
Interiors Addict

How to: give an old Ikea favourite a new look with spray paint

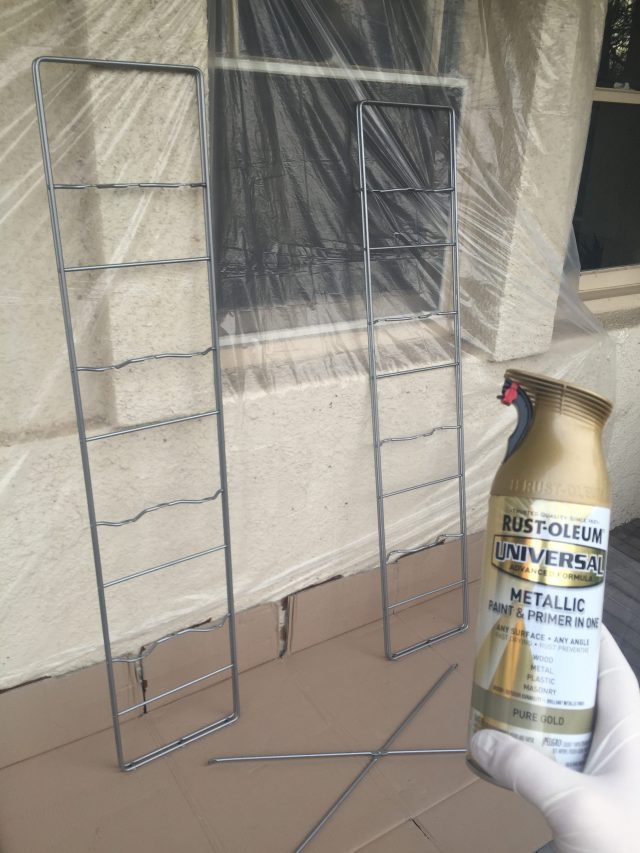
Let me just say first up, I love IKEA. I really do. They seem to always have a solution at an affordable price. Although sometimes the finishes aren’t always ideal, the great thing about Ikea is that everything comes apart so simply it’s so easy to hack it into something a bit more custom. So thanks to some spray paint from Rust Oleum, that’s exactly what I did.

image

I picked up an old ENETRI shelving unit off Gumtree for $30 (bargain, right?!). It’s honestly such a versatile piece and everyone always comments on it, wanting to know where they can get their hands on one. Unfortunately IKEA no longer sell them but there always seems to be one out there on Gumtree.

Step One: Pick up supplies

  • 1x can of Rust Oleum spray paint (in Pure Gold)
  • Drop sheets
  • Cardboard
  • Gloves

image

Step Two: Set up a spray zone

Always put a drop sheet down first to protect your flooring, I always then put a layer of cardboard on top to spray on as I learnt the hard way that EVERYTHING sticks to drop sheets including whatever you’re spraying. Ha!

Step Three: Spray away

The beauty of the RustOleum spray paint is that is that it is a primer and paint in one go so it saves a lot of time and mucking around! I always recommend doing two coats to make sure you haven’t missed any spots and ideally leave it overnight to dry.

image

–Kathryn Bamford is a certified interiors addict and regular contributor. You can follow her DIY and design adventures on Instagram @thedesignrookie.

Categories
Interiors Addict

How to: give your old decorations a new look with spray paint

I love a good quality store bought ornament as much as the next person, however when you want to update the whole look of your tree and have over 400 stems on it, things can get really expensive really quick! So this year, with some help from Rust-Oleum, I decided to mix up the decorations with some spray paint which changed the whole look of my tree.

image

Given that almost everything in my house in monochrome, I decided black and white was a pretty obvious choice and well, being a gold girl, I had to have some of that in there too.

I had a whole box of traditional gold and glass ornaments in the garage so I didn’t need to actually go out and buy any. However, if you do need to buy any, I can tell you that the cheapies from the junk shop actually came out nicer than  the expensive ones I sprayed!

image

Here is just how simple and easy it is..

Step 1: Pick up supplies

Step 2: Set up spray zone

Hang your ornaments outdoors on a suspended line to be able to spray paint them from different angles. I set up a makeshift rack in the backyard with string between branches and a drop sheet behind, which made the clean up super easy. If you set up a string system it also serves as a drying rack 😉

Step 3: Spray away

Make sure you wear gloves as you will need to hold some of the decorations to spray them properly. Spray the decorations from at least 20cm away and use light layers and several coats to eliminate drip marks on your ornaments. It’s honestly really simple and you are done within minutes. I left the decorations out in the sun for a few hours and then they were ready to be hung!

Step 4: Decorating time!

It’s always fun watching other people put up their trees; it’s like everyone has a different process they go by. I always fluff the branches then put the lights on. I group the decorations into different lots (really nice ones that I love and then fillers) I always hang the ones I love evenly all over the tree and then add the fillers inbetween.

image

All in all, I may have a new obsession with spray paint. So expect some more DIY stories to come!

image

–Kathryn Bamford is our girl on the ground in Melbourne; you can follow her DIY & design adventures on Instagram @thedesignrookie.

Categories
Bathrooms RENO ADDICT

A new look bathroom for less than $100

Creating a better bathroom on a budget is now easier than ever thanks to the new Rust-Oleum Tile Transformations Tint Base Kit. Designed for the budget-conscious DIYer, Tile Transformations adheres to ceramic surfaces to deliver a big change in a single weekend.

Tint_tile_swatches

Using the same breakthrough technology of Tile Transformations in popular Aspen White, Rust-Oleum’s new Tint Base Kit offers homeowners a palette of 40 contemporary colour options, including Blue Haze and Cool Mint – perfect for turning a lack lustre, dated bathroom into a relaxing sanctuary.

Before
Before
After in Aspen White

The kit covers up to five square metres and contains almost everything required for a successful renovation, without the expense, mess or inconvenience of demolition. Durable and long lasting, it can also be applied to floors, unlike other tile paints. Easy enough for even the novice DIYer, simply clean the tiles with the special cleaner, included in the kit, and roll on the new coating. No sanding or undercoating is required.

Rust-Oleum Tile Transformations Tint Base Kit is RRP $99.95. Available from Bunnings Warehouse and independent hardware stores nationally. Go online or call 1300 784 476 for more information.