Categories
Expert Tips Interiors Addict Outdoor & Exteriors

How to turn your cramped backyard into a hidden gem

We’ve all heard the same story. Cities are becoming more populous, more expensive, houses are getting smaller and backyards are on the way out. While some see the shrinking size of the back garden as the end to an outdoor oasis for entertaining and relaxing after a hard week’s work, a small garden can often be more easily transformed into a lavish exterior than larger spaces. According to Beaumont Tiles design specialist Rachel Gilding, with a bit of savvy styling and know-how, even the most modest backyards could be magically transformed into a lavish exterior with these three ideas:

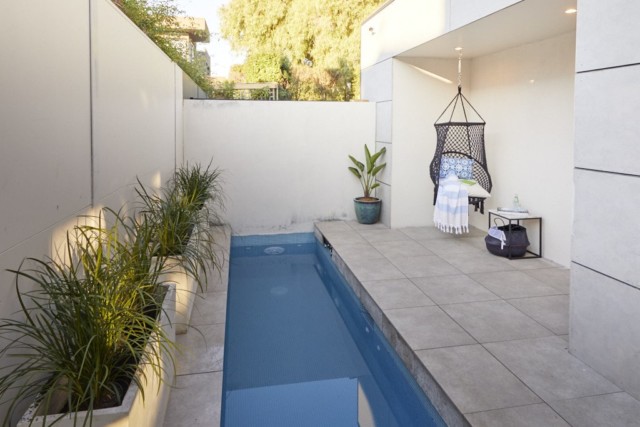
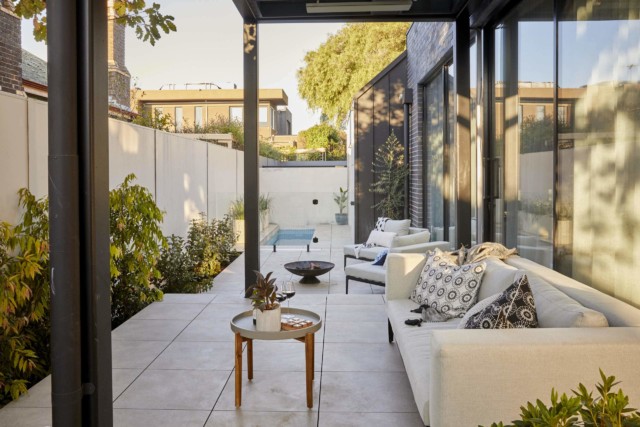
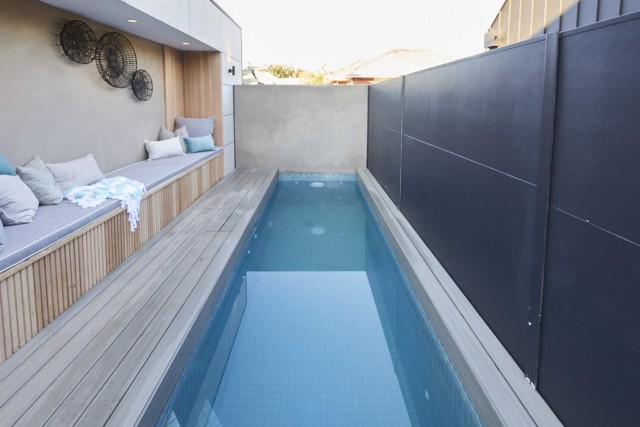
A calm watery paradise

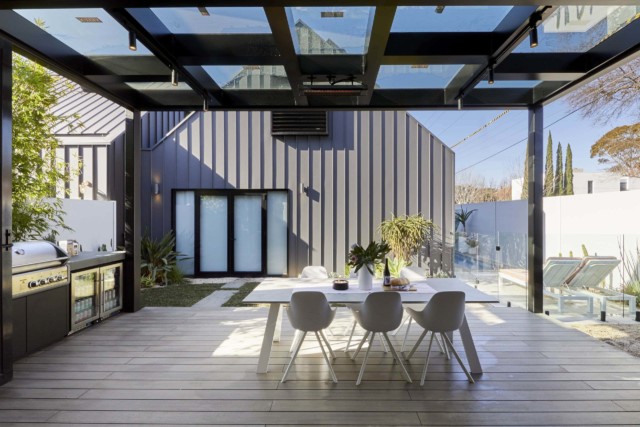
Pending the size of your garden, Rachel said consideration should be given to a bath, spa, or water feature to help transform your patch into a bit of beautiful backyard bliss.

“Any water design feature can create a relaxing vibe and brightens any space with its brilliant bluey reflective hues,” said Rachel. “The feature doesn’t have to be big; water features can create that zen vibe without a massive loss of square metres.

She said a water feature matched with outdoor porcelain pavers will create a beautiful coastal feel. Just make sure your outdoor wall colour matches the neutrality of your paver to maximise this gorgeous aesthetic.

“On the other hand, you could opt for a darker paver which will give off a stunning, smooth modern feel that is sure to impress. And by opting for outdoor porcelain pavers, you have a durable and long-lasting surface that is slip-resistant and can handle exposure to any household chemicals. 

“Installing them with pedestals or raised supports is perfect for renters and small spaces with open joints creating great drainage which will solve any outdoor bath spills.”

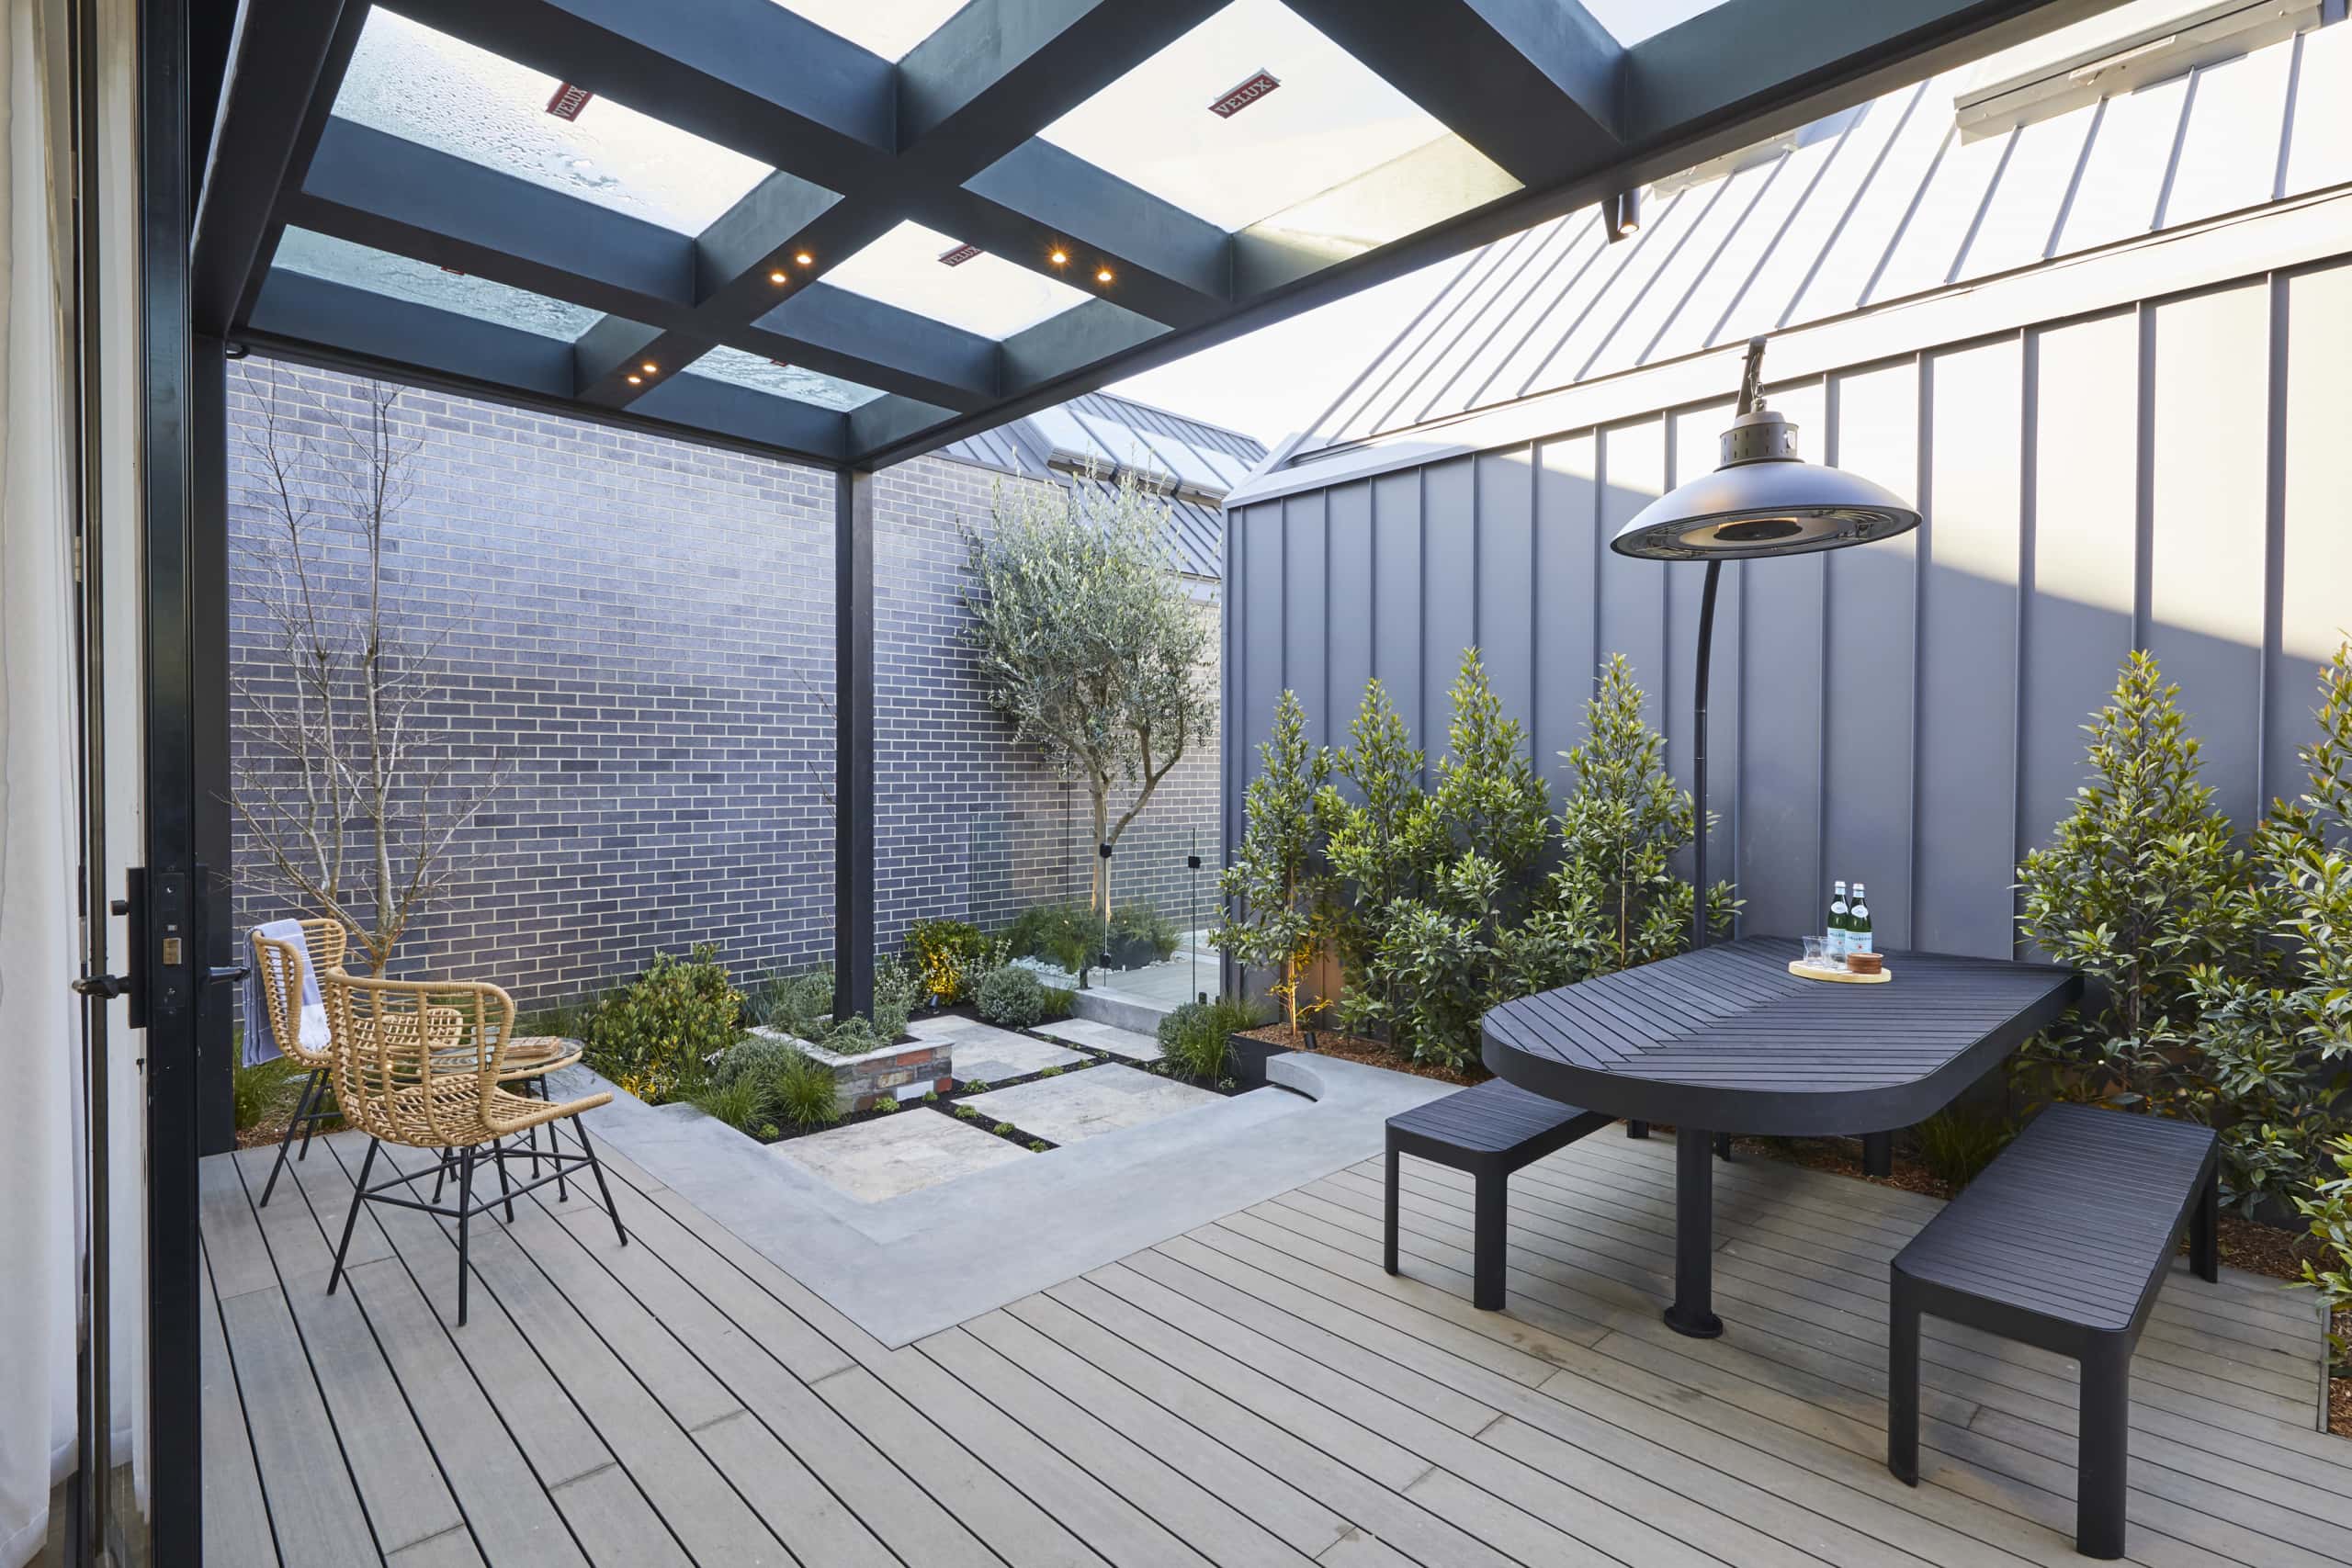
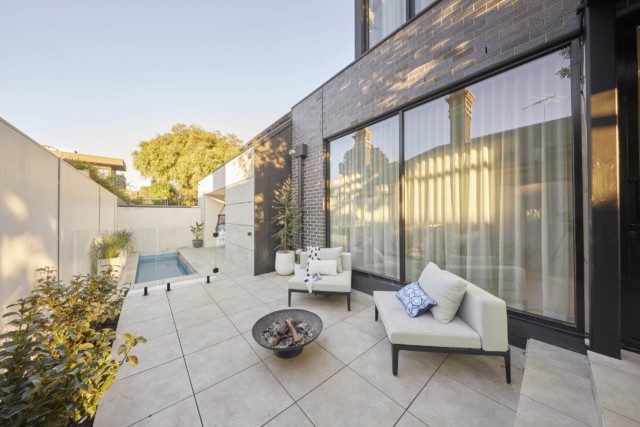
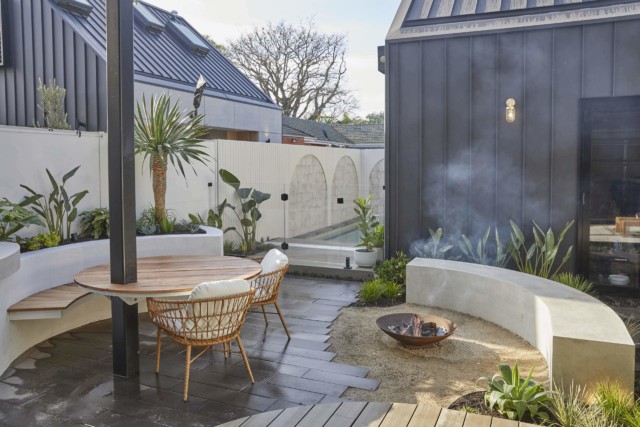
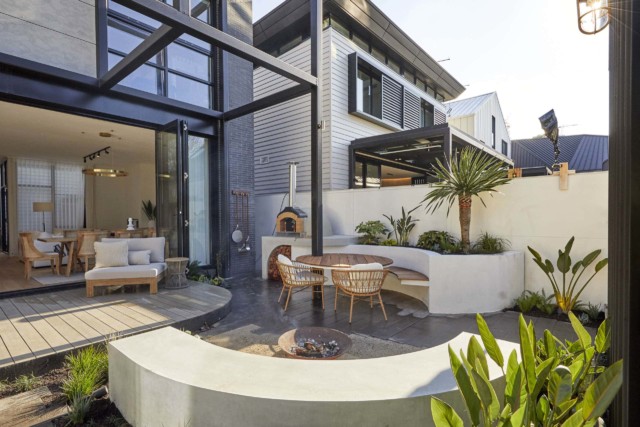
Add that firepit flare

Rachel said that while a firepit may seem unrealistic for a smaller backyard, there is a range of smaller braziers or fire pits available that overcome the challenge. “A fire pit is a design feature that draws the eye at a social gathering and is where people will naturally gravitate to.

“If you have modest space, try a freestanding outdoor fireplace to utilise that limited space you have, just make sure you check your fire regulations before installing this one.

“This, combined with a stone or wooden bench a safe distance around your brazier and a basalt grey paver as the base and some pot plants can create an amazing wanderlust sanctuary. Adding outdoor porcelain pavers with a concrete base can be the perfect accessory to this area, as pavers can be used as a suitable base thanks to being fireproof and durable.”

Being porcelain, these thicker pavers have excellent durability for outdoor weather with UV fade-resistant qualities and they don’t curl on the edges as some natural stones do.
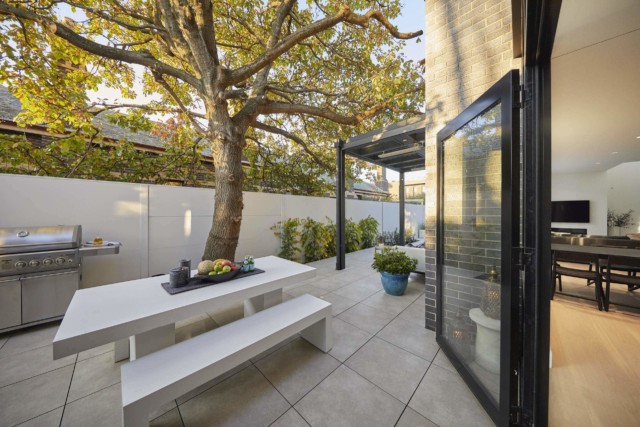
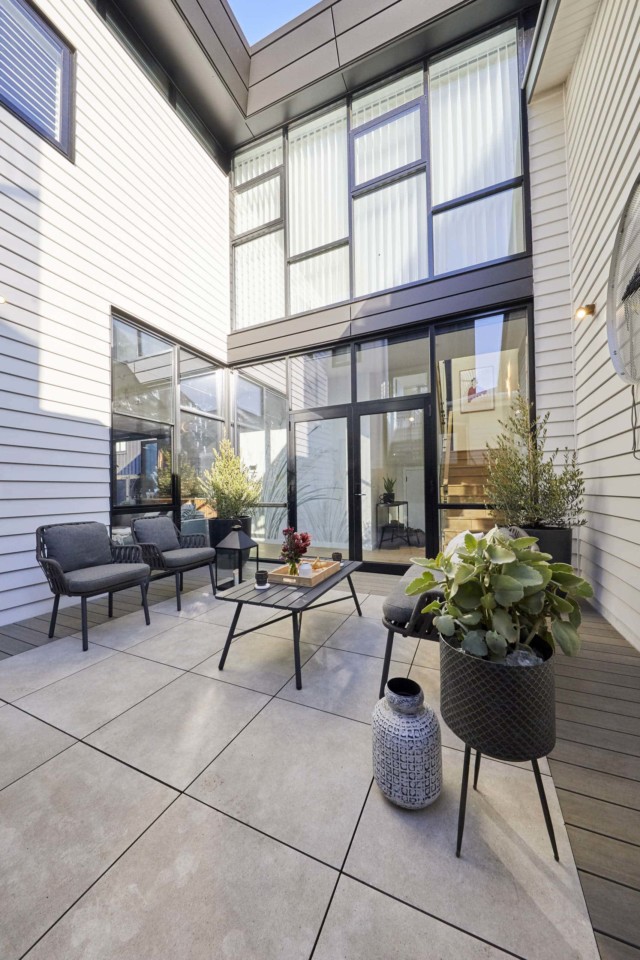
Gorgeous greenery

An all-natural look can be a soothing focus for creating a hideaway from your nextdoor neighbours or the sprawling neighbourhood you live in, and you don’t need too much room for this!

“This biophilic inspired design is sure to bring you closer to nature,” said Rachel. “It’s all about bringing nature into an overall design narrative, to bring harmony and wellness to the space. 

“One of the incredible ways to make the most of limited space is to make a vertical garden which can create a great privacy screen from your neighbours. It can also be used to grow herbs and vegetables for lovely garnishes for those home-cooked meals.

“Outdoor porcelain pavers are easier to maintain than many other types of material and when you lay them out in a diagonal pattern they will actually make your backyard look much larger than it actually is so you can get an expansive feel to your green sanctuary.”

For more on Beaumont Tiles’ outdoor range

Categories
RENO ADDICT The Block

The Block 2020: back yard and pool reveals

It’s the last reveals of the season! And I must admit I haven’t watched them yet so today’s writeup comes courtesy of our friends at The Block Shop. You’d better believe I’ll be tuning in for the auctions though! This week saw Sarah and George pick up the perfect 30 out of 30. Read on to see how all the couples fared!

Harry and Tash | Last | 22.5 /30

The huge oak tree is the real hero in the backyard of Harry and Tash in House No.1. It was a pared back effort this week as they had to change some original plans because of budget issues.

The pool tiles were a perfect choice but the space but it was obvious to the judges that Harry and Tash ran out of money because of their lack of styling. 

Harry and Tash installed a wall between the front and back gardens, which the judges thought was the wrong decision but they are sticking with it. Tash believes privacy from the front of New Street is more important. So after some ups and some downs, the build is done for the Melbourne father and daughter.

Sarah and George | First | 30/30

Where do we start with this amazing effort by Sarah and George? The lovely Japanese Maple tree in the courtyard immediately caught the eyes of the judges, as did the black timber fence.

In the backyard the outdoor table was a perfect addition as was the pizza oven. The pool area could easily be a magazine shoot or Instagram post, with a beautiful tile choice. Sarah and George ended up winning the Ford Puma, which is perfect as they were on the hunt for a new car once The Block was over. Talk about a strong finish to the build. 

Daniel and Jade | Fourth | 24/30

How about that stunning magpie themed artwork in the courtyard? The judges loved it.

They did feel that the space could have been more comfortable and better laid out. Walking into the backyard they loved the sculpture and the effect of the Velux skylights.

The outdoor shower was a great idea, but it lacked a bit of functionality because of where it was positioned right above the dirt in the garden. While the pool was lovely, the judges felt Daniel and Jade could have done more with sprucing it up a bit.

Luke and Jasmin | Second | 29.5/30 

This loss by half a point really hurt the Perth married couple as they threw literally everything into the last week on The Block.

The daybed in the courtyard was very well received, perfect to lay on with a book and glass of wine. The judges thought the execution across the board this week for of a gold standard. The pizza party pit, amazing.

Jasmin’s styling choices in the pool area were spot on. So while they didn’t win yet again, there was a lot to be proud of this week for Luke and Jasmin. They started slow on The Block, but finished very well.

Jimmy and Tam | Third | 27.5/30

The coral painted breeze block wowed the judges in the courtyard, setting the scene for another positive week for Jimmy and Tam.

Their choices of plants, cactus and bamboo, was a hit. Shaynna loved the simplicity of the backyard. The pool had a couple of daybeds that would be perfect to lay on, on a hot Melbourne summer day.

They judges did feel the space next to the pool was not right, but Jimmy and Tam maintain it is all about storage.

So another strong week for Jimmy and Tam in what has been a very strong few months on The Block with their 1950s unique house.

Shop what you saw at The Block Shop

Categories
Before & Afters Jen's reno Outdoor & Exteriors RENO ADDICT

My new deck: the big reveal!

Photography by Jacqui Turk

It finally stopped raining long enough in Sydney for us to shoot these photos of the finished deck and I couldn’t wait to share it with you. I also can’t wait to spend as much time out here as possible over the holidays!

When we bought this house, although it needed a lot of work to bring it up to the 21st century, we loved the size, the flat block and the backyard which had both an entertaining area –now decked–  and a lawn for the kids. Although we still have a few things to finish, seeing it come together like this makes me so happy. We intend to live here for many years and I am thrilled that we now have an outdoor area that really does function as extra living space and an outdoor room (or two). It’s also brought the exterior up to date in a big way!

My husband Damian and I agree it’s now our second favourite space in the house after the kitchen. This may sound like a half-baked compliment but when you consider it’s not actually an enclosed room, I think it’s high praise indeed!

Although the new Trex deck is no bigger than the paved area was before, it feels so much bigger. This is due to a few things: the planks laid horizontally give the illusion of a wider space, the deck comes out from the French doors at the same height which gives great indoor/outdoor flow, we’ve removed the old timber pergola which was about halfway down, plus the light grey composite deck gives a modern, clean aesthetic.

The addition of the steps down to the lawn give it a really slick, finished look and nicely separate the two distinct areas. They’re also great to sit on and put pots on! I’m really glad I went with the grey colour, Island Mist, of the Trex Transcend decking collection, because it has toned down our sixties red brick house and it looks modern (while still in keeping), light and bright.

Because we no longer have a big back step, we can make use of extra space near the French doors, so we now have two distinct areas: one off the dining room for lounging with a coffee or a glass of wine (this was always my dream!) and the other further back for the barbecue and large dining table for entertaining friends. We can look out onto the lawn from wherever we’re sitting and there’s still room for the paddling pool if needed. What more can a girl ask for (maybe a spa, Santa?!)?

If I had to say what I love best about our Trex deck apart from the aesthetics, it would be the low maintenance aspect. And the fact it is hardwearing means I don’t cringe every time Seb rides his scooter over it or drops food on it, knowing it won’t scratch and I can easily hose anything off it. We’ve had plenty of rain (too much!) lately so I can see it drains well and dries off in the sun. While it does get quite hot under direct sun (we’re getting a retractable awning soon), so does any hard surface, including timber. This is the only minor negative I can find but the many other advantages of a composite deck far outweigh it in my honest opinion. I don’t make habit of hanging around in direct sun anyway!

In a nutshell I am absolutely thrilled with the finished product and the process of having it delivered and built was exceptional. The new deck has massively improved the use we can get out of our outdoor area for entertaining, eating as a family and just simply relaxing, right in time for summer. But we love it so much I think we’ll be out there even when it’s colder, huddled around our firepit!

Our al fresco’s now almost finished with new lighting, retractable awning and vertical herb garden still on the list. The new life that has been breathed into this backyard with our Trex deck make the mortgage repayments and living out in the ‘burbs seem more worthwhile than ever!

And before I sign off, here’s a little reminder of what it looked like when we bought it!

Why I chose Trex

More about my deck build

More posts about my house reno

Disclaimer: My deck was supplied to me by Trex in exchange for coverage on this website, though this is an honest review of the product and service.

Deck build by Urban Arch and product delivered by Master Woodturning | Furniture from Early Settler, barbecue from Barbeques Galore | Gutters painted in Haymes Paint: Intimacy | French doors from Corinthian Doors.

Categories
Interiors Addict

Choosing a deck: my backyard transformation with Trex

Today is the first in a series of three posts about our yet to be revealed backyard transformation, which I can’t wait to share.

A deck is every Aussie’s dream for the ultimate in indoor/outdoor living and seamless entertaining flow from your house to your al fresco, am I right?! Damian and I have always loved the idea of a deck, especially when we bought our family home 18 months ago, with a designated area for entertaining as well as a flat lawn further back for the kids (there are two since little Charlie joined us last month!) to play.

The back garden in full bloom last summer!

Maintenance though, is not our idea of fun. We have already realised that going from apartment balcony (where someone else takes care of the outdoors for you!) to front and back gardens is a big jump. Is it even the weekend if you’re not at Bunnings buying a lawnmower, hedge trimmer, lawn feed, and so the list goes on! Not to mention trying to modernise what was a very “Nanna” house inside too, lived in by the same old lady for three decades.

So, we didn’t want to have to think about sanding back, staining and treating a deck. No thanks! Plus we live in a bushfire prone area of Sydney’s upper north shore, we’re terrified of termites and we want the kids to be able to drop ice creams and have the paddling pool spill everywhere without worrying about a deck staining or rotting. And, of course, Australia gets really bloody hot for a large portion of the year, so I didn’t want something that would warp and split. Does a deck like this even exist?!

Enter: Trex Company, the world’s number one decking brand and the inventor of timber-alternative composite decking, with more than 25 years of product experience. When the brand approached me to work with them on creating the back deck we’d been dreaming of, I read the product information and it was like it had been designed for us! Equally, it’s eco-friendly and made of 95% recycled materials (a 4.9 metre Trex composite deck board contains approximately 2,250 recycled plastic bags), which sits well with me and my increasing consciousness of our disposable, throwaway society.

We picked Trex’s Transcend decking in their grey-toned colour option (there are 10 to choose from), Island Mist. It requires no sanding, staining or painting and uses special technology to ensure it will maintain its colour and finish against all of the Aussie elements. Sound too good to be true? It’s backed by a 25-year fade and stain warranty, so I was on board (or deck!).

My choice: Trex Transcend in Island Mist

In terms of caring for it, you literally sweep it with a soft bristle brush and clean the composite deck with soap and water when required. Too easy!

While you can install Trex decking yourself, I’ve made no secret in the past of our lack of practical skills, although Damian is becoming handier by the day since we moved here! So we were lucky enough to have experienced tradespeople Urban Arch do the job for us, with distributor Master Woodturning delivering the product.

Tony Masciocchi from Urban Arch came out to our home with samples to discuss what would work well, show me colours, discuss the design and what we wanted. Tony made everything really clear and answered all my stupid questions without making me feel stupid for asking them! I felt really confident that his team knew their stuff, having seen photos of other jobs, and I had no issue leaving them to it as the job was half finished when I disappeared into hospital to give birth!

Trex Transcend in Spiced Rum, one of 10 colours

So, just how hardy and low-maintenance is it? Unlike timber, Trex composite decking is termite-proof (woohoo!) and will not rot, splinter, split, scratch or require seasonal painting, staining or sealing. And it can withstand and resist intense sun, powerful winds, animal, insects (and children, presumably!), furniture and shoe wear, and strong salty seawater.

All Trex composite decking products come with an installation guide that covers planning and preparation, installation and care, if you want to DIY rather than have someone DIFY (Do It (For) You)!

NEXT WEEK: Read and see more about the build of our deck, including before photos.

For more information about Trex, help with planning and budgeting, decking inspiration or to order free samples.

Disclaimer: My deck was supplied to me by Trex in exchange for coverage on this website, though this is an honest review of the product and service.

Categories
Outdoor & Exteriors The Block

The Block series 13, back yard reveals

So many Blockheads got my back up with their antics this week! I won’t even go there! So let’s just concentrate on what the judges, who were oblivious to the drama, had to say!

Jason and Sarah: Third place with 27/30

First impressions were good. It looked big. Shaynna loved outdoor kitchen saying the BBQ felt like an extension of the kitchen.

Neale said it was luxury in terms of both the fixtures and the space.

Darren said the outdoor heater was the most beautiful he’d ever seen and that it felt like it had everything an Australian backyard needs.

Shaynna liked the built in bench but not the colour of the wall panels. And they all liked the firepit.

Shaynna said they’d created really simplistic and successful zones and a low maintenance space. It had been successfully planned and executed.

The only thing missing was the cubby house, which the couple said they left out because they thought it was ugly. They lost a point here for breaking the rules. Not that it would have made them place higher as it turned out.

Our picks to buy: Big Green Egg barbecue, Heatsail Dome electric outdoor heater.

Hannah and Clint: last place with 22/30

Again, the judges thought it felt huge with the large deck and outdoor kitchen.

Neale felt something was wrong with the proportions and the dining table was squashed in. He also hated “the sad corner,” saying nobody would want to sit there.

Shaynna hated the spa, saying it was 20 years ago and not worth the money.  Darren agreed it was tacky with its disco lights and speakers and belonged in a bachelor pad or the back of a hummer!

Neale and Darren agreed the firepit worked really well and was beautiful. But Shaynna said the yard needed taller greenery for screening and softness rather than the short plants in pots. Their zones didn’t work as well as Jason and Sarah’s.

Neale said the couple’s lack of experience showed but commended them for having a good crack at it.

Our picks to buy: Sahara fire pit, Thermastrip outdoor heater.

Ronnie and Georgia: fourth place with 25.5/30

After all that drama with getting the pool in, I’m sure the confident and experienced couple expected to do better than fourth place.

The judges did think it was an amazing addition to the home and a remarkable effort to get it in there (if only they knew!). Darren said it was like a beautiful rockpool. Neale said he wanted to plunge in there, even on a cold Melbourne day! He said plenty of buyers would want it too.

Although the space was beautifully and meticulously planned, Neale couldn’t get over the lack of dining table and said a house at this price point demanded one. All the judges agreed it wasn’t family friendly enough.

They didn’t like the fireplace wall at all, saying it was all about looks and not functionality. Neale said it was visually beautiful but wouldn’t appeal to a broader family buyer.  This was a shame because the pool was amazing.

Our picks to buy: Plunge pool, black rattan chair.

Sticks and Wombat: second place with 29/30

I loved this one and so did the judges.

Shaynna said it felt bigger than others because there were no barriers. It felt family friendly with the cubby house and veggie patch.

Neale said it had everything you’d want: a beautiful lawn, ample room for a dining table and a swimming pool. That shipping container pool was so them and so cool, don’t you think?

Darren loved it, saying it was amazing they’d thought that through and that it worked really well with the Colorbond paneling.

Neale was very enthusiastic saying the yard was beautifully thought out and done with love. It was the perfect example of how far the boys had come. It had a real sense of harmony and was very human.

Our picks to buy: Custom hand cut spherical firepit, wire dining chairs.

Josh and Elyse: first place with 29.5/30

It looked like Sticks and Wombat might win, and they nearly did, but the best was yet to come! The youngest couple did it again (by half a point) with their outdoor space.

The in-ground pool was of course a showstopper.

Shaynna said it was the perfect family garden. Neale said it was visually sophisticated. Darren loved the contrast between the timber, concrete and brick.

Shaynna loved that it was the only space where you could actually sit at the poolside. Darren just couldn’t get over the pool! He said the yard felt luxurious and high end and the whole thing was genius. “It’s incredibly sophisticated yet so simple too. I’m blown away that they could achieve something this good in a week.”

Neale said there was an amazing continuity about the house.

Our picks to buy: Outdoor steel table, copper outdoor lights.

At the end of the scoring, Scotty revealed each couple would get an extra $25,000 this week as it had become clear many of them couldn’t possibly finish on their existing budgets. It looks like next week’s going to be another week of stress, drama and arguments! Watch this space…

All our Block coverage.

Categories
Expert Tips Outdoor & Exteriors

How to: Plan an outdoor room

By Cherie Barber

In a climate like Australia’s, an outdoor room isn’t just an asset; it’s almost obligatory. What better way to capitalise on all that blue sky and months of warm weather than creating an extension to your home that marries the comfort of a living room with the breezy bliss of lounging around outdoors? The answer, of course, is an outdoor room.   

rfp_cromer_-16

However, it’s not just a matter of propping an umbrella over a table and chairs. You need to create something practical and inviting, sheltered from the elements, with a good connection to the indoors. Here are some important elements to consider.

Find inspiration

A small space like an apartment balcony is probably going to offer limited options, but if you’re sizing up something larger, then spend time browsing magazines and online sites for examples of beautiful outdoor rooms you’d love to recreate.

Plan your room

Just like you would for an indoor renovation, you need to draw up a plan, whether you’re converting a barren courtyard, a disused balcony or creating something like a deck from scratch. Are you planning something quite simple on a low budget or a luxurious outdoor kitchen with barbie, sink, lounging furniture and a 12-seater outdoor setting? You don’t need sophisticated software; just break out the graph paper, measure up the dimensions of your outdoor space to scale, then start playing around with ideas. Use cut-outs for things like table settings, potted plants, barbecue, etc. This will begin to give you an idea of the space you have to play and realistically what you can fit in.

rfp_cromer_-11

Prioritise what’s important

Budget and size of the space will be the main limiting factors here. At a minimum you need shade, some privacy from neighbours, hopefully easy access to indoors, furniture and some kind of lighting so you can use it at night.

Things like screening, shade sails, sun umbrellas and retractable awnings can turn an unusable courtyard, deck or balcony into a protected outdoor room you can enjoy year-round. And features like foldaway clothes lines, a wall-mounted hose reel and bench seating that doubles as a storage box help keep the area clutter-free.

If you’re creating something more lavish, like an outdoor kitchen, you may need to consider new power points, plumbing and appropriate task lighting. This is where your graph paper will come in useful.

Go furniture shopping

There are just so many budget-conscious choices out there, you’ll be spoilt for choice when you go shopping for the components of your outdoor room, whether it’s loungers, table and chairs, barbecue or storage ideas. Just make sure they-re size-appropriate to the space. No point having your sights set on a top-of-the-line barbie when the reality is you only have room for a Weber.

chippendale-studio-21

Sprinkle around some magic

Now this is where you elevate your outdoor room from a practical space to something really special. Night time is often when your outdoor room comes into its own and lighting will make it feel intimate and warm. If you don’t have access to a power point, you can always use tealights, outdoor candles or even solar lighting to create atmosphere.

If you don’t have a lot of floor space for pots, consider a vertical garden; a wall of edible potted herbs perhaps. 

Mirrors immediately enlarge any space, so think about a nice, big one you can strategically place to capture the best aspect.

If you have a big enough courtyard, it’s worth sacrificing space for a striking focal point, like a potted elm or large ceramic urn. Landscape designers use this trick often: in a confined area, one big object that draws in the eye will have much more impact than a whole lot of small things, which can simply make it look cluttered.

A successful outdoor room all starts with clever planning, a realistic appraisal of what can be achieved, then that attention to detail that’s much more about imagination than a bottomless pit of money.

–Cherie Barber is the director of Renovating for Profit, a company that teaches everyday people how to buy and renovate properties for a profit. 

Categories
DIY Expert Tips Outdoor & Exteriors RENO ADDICT

What to consider when building a fire pit in your back yard

Who doesn’t love sitting next to a fire on a chilly night with friends and family roasting marshmallows? Before you build a pit, it’s wise to weigh the pro’s and con’s of having one as it’s so so so important to get this right not only for appearance and function, but more importantly safety.

One reason for a fire pit’s appeal? We believe a fire pit can extend back yard use through autumn and winter. Gone are the days of outdoor entertaining only through the spring and summer months with a great barbecue and pool party – fire pits are the way to go in the cooler months!

Here’s what you should consider before planning a fire pit and dreaming of cool, moonlit nights roasting marshmallows.

Types of fire pits

Ok, so there are generally four types of fire pits that you can choose from:

1. Chimineas

These fire pits traditionally have closed sides, with an opening on the front and a chimney on top. Chimineas are easy to find, sold at most home and garden stores, and are full of style. The ceramic material used to build chimineas can be painted, adding a pop of colour to your outdoor space. Chimineas are usually pretty heavy and are not meant to be moved around. Their design is helpful in keeping smoke out of your guests’ eyes.

Chiminea fire pit

Photo credit curbly.com

2. Wood burning fire pits

A wood burning fire pit is like having a campfire right in your very own backyard. They provide warmth, the crackle of wood, and real smoke all while keeping the fire completely contained. There are a variety of different types of wood burning fire pits you should be aware of:

  • Outdoor fireplace: An outdoor fireplace, whether a portable one or a built-in design, will greatly enhance your patio.  The design is usually similar to an indoor fireplace.
  • Brick or stone fire pit: This is basically an easy DIY project. Brick or stone fire pits can be built by using cinder blocks, stones, or bricks from almost any local hardware store.

Outdoor fire pit

Photo credit mydomainehome.com.au

3. Natural gas fire pits

This fire pit is a permanent fixture in your backyard. One of the best things about natural gas fire pits is that they never run out of fuel. Here are a few different ways to design this type of fire pit:

  • Sunken design: A sunken natural gas fire pit is built down into the patio or ground. You need to be especially cautious around these designs, as the flames are close.
  • Square, round, or tabletop design: Design your natural gas fire pit to be raised above the patio with stone, brick, or copper designs, among others. They make a beautiful addition to the space.

Sunken gas fire pit

Photo credit renoguide.com.au

4. Gel fuel fire pits

Gel fuelled fire pits are the perfect way to add ambiance and intrigue to your backyard. The gel is clean and burns without producing a scent or smoke. They are also extremely versatile and can be moved almost anywhere in your backyard. Here are a couple different types of gel fuel fire pits:

  • Gel fuelled logs: You can purchase gel fuelled logs to place in any fire pit design. They create the real look and feel of a fire while completely concealing the gel fuel holders inside the logs.
  • Tabletop fireplace: For those who want a small fire in the backyard, consider a gel fuelled tabletop display. These can be easily moved indoors or out, and add a great display to the outdoor table.

Gel fuelled fire pit

Photo credit: bgh.com

Check building codes for proper speculations and regulations

Before building a fire pit, check the building codes in your area to get the proper specs and regulations. Choose a spot that is away from your house and away from any low-hanging trees or other structures. Take precautions when digging holes, so that you don’t hit utility lines, so in Australia make sure you call Dial Before You Dig.

How much you are willing to spend?

Costs can be as low as $100 if you plan for a small fire pit. This means buying your own stones and digging the hole yourself or if you purchase a simple unit at a big box store. It certainly can also go up to several thousand dollars, especially when seating is added.

Whether it is permanent or portable?

Do you want a fire pit that is built in — a focal point in the yard — or something that’s lightweight and potentially portable, so you can take it where you want your gathering?

For a built-in design, you generally want to match materials in the garden or house. You can do a DIY job and assemble materials yourself or customise one with a landscape professional or contractor.

The options for portable fire pits are equally varied. There are copper or stainless steel bowls that are usually lighter, but heavier cast iron bowls also do a nice job of radiating heat.

Choose the fuel type: wood or gas

While there are alternate fuel types like gel fuels, wood or gas seem to be the most common choices. Those who favour a true outdoor smell usually prefer burning real logs, but that requires keeping flames going and requires a steady supply of firewood.

An alternative is to use gas or propane for an instant fire—maybe even powered with a remote switch–though it’s not as hot as a wood fire and you don’t get the same crackle and smoke.

Choose the surface you would like to set your pit on

It’s best to set a set a portable fire pit atop a natural surface such as concrete, stone, gravel, brick, slate, or a fire-resistant composite. Putting it on a wood deck can be dangerous if embers fly. A permanent fire pit is typically built on a base of gravel somewhere in the back yard.

Where to set up your fire pit?

Many communities require a minimum of a 10-foot distance from your house and neighbours’ yards. Some don’t require a permit if the fire pit fits within set size requirements; others require a site inspection to make sure your proposed location is safe (away from fences, structures, overhanging branches). It’s best to check with local officials before you do anything.

How to create the right vibe and enjoy the most of your fire pit

To get the best enjoyment, consider installing outdoor lighting near the pit. Make it subtle to avoid destroying the camp-fire mood. Energy-efficient LEDs can be plugged into a nearby outlet. More importantly consider seating arrangements!

Safety first 

A fire of any kind, small or roaring big demands serious attention to safety. Consider:

  • Check wind direction before you light a fire
  • Don’t use flammable fluids (gasoline, lighter fluid) to light or relight
  • Don’t wear flammable clothing (like nylon) or any loose-fit clothing
  • Avoid using soft woods like pine or cedar, because they can “pop” and throw sparks.
  • Know how to safely dispose of ashes.

Naomi Findlay is one of our resident experts, principal of Silk Home and founder of the International Institute of Home Staging

Ask Naomi a question | Read all her articles for Reno Addict.


Categories
Outdoor & Exteriors RENO ADDICT

How to: choose the right landscaper

Choosing the right landscaper is vital to ensure your dreams of an aspirational outdoor space becoming a beautiful reality. Get it wrong and your vision of a tranquil, backyard retreat might end up resembling a sandy hole from your local ‘pitch n putt’ golf course.

A good landscaper is integral to your project’s success. They need to be able to visualise your goals and ideas before breathing life into your plans. Hopefully you’ll be spoilt for choice in your area and if so, how can you pinpoint the right landscaper for you?

Landscaping4

Large or small companies? Both have their merits

A large design firm may tempt you with its renowned nationwide reputation, whereas a smaller family-owned company could have specific local knowledge which may place it ahead of the game. Certain landscapers will also specialise in individual fields of landscaping.

If your concept is focused on ‘softscaping’ you’ll need to make sure your chosen landscaper has green fingers. If they’re a maestro in paving, that’s great, but it won’t be an asset to you if you have big plans to reshape your lovingly manicured lawn.

Personal qualities

A garden can often become a reflection of your personality and a good landscaper will understand that. They should be tuned in to your way of thinking and present a high level of attention to detail in their planning approach.

Don’t lose sight of the fact that you are the customer and should feel in control of the process. The right landscaper will see themselves as the vessel through which your outside space must travel to reach its full potential.

Landscaping5

Qualifications and reputation

Experience is crucial in landscape gardening. Mistakes can be expensive to rectify in terms of time and materials so ensure that your chosen firm has the expertise required. Ask to see a portfolio of previous projects which they’ve recently undertaken, preferably including ‘before and after’ photos.

Make sure the company is licensed and certified for the work you require. Degrees and diplomas in landscaping vary in their worthiness so a bit of background research in that area won’t do any harm.

In case things go wrong

Ask if the company provides a guarantee for the work they intend to undertake, and don’t be afraid to request details such as duration and warranty for any repairs, should they be needed in the future. Also make sure they have public liability insurance which at least covers the value of your home.

This may sound extreme but keep in mind that landscaping work can result in costly mistakes such as the cutting of a gas line or a tree falling on your house or apartment block. It’s the worst case scenario but you’ll be safe in the knowledge that you won’t be paying for any blunders.

Environmental impact

Landscaping can have adverse effects on the local environment if not undertaken correctly. Water conservation and avoidance of chemicals during your work may well be important to you, so seek assurances from your landscaper of their methods in advance.

–Owen Fulda is a content marketer at hipages.com.au, Australia’s number one site to hire tradies and the perfect place to get quotes for your landscaping project.

Categories
Before & Afters Expert Tips Real Renos RENO ADDICT

‘Tis the season for alfresco living!

This time of year is always a torture test for how well you’ve designed your entertaining areas at home. Whether you’re hosting the family Christmas lunch (eek, that’s me this year) or just a lazy January BBQ, you’ll find these events so much more enjoyable if you have a practical (and beautiful) area to host your guests. And in Australia, at this time of year, you simply can’t have a party indoors. Alfresco entertaining is a must.

In all our renovations, we spend much time and energy transforming dead outdoor spaces into entertaining alfresco havens. Here are some before & afters from the Three Birds’ alfresco almanac.

House 1

House 1 gas strut before
Before

House 1 gas strut after
After

Before
Before

After
After

House 2

Before
Before

After
After

House 3

Before
Before

After
After

Before
Before

After
After

Before
Before

After
After

Lana’s Pool

Pool wide shot before

After
After

Before
Before

Pool closeup after
After

Before
Before

After
After

Our alfresco crushes:

  • Gas strut window + servery– a great alternative to bi-folds, these awning windows (popular in Queensland) bring a super-relaxed vibe to the space and when teamed with an external servery it becomes the ideal connection between outside and in.
  • Decking – a no brainer in most outdoor spaces, a timber deck is hard to go past for creating the perfect outdoor zone. But sometimes a large deck can be quite costly and need council approval, so well-laid pavers are a smart substitute (see House 3).
  • French doors – it’s true we have a French door fetish but they are just so damn beautiful, practical and affordable. They’re a brilliant alternative to bi-fold doors which can cost double or triple that of Frenchies – and if the opening is quite wide we like to put four frenchies next to each other (the two middle ones open up and the two on the outside are fixed).
  • Pergola + timber screens – creating an outside room is easier than you think. It doesn’t have to be a full-on extension to the house, rather a well-placed pergola with timber screens creates the impression of an outdoor room in a flash.
  • Homewares – soft furnishings like pillows, throws and rugs add color and texture to help make an outside space feel like a welcoming room and lush green pot plants are the perfect finishing touch for a true alfresco feel.
  • Paving paint – it’s amazing how crummy-looking concrete can be transformed with a few coats of paving paint (we love Ultra Pave by White Knight). It’s so cheap, fast and effective, and you can have it tinted to any colour you want.

Got a question for the Three Birds girls? Ask it in the comments or send it to us.

Read all posts by Three Birds.

For more information about Three Birds Renovations.

Categories
Designers House Rules Outdoor & Exteriors RENO ADDICT

The battle of the gardens begins with House Rules’ first semi-final

After tying for first place in last week’s holiday home challenge, Bronik and Corrine’s good form continued with the Victorians taking out the first semi-final.

Here’s what judges Wendy Moore and Joe Snell had to say:

Bronik and Corrine — 17/20

Before - NSW front yard
Before – NSW front yard

After - NSW front yard
After – NSW front yard

The pair earned 17 points for overhauling team NSW’s front exterior. They impressed with a modern front fence and a diagonal wooden path, giving Steve’s yard an angular and contemporary look. “You guys delivered a really fantastic front garden,” said Wendy. “Great design, great ideas and great execution.”

Steve and Tiana — 14/20

Before - QLD front yard
Before – QLD front yard 

After - QLD front yard
After – QLD front yard

NSW and South Australia tied for second place with 14 points, joining forces to transform Ben and Danielle’s red-brick eye sore into a French Riviera masterpiece. Steve and Tiana worked on team Queensland’s front yard, using boulders and stairs to create different levels heading up to the front door. They also splurged on a luxe outdoor setting in the courtyard to create a French inspired retreat. “You guys instantly changed the street appeal of that home,” said Wendy.

Ryan and Marlee — 14/20

Before - QLD backyard
Before – QLD backyard

After - QLD backyard
After – QLD backyard

Ryan and Marlee renovated the Brisbane backyard, creating a raised deck area and a separate alfresco lounge area. “Your decked area was great,” said Wendy. “And the decision to put that retractable awning was a really good design choice.” But their furniture choices cost them points. “The lounge whilst a great idea in terms of design, the aesthetic was nowhere near French Riviera and that was just disappointing,” said Joe.

Ben and Danielle — 13/20

Before - NSW backyard
Before – NSW backyard

Before - NSW backyard
Before – NSW backyard

Ben and Danielle were not up to their usual high standards finishing last on 13 points. The newlyweds were tasked with transforming Steve’s massive backyard. Their design included a timber deck and paved outdoor lounge area with a fire pit. “Whilst part of the design worked beautifully, it really didn’t have a clear vision,” said Joe.

The second semi-final showdown kicks off Sunday at 7pm with the final garden reveals on Monday at 7.30pm. For more House Rules.