Categories
Interiors Addict Outdoor & Exteriors

7 perfect exterior colour palettes that will inspire homeowners

Trying to pair colours on the exterior of a house is no easy task. The bricks, pavers, roofing and downpipes must complement each other to reinforce your home’s feeling and genre. Thankfully Wattyl paint and CSR PGH Bricks & Pavers have done the hard work for you. Together they have created seven exterior colour palettes illustrating perfect pairings of exterior paint colours for a wide variety of architectural styles and locations.
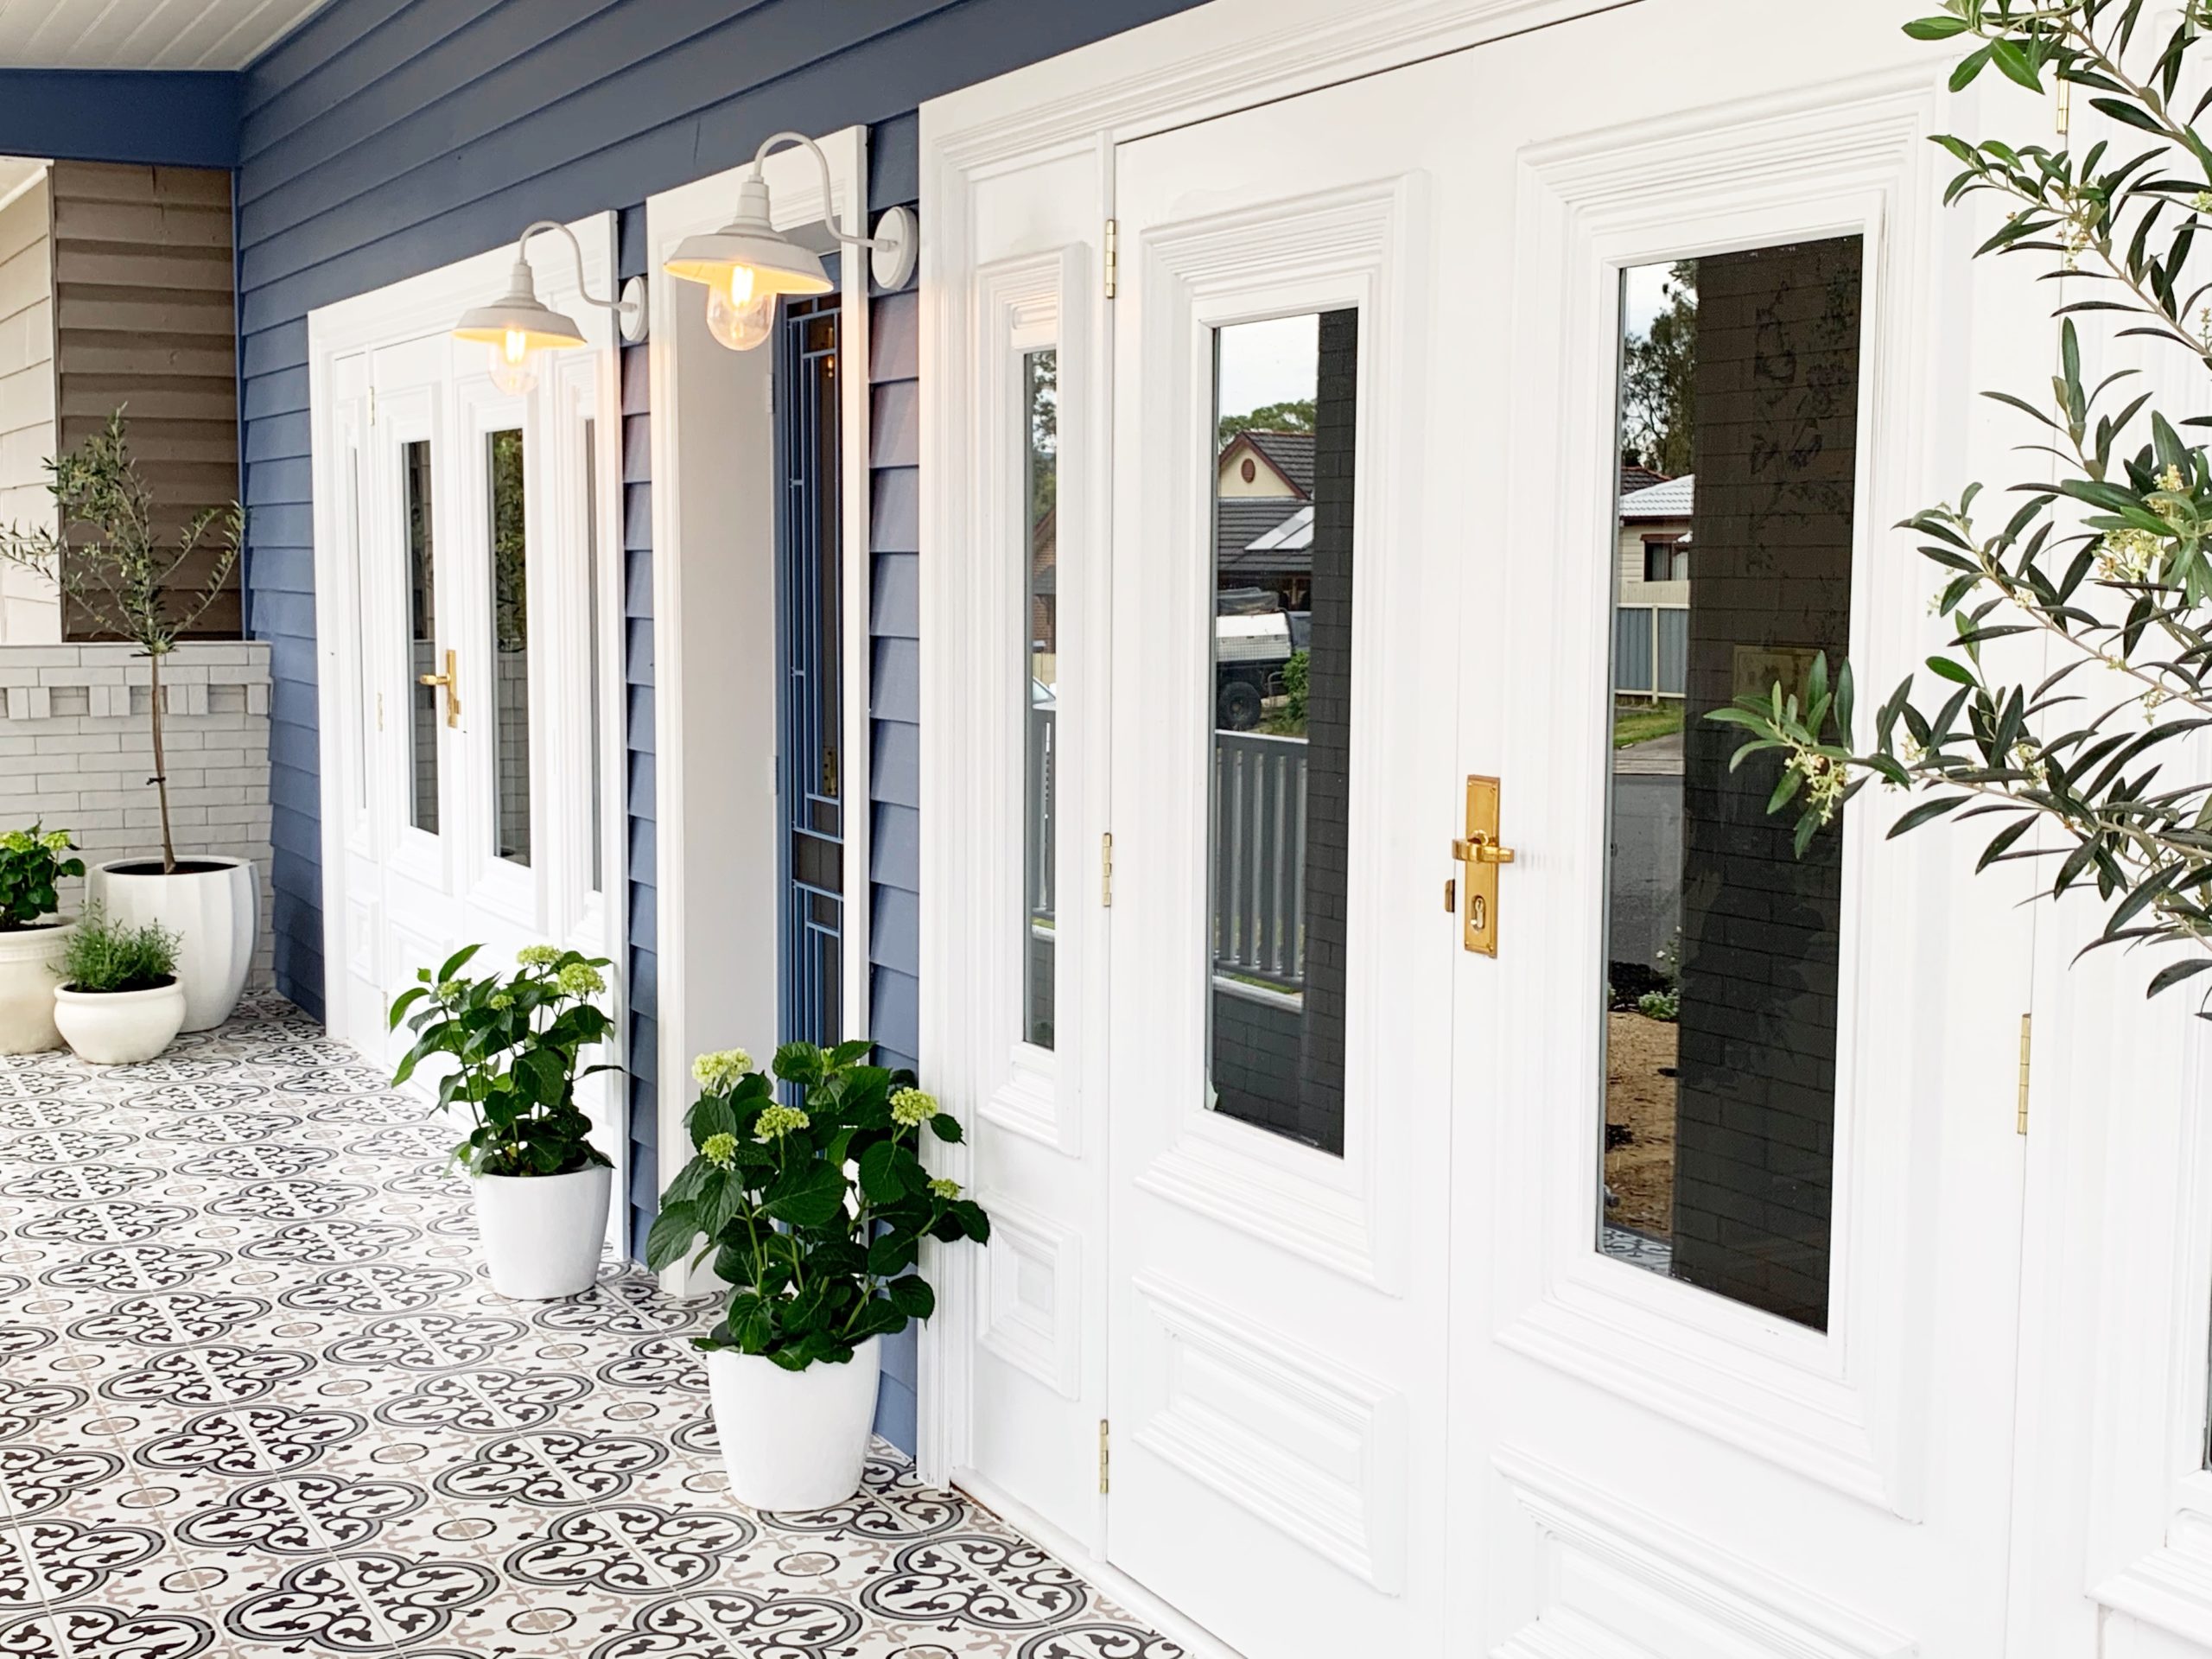
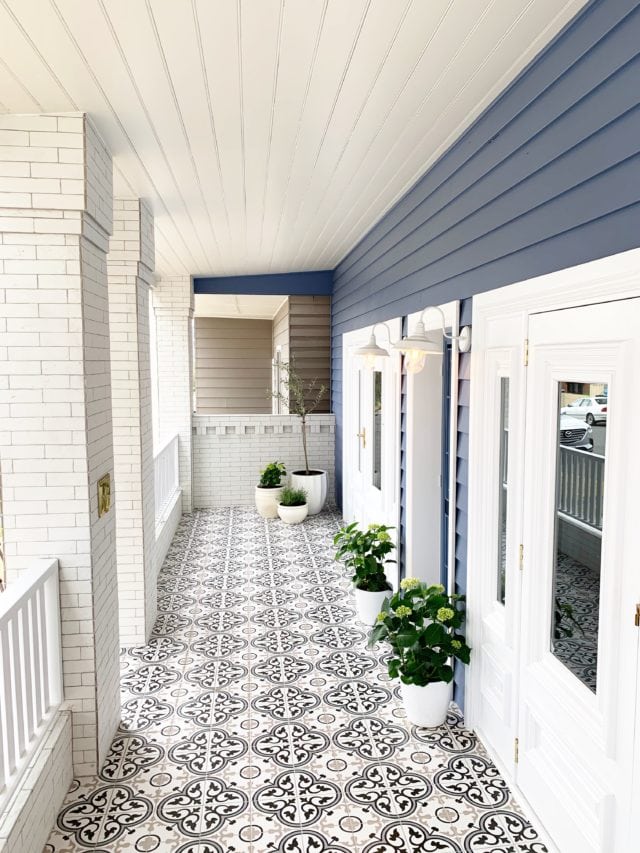
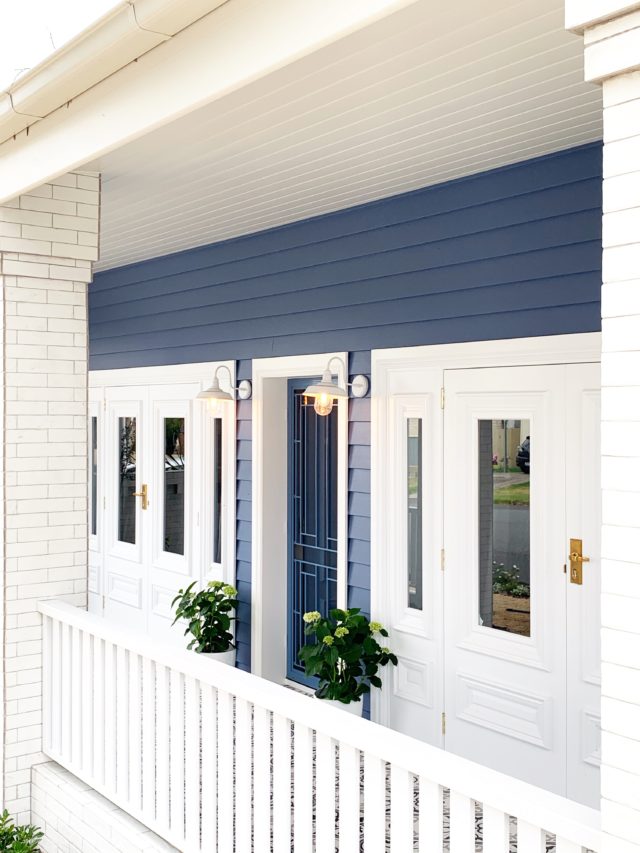
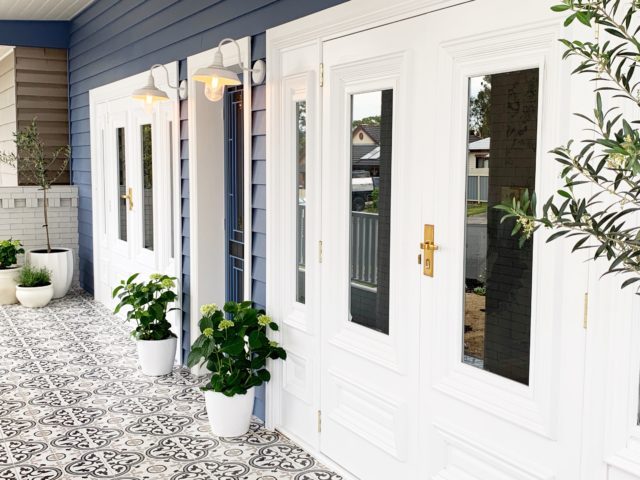
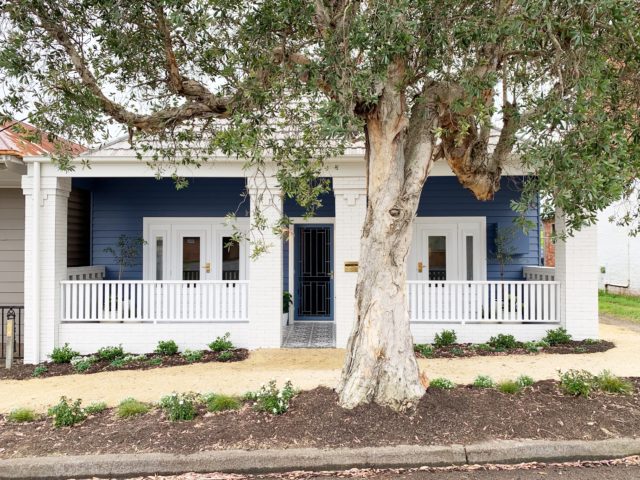
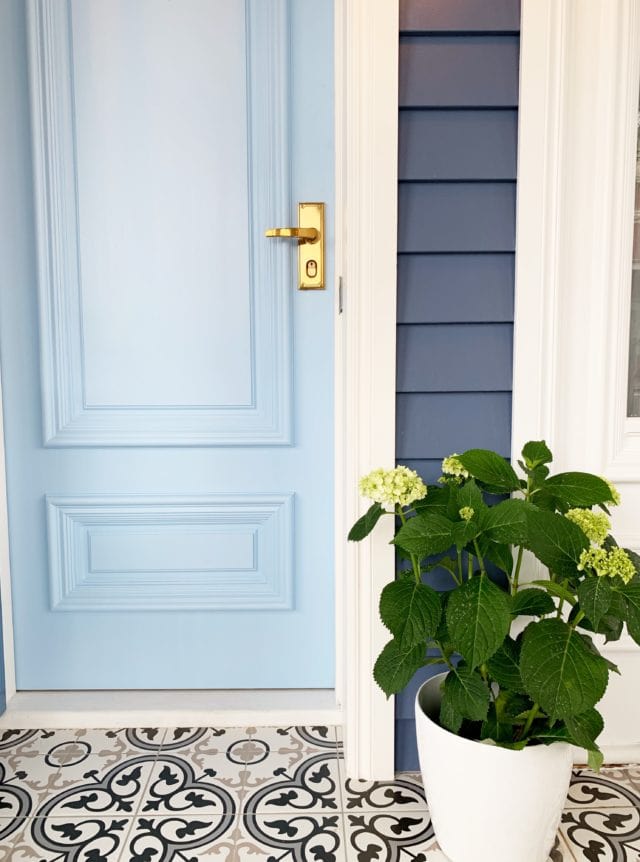
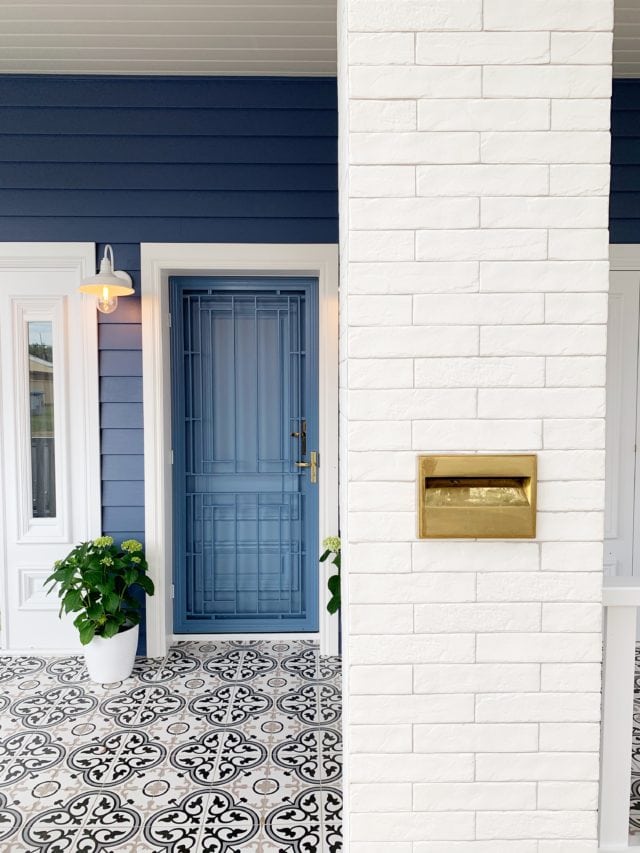
1. Hamptons

Inspired by the classic Hamptons aesthetic, this palette has been given a distinct Australian coastal style with the ocean blue of Wattyl Solagard Mystic Blue teamed with the fresh, crisp white of Calcium and the warm, soft grey of Bubbling Mud. Complete the look with PGH Bricks Simply Hamptons Breeze and Fresh White, plus Colorbond in Wattyl’s Dune.

2. Coastal

The quintessential coastal palette – the classic white of Wattyl Solagard Astor White, the beachy blue of Kinfolk and the soft, grey hues of Wattyl Colorbond Dune, reminiscent of weathered driftwood and ocean-worn pebbles. PGH Bricks Coastal Hamptons Washed White paired with PGH Bricks Morada Blanco are the perfect light and effortless beachside partners.

3. Mid Century

Designed to highlight the structural elements of contemporary design, featuring a combination of white (Wattyl Solagard Dobson), charcoal (Wattyl Colorbond Nightsky and PGH Bricks Dark and Stormy Zephyr, plus the sophisticated PGH Bricks Morada Nero Gloss and the beautifully grounded neutral of Wattyl Solagard Safe and Sound.

4. Modern

A slick, tonal palette of greys from the deep neutrals of Wattyl Solagard Pitchstone and PGH Bricks Dark and Stormy Whirlwind to the tailored contrast of Wattyl Solagard Cold Rush and PGH Bricks Morada Gris. The richness of Wattyl Solagard Black Tied anchors the palette.

5. Natural Neutrals

Inspired by nature and designed to blend with the landscape, this exterior palette combines the muted earthy hues of Wattyl Colorbond Pale Eucalypt and Solagard Light Earth, alongside Dhimba. The beautiful natural texture of PGH Bricks Essentials Heathwood, accompanied by the cool muted grey of PGH Bricks Morada Ceniza Linear, strikes the balance between traditional architecture and the beauty of the natural Australian colour palette.

6. Urban

Combining the strong, deep charcoals of Wattyl Solagard Grey Ember and Colorbond Monument with PGH Bricks Alfresco Espresso. Beautiful, earthy contrasts are introduced in the form of Wattyl Solagard Magic White and Lavish Tan plus PGH Bricks Manhatten East Hampton.

7. Whimsical

This uplifting, upbeat palette of washed pinks and greys is equally well suited to coastal and urban locations. The dusky pink of Wattyl Solagard Tombola, alongside the soft, cool tones of Soft Apparition, creates a sense of whimsy, with the cool hue of Feather Dawn introducing a fresh contrast. PGH Bricks Botanicals Sandalwood and the chalky texture of PGH Bricks Zen by Nature Salt add softness and natural texture to this dreamlike palette.

For more information visit Wattyl or CSR PGH Bricks & Pavers
Categories
DIY Outdoor & Exteriors RENO ADDICT Reno Products Shopping

The great first impression you can even DIY with ModularWalls

Sponsored by ModularWalls

There’s a lot of talk about kerb appeal with good reason. Never underestimate the difference an impressive front facade can make to your home. And with ModularWalls’ EstateWall you can erect a beautiful front fence in a few easy steps which will look a whole lot more expensive than the reality!

EstateWall customised with tiles and lighting

With their largest posts yet, ModularWalls’ EstateWall solution is for those looking to make a sophisticated statement that’s sturdy and won’t cost a bomb. This alternative to a masonry wall can even be installed yourself over a few days for those who are a bit handy!

It’s perfect for front wall, entry walls, premium boundary walls, feature walls and security perimeters. And to give you an idea of the many ways you can use it, we’ve rounded up three case studies for you here:

Coastal barn dream

Lauren Cecil loved the way the product gave a grand entrance to her driveway (above). “I also had the opportunity to play around with it and make it more personal by adding tiles and rendering the walls to make it more our own.”

Details

Lauren talks more about why she chose EstateWall in this short video:

Hamptons Farm Estate

Interior designer Natalee Bowen, of Indah Island, used EstateWall for the boundary of her impressive Hamptons style farm estate in WA. “On driving up to the estate, one of the first things you see is this incredible EstateWall. It just encompasses the whole design of the landscape and gives it that huge, beautiful designer resort feel,” she says.

A DIY front wall

The owner of this Melbourne home, Darren, says: “We looked at a few different wall systems and liked EstateWall the best — as well as the fact that it looked easy enough to do ourselves, it emulated a rendered brick wall with the thickness but was super easy to DIY.”

More about EstateWall from ModularWalls

Australian designed and made, EstateWall offers privacy, security, and noise-reducing capabilities. But if, like us, you’re just as interested in the aesthetics and creating something a little personalised to you and your home, you’ll love the ability to put your own stamp on it too. Let’s face it, it’s not that often you can customise your fence, especially when it’s something modular and easy to install, rather than a more expensive custom solution.

Your only limit is your imagination in some respects! You can add tiles, render, slats, or lighting (from your choice of third party suppliers) and even colour match to the paint of your home’s exterior. ModularWalls themselves also sell a selection of letterboxes and gates.

EstateWall can either be professionally installed or delivered for DIY installation, with installation guides and a customer hotline for any installation questions. 

Could be just the thing for the upcoming long weekend…

For more information

Categories
Before & Afters Outdoor & Exteriors Real Renos RENO ADDICT Reno Products

Navy weatherboard house: a crazy good before & after

It’s been a while since we caught up with Naomi Findlay’s progress on her Carrington House reno, but we can assure you it’s been worth the wait because today we have this knockout before and after of the exterior to walk you through. I mean, really?! It’s off the charts! It’s a brave woman who takes on a project like this one, but if anyone can…

AFTER
BEFORE

Over to you, Naomi…

Today we’re taking you outside! Tackling the facade has transformed this once old brick house into an eye-catching home with a breathtaking streetscape.

We didn’t have much appealing to start with so we had a lot of work to do here! We had balustrades that were cracked due to the beautiful trees, ceilings full of asbestos and a leaky roof. In other words, it was about time that we did something about it!

AFTER
BEFORE

STAGE ONE 

The first step was grabbing the sledgehammer and knocking down the cracked balustrades. To balance the symmetry of the house, we decided to install two beautiful French doors on either side of the rooms.

Next, it was time to remove the asbestos and the roof with sadly, a complete rebuild.

STAGE TWO 

Pachira Tiling came to screed the porch floor, giving it falls so when it rains, the water simply runs away. Then Andrew tiled away the balustrades of the front porch with some beautiful white brick balustrade tiles.

For a completely different but traditional look, we decided to go with a beautiful cast panel custom colour front screen door. The team from Cotton’s Glass came in to install the door to sit in front of our main door.

STAGE THREE 

With doors in and tilling begun, it was time to start cladding the front facade of the house! Team Ferris come in to first help set up the string lines, batten the front facade and then accept the deliveries.

Then we were ready to add some colour! We went with a cape blue from Taubmans, and spray painted our beautiful french doors white. We kept it super simple for these balustrades and rails with a simple, clean and classic look.

STAGE FOUR

With all the construction and work done, it was time to tile the floor, and don’t we have a showstopper tile for you?! Andrew came in to help tile the floor in this beautiful grey patterned floor tile from Beaumont Tiles. And with the tiles all in, that wrapped up our transformation of the front facade. 

What do you think?

Here’s a few more detail shots…

Read about everything used for the facade

Want to learn from the best? Check out Naomi’s free online renovation masterclass.

Categories
Before & Afters Jen's reno Outdoor & Exteriors RENO ADDICT

My new deck: the big reveal!

Photography by Jacqui Turk

It finally stopped raining long enough in Sydney for us to shoot these photos of the finished deck and I couldn’t wait to share it with you. I also can’t wait to spend as much time out here as possible over the holidays!

When we bought this house, although it needed a lot of work to bring it up to the 21st century, we loved the size, the flat block and the backyard which had both an entertaining area –now decked–  and a lawn for the kids. Although we still have a few things to finish, seeing it come together like this makes me so happy. We intend to live here for many years and I am thrilled that we now have an outdoor area that really does function as extra living space and an outdoor room (or two). It’s also brought the exterior up to date in a big way!

My husband Damian and I agree it’s now our second favourite space in the house after the kitchen. This may sound like a half-baked compliment but when you consider it’s not actually an enclosed room, I think it’s high praise indeed!

Although the new Trex deck is no bigger than the paved area was before, it feels so much bigger. This is due to a few things: the planks laid horizontally give the illusion of a wider space, the deck comes out from the French doors at the same height which gives great indoor/outdoor flow, we’ve removed the old timber pergola which was about halfway down, plus the light grey composite deck gives a modern, clean aesthetic.

The addition of the steps down to the lawn give it a really slick, finished look and nicely separate the two distinct areas. They’re also great to sit on and put pots on! I’m really glad I went with the grey colour, Island Mist, of the Trex Transcend decking collection, because it has toned down our sixties red brick house and it looks modern (while still in keeping), light and bright.

Because we no longer have a big back step, we can make use of extra space near the French doors, so we now have two distinct areas: one off the dining room for lounging with a coffee or a glass of wine (this was always my dream!) and the other further back for the barbecue and large dining table for entertaining friends. We can look out onto the lawn from wherever we’re sitting and there’s still room for the paddling pool if needed. What more can a girl ask for (maybe a spa, Santa?!)?

If I had to say what I love best about our Trex deck apart from the aesthetics, it would be the low maintenance aspect. And the fact it is hardwearing means I don’t cringe every time Seb rides his scooter over it or drops food on it, knowing it won’t scratch and I can easily hose anything off it. We’ve had plenty of rain (too much!) lately so I can see it drains well and dries off in the sun. While it does get quite hot under direct sun (we’re getting a retractable awning soon), so does any hard surface, including timber. This is the only minor negative I can find but the many other advantages of a composite deck far outweigh it in my honest opinion. I don’t make habit of hanging around in direct sun anyway!

In a nutshell I am absolutely thrilled with the finished product and the process of having it delivered and built was exceptional. The new deck has massively improved the use we can get out of our outdoor area for entertaining, eating as a family and just simply relaxing, right in time for summer. But we love it so much I think we’ll be out there even when it’s colder, huddled around our firepit!

Our al fresco’s now almost finished with new lighting, retractable awning and vertical herb garden still on the list. The new life that has been breathed into this backyard with our Trex deck make the mortgage repayments and living out in the ‘burbs seem more worthwhile than ever!

And before I sign off, here’s a little reminder of what it looked like when we bought it!

Why I chose Trex

More about my deck build

More posts about my house reno

Disclaimer: My deck was supplied to me by Trex in exchange for coverage on this website, though this is an honest review of the product and service.

Deck build by Urban Arch and product delivered by Master Woodturning | Furniture from Early Settler, barbecue from Barbeques Galore | Gutters painted in Haymes Paint: Intimacy | French doors from Corinthian Doors.

Categories
Jen's reno Real Renos RENO ADDICT

A new deck and new backyard look in under a week!

Following on from last week’s post on why I chose Trex Transcend composite decking for our backyard, today I’m telling you a bit more about the installation process and largely, how quick and easy it was. I only got to witness the first two days of the build before I was off to hospital to be induced and have baby Charlie, nine days late! But Damian left me updated with progress pictures and the best part was getting home with a new baby to a brand new, finished, beautiful deck!

Before we go any further, shall we flash back to what the ‘Nanna House’ backyard looked like when we bought it 18 months ago?

We’ve changed the sliding doors to timber French ones, removed the old pergola and had all that red trim painted charcoal

I know, right?! VERY Nanna! We’ve done a lot out here, including removing the old pergola and reclaiming a lot of lawn from the many little flowerbeds, but I don’t want to keep you all day, so I’ll stick to the decking for the purpose of this post!

The entire build took just 4.5 days, including creating two steps at the end down to the lawn (the most time-consuming part of the build). I was so impressed with how thorough the job was. The guys from Urban Arch really knew their stuff and it all ran like a well-oiled machine! When they told me it would only take a week, I was dubious, but in the end, it took even less! This has a lot to do with the Trex Hideaway Hidden Fastening System which makes install a breeze, within the realm of handy homeowners (which Damian and I are not), so you can even do it yourself!

Everything was delivered by Master Woodturning on day one, who expertly craned the heavy materials over our brand new picket fence!

First, a pest expert came to install a termite barrier around the edge of the house where the deck would meet it.

Termite treatment around the edge of the house where the deck meets it

I have mentioned my termite phobia before, so this gave me extra peace of mind! Then our old red-tiled back step was jack hammered off in preparation for the frame going in, which, much to my excitement, would be at the same level as the back door, hugely improving our indoor/outdoor flow.

Bye bye back step!

You also don’t want a high step from your back door down to your al fresco when you have kids; it’s just asking for trouble. I am so happy to no longer have to worry about anyone tripping off the back step and falling flat on their face!

While all this was happening, we also had our favourite painters from BK Decor painting all the external trim of our house. All the trades managed to work around each other beautifully! I needn’t have worried about them getting in each other’s way or holding each other up!

Next, the timber frame, which was cut to size on site, went in. There was much measuring and cutting of timber and it all looked so pleasingly at right angles! Urban Arch explained that installing on top of pavers with good drainage was actually an excellent base for a deck. We decided against having railings installed, which Trex does offer in matching colours, because they weren’t really necessary at this height and we wanted to maximise the sense of space.

Where the steps will go in where the deck meets the lawn

It was really exciting to see the decking go in, and the space suddenly looked so much bigger and fresher, not to mention the fact it was all finally on one level. Yay! It was then I could really appreciate I’d chosen the right colour in the grey-toned Trex Island Mist, which I’m delighted with and everyone comments on!

I don’t want to share the entire transformation with you just yet (that’s coming next week, post-photoshoot) so these glimpses are just a teaser! Suffice to say we are thrilled and so impressed by and grateful for the great job done by Urban Arch and the amazing end result using Trex composite decking. You’re going to be super impressed when you see the finished look!

These smart steps provide a great transition to the lawn which was definitely missing before.

Make sure you come back next week to see it all! And if you have any questions, please ask them in the comments.

Disclaimer: My deck was supplied to me by Trex in exchange for coverage on this website, though this is an honest review of the product and service.

Categories
Outdoor & Exteriors Real Renos RENO ADDICT

Weatherboard homes: three looks (that aren’t Hamptons!)

Australia’s love affair with the weatherboard look can be seen in many of our historic and most popular styles – from the Queenslander to coastal and new, contemporary designs.

“Weatherboard is extremely versatile and is embedded in Australian home design. Traditionally, timber has been the go-to, but today, we have more advanced options, like Linea Weatherboard, which open up new design possibilities for personal style to shine through,” says Steve Pisani, national builder business manager, Scyon Walls.

Here, Steve offers his top tips for achieving three of the most authentic Aussie home designs with cladding:

Contemporary

Combining a mixture of materials when building or renovating allows homeowners to increase visual interest, add personality and make the style of the home their own. Often built to create an immediate impact, these stand-out designs can be softened to suit suburban surrounds with the addition of more traditional materials like weatherboard.

Most modern contemporary designs use a number of types of cladding. Linea Weatherboard is narrow with clean lines and deep shadows. The smooth texture and square profile boards provide crisp definition and can be painted any colour for a contemporary look. For larger expanses use the 180mm boards to create a larger feel and scale down to the 150mm in smaller areas to enhance the perception of space.

The mix of materials can add to the functionality of a home while instilling a strong sense of individual style and character to the home.

Coastal

The main elements of the coastal style mirror the beach itself, light, breezy and open. Choose a colour palette of whites, creams, greys and blues that reflect the hues of the beach and add to the easy-going, simple feel. The architecture of the house should accentuate the view and blur the line between the indoors and outdoors. When designing the home, opt for large, open-plan rooms with many windows and skylights, to allow sunshine to flood in and create clear sightlines to the outdoors.

If the house is located in a coastal area, selecting materials that can withstand the harsh climate is vital. Linea Weatherboard is able to achieve the deep shadow line look of traditional timber options without the maintenance, as it is less prone to flaking, warping or swelling, and is resistant to fire and damage from termites and moisture.

The Queenslander

Developed in the 1840s, the uniquely Australian Queenslander is a design response to the sub-tropical climate of north-eastern Australia. Today we see modern interpretations of the classic Queenslander style with elements including elevated spaces, heritage detailing and partially enclosed verandas that extend the indoor living space and provide relief from lengthy, warm summer days.

When building elevated homes, keeping the weight of building materials to a minimum is key. Choose light timber frames with weatherboard look cladding to achieve the classic aesthetic and functionality of the Queenslander. Linea Weatherboards are lightweight and easy to install, making a crisp, clean timber look quick and easy to achieve.

The Scyon™ brand is owned by James Hardie Technologies™ Ltd and was invented in the research and development facility at James Hardie Rosehill, NSW. Launched in 2006, Scyon products are made from sand, cement and cellulose. Scyon is manufactured at plants in Rosehill, NSW, Carole Park, QLD and Penrose in Auckland, New Zealand.

Categories
Expert Tips House Tours

3 years of landscaping to get married in acreage back yard

Three years ago, snakes were regular yard guests at Nikki and Luke Hobbs’ newly purchased five-acre Gold Coast Hinterland property. The overgrown yard, once towering in lantarna and tobacco trees, had been ‘let go’ by previous tenants.

Rather than start with the interior of their new home, the couple decided to tackle outside first. And they had a great incentive; wanting to get married in their own (substantial) back yard!

After watching back-to-back episodes of River Cottage Australia, three years and a lot of hard yard work passed, and the couple– a builder and a stylist– were ready to unveil their landscaping while they said ‘I do’ from the comfort of their home.

Here, Nikki shares their top five ‘River Cottage’ makeover tips:

  1. Work with the unique shapes, contours and quirks of the existing parcel of land (ours was once a hydroponic tomato and strawberry farm boasting flat paddocks).

BEFORE Veggie garden

AFTER Veggie garden

2. Hire in the heavy machinery to do the grunt work (ours included countless excavator bookings and eight semi-trailer loads of forest mulch).

BEFORE Back yard

AFTER Back yard

3. Plan your landscaping for success by considering the types of plants currently thriving in your surrounds. (We also opted to hire Ryan from nearby Canopy Wholesale Nursery for expert advice and a killer yard map).

4. Naturally humans are drawn to water including creeks, dams and man-made features and therefore it was important to us to create a space we could enjoy daily (think sunset vino, morning yoga rituals and a wedding ceremony deck).


5. Highlight the natural assets such as river rocks and large established trees. For example, our two DIY rock pillars (now filled with white annual blooms) draw the eye from our house to the backyard creek.

BEFORE Creek

AFTER Creek

“Learning the ropes of acreage living including operating septic systems, petrol generators and large machinery has been incredibly rewarding,” Nikki says. “Our landscaping and renovation plans for Platypus Valley Homestead will continue to evolve as we now kick off our interior renovation.”

–Country stylist Nikki Hobbs and builder husband Luke, run Hobbs Building & Interiors, an award-winning sustainable home builder located in the heart of the Scenic Rim, Queensland.

Categories
Expert Tips Outdoor & Exteriors RENO ADDICT

3 on-trend and foolproof exterior colour schemes

Transforming the outside of your home with the right colour scheme can future-proof your exterior and help you achieve curb appeal for years to come. But choosing the right paint can be tricky, it’s a long-term investment after all. So to eliminate colour guesswork, Dulux have curated three on-trend and foolproof exterior colour schemes which can be easily applied to virtually any architectural style.

Bright Spot

Featuring pops of brighter hues and a selection of easy-to-use neutrals, Bright Spot is especially ideal for popular mid-century architecture. Experiment with hues to achieve a modern take on architectural colour palettes. Use bold hints of colour such as Dulux High Blue or Go Alpha in architectural details such as the front door, pot plants and even letterboxes.

Dulux Natural White, Ticking and Go Alpha

Expert tip: Try a pop of colour on the doors and exterior trim, or pair neutrals such as Natural White and Timeless Grey with bright pots, chairs and exterior accessories.

Dulux Terrace White, Vivid White, High Blue and Surf’n’Dive

Botanical Life

Offering a more traditional colour scheme, Botanical Life achieves a warm and welcoming lush look. Globally inspired, it features spicy colour accents, bohemiam styling and tropical flare as seen in Dulux Cinnamon Sand, Coyote and Jungle Cloak.

Dulux Cinnamon Sand and Tambo Tank

Expert tip: Bring this theme to life with bohemian styling including woven exterior furniture and planters as well as lush tropical greenery.

Dulux Pale Tendril Half, Jungle Cloak, Water Rock and Coyote

Natural Beauty

Inspired by tactile elements, Natural Beauty offers colours which are drawn from nature, focusing on neutrals, warm greys and charcoals. The colour scheme achieves a relaxed look with colours such as Dulux Vintage Beige, Malay Grey and Domino, which can be paired perfectly with materials such as brick, timber and stone.

Dulux Teahouse and Domino

Expert tip: Pair these neutrals with natural textures such as wooden elements and stone accessories and decorations.

Dulux Colorbond Shale Grey and Harold

Achieving the right look and selecting colours can be daunting, so these exterior colour schemes can simplify the process, helping you avoid a costly colour mistake.

Photography by Mike Baker | Styling by Bree Leech and Heather Nette King

For more information | Paint inspo 

Categories
Designers Expert Tips Outdoor & Exteriors RENO ADDICT

The top 5 exterior trends for 2018

About to take on a renovation or just revamp your outdoor space? Well put down that paintbrush and read this. The team at Nexus Designs have shared their predictions on what’s in store for 2018 and there’s a few surprises. Two words… red bricks!

Texture

Increased awareness of texture is coming to the forefront. This is being expressed in two key ways, contrasting textures and self-patterned textures. Contrasts between gloss levels of the same material are highly effective. This trend has been increasing in the interiors sphere and is now extending to the exterior.

Self-patterned textures are being seen with the increased popularity of bricks, particularly in the new, more elongated shapes that are now available. This textural trend brings a level of craftsmanship to exteriors which is a welcome relief to acres of render.

Embrace textural contrast by using COLORBOND steel Matt for the roof and standard COLORBOND steel for the gutters and trims.

Red bricks

They’re back! But they will be used in a more considered way. Red brick has been used beautifully in heritage buildings and not-so beautifully in generic suburbia where it was a default choice. Now this classic, ancient building material (the Romans used it exceptionally well) is coming back and bringing with it a warm, premium finish. It’s not being used for whole houses but rather to enhance the building’s form, alongside other curated materials in a very contemporary way.

Natural finishes

With the resurgence of interest in mid-century Modernist houses, we are flagging an interest in a more authentic, natural approach to building materials. Referencing the way ground-breaking firms of that era (like Merchant Builders in Victoria and Pettit & Sevitt in NSW) used materials honestly, timber is being finished with a clear, natural or lightly stained coat rather than being disguised by heavy paint.

Photography by James Geer | Architecture by Sally Draper | Interiors by Nexus Designs

Neutrals

The appeal of neutral colours – greys, beiges, off-whites – is not going away, but it is becoming more sophisticated. The neutrality is being subtly enhanced by the use of different materials within one colour palette ie silvery grey concrete, mid grey bricks and dark grey roofing, which links back to the texture trend.

Photography by Mark Roper | Architecture by Inarc Architects | Interiors by Nexus Designs

Upgraded landscape elements

We are seeing new attention being paid to the peripheral elements of the house including garage doors, fences, sheds and water tanks, and how they work with the house and the streetscape. The trend is for these to be integrated into the overall exterior scheme, rather than being less important afterthoughts. Their impact on the landscaping is being recognised and being used to greater advantage.

For more on Nexus Designs | Our favourite outdoor furniture

Categories
Art Outdoor & Exteriors

Meet Jamie Durie at Canvas Workshop popup this weekend

The Canvas Workshop and Jamie Durie are holding a pop-up store at Jamie’s Rosebery showroom in Sydney this Saturday (23 January).

Jamie Durie x The Canvas Workshop

You’ll be able to purchase ex-display prints, wall panels and cushions from his range at up to 50% off the RRP. Jamie will be there for a meet and greet and to offer his style advice to customers on the day.

A limited number of best-selling canvas prints will be available at the special price of $199.

Jamie Durie

Where: 85 Dunning Avenue, Rosebery

When: 9am-to-4pm, Saturday 23 January 23

View the full collection online.


Categories
Design DIY RENO ADDICT

How much does painting a house cost?

In need of a face lift, or should I say could your home do with a refresh? Glad I clarified that! Everyone will tell you that the easiest way to reboot your home is to add a lick of paint, indoors or out. And they would be right. But should you DIY or get a pro in and how much will it cost?

SV Constructions

To DIY or not…

While many of us are happy to DIY, the reality is time and expertise are two commodities in short supply. You also might think that there is not much to painting, how hard can it be? Truth be told a lot of the work happens before any brushes, rollers or cans of paint make an appearance. Any experienced painter will tell you that surface preparation (cleaning, sanding and filling in holes and gaps) is as important as using quality paints, equipment and the right technique. So think twice before you head to the hardware store.

How much will my painting job cost?

So assuming you decided to get a pro in, the first question on most people’s minds is how much is this going to cost me?

You should really be looking for a painter to visit your home and give you a written quote for the entire job. Painters will typically quote a flat fee which includes materials and labour. They are also able to quote for smaller jobs, for example a single room. Some painters may even give you a ‘per square metre’ or hourly rate. Expect to pay anywhere between $18 to $20 per square metre depending on where you live. In terms of an hourly rate, painters charge in the region of $40 per hour, but this can vary significantly.

These rates are all well and good, but beware of being lured by ‘too good to be true’ figures. The bottom line on cost is that you should consider a range of factors when hiring a painter, not just price. That means screening them to get an idea if they are right for your job.

Paron Developments

Ask your painter the right questions

Hiring the right painter for your job isn’t hard if you know what questions to ask:

  • How long have you been in business?
  • What does your quote include?
  • Do you have insurance cover?
  • Are you licensed (if this is required where you live)?
  • Can you provide me with references/client recommendations?
  • What paints do you use?
  • How many people will work on my job?
  • How long will you take?

Painting your interiors

Points to consider when painting your interiors include the type of paint. Gloss, low sheen or matt each have a unique finish, so decide what look you are after. There are also easy clean paints, marketed as ‘mark resistant’ by manufacturers, which you should be aware of. Timber elements such as doors, windows, their frames and skirting boards will typically require a gloss or semi-gloss enamel paint or wood stain. These are available in oil or water-based versions, with the latter offering the benefit of drying quicker and having less odour. Painters also often double up as decorators, so are able to take care of any special finishes or effects, such as wallpapering, that you require.

Wallpaper Antics

Painting your exterior

In terms of your exteriors, these surfaces may require more remedial work such as patching and filling in. This is particularly true of any timber elements. Also bear in mind that a multi-storey home is likely going to require scaffolding. Painters will factor the cost of all this into your quote.

Don’t forget to get a range of quotes, say three or four, to be in a position to judge what you are willing to pay. Remember, don’t always be swayed by the lowest price…

– Craig Gibson is the online editor of hipages.com.au, Australia’s largest network of trade professionals and the perfect place to find a painter in your local area.

Categories
Furniture Homewares Outdoor & Exteriors

Tait’s Sydney and Melbourne clearance sales

For one weekend only, outdoor furniture maker Tait, will be offering 30% off everything!

NNfEUeFXHzt4Uv2WhIFXVFJbJmXqEKQ-n00TQGc7CDU

Running 2-to-3 May at their Sydney and Melbourne showrooms, product highlights include the Tait Box and Softline Planters (from $84), the perfect compliment to any outdoor setting; the Tait GardenWall Set of 3 Planters (was $870, now $609), ideal for screening or dividing in/outdoor areas; the Tait Jak + Jil dining setting (was $4,190, now $2,933), which includes a Jil 1150mm glass top table and four Jak chairs; and the Tait Breeze Daybed (was $4,620, now $3,234), finished in a white frame with grey cushions.

I_820AqqqwTyDolIy_tNnJCtCt6Xjb4DaH77eR05XQc
Tait Jak + Jil dining setting

The floor stock clearance sale will take place at the Sydney showroom: 611 Elizabeth Street, Redfern NSW 2013 and the Melbourne showroom: 176 Johnston Street, Fitzroy VIC 3065.

For more information.

Categories
Expert Tips Outdoor & Exteriors

Interiors Addict TV: with Charlie Albone from Selling Houses Australia

We love Charlie Albone, our resident expert on all things outdoor on sister site Reno Addict, and of course slightly better known for his role on the top rating LifeStyle show Selling Houses Australia.

In this episode of Interiors Addict TV, Lauren Ellis talks gardens with Charlie; everything from how to create a garden that suits your house, what formal gardens are all about and how not to make mistakes with colour! And don’t forget to watch to the end for Charlie’s number one gardening tip! Enjoy!

Watch all our other Interiors Addict TV episodes.

Read Charlie’s articles on Reno Addict.

Categories
Outdoor & Exteriors RENO ADDICT Shopping

Get your deck Easter ready with Feast Watson’s De-xpertise

Sponsored by Feast Watson

The Easter break poses a welcome opportunity to undertake DIY and ‘fix-it’ jobs that have been put off around the home. A good place to start is a simple yet effective update to your deck! You can simply ‘refresh’ or create on-trend looks thanks to Feast Watson’s range of decking products. Here are some handy tips:

Starting from scratch

A new deck always starts with the right timber choice and the right timber treatments. Feast Watson have pulled together a collection of some of the most popular timbers perfect for creating inspiring and on-trend decking.

CYPRESS PINE is an Australian softwood, despite its apparent hardness. It varies in colour from pale yellow to variegated browns. Although Cypress Pine has a fine even texture, knots are very common and it tends to be brittle and prone to fine surface checking.

Swatch Cypress Pine

JARRAH is a heavy, tough Australian hardwood with a distinctive dark red colouration.

Swatch Jarrah

SPOTTED GUM is a very dense, oily Australian hardwood that ranges from pale to dark brown. It is essential to weather and clean Spotted Gum with Feast Watson Woodclean (as per label instructions). Note: Spotted Gum is often present in decking timber sold as ‘mixed hardwood’.

Swatch Spotted Gum

TREATED PINE is Radiata Pine that has been pressure treated to resist decay, termites and fungi. This treatment involves saturating the timber, so it is essential to leave Treated Pine to dry properly before staining. Tip: When choosing your timber and constructing your deck you’ll need to allow it to weather in its final position for four-to-six weeks before coating. After this time, prepare timber for coating using Feast Watson Woodclean as per the instructions. For best results, lightly sand the surface to remove any grain raise. Remember to remove all sanding dust before coating.

Swatch Treated Pine

Looking for a simple refresh?

It’s difficult to state an exact timeframe for how often timber decks should be recoated because it is dependent on so many factors; quality of the coating, amount of foot traffic, degree of exposure to UV radiation and the weather. As a rule of thumb, we suggest you conduct a regular annual inspection of the coating, and touch up any areas that are looking worn. A full recoat is required when the overall coating is looking tired and in need of a refresh. Tip: Refresh regularly as it’s easier to maintain the coating before it becomes too worn and the timber underneath starts to degrade.

Decking Oil: Try Feast Watson Decking Oil to refresh your deck. It’s a hardwearing, semi-transparent timber coating that enhances the natural beauty of timber whilst protecting it from Australia’s harsh conditions. If you’re looking for a higher sheen, try Feast Watson Wet Look Deck.

Feast Watson Decking Oil (2)
Before

FWA164_IMG_4076_RGB_HR
After

Looking for a whole new style?

When it comes to home renovation and decorating, there has been a move away from traditional finishes that simply protect and maintain the natural look of timber. The newest trends in decking are finishes that create a unique statement and provide impressive bases for outdoor entertaining.

Grey Look Deck

Feast Watson Grey Look Deck (2)

Feast Watson Grey Look Deck provides an immediate grey, naturally weathered timber look and durable protection. Formulated to appear grey, the finish protects timber from harsh Australian conditions and will increase in colour intensity over time.

Wet Look Deck

Feast Watson Wet Look Deck

Feast Watson Wet Look Deck provides homeowners with a timber finish that has a long lasting, freshly coated ‘wet’ look. Feast Watson Wet Look Deck is a great base for an outdoor room in need of a fresh, clean look.

Dark Deck

Try Feast Watson Timber Deck & Stain for a deep colour option. We’re seeing a resurgence in the use of darker coloured stains such as black and ebony, to enhance outdoor areas. Feast Watson Timber Deck & Stain in Black Japan is a great dark colour option and can be matched with interior flooring to encourage style consistency throughout the home.

Feast Watson decking can images

For a new decking look or a simple decking update, try Feast Watson Grey Look Deck, Wet Look Deck, Decking Oil and Timber & Decking Stain and more. To find out more about Feast Watson products and their application, visit their website and for inspiration, check out the Feast Watson Instagram.

Categories
Homewares

Javi Letterboxes: a stylish new approach to an everyday item

Perfect for the style-conscious Aussie, the Javi Letterbox range redesigns and redefines the humble letterbox.

javi letterbox interiors addict 2

Sleek, custom designed and suitable for both residential and commercial use, industrial designer Lee Rodezno created the range after being thoroughly disappointed by the quality and designs of products already on the market. “I couldn’t understand why people would put so much effort into the design of their homes,” says Lee. “From the architecture to the interior styling and even landscaping and then plonk a dull, uninspiring old-fashioned letterbox out the front.”

javi letterbox interiors addict

Australian-made, the letterboxes are made from sustainable Accoya wood and coated Australian steel, ideal for surviving the harsh Australian climate. Entirely modular, the letterboxes can stand alone out the front of any home, or be integrated into walls, fences, or apartment buildings. The simple unfinished timber front panel allows for customised painting or staining, as well as specific engraving.

javi letterbox interiors addict 1

The range also offers more than just good looks, with the letterboxes being 100% secure with added features. “Whether it is the stainless steel visor or the box within a box protective structure, the hidden fasteners, handy magnetic door latch or the discrete lock access, we think customers will appreciate the extra effort we have gone to.”

Shop online.

Categories
Expert Tips Furniture

5 top tips for selecting outdoor furniture

Outdoor furniture is an essential part of Australian living, whether it’s for a cosy balcony, urban courtyard, expansive deck or stylish pool surround.  King Furniture offer their five tips for finding the perfect balance of durability, style and comfort when considering a new outdoor setting. Here’s what you should be asking…

DELTAO

  1. How will the furniture be used? Alfresco dining, weekend relaxing, or family and friend get-togethers? Modular furniture provides the option to reconfigure seating to suit each occasion.
  2. Are frames and fittings made for outdoor conditions? The best outdoor furniture is completely constructed using marine grade materials, which can withstand temperature fluctuations, salt water, wind and rain and offer superior corrosion resistance. Waterproof cushion covers, vents in seating and meshed storage areas also help to release water from rain and poolside splashes to prevent mildew.
  3. Will the fabric last? Look for fabrics containing UV stabilisers as they will resist fading from sunlight. This also assists in water repellency, allowing water drops to run off the surface and prevent soaking through fibres; making it quick to dry. King Furniture is launching a new outdoor fabric called Cabana, which has an additional waterproof backing that creates a barrier, making it completely waterproof.
  4. Is maintenance easy? Materials that are coloured all the way through, rather than coated on the surface, will look new for longer with minimal maintenance.
  5. What extra features are available? Other attractive design options and accessories include in-built storage for cushions and towels, optional side tables and umbrellas for shade.

Advances in outdoor materials and fabrics mean there is no need to sacrifice style and comfort for durability. A new setting should look good and feel luxurious, transforming outdoor spaces into desirable places to live and lounge.

King Furniture are an award-winning Australian furniture brand, famous for designing and manufacturing contemporary furniture since 1977. 

Categories
RENO ADDICT

Free help for Victorians to plan energy efficient renovations

With more than half of Australian homeowners planning to renovate in the next four years, it has never been more important to put energy efficient renovating on the map. Yet while installing energy efficiency measures in your home can improve year-round comfort, save you money and add value to your home, there is still very little practical information available to help renovators go beyond minimum building standards. Well, until now!

RSE020_Smarter Renovations Tablet_Sm_CMYK

Sustainability Victoria’s new Smarter Renovations program is an online planning resource that provides home renovators with interactive tools, information and independent advice on how to improve and maximise the energy efficiency of any home or size of project.

Features include: the Smarter Renovations Planner that calculates accurate cost savings that can be achieved by making energy efficiency improvements; Your Guide to a Smarter Renovation, a consumer guide with practical advice on how to incorporate energy efficiency improvements during a home renovation; a series of Renovation Profiles, detailing the experiences of several individuals during their home renovation projects; and the latest evidence-based energy efficiency solutions, from efficient lighting to dressing the windows, draught-proofing and improving insulation.

Fiess 1

The Smarter Renovations Planner in particular is a tool worth using. Accurately calculating the cost saving that can be achieved by making different energy efficiency improvements such as improving insulation, windows or lighting, draught-proofing and upgrading appliances. It works by assessing the type of house, current energy needs and use, together with the renovation work being planned.

To try these tools for yourself, visit Smarter Renovations here.

Categories
House Rules RENO ADDICT

Post House Rules reveal chat with winners Adam and Lisa

With the teams having finally gained their confidence renovating interiors, it was time for their biggest challenge yet: exteriors and gardens! Last night’s episode of House Rules saw the first semi-final exterior reveal, with the popular Melbourne pair Adam and Lisa taking out the win.

adam and lisa
Adam and Lisa

Tasked with the job of transforming Carole and Russell’s barren and rocky front yard into a tropical paradise, the team was nervous from the outset, though it turns out there was no reason to be!

“Literally Lisa and I hadn’t planted a plant between us, so to win that was an unbelievable feeling,” says Adam. “It just proves that if you stick to a plan, do your research and do the hard yards, then eventually it will pay off.”

Yet receiving a 17 out of 20 from judges Joe Snell and Wendy Moore, didn’t come easy. The pair took on a mammoth task: moving the rocks that littered the garden into a carefully designed rockscape. “Across the road from Carole and Russell’s are magnificent mountains with all these natural rocks, and straight away we noticed there were heaps of them on the property as well,” explains Lisa.” So we were just hoping and praying that there would be enough to set the terracing and create a rockscape down the hill.”

image
Before: Carole and Russell’s front yard

With a time limit of just three and a half days, Adam spent most of his time running up and down the steep WA property maneuvering rocks, with them being too heavy for Lisa to carry. “It was an absolute killer,” says Adam. “It was unbelievable. It seriously felt like we were working on Mars, there was just red dirt up there and rock, it was hectic. But I think the harder a challenge, the better the feeling when you’ve finally finished it.”

Receiving such positive comments has also given Adam and Lisa some extra confidence for tackling the next round of exteriors. “We’ve learnt a lot,” explains Adam. “We learnt about grouping, that you need to make sure you have multiple areas in the garden and obviously we learnt about layout and landscaping, that you have to make sure it all flows. So we wanted to take all that forward to the Townsville garden.”

image
After: Carole and Russell’s front yard

While Adam and Lisa may have come out on top, not all teams were so lucky, with Candy and Ryan, who made over Carole and Russell’s backyard, receiving a 13 out of 20 from the judges. The other exterior that got a transformation was Candy and Ryan’s NSW property, with the judges scoring Carole and Russell a 14 for the backyard and Maddi and Lloyd an 11 for the front yard.

The second semi-final showdown kicks off tonight at 7.30pm with the reveals on Tuesday night. The four teams must next make over the gardens and house exteriors of Maddi and Lloyd’s Townsville Queenslander and Adam and Lisa’s Melbourne cottage.