Categories
Designers RENO ADDICT The Block

Blockheads Matt & Kim transform home for terminally ill dad

Get your tissues ready tomorrow night when former Blockheads Matt and Kim renovate the home of a man with terminal cancer and his family. Part 3 of Matt and Kim to the Rescue airs nationally at 7.30pm on Channel 9. We have a sneak peek of the stunning makeover.

Kim with Tracey at the reveal
Kim with Tracy at the reveal

In mid-2015, Matt and Kim got word of the Nyugen Le family’s desperate situation. Father Hung, aged 48 and having battled cancer for 10 years, now has terminal kidney cancer and just months to live. “Wife Tracy and their three beautiful kids have a mortgage they can no longer afford to pay, school fees, bills, a dilapidated home worsening by the day, and worse than that… no plan for the future,” Matt says.

Matt and Kim are rocked by this story and take the opportunity to create the most dramatic transformation in Domestic Blitz history. In just four days, they embark on a $370,000 renovation that involves the demolition of three quarters of the home and a complete structural rebuild. In true Matt and Kim style, the design duo present us with yet another daring and luxurious transformation.

A sneak peek of the luxurious transformation

But if that wasn’t enough, Matt and Kim used their creative minds to manifest one more surprise at the end of the show that will no doubt leave the audience breathless. We had the chance to chat with Matt and Kim about it before the show airs tomorrow night.

Tell us about the surprise?

Matt: Haha, I can’t tell you that! There are numerous Australian TV firsts in this show, but the one at the end is best experienced with a box of tissues close by.

Sounds amazing. So it’s not just renovations for Matt and Kim to the Rescue?

Matt: It’s renovations with a plus-1. It’s important that we address the family’s problems at hand first. That is the starting point of each design. It’s a metaphor for life. It explores the lows of bad times, and shines in the glory of a society coming together to create something truly magical and meaningful.

Tell us about the interior you created?

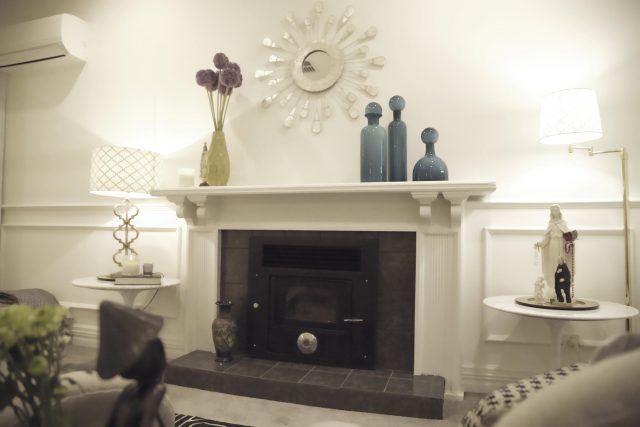
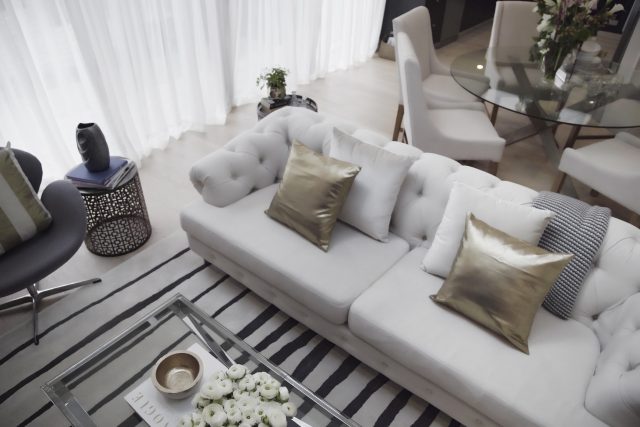
Kim: Matt is a touch obsessed with Haussmann style interiors at the moment, and because the house was a complete rebuild, we had the freedom to experiment. So we went with a colour-poppy, classic style that reflects the Parisian Haussmann period. Splashes of gold, marble and soft timber flooring were consistent throughout. The stunning lighting was all from Lucretia in Melbourne. The furniture was all in a classic style. Our favourite would have to be the master bedroom. We both feel it very important to continuously change up our style and take risks, for the viewer and for ourselves. I feel this house was a nice step in a new direction for us. The difficult part of our show is that everything is donated, so our task is to create the most beautiful home with what is available. The show has grown into a monster and our sponsors and interiors are beginning to reflect that. It’s something we are very proud of.

mk3

How involved in the show are Kim and yourself?

Matt: I’m co-executive producer alongside Ed Hobbs and our great team in Perth. Kim is still teaching full-time so she hosts and helps project manage. Kim and I originally wrote and pitched a 12-episode show to Channel 9 Perth and one of those episodes was indeed this show. From its infancy, we’ve built this thing. One of the amazing things that people may not know about Matt and Kim to the Rescue is that it is all donated. And thus far we have donated around $1.1 million dollars worth of renovation. Pretty cool.”

What does 2016 and beyond look like for Matt and Kim?

Matt: We will complete another 2 or 3 episodes with Channel 9 Perth. We will finish our own home renovation, which will look a lot like the house we would have created on The Block Triple Threat. I’ll still design on the side. I’m up to my 11th full scale residential/commercial project and still very much enjoy it. But our plans, ultimately, are to push further into the kind of design we believe in: risky, bold, inspiring and purposeful. My intentions are to continue to write, make TV, study, create and deliver projects that inspire and excite Australians.

–Matt and Kim to the Rescue – The Nyugen Le Family. Channel 9 nationally, Thursday 21 January, 7.30pm.

Categories
Design DIY RENO ADDICT Shopping

Upcycling how-to: the retro revamp of a sideboard

Sponsored by Feast Watson

Check out this beautiful retro buffet by Alicia Parsons, isn’t it stunning? Here’s how she created it.

uZlxL-Tk5cox1JlNIpM0FCpIkOWp9WV2KkIDfSHGt_c

Products:

  • Feast Watson Clear Varnish (Satin)
  • Feast Watson Timber Primer
  • Feast Watson Prooftint (Walnut)
  • Intergrain Woodblend (Teak/Blackwood)
  • Dulux One-Step
  • Wood glue
Before and after
Before and after

Planning:

  1. Choose a sturdy, well-made piece. Look for interesting details such as an unusual shape or distinctive hardware.

Preparation:

  1. Prepare the timber by removing anything foreign, such as drawer lining and bits of sticky tape. Also remove the glass doors and shelf.
  2. Flatten any raised veneer with wood glue and place bricks (or something heavy and flat) on top until dry.
  3. Fill any larger holes with the Woodblend putty.
  4. Use a sheet sander to smooth out the surface, firstly with a coarse grit then a fine grit. Wipe it clean.

LW1GE9LLdaYOt1wByKmqi4sMw52KDKV7NKPUEC8LGSU

Achieving your vision:

  1. Apply a few coats of Feast Watson Timber Primer mixed with Prooftint, slowly building up the colour with each coat.
  2. Lightly sand and clean.
  3. Apply two coats of Feast Watson Clear Varnish (Satin) for a lustrous finish.
  4. Paint the inside centre panel with Dulux One-Step. Once dry, cut the wallpaper to size, wet it with a sprayer bottle and adhere it to the back panel and the inside of the drawers.
  5. Finally, clean the glass doors and shelf and fix back into place

psTOpeETNtMRXnQjIXNBNITTLKHixP37E3yfGaGyJnk

“When it comes to upcycling be patient – wait until you find a piece you fall in love with. Also look for a piece that is well made and has great character.” – Alicia Parsons

NB: Always test the colour on an off-cut or inconspicuous area of your piece prior to coating the whole to ensure you’re happy with the colour.

To find out more about Feast Watson products and their application, visit their website and for inspiration, check out the Feast Watson Instagram.

Categories
House Tours Kitchens

A light and bright real kitchen reno

Homeowner: Jessie Harvey

Cost: $28,000

This family kitchen is the hub of the home and it’s hard to believe it was once dark, dingey, uninspiring and all kinds of brown! Homeowner and mum Jessie Harvey, tells us what they did.

201409Apr_6657

“We opted for a new kitchen as a makeover was not an option due to the condition of the old carcasses, which were literally falling apart! We installed Granite Transformations Trend Surfaces in Bianco Real on the main benchtop and Trend Surfaces in Venus Grey on the island benchtop. Gloss white doors opened up the space and a mirror splashback reflects the light and garden opposite the kitchen.” Add to the mix some IAG appliances and concrete effect wallpaper above the overhead cupboards to tie in with the grey island benchtop and create some texture, and the kitchen was given a whole new lease on life.

201409Apr_6653

“The space before was dark and closed in by walls so we wanted to open it up by removing two walls on either side of the kitchen,” Jessie explains. “It’s a much more open space now with the lounge and dining room opening to the kitchen. The removal of one of the walls also means there’s a view to the backyard, perfect for watching the kids outside while cooking.”

The family, including kids Bonnie-Willow (seven) and Banjo Lee (four), didn’t used to want to spend any time in the kitchen. “Now, I’m always in there,” Jessie says. “My kids are always doing homework, craft activities and anything messy really on the benchtops so it was essential to have surfaces that could allow them to do this without any staining or marking. The stone surfaces are amazing. The kitchen really is the centre of the house now.”

201409Apr_6663

Jessie is most happy with the amount of benchtop space she now has and loves the feeling of openness. “I can watch the kids in most spaces of the house from the kitchen now. I also love putting the pendant lights on over the island benchtop at night time as it creates such a relaxed and calm mood.”

And here are the before photos…

granitetransformations_Before - image 2_kitchen

I don’t think I need to ask which you prefer!

granitetransformations_Before - image 1_kitchen

We’d love to hear about your kitchen makeovers. Drop us a line.