Surround by Laminex decorative wall panels have taken the design world by storm since their launch mid last year. They’ve now added five new profiles to their collection, and have certified the entire range as moisture resistant, opening up a whole range of possibilities for applications in wet areas such as laundries and bathrooms.
Surround by Laminex decorative wall panels are pre-primed profiled sheets constructed from raw MDF with a tongue and groove system for easy install. Made in Australia from sustainably sourced timbers, the panels are impact-resistant and ideal for hardworking areas such as hallways, kitchens and bathrooms.
New additions to the range include a brand new French Stripe profile which is inspired by the Breton shirt, a classic staple in Frenchwomen’s fashion. It features narrow stripes that add depth and dimension to a modern interior.
Classic VJ 200mm
There are also new additions to the much-loved Batten, Scallop and Classic VJ ranges, including Scallop 135 which offers generous defined curves, and the widest of the range, Batten 300, which features 300mm battens that give a polished and contemporary look to any large space.
Sacha Leagh-Murray, general manager sales & marketing, says the expansion of the range is indicative of Laminex’s ongoing commitment to innovation.
“Surround by Laminex has been met with an overwhelming response from consumers and designers alike, and we are proud to launch five incredible new profiles that offer endless design potential for any interior project.”
She adds: “The product is a culmination of years of leading-edge product development for the Laminex brand, and we are excited to continue our focus on innovation to bring Australian consumers and designers quality, sustainable and design-led product.”
The latest wall panel solution to hit what is an ever-expanding scene, Surround by Laminex is a new range of profiles designed to help add texture and personality to your home. And with eight fabulous designs to choose from, we’re rather excited about the endless decorating opportunities that the range represents. And as a bonus, the collection of pre-primed MDF wall linings are easy to use, making them perfect for a weekend DIY project.
The Batten 25 wall panel design painted with Dulux Clay
From a gorgeous, scalloped design to a classic VJ or heritage profile, the ready made decorative surface panels are made for the indoors (ie. they’re not suitable for wet areas) and are a fabulous way to add depth and interest to a hallway, bedroom, mudroom, or main living area. Comprised of sustainably sourced timber and medium-density fibreboard, the panels are available in a standard sheet that can be painted the colour of your choosing, once installed.
“When conceptualising Surround by Laminex, quality and ease of application were two key factors. The panels are durable and hardwearing, whilst still being easy to install. Surround by Laminex really is a product like no other,” says Sacha Leagh-Murray, general manager of sales and marketing.
Scallop 45 and Scallop 22.5 look fabulous paired together. They are painted in Dulux White Duck Quarter
Sustainably manufactured in Australia, the range is created with medium-density fibreboard (MDF), and the timbers of the collection are sustainably sourced too.
The Batten 100 design is a modern, masculine take on classic timber panelling that features defined boards separated by deep, straight-edged grooves. Similar, but much smaller in scale, Batten 25 is a statement narrow board that features defined edges and deeper routing.
Batten 100 painted in Dulux Maximus
The Classic VJ 100 is as it sounds – classic tongue and groove panelling offers a timeless look in just about any space and this design features linear boards separated by vertical joins (VJ). Heritage 150 is ideal for period homes and, with its wider boards defined by curved joints, it’s an update on the more traditional timber panels
Scallop 45 has a uniquely rounded, undulating curved profile that creates a luxe statement, while Scallop 22.5 is similar but narrower in width. The Demi Round 40 is another softly curved profile that is well suited to both full and half-wall applications and its little sister, the Demi Round 20, features narrow curved rods.
The Scallop 22.5 design painted in Dulux Winter Sea
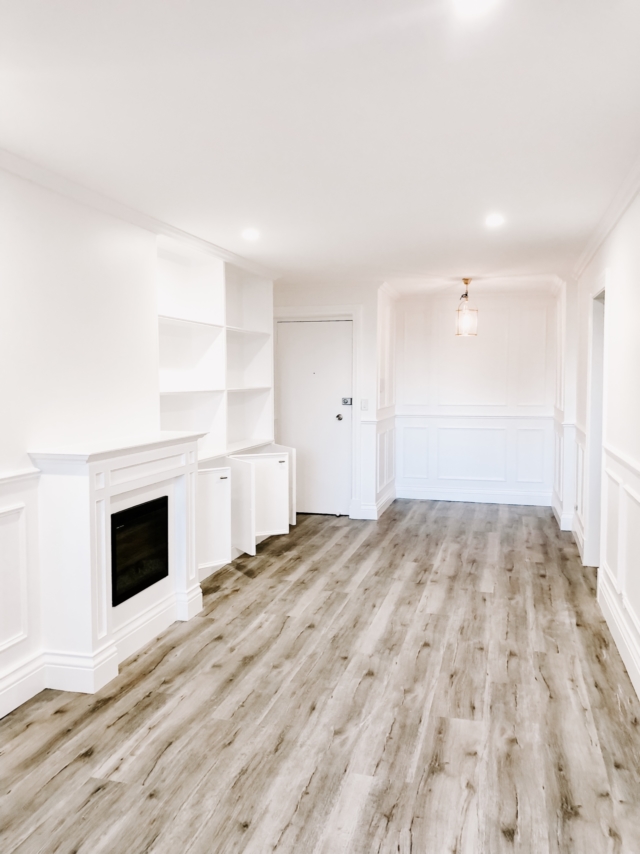
Saving money by using VJ panels instead of tiles in our new en suite reno
Welcome to the third and final Monday in a row (for a while, anyway!) of sharing a project from my very own home! I hope you enjoyed the flatpack built-in…
Lucky for us, we get to look at interior trends on the daily and while many stick around for the requisite five minutes, the wall panel trend is one that has enduring appeal. An ideal way to imbue a home with character and depth, wall panels are surprisingly versatile too. From simple VJ boards to wainscoting and a brand-new scalloped design, there are wall panel iterations to suit every type of home from beach house to farmhouse and everything in between.
Wainscoting A super popular look, wainscoting is being used in Hamptons and more traditional style homes across the globe. The variety of inlay mould choices and different styles of wainscoting allow for amazing creativity and this look really adds richness to a space.
Intrim wainscoting
Hands on renovators will be excited to hear that Intrim sells a DIY wainscoting kit that can be ordered online and used in conjunction with a variety of instructional videos making it perfect for a weekend project.
DIY wainscoting kit
Intrim Cavetto Wall The latest offering at Intrim, the Cavetto Wall panelling design is inspired by our current obsession with curves and arches. A lining board, this design features a tongue and groove that clip together for a continuous scalloped effect. While a quick and effective option for covering an entire feature wall, you can also use them on the bottom half of a wall topped with a chair rail.
Available in lengths of up to 5.4 metres, entire walls can be covered without joins, making for a seamless finish and once installed you can paint them to match your room or make a statement with a feature colour. Made in Sydney, the scalloped design is unique to Intrim.
The Cavetto Wall design
VJ Board Pro Very popular right now, VJ (vertical join) is a versatile look that feels perfectly at home across a variety of architectural styles from Hamptons to coastal and country farmhouse. Like the Cavetto Wall design, the Intrim VJ Board Pro is available in a range of different lengths up to 5.4 metres meaning there are no joins or wastage. Made from MDF, this design is best suited to dry rooms and is perfect for more contemporary homes or if you want to simply dip your toes in the trend.
VJ Board Pro. Photography by Carole Margand.
Lining Boards Lining Boards give the look of the VJ Board Pro, but with narrower boards. The boards have a tongue and groove and clip together and they’re great for smaller spaces where the larger VJ Board Pro panels aren’t practical. Made from timber, they’re perfect for wet areas because mdf and water don’t mix. Like the VJ Board Pro, Lining Boards can be run vertically or horizontally on a wall, and as a ceiling lining too.
Jen used Lining Boards as a cost-effective alternative to tiles in her en suite renovation
Wall battens and timber mouldings This look has really taken off of late, with different types and shapes of wall battens and mouldings being used to create artwork treatments on walls and furniture facings. A growing trend (we’ve seen it in a lot of kitchens), we can’t wait to see more of it.
Intrim’s Concave design is a great wall battening option
Sponsored by Intrim The rise in popularity of features like wainscoting, now accounts for almost half of joiner Jason Alexander’s work at Living Walls Joinery & Decor. And while he…
I’ve recently used VJ boards in my home in two different rooms, and two different ways, so I thought it would be fun to share some more inspiration about using this very popular type of wall panelling and what to bear in mind!
But hang on, what is it?!
First off, what is VJ? A lot of people give me a blank look when I casually throw this term into conversation! VJ stands for vertical joints (also commonly known as tongue and groove), and it’s a kind of timber or MDF wall panelling with vertical panels, equally spaced. That said, some people use it horizontally too.
It has become very popular as a way to add character to bare walls (and ceilings!) and is also being used to pull together things such as a TV wall, bedhead or office nook. It can be used full height or half height (or anywhere in between!) as wainscoting, usually with some type of chair rail at the top and skirting at the bottom. Large boards of MDF VJ, such as Intrim’s VJ Boards Pro are quick, easy and affordable to install and suitable for most interior applications. In rooms where there is moisture however, like a bathroom, a timber lining board is more appropriate and practical.
One of my favourite things about VJ panels is you can paint them whatever colour you like and you can use a little or a lot, depending on the look you’re going for. Plus, when you’re after a new look, you can simply paint them a fresh colour! They also look great in traditional homes (of course you’ll find them everywhere in old Queenslanders!) and modern ones, with their clean lines.
Let’s look at some ways to use VJ that are a little less obvious…
TV wall
TV walls are notoriously hard to get right due to the mess of cables. And unless you have a Samsung Frame TV that looks like art when it’s not in use, those big black rectangles aren’t often our favourite feature in a room! Adding VJ behind your wall mounted TV and entertainment unit is a great way to pull the whole look together. You can even make your TV ‘disappear’ by painting a dark coloured VJ wall behind it. I recently used Intrim’s VJ Boards Pro behind our new built-in TV unit and it was the thing that brought the whole look together. I don’t think it would have been half as aesthetically pleasing had it been a bare painted wall instead.
Images: Jacqui Turk
The VJ Board Pro is an MDF sheet with the grooves cut into it, which comes pre-primed and ready to paint. So easy! My carpenter simply glued this onto the wall with a few nails for extra strength.
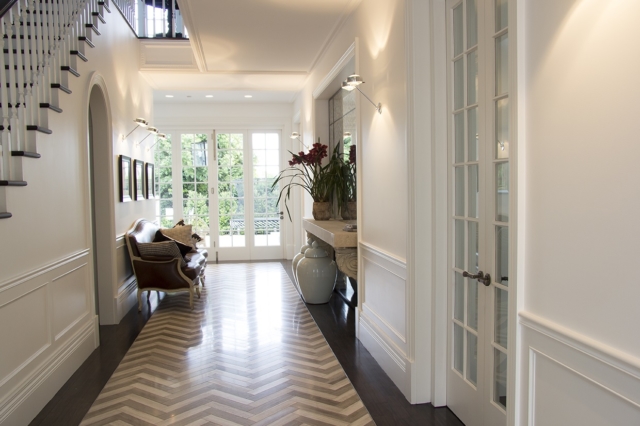
In a hallway/entry
Hallways and entries by their very nature get a lot of action and lining their walls with VJ can be a great way to make them a bit tougher against all the knocks and scuffs! Mounting wall hooks on top of VJ, like in this image below, is a great way to create a mudroom look without having an entire room dedicated to your coats and hats!
Image via https://www.instagram.com/this_old_house52
Lining your entry with VJ is a low cost way to really improve the first impression of your home and to get an idea if you like it before using it in larger areas.
In a bathroom
I love the look of VJ in bathrooms, a room where we often don’t think beyond tiles (which are gorgeous and waterproof but expensive, especially when you factor in the tiler). In my recent en suite reno I had the brainwave to cover over existing old (but solid) wall tiles with VJ panelling but the VJ Board Pro wouldn’t be the best choice here because MDF and moisture aren’t a good match. My dream wasn’t over however, as Intrim advised I could get the same look using their timber lining boards.
Images: Jacqui Turk
These are individual boards which simply click together and they’re available in a choice of MDF or FJ Pine, the latter being the best choice for a bathroom or laundry. Althought they take a bit longer to install because they don’t come in a sheet, the other benefit is that they’re flexible and can fit easier around tricky spots such as roof rafters.
Don’t be afraid to think beyond walls! You can just as easily use VJ on your ceilings alone, or carry it on from your walls across your ceiling.
Image via https://www.instagram.com/this_old_house52
Around built-in joinery like a bench seat or cabinetry
Below, the VJ has been used on the whole of the wall in this gorgeous room, but it could just as easily be used to highlight the window seat only. If you’ve thought about creating banquette-type seating in a dining nook for example, VJ could be the perfect finishing touch.
Pic via https://www.instagram.com/this_old_house52
Inspired?
I hope this post has shown you there are so many ways you can use VJ, large or small, in your home. I warn you though: once you start, it’s hard to stop!
Timber mouldings totally transform small 70s apartment
Sponsored by: Intrim Mouldings Located inside a 1970’s apartment building in Sydney’s inner-west, this petite abode underwent an incredible makeover recently and its success can be largely attributed to the…
Roxy Jacenko’s new house: a kitchen to die for!
When your life’s as crazy as Roxy Jacenko’s, it’s perhaps no surprise the PR queen likes things to be calm and minimal at home, and the renovation of her new…
You may have heard a lot of buzz about wall panels and wainscoting lately, seen it used by some of your favourite renovators in the media or on The Block. Like me, you may love the look but didn’t actually know that architectural mouldings is the term for all these fancy add-ons for your walls, skirting, door and window frames! Well, now you do!
“Mouldings, including skirting boards, architraves and wall panelling are those details that seem so small, but make one of the biggest impacts in a room,” says Candace Brigden from Intrim, the leaders in timber architectural mouldings. “They frame all of your hard work, they create depth and character, and most of all elevate the luxe in an interior.”
Roxy Jacenko used Intrim mouldings in her kitchen
But the options are many and varied which could leave you feeling a little confused as to which and how much you should use in your home, and whether they’ll suit it.
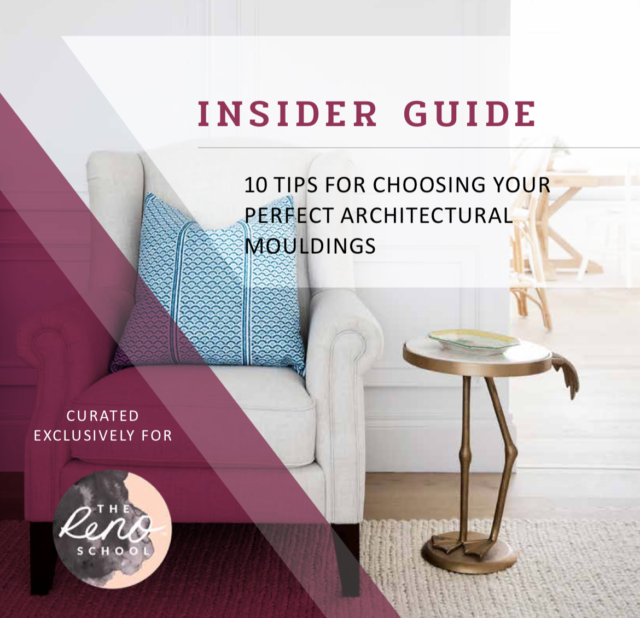
Luckily for you, Intrim have put together a free handy guide to help! So if you don’t know where to start, it’s time to download it.
“With so many decisions to make, it can be overwhelming knowing where to start. This is why we recommend to start with your finishings!” says Candace.
“This guide is as beautiful as it is informative, and as it has been curated exclusively for Three Birds Renovations’ Reno School, it is filled with beautiful images from their previous projects.”
Intrim’s guide gives you information, tips and tricks on:
Understanding mouldings types and how to use them in your home.
How to choose the right style of mouldings for your home, explaining the key features of each interior style.
Guiding you through choosing the right size of mouldings for your room, as well as what sizes of different mouldings compliment the other. This section answers their most common questions around “what height skirting boards to choose?” and “what size architrave to match my skirting with?”
How to measure your room for skirting boards, door architraves and window architraves so you can plan the quantity you need for your order.
Explaining the different types of wainscoting accompanied by stunning project images to show the look and impact each can give your interior. They also provide easy to follow wall-measuring instructions to create the layout for basic wainscoting.
What type of timber to use for your mouldings. Discussing the benefits and disadvantages of MDF and pine timbers, their two most popular timber choices.
Whether you should purchase primed or raw mouldings, the benefits of priming and the long term time and cost savings it can provide to you.
This small 70s apartment was transformed with Intrim mouldings
Intrim, an Australian owned and run business, are conscious of and actively pursue reducing their environmental footprint, supporting farming communities through their FSC certification.
Even if you haven’t got a lot to start from, the Intrim team can lead you to previous projects and social pages where you are sure to find a look you love to emulate in your own home. Contact them via their website any time.
Intrim start selling DIY wainscoting kits and VJ board online
Sponsored by Intrim With the explosion of home DIY projects since the pandemic started, Intrim are making customers’ lives easier by selling some of their most popular products online for…
Why wall panelling is so popular and worth it
Sponsored by Intrim The rise in popularity of features like wainscoting, now accounts for almost half of joiner Jason Alexander’s work at Living Walls Joinery & Decor. And while he…
Transform your home with architectural mouldings
Sponsored by Intrim Mouldings When it comes to redecorating your home, skirting boards, architraves, handrails and the likes don’t get much attention. Let’s be honest, choosing soft furnishings seems a…
The rise in popularity of features like wainscoting, now accounts for almost half of joiner Jason Alexander’s work at Living Walls Joinery & Decor.
And while he admits he doesn’t keep up with what’s on trend or watch shows like The Block, he says wall panelling will always add a classic and expensive look to any home. Having done his apprenticeship in the UK, working on countless heritage homes, Jason knows what a difference the sum of all the little details make. And with features like wainscoting, this can now apply to newer homes too.
“People are looking for something that isn’t going to date. The sort of looks houses had pre-war were very timeless. A lot of the stuff since then, like the seventies, has been very faddy, even though some people like that too. So that classic look tends to work in most homes today.”
The half-height wainscoting with a chair rail is probably what Jason and his team are asked for the most. “It gives you a flavour of it without it being too in your face,” he says. And in terms of bang for buck, there’s nothing like it for impacting the look and feel, or value of your house, for a relatively low price. “To get the same impact you’d need to do something like re-do the kitchen or bathroom and we all know how expensive that can be.”
Jason says many choose to install wall panelling in the common areas only, and this is enough to really improve the look and character of their home: “It completely changes.”
And while there are MDF and timber options, you basically get what you pay for, and you’ll use the material suited to the application. “You wouldn’t go into a multi-million dollar house in Mosman, for example, and use MDF,” he says.
In terms of having a go at DIY wainscoting yourself, Jason says the most important thing is to have quality tools. He and his team are very precise, using laser levels for every job. “We’ve been doing this so long that we know lots of little tricks to get the best outcome. Like most things, if you do it well, it will add value, and if you don’t, it can look terrible.”
While panelling accounts for around half of Living Walls’ jobs, they’re also seeing a rise in popularity of things like fire surrounds for modern gas fireplaces, coffered ceilings and custom wine racks. In general, he thinks the value of getting things made custom, is now appreciated more.
“People are realising that you can’t just buy off the shelf, put it in your house and it fits and works perfectly for the space,” he says. “If you walk into a home and see character and nice features, you feel like it’s a home that someone has put real love into. If your home has these kind of touches, then even without a stitch of furniture or styling, it will still have character.”
In terms of adding value for resale, Jason says there’s no question that having things like beautiful panelling, skirting blocks and cornices will achieve that. Sadly, people are often already stretched when they first buy their home, so can’t afford to add them until later.
“Spending say $25,000 on doing all of those things beautifully could easily take a house that’s not quite worth a million to $1.1million because people will walk in and feel it has that X-factor.”
When your life’s as crazy as Roxy Jacenko’s, it’s perhaps no surprise the PR queen likes things to be calm and minimal at home, and the renovation of her new…
Timber mouldings totally transform small 70s apartment
Sponsored by: Intrim Mouldings Located inside a 1970’s apartment building in Sydney’s inner-west, this petite abode underwent an incredible makeover recently and its success can be largely attributed to the…
DIY wainscoting just got really easy!
If there’s something that’s stayed consistently popular in interiors in the last few years, it’s wall paneling. Whether it’s whole walls of VJ or half walls of a more traditional…
If there’s something that’s stayed consistently popular in interiors in the last few years, it’s wall paneling. Whether it’s whole walls of VJ or half walls of a more traditional wainscoting, there’s a solution for everyone and there’s nothing quite like it for adding instant depth and character to your walls, literally!
And as we all seem to have been gripped by home improvement fever in lockdown, Intrim, the leaders in timber mouldings, got their thinking caps on and came up with a really simple DIY solution, sent in the post in a tube! Along with a step-by-step video tutorial, it has everything you need to get cracking by yourself.
“This is a product we have considered for some time as we often hear from customers that they cannot find a carpenter to install small amounts of wainscoting in their home or they don’t have the budget for a big reno and would like to install it themselves,” says marketing and brand manager Candace Brigden.
“Many people are DIY inclined but don’t have access to expensive power tools, so we developed these kits that have most of the mouldings pre-cut, ready-to-go and an adhesive that just sticks the trim right onto the walls.”
Candace notes we’re spending much more time in our homes, looking around to see what we can fix, change or beautify. “It also gives people a great sense of pride and satisfaction to see what they have been able to achieve and create themselves.”
Wainscoting is the perfect solution for all areas of the home from a feature wall in your baby’s nursery to the length of your hallway!
Does it really look quality though? Candace says yes, because what you receive in these packs is exactly the same premium quality inlay mould and chair rail you would receive in a regular order from Intrim. “They look just as beautiful once installed, the only difference is this way you can DIY. The Intrim team have spent numerous hours brainstorming how to simplify the installation process so that this is within the reach of even a beginner DIY-er.”
You can choose whether to do just the bottom half, or the whole wall, depending on which kit you buy.
With their expert knowledge, they’ve streamlined the steps and taken out some of the guess work around cutting, by offering pre-cut lengths, and easy to follow formulas.
The easy-to-follow installation video (above) will really help guide you through the process.
“This is something very different to what we have done in the past so we probably needed this climate as the push to get it out there,” Candace adds. “We’re hoping people love it as much as we do and it puts beautiful mouldings in the hands of many more people who previously wouldn’t have had it within their reach, or possibly even considered it.”
The inlay mould and chair rail they’ve chosen will suit a wide variety of styles from Hamptons and Scandi, to Colonial and Edwardian, and everything in between.
“It will elevate the look of the home and make it much more classic. Wainscoting adds depth, character and a luxurious design feel you cannot achieve through other means. We’re hoping people really take hold of it and get creative too, customising it for their own homes. The only limit is their imagination and creativity!”
Anyone really can give this a go! “We have made it as simple as possible through the products in the kit to the installation instructions and video we prepared. Best of all, you don’t need any serious tools and there is no nailing required!”
Their top tip for a nervous beginner is to spend your time planning. Make sure your measurements are correct, and double (even triple!) check before installing on the wall. You may even like to sketch up a little plan of the wall with your measurements to follow to help visualise and keep you on track.
The colour paint you finish the wall and mouldings with will have a major impact on enhancing the end result, so carefully consider your finishes too.
If you are looking for a more traditional look, stick with just using the Kit A, which gives you the chair rail and inlay mould on the bottom section of the wall. For a more classic or modern look, install Kit B too, which adds further inlay mould, or ‘frames’ as some people call them, on the top section of the wall.
You can do as much or as little as you like. “If you have a smaller space, we would recommend installing on a feature wall/s, such as two or more blank walls in a living room or the wall where the head of your bed sits in a bedroom.
“If you want to tackle a larger area, make sure the wainscoting is installed to flow through the spaces. For example, you may want to make an impact to your entry and install a full wall of top to bottom wainscoting, but make sure you continue that down the hallway too, even if it is just on the lower section of the walls. Our product team are always here to bounce your design ideas off too and help you plan your design.”
The latest offering from Carpet Court is, rather interestingly, all about walls! ‘Elevate’ is a new collection of purpose-built timber wall panels that has been developed with the DIY market in mind. Perfect for adding warmth and texture to a space, each lightweight plank is created from sustainably-sourced plantation timber and features an adhesive backing allowing you to simply peel and stick them onto most wall and ceiling surfaces. It’s the perfect Easter long weekend project, don’t you think?
Carpet Court’s new Elevate timber wall panels in ‘Storm’
“Wooden wall panels can help elevate a room lacking atmosphere, as well as add a little formality to new and modern homes. The panels are perfect for ‘zoning’ open plan homes, such as reception areas like hallways and stairways, as well as living spaces like dining areas,” says Carpet Court style ambassador and interior designer Darren Palmer. The panels each measure 1210mm x 128mm x 5mm thick and retail for $69 per square metre.
BEFORE
AFTER
“For an understated approach, the panelling can add visual interest on the risers of a kitchen island bench, or act as a natural bedhead feature in a bedroom. Best of all, they can hide a multitude of imperfections, such as uneven surfaces and are strong enough to hold your valued pictures and artwork,” says Darren. The range offers 10 wood stains with both warm and cool tones and an array of wood grains in the mix.
The planks come with easy to use adhesive backings
“Proportion is key. Vertical panelling, or even wrapping one-wall panelling on to the ceiling, is an effective way to make ceilings appear taller. Conversely, horizontal panelling can widen the appearance of a narrow room,” says Darren who warns that if you’re going to use panelling in more than one room in your home you should stick to one style and colour for the sake of continuity.