Categories
Recipes

Foodie Friday: Chocolate cake with stewed blood plums

This week’s recipe comes from Maxwell & Williams and Melbourne blogger @Georgeats. Styled on Maxwell & Williams’ gold mezze serving tray.

Serves: 12  | Prep: 20mins | Cook: 40mins

Ingredients

For the cake:

  • 200g dark cooking chocolate
  • 150g butter
  • 4 large eggs
  • 1 ½ cups almond meal
  • 1 tablespoon espresso
  • 50g caster sugar
  • 50g brown sugar
  • ½ teaspoon salt
  • ½ teaspoon baking powder

For the plums:

  • 5 ripe blood plums
  • 1 teaspoon maple syrup
  • ½ teaspoon vanilla bean paste
  • 20g butter

Method

Preheat the oven to 180 degrees Celsius.

Using the double boiler method, melt the chocolate and butter in a stainless steel bowl over a pot of boiling water, ensuring the water doesn’t touch the base of the bowl. Once it is completely melted and combined, add the sugar, salt and espresso, and continue to stir until the sugar granules disappear.

Remove from the heat. Separate your egg yolks from your whites, ensuring your utensils are squeaky clean, and beat the egg whites until stiff peaks form.

In a large bowl, combine the almond meal with the chocolate mixture, followed by the egg yolks, and mix well.

Gradually, spoon by spoon, mix in the beaten egg whites, until they are completely combined, and you are left with a fluffy chocolate cake batter.

Take a lined and greased 21cm spring form cake tin and pour in the batter. Put it in the oven for 35-40 minutes.

While the cake is cooking, slice your plums and put them in a medium saucepan along with the other ingredients. Cover them and cook on a gentle low-medium heat until they soften and become juicy. Remove from the heat.

Once the cake has cooled, remove it from the tin, spoon over the stewed plums and serve.

Serve up a slice of this cake with clotted cream and enjoy with a glass of sparkling.

More recipes.

Categories
Designers Interviews

Signature dish inspires new Sydney dessert bar interior

The southern Sydney suburb of Kareela has been graced with a stunning new hospitality outlet in the form of Moss Bros, a luxe dessert bar that combines the aesthetic of an Art Deco European patisserie with Asian and Australian influences to fabulous effect.

The patterned tiled floor combined with gold, marble and emerald is utter perfection.

Bathed in the colour of the moment, Pantone Greenery, the emerald and sage interior was inspired by the highly verdant Moss Bross signature dessert which is available at the chef’s fellow business, KOI Dessert Bar.

I love the tufted green velvet banquette seating!

“The signature dessert features pistachio mousse, caramel gel, white chocolate matcha dulce cremeaux, pistachio sponge, matcha moss, apple blossom jelly, nitro lime and yoghurt and green apple,” says Rachel Herzberg, executive business director of Collectivus, the design firm responsible for the project.

The desserts look too pretty to eat.

“I love that the interiors and in-store experience were influenced by the colourful, creative product on offer.  If you have seen the amazing deserts on offer at Moss, you will understand the inspiration behind the venue,” says Rachel of the outlet that is the second for Moss Bros – the first is in the Sydney CBD.

There is something so luxe about emerald green

Combining green with brass, velvet and timber, the new Moss Bross has certainly raised the hospitality bar for the suburbs and it’s a direct response to the ubiquitous monochrome interiors. “The colour palette was designed to stand apart from the current industry trends of monochrome and concrete venues. The luxury elements such as brass and marble details, feature tiles, velvet banquette seating, detailed lighting and warm timber furniture set the expectations for visitors for the experience they will have in the space,” says Rachel.

Moss Bros
Shop T5/6
1-13 Freya Street
Kareela NSW

For more on Collectivus

Categories
Recipes

Foodie Friday: No-bake banoffee pie

foodie friday logo

Banoffee pie is a household favourite and this no-bake recipe from Australian Bananas, makes it a quick and easy treat. Serves 8. 

img_1483-x1

Ingredients

  • 23 cm diameter spring form cake tin
  • 1 x 250 gm packet of Granita or Marie Biscuits
  • 125 gm butter, melted
  • 1 x 495 gm tin sweetened condensed milk
  • 50 gm or 2 ½ tablespoons of butter, cubed
  • 3 tablespoons or 60 gm golden syrup
  • 4-5 firm bananas
  • 400 ml cream, whipped
  • 50 gm dark chocolate, grated

Method

  1. Crush the biscuits in a food processor until you have fine crumbs then and add the melted butter. Process again to combine. The crumbs should stick together when squeezed.
  2. Press into the spring form cake tin halfway up the sides. Refrigerate while you make the filling.
  3. Place the cubed butter and the golden syrup into a saucepan and heat, stirring until melted.
  4. Add the tin of condensed milk and stir on medium heat for approximately 5-8 minutes until the mixture bubbles, thickens and starts to change colour.
  5. Remove from the heat and cool for a couple of minutes before pouring into the chilled crumb crust.
  6. Refrigerate until cold and firm. The pie can be made up to this point and finished when you are ready.
  7. Slice three bananas and mix them with the whipped cream.
  8. Pour into the tart shell on top of the chilled caramel and smooth down to a nice flat surface.
  9. Sprinkle chocolate shavings onto the top of the tart and then decorate with the final sliced banana.

Tips

  • If making ahead of time, toss the bananas in a small amount of lemon juice.
  • This pie is very rich and you only need a small slice!

More recipes

Categories
Recipes

Foodie Friday: Buttermilk doughnuts

foodie friday logo

Perfect for a weekend treat, these old-fashioned cake doughnuts and doughnut holes from Williams-Sonoma are beautifully aromatic with cinnamon and freshly grated nutmeg. They’re easy to prepare and so delicious you might want to make a few batches! The doughnuts will almost triple in thickness while they’re cooking, so be sure to fry them in batches to avoid crowding.

Buttermilk Doughnuts

Ingredients

  • 2 1/4 cups all-purpose flour, plus more for dusting
  • 3/4 tsp freshly grated nutmeg
  • 1/2 tsp ground cinnamon
  • 1/2 tsp baking powder
  • 1/2 tsp baking soda
  • 1/2 tsp salt
  • 1 egg
  • 1/2 cup caster sugar
  • 1 tbs unsalted butter, melted
  • 1/2 cup buttermilk
  • Peanut or canola oil for deep-frying
  • Icing sugar for dusting

Method 

In a bowl, sift together the flour, nutmeg, cinnamon, baking powder, baking soda and salt. Set aside.

To make the dough by hand, in a large bowl, whisk together the egg and caster sugar until creamy and pale. Add the melted butter and buttermilk and whisk until blended. Add the flour mixture and stir with a wooden spoon until the dough holds together.

To make the dough with an electric mixer, in a large bowl, beat together the egg and caster sugar on low speed until creamy and pale. Add the melted butter and buttermilk and beat until blended. Reduce the speed to low, add the flour mixture and beat until the dough holds together.

Line a large baking tray with paper towels. In a deep, heavy saucepan, pour in oil to a depth of 5 cm and heat to 185°C (check with a deep-frying thermometer like this Digital Candy & Deep Fry Thermometer from Williams-Sonoma, or test with a cube of bread; it should turn golden in 60 seconds). 

Turn the dough out onto a lightly floured work surface. Roll out to a 25 cm round about 1 cm thick. Use a 7 cm cookie cutter to cut out 8 rounds, then use a 2 cm cutter to cut a round from the centre of each.

When the oil is up to temperature, place 2 doughnuts and 2 doughnut holes into the oil and fry for about 2 minutes until deep golden brown. Using a slotted spoon, turn them and fry on the other side, about 1 1/2 minutes. Using the slotted spoon, transfer to the paper towels to drain. Repeat with the remaining doughnuts and doughnut holes.

Arrange the doughnuts and holes on a serving plate. Using a fine-mesh sieve, dust with icing sugar and serve immediately. Makes 8 doughnuts and 8 doughnut holes.

– Recipe adapted from Williams-Sonoma Essentials of Breakfast and Brunch, by Georgeanne Brennan, Elinor Klivans, Jordan Mackay and Charles Pierce.

Categories
Recipes

Foodie Friday: Spiced pumpkin pie

foodie friday logo

Winter is all about indulging in rich and warming creations, using seasonal produce and spices to create decadent desserts.  Warm up with this creamy spiced pumpkin pie on a buttery crust. Thanks to Maxwell & Williams for this week’s recipe.

_D4A4887

Serves: 12

Ingredients

  • 2 cups freshly mashed cooked pumpkin
  • 1 sheet of store bought shirtcrust pastry
  • 395g sweetened condensed milk
  • 2 eggs
  • 1 pinch of salt
  • 2 ground cinnamon sticks
  • Half of a fresh nutmeg
  • 1 tsp grated fresh ginger

Method

  1. Roll out one sheet of short crust pastry to fit in the 27cm Maxwell & Williams Pyromax Pie Dish.  Line the top of the pastry with non-stick baking paper and fill with oven weights or dry beans.  Place shell into a preheated oven of 180 degrees Celsius and blind bake for 10 minutes until it begins to golden.
  2. In a food processor, combine the freshly mashed cooked pumpkin, sweetened condensed milk, eggs and a pinch of salt.
  3. In a mortar & pestle, grind two cinnamon sticks and half a nutmeg with 1 tsp of grated fresh ginger. Add spice mixture to pumpkin mixture and pulse to combine evenly.
  4. Pour pumpkin spiced mixture into half-baked shell and place in oven for 40 minutes.  When the pie is ready, it will brown slightly around the edges and the centre will appear slightly wobbly, yet firm to the touch.
  5. Serve from the oven with a generous spoon of whipped cream.

Best served out of the oven with a dollop of freshly whipped cream, you’ll swear you were in a log cabin in front of a roaring fireplace.

All our recipes

Categories
Recipes

Foodie Friday: Roasted pears with honey and yoghurt

foodie friday logo

This dessert recipe from Williams-Sonoma celebrates winter in a way that’s not too decadent. It’s just right. In season now, pears roasted and served with toasted almonds and a dollop of tart Greek-style yoghurt make a great finish for this weekend’s dinner party. Fresh bay leaves lend aromas of pine and white pepper, adding an exciting twist to this simple dessert. If you’re stuck, dried bay leaves will work too.

Roasted Pears with Honey and Yoghurt

Ingredients

  • 3 ripe-but-firm pears
  • 1/3 cup honey
  • 4 bay leaves
  • 3 tbsp unsalted butter, cut into 6 pieces
  • 2 tbsp amaretto
  • 1½ cups Greek-style plain yoghurt
  • 1/3 cup sliced almonds, toasted

Method

Preheat an oven to 190°C. Halve the pears lengthwise. Cut out the stems and scoop out the cores.

In a deep, wide saute pan over medium-high heat, combine the honey and bay leaves and bring to a simmer. Reduce the heat to medium and continue to simmer, stirring occasionally, until the honey is fragrant and turns a rich amber colour, about 3 minutes. Remove from the heat.

Place the butter pieces in the pan, spacing them evenly. Using tongs, place a pear half, cut side down, on top of each piece of butter. Cover the pan, transfer to the oven and cook for 10 minutes, then gently turn the pears over and baste with the honey mixture. Drizzle the pears with the amaretto. Return the pan, uncovered, to the oven and continue to cook until the pears are golden brown and tender, 6 to 8 minutes. Remove from the oven and let the pears cool slightly in the honey mixture, about 30 minutes.

In a bowl, whisk the yoghurt until smooth. Place the pear halves in bowls, top with the yoghurt and sprinkle with the almonds. Drizzle some of the honey syrup over the pears and serve. Serves 6.

–Adapted from Williams-Sonoma’s Dessert of the Day, by Kim Laidlaw (Weldon Owen, 2013).

Read all our recipes.

Categories
Dining Recipes

Foodie Friday: Chocolate Caramel Tart

foodie friday logo

With Valentine’s Day coming up this weekend, this tart takes a bit of work to make, but the result is well worth the effort and will definitely please your Valentine! It’s essential to use a good-quality chocolate with a high cocoa content.

12 Feb 2016 - Chocolate Caramel Tart

Williams-Sonoma has a fabulous range of bakeware, including Gobel Tart Pans that are perfect for this recipe. With a removable bottom to support the baked crust as you slip off the pan’s outer ring, this tart recipe will be a cinch to prepare at home.

Ingredients

  • 1 ¼ cups of plain flour
  • ¼ cup unsweeted cocoa powder
  • 230g unsalted butter, chopped and divided evenly into two portions
  • ½ cup plus 1 tbsp icing sugar
  • 1 egg yolk
  • 1 tsp vanilla extract
  • ½ cup water
  • 2 cups caster sugar
  • ¼ cup glucose syrup
  • 2 cups plus 2 tbsp double cream
  • 285g 70% dark chocolate
  • Fleur de sel, to garnish (can’t find it? Williams-Sonoma has you sorted)

Method

Sift together the flour and cocoa powder into a bowl. Set aside.

In the bowl of an electric mixer fitted with a flat beater, beat together 115 grams of the butter, the icing sugar, egg yolk and vanilla until just smooth and creamy. Add the flour mixture and beat until a dough forms. Do not overwork. Transfer the dough to a work surface, shape into a ball and wrap with cling wrap. Refrigerate for at least 1 hour or up to overnight.

Remove the dough from the refrigerator. On a lightly floured work surface, roll out the dough into a 24cm tart pan. Press the dough into the bottom and up the side of the pans. Cut off any overhanging dough and prick the dough in several places with a fork. Refrigerate for at least 30 minutes or up to 1 hour.

Preheat oven to 175°C.

Line the dough with baking paper and fill with pie weights. Bake until the sides are cooked through and base is almost cooked through and slightly flaky, 25 to 30 minutes. Remove the pie weights and baking paper and continue to cook until the base is dry and set, about 8 minutes. Transfer the pan to a wire rack and let cool.

In a saucepan over medium-high heat, combine the water, caster sugar and glucose syrup. Cook, stirring occasionally, until the sugar turns into a deep amber-coloured caramel, about 10 minutes. Remove from the heat and, very carefully and slowly, pour in 1/2 cup plus 2 tbsp of the cream (the mixture will spatter). Add the remaining 115g butter, 1 piece at a time, stirring until smooth. Pour the caramel filling into the cooled tart shell and let cool, then refrigerate until firmly set, at least 30 minutes.

Put the chocolate in a heatproof bowl. In a small saucepan over medium-high heat, bring the remaining 1 1/2 cups cream to a boil and pour it over the chocolate. Let stand for 2 minutes, then whisk until smooth. Pour the chocolate ganache over the caramel and refrigerate until set, at least 30 minutes. Remove the tart from the refrigerator 10 minutes before serving. Garnish with fleur de sel.

Serves 8, or 2 this Valentine’s Day.

–Enjoyed this recipe? You can try many more at the Williams-Sonoma Sydney Cooking School. Whether you’re a beginner or an experienced cook, book yourself in to learn a range of different techniques and cuisines.

Categories
Art Expert Tips Styling

Confetti Fair presents DIY Workshop Extravaganza

Whether you’re entertaining a bunch of raucous five year olds or a group of high tea-loving ladies, DIY Workshop Extravaganza will unlock the trade secrets to partying like a professional.

image

With 102 workshops in 19 hours being held at Legs on the Wall Studios, Lilyfield, Sydney (6 & 7 February) and Melbourne Showgrounds (5 & 6 March), take your pick from:

Styling With The Block 2015 winner Shay

Chalk Art Signage With graffiti artist Simon (Ashdown & Bee)

Creative Cupcakes Whip up a batch of breakfast cupcakes that look like bacon and eggs on toast with Katherine Sabbath

Piñatas Unleash your piñata-making skills with Fiona from Craft Hunter

Floral Backdrops With Cheryl from Rosehip Flowers

Professional Event Planning With industry guru Nicole from Penny Lane Studio

Raw Sweets Make your own mouth-watering (and healthy!) sweets with Aurora from Love

image

Drawing Fondant With Alisha from Sweet Bakes

Instagram Brand Take your Instagram feed to another level with Instagram star Wendy from Wedded Wonderland

Dessert Tables Style the ultimate kids party dessert table with Lina from Sweet Bambini

Magazine-Worthy Photography With Leanne from Sweet Style

Upcoming Styling Trends THE masterclass for 2016 trends with Oak & Linden

image

This workshop fiesta is presented by Confetti Fair founder Claire Cassey, a graphic designer, event manager and publisher all rolled into one.

image

Get your dose of DIY madness by booking online. Well worth the $50 if you ask me.

Categories
Interiors Addict

Foodie Friday: Gingerbread Cookies 

foodie friday logo

You know Christmas can’t be far away when you suddenly find yourself drawn to baking buttery biscuits laden with spice and covered in beautiful decorations. Especially if you’re not a super-keen baker throughout the rest of the year! Christmas is the perfect time to exercise those unused baking muscles and whip up something homemade that you can give your loved ones. Or just have in the pantry for those extra holiday visitors.

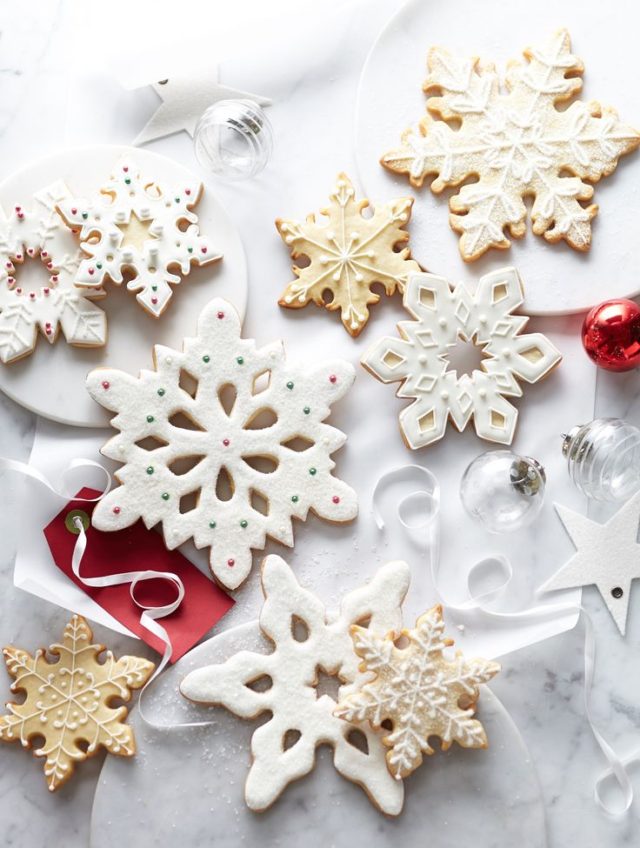
These classic gingerbread cookies make the perfect end-of-year gifts for school friends and teachers, or Christmas gifts for neighbours and workmates, and are a great way to get the kids involved in Christmas preparations.

williams-sonoma-ornament-cookie-cutter-with-cutouts-and-im-c

Plan ahead, though – this recipe (like most good gingerbread biscuits) require you to rest the dough for at least a couple of hours or overnight. Longer resting means the flavours and colour will have more time to develop – in the case of gingerbread, this can only be a good thing!

STYLING TIP This recipe will work wonderfully with any of Williams-Sonoma’s festive cookie cutters. Of course, decorating is only limited by your imagination – store-bought icing pens and icing keep things simple, but feel free to break out your favourite royal icing recipe if you prefer! For gifting presentation, why not enclose each cookie in a small cellophane bag sealed with a decorative sticker, or layer them on a pretty Christmas plate or a shiny new baking tray that also doubles as part of the gift?

Still not too sure about baking your gifts? Why not leave it to the experts? Check out the in-store pop-ups happening in Williams-Sonoma this weekend featuring Nectar & Stone (in Chadstone), Grumpy Donuts (in Bondi Junction) and MakMak Macarons (in Chatswood).

Ingredients (Serves 12)

  • 225 g unsalted butter, at room temperature
  • 1/2 cup firmly packed brown sugar
  • 1/2 cup caster sugar
  • 1 cup molasses
  • 1 egg
  • 5 cups plain flour
  • 1 tsp bicarbonate of soda
  • 1 tbsp ground ginger
  • 1 tsp ground cinnamon
  • 1/2 tsp ground cloves
  • 1/2 tsp salt
  • Icing pens, coloured sugars and other decorations as desired

Method

In a large bowl, using an electric mixer, beat the butter on high speed until fluffy and pale yellow. Add the brown sugar and caster sugar and beat until the mixture is no longer gritty when rubbed between your finger and thumb. Reduce the speed to low and gradually beat in the molasses. Add the egg and beat until the mixture is blended.

Sift the flour, bicarbonate of soda, ginger, cinnamon, cloves and salt together onto a sheet of greaseproof paper. Gradually add the flour mixture to the butter mixture, beating on low speed or stirring with a wooden spoon until well blended.

Turn the dough out onto a floured work surface and, with floured hands, form into a large, smooth mound. Divide the dough into 4 equal portions, shape into discs and wrap each disk in plastic wrap. Refrigerate for at least 2 hours or up to 2 days.

Preheat an oven to 200°C (180°C fan-forced). Lightly grease 2 baking trays or line them with baking paper.

Working with 1 disc at a time, roll out the dough between 2 sheets of greaseproof paper to a thickness of about 5 mm. Using gingerbread cookie cutters about 7-10 cm tall, cut out figures. Using an offset spatula, transfer the cookies to a prepared baking tray. Repeat with the remaining dough portions, then gather up the scraps and reroll them. If the scraps of dough have become sticky, refrigerate them for 10 minutes before rerolling. For best results, do not roll the same piece of dough more than twice.

Bake the gingerbread figures until lightly browned on the bottom, about 6 minutes. Let cool on the sheets for 5 minutes, then transfer the cookies to wire racks and let cool completely. Dress up the cooled gingerbread figures with the icing, sugars and other decorations. Makes 2 to 5 dozen cookies, depending on size.

Head to Williams-Sonoma for lots more inspiration, or book a cooking class in their Sydney Cooking School – it makes the perfect Christmas gift for your favourite foodie.

Categories
Recipes

Foodie Friday: Mini Ricotta Doughnuts 

What are the weekends for if not for a little indulgence? These Italian-inspired doughnuts are filled with good, wholesome ingredients and they’re not overly sweet, making them the perfect treat for any time of day – even breakfast. Yep, we’re going to say it, they’re almost good for you.

foodie friday logo

Ricotta is a perfect ingredient for spring, being the most simple fresh cheese around. Traditionally, it’s made with the whey left over from the production of other cheeses and always is best when it’s freshly made. You can easily make your own, too, by heating cream and full-cream milk, adding vinegar and salt, and then draining the mixture over cheesecloth. There are countless recipes online to try.

OCT-14_Mini-Ricotta-Doughnuts-652x652

The addition of ricotta makes this dough light and tender, which is perfect for yielding deliciously fluffy fritters with a sophisticated tang. The flavour is further elevated by the lemon zest (you could substitute orange zest) and fresh thyme. Choose a neutral-tasting honey so it doesn’t overpower the delicate flavour of the fritters. Or you could ditch the honey drizzle altogether and simply finish with a dusting of icing sugar.

STYLING TIP These delicious little morsels should be served and enjoyed as quickly as possible after cooking. They are a rustic dessert, so keep presentation casual and simple. If you’re serving to guests at the table, consider presenting the honey drizzle in small shot glasses garnished with an extra sprig of thyme.

Ingredients

  • Canola oil for deep-frying
  • 3/4 cup (125 g) plain flour
  • 2 tsp baking powder
  • 2 tsp finely grated lemon zest
  • 1/4 tsp salt
  • 1 cup (250 g) full-cream ricotta
  • 2 eggs, lightly beaten
  • 2 tbsp sugar
  • 1 1/2 tsp vanilla extract

For the honey drizzle:

  • 1/4 cup (90 g) honey
  • 1 tsp coarsely chopped fresh thyme
  • 1 tsp finely grated lemon zest

Method

Pour oil to a depth of 4 cm into a deep, heavy saucepan and heat to 190°C on a deep-frying thermometer.

In a bowl, whisk together the flour, baking powder, lemon zest and salt. In a large bowl, whisk together the ricotta, eggs, sugar and vanilla. Add the dry ingredients and whisk until well blended.

Working in batches, gently drop level tablespoonfuls of the batter into the hot oil and fry, turning occasionally, until golden, about 3 minutes (be careful, hot oil will spit). Using a slotted spoon, transfer to paper towels to drain. Allow the oil to return to 190°C between batches.

Meanwhile, in a small saucepan, warm the honey, thyme, and lemon zest, stirring occasionally, until a thin, fragrant sauce forms. Serve alongside or drizzle over the finished doughnuts. Makes 24 doughnuts.

–This recipe is adapted from one in Dessert of the Day by Kim Laidlaw.  Head to Williams-Sonoma  for more foodie inspiration, or book a cooking class in their Sydney Cooking School.

Categories
Covet my coffee table House Tours

Covet my coffee table: with Caroline Khoo of nectar & stone

Caroline Khoo is the owner of boutique chocolate and dessert company nectar and stone, whose creations I’ve been admiring on Instagram for the past few weeks. The Melbourne brand’s sweet treats are works of art (and available to buy online, don’t worry!). So it’s perhaps no surprise Caz’s coffee table is a pretty one too. I think her former life in fashion also shines through.

IMG_5991

So, what’s on it?

The coffee table was handmade by her father, who is a carpenter. “I am a lover of handmade items as I feel it connects me with the person and my father always loves a challenge,” she said. “The coloured faceted bowls were handmade by misskellymadeintasmania (I totally need some of my own, don’t you?!). I asked her to make a collection for me in the nectar and stone colour hues. I have over 15 of these bowls in various shades.”

IMG_6016
Caz Khoo of nectar and stone

The geometric glass jar is from Anthropologie and was bought on a trip to LA in August. the books were gifts from her husband, who knows Caz’s love of interiors and colour. And the ombre pineapple chocolates with gold leaf detail are, of course, handmade by nectar and stone.

nectar and stone

Caz was kind enough to send me a box and I can vouch for them tasting as good as they look. But I did feel bad about eating something so gorgeous! But not that bad…

Shop nectar and stone online.

See our previous featured coffee tables.

Categories
Appliances Kitchens

The $55 appliance that helps you make guilt-free ‘ice cream’

It may be winter in Australia, but that doesn’t mean you suddenly stop wanting ice cream, am I right? At the same time, if you’re into the latest paleo/no sugar kind of diet, you may be avoiding processed nasties. So, what if I told you could make guilt-free ice cream at home, really easily? The only catch is you have to like bananas!

Cherry and banana Yonanas

The last gadget I tried out before setting off on my travels was Yonanas and I loved it so much, it is sure to become a regular feature on my kitchen bench when I get home. Its technology and high-torque blade emulsify frozen fruit into a healthy treat that looks, tastes, and feels like soft-serve ice cream—in just seconds. Unlike other dessert makers, you don’t have to add any other ingredients such as milk, cream, sugar, yogurt or soy—which makes it perfect for vegans, diabetics and those who are lactose intolerant (which seems to be a lot of people these days).

yonanas

While you can chuck any fruit through this machine, if you want a creamy, ice cream-like texture, you really do need to include bananas. What’s more, it works best with overripe bananas (the ones you end up chucking out when they get too brown and spotty) which will no longer be wasted. When you have those sad looking brown bananas in your fruit bowl, simply peel and freeze them to use in your Yonanas later. You basically chop them up and force them through the machine, a bit like pushing fruit and veg through a juicer. It’s amazing how frozen bananas alone come out tasting so good and so similar to the consistency of ice cream. I bet you could trick your children!

The machine comes with a great book of recipes. I tried adding both peanut butter (not that great) and dark chocolate (yum!) to my bananas, but to be honest, the frozen bananas alone were so satisfying I didn’t feel the need to add any extras, plus it’s healthier that way.

My husband Damian wasn’t as convinced, but let’s just say I have healthier tastebuds than he does and he’d rather have the processed, artificially flavoured version of most things (it’s a constant battle…). It wasn’t that he didn’t like the end result, but just refused to believe my claims that it really was just like ice cream!

I found it really easy to use and loved that it was dishwasher safe. The only downside was the noise. It’s not quiet!

Since I checked out the appliance ($55), they’ve released a new, snazzier version called Yonanas Elite ($165). The original machine got a makeover with sleek new design elements and a quieter and more powerful motor. Available in glossy red or black.

Yonanas is available online or from The General Trader, Harvey Norman and David Jones.

Categories
Appliances Kitchens

Russell Hobbs Ice Cream & Yoghurt Maker plus Vegemite toaster

I got pretty excited about this. It looked like a go kart engine, which piqued my interest. Turns out it was the new Russell Hobbs Ice Cream & Yoghurt maker… which is probably a much better fit for this site.

russell hobbs ice cream maker

But when I checked out the website for more info, the limited edition Vegemite toaster up for grabs smacked me in the face. That is one mighty awesome pop art style toaster which is still up for grabs from Russell Hobbs and Vegemite. And considering the Marmite vs. Vegemite debates I often have with my Pommy fiancee, I think I need this in our kitchen to make a point!

Russell Hobbs vegemite toaster

First things first, the Ice Cream & Yoghurt maker which I can 100 percent assure you IS NOT a go kart engine. It makes creating your own frozen treats like ice cream simple and also does yoghurt or ice cubes. So what? Stacks of products out there do the same. This one has some tricks up its sleeve though, which may seal the deal.