Categories
Bedrooms Designers Homewares Parenting Shopping

Brisbane mum turns handwoven baby baskets into million dollar business

When Skye Donaldson, owner of the ethical brand The Young Folk Collective, was pregnant with her first child, she didn’t know searching for an elusive natural product would completely change the direction of her family’s lives. Her search for a natural newborn sleep space led her to Ghana in West Africa.

“I had stumbled upon weavers in Bolgatanga, home of the classic Bolga market baskets. Having used these baskets, I knew the material (elephant grass) was extremely high quality – ideal for a baby basket,” Skye explains. “When talking to family and friends, it became clear that this gap in the market was real and could transform into a business.”

The Moses Basket and Stand

Taking a leap of faith, she and husband James invested their modest savings of $5000, and The Young Folk Collective was born. This move proved a highly successful one, selling out of their first collection within days. “We were overwhelmed by the immediate response,” Skye says. 

Fast forward four years, and the company is now a successful family run business, with a large selection of products, handmade by artisans around the globe and an annual turnover of well over a million dollars and growing.

The baby change basket

Their baby baskets are safe, ethical, and look gorgeous. With many of us looking to bring natural elements into our homes, their elephant grass items are a perfect choice. Plus, you don’t have to hide them away once your baby moves into a new bed. Their signature baby baskets grow with your child, functional as a sleep basket, a doll cot, or a unique storage space.

“Our pieces have become a huge hit for those who love aesthetics,” Skye says. “Our baskets are the storage solution that people don’t need to hide.”

Quality craftsmanship is another cornerstone of The Young Folk Collective. “As each piece is handmade, with unique characteristics, they really are a functional piece of art for your home,” Skye adds. “We feel there has been a major shift in people searching for authentic products, with a real story behind them.”

The play mat in Into The Ocean

Their offerings have expanded to include play mats. Skye found that many play mats on the market were too cartoonish to fit into a main living space, and that others sacrificed the bold and contrasting colours that promote childhood cognitive development. The Young Folk Collective’s mats are designed with both form and function in mind, so both you and your children can enjoy their play space.

“Our playmats fit harmoniously into your existing decor, complimenting your style, rather than clashing with it.”

Skye and her family, with one of their Moses baskets

Skye believes in providing a heartfelt customer experience. “To this day, I still hand write thank you notes for every order. This is usually late into the night after our children are in bed,” she says. “In recent times, the world has come to appreciate the important things in life more. Being able to work together alongside my husband while raising our children has been invaluable.”

For more information.

Categories
Art Homewares

Online shopping fix: NickersAnne

Growing up with an avid sewer for a mother, Nicole Pollock was crafting from a very early age. Yet it wasn’t until her thirties, after going back to university to study interior design, that she began to appreciate her skills.

Screen Shot 2015-07-09 at 10.30.37 am

Purchasing a beginner’s loom, Nicole fell in love with the act of weaving, leading her to delve back into the memory bank and pull out her long forgotten macramé skills. Now a year later she creates full-time, making one of a kind wall hangings, usually woven or knotted (macramé), for her fibre art line, NikersAnne.

il_570xN.767601485_95d6

Loving texture and colour, Nicole also dabbles in dying her own yarn, designing wall hangings that are both traditional and modern.

Screen Shot 2015-07-09 at 10.29.56 am
All hand-knotted or hand-woven, they can be shipped worldwide. Shop online.

Categories
Art Expert Tips Homewares

Weaving tutorial: create your own wall hanging

When Amanda O’Sullivan shared one of her beautiful woven wall hangings during our 7 Vignettes contest on Instagram earlier this month, she wowed plenty of our readers. So we were delighted when she agreed to put together this great tutorial for us.

WeavingStyled1

There’s a weaver fever going around right now! If you are excited about weaving being cool again and you’re keen to try making your own woven wonder, you will be happy to hear that it’s not that hard. While it may look complicated, all you need are a few simple techniques under your belt and you’re ready to create your own beautiful wall hangings. Don’t despair if you haven’t got a loom, because you can make your own from an old frame or even a piece of sturdy cardboard. Today, I’m going to share the basic skills you will need to know to create your first wall hanging. Enjoy!

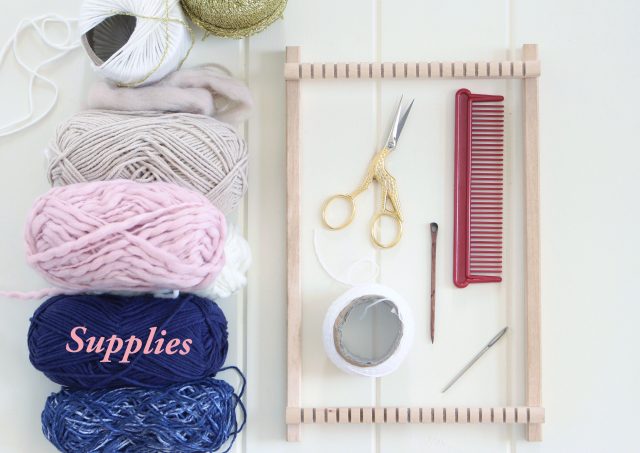
What you’ll need

WeavingSupplies

  • Lap loom
  • Wide tooth comb
  • Strong cotton for warping
  • Various yarn and fibre for the weft (the weaving threads)
  • A weaving or tapestry needle
  • Scissors
  • A stick or rod for hanging.

Step 1: Let’s get warping! Warp is the term used for the strong cotton threads that run up and down vertically on your loom. To start, wrap your cotton around the first tooth and tie it securely in place, then run the thread up to the opposite tooth at the top of the loom. Wrap the cotton around this tooth and then run your thread back down to the bottom of the loom. Continue running the thread up and down until you have reached your desired size. I’ve covered my entire loom with warping thread for this project. Tie another knot firmly around the last tooth. Finally, turn your loom 180 degrees so that the bottom (the end with the knots) now sits at the top of your weave.

WeavingStep1

Step 2: Thread your tapestry or weaving needle with yarn and cut off a workable length, as you don’t want to get yourself in a tangle! For larger weaving projects you could use a shuttle; a stick that you can load up with yarn and pass through the warps. I prefer to stick to a needle. The threads that go across are called the weft. Remember to start at the end of the loom without the knots and weave your needle over and under the warp thread until you reach the end, then return back through the warp, alternating over and under. Always leave 2-to-3 inches of tail so that you have enough length to weave in your ends.

WeavingStep2

Step 3: When weaving your thread, work a few inches above your previous row, as this will help maintain good tension. Each row of weaving is then pushed down onto the previous row with your wide tooth comb. If you run out of yarn in the middle of a row, simply pull your yarn through to the back, making sure to leave a few inches to stitch in later. Start your new yarn where your last finished and continue.

WeavingStep3

Step 4: After 5 or so rows, you may like to add some tassels to your weave. The number of pieces of yarn required for each tassel depends on the thickness of your thread. As my yarn is quite thin, I’ve used 8 pieces for each tassel. If your yarn is thicker, 8-ply or larger, you may only need 3 or 4 pieces. Don’t make your tassels too bulky as they won’t sit nicely. Layer your threads on top of each other and then weave your threads under 2 warps. Lift the threads up through the warp with your finger to create a small loop. Grab both ends of the tassel and thread them through this loop. Lift up and pull to tighten your tassel and then tug down into position.

WeavingStep4

Step 5: I’ve placed tassels all along the bottom of my weave. Continue weaving, changing colours as you go.

WeavingStep5

Step 6: If you’d like to add shapes or change colours mid loom, simple weave as normal to the point where you’d like the colour to end. Weave in between the threads of the neighbouring colour (see picture) to keep the weave smooth and connected. Continue weaving, changing colours and adding tassels as you please. Make sure you stop weaving at least a couple of inches before you reach the top, as you’ll need some length in your warp to tie knots when you remove your weave from the loom.

WeavingStep6

Step 7: Removing your weave from the loom can be a bit scary, but if you follow these instructions, your weave will remain happily intact! Carefully slip your weave off the bottom of the loom — the bottom is where you started weaving, the end without the knots. When the weave is free from the end, push your work gently to the bottom. At the top of the loom, remove the warp from one tooth at a time and cut at the top of the loop, creating 2 threads. Tie these threads together firmly into a knot. Continue removing your warp, one tooth at a time, until all of the threads are knotted. Ta-dah! Your weave is now free.

WeavingStep7

Step 8: Tuck these ends into the back of your weave using your needle. Alternatively, you may like to tie these threads onto your stick or bar for hanging.

WeavingStep8

Step 9: Now it’s time to tidy up your loose threads at the back of your weave. Simply thread the dangling yarns into your needle and pass them through about 2cm of weave at the back and snip off the ends to tidy up.

WeavingStep9

Step 10: How you choose to attach your weave to a hanging mechanism is completely up to you. I’ve loosely stitched mine onto a stick and then attached some string for hanging. Once you’ve attached yours, simply hang and admire!

–Amanda O’Sullivan is country girl with a passion for interiors, craft and design. She is the proud owner of RedAgape Guesthouse in Millthorpe and RedAgape Blog, where she showcases her creative endeavours. We think her Instagram feed is well worth a follow too!

WeavingStep10

So, will you give it a go? We’d love to see your efforts on Instagram! Please tag us if you share them!

Categories
Expert Tips Homewares

Learn the latest craze for free form weaving

We’re seeing it everywhere lately: for sale in homewares stores and all over Instagram: weaving! If you want one of these retro style creations with a modern twist in your home, why not join this free form weaving workshop at West Elm next month?

photo5

The evening workshop on Thursday 7 May at West Elm Bondi Junction is being run by Sky Carter, a passionate weaver and textile artist sharing her love of weaving with the world! She has a studio in St Peters, Sydney, where she creates wall hangings and makes cushions full-time. “In my workshops I teach my weaving style which is a free and intuitive style using materials beyond just yarn,” she says. “They are a lot of fun.”

photo9

The cost is $120 with everything provided and you get to take home your own wall hanging. Enquire/book via email: [email protected]

photo8

Categories
Interiors Addict

Win woven leather cushions from the new ELSON collection

A second bed linen collection from new brand ELSON is coming towards the end of this month, but in the meantime, these fab woven leather cushions have been released today. And the even better news is you could win two (worth almost $300) for yourself in your choice of black or tan.

Black-Leather-Woven-Cushion

The cushions, featured exclusively here for the first time, have a gold zip which is exposed around three edges. Fancy!

Tan-Leather-Woven-Cushion

The second collection from ELSON promises to offer a softer, more summery feel but still with a unisex appeal that saw the first season be such a success. We promise to share the linen and accessories collection with you as soon as it’s released.

For your chance of winning, complete the quick form below by midnight on Friday 14 November 2014.

Buy your own here.

[gravityform id=”6″ name=”Elson” title=”false” description=”false”]

The winner was Kelly Fararro.