Categories
RENO ADDICT

How to paint a bath tub

By Naomi Findlay

Let’s face it, bathrooms should be spaces of zen and relaxation. No matter how big or small, every home deserves a beautiful, practical bathroom. Rather than spending big on major renovations (bathroom renovations and dollar signs go hand in hand), there are some simple changes you can do to update the look and feel of your bathroom – starting with the tub. Today, we share how to paint a bath tub.

Bath tubs are built to withstand endless hours of bath time, but that baby pink shade of enamel (or turquoise in Jen’s new reno!)? Not so much. Save yourself the hassle (and dollars) involved with ripping out your dated or worn-out bathtub by giving it a fresh lick of paint instead! A DIY paint job can not only give your bathtub a facelift, but also help protect the enamel so you can enjoy it for years to come.

Source: http://adrianned-onedayatatime.blogspot.com.au Click through for more

Stock up
Unlike DIY paint jobs involving tiles or cabinets, most bathtubs are of a similar size – meaning no calculations are needed to work out how much paint you will use. Just one pack of White Knight Tub ‘n’ Tile should adequately cover your whole tub (unless it is in really poor form, in which case you may need two packs).

Clean
Preparing your tub’s surface is a crucial step in a successful DIY makeover. Use an abrasive scrubber to blitz away any soap scum or bath oils that may be lurking on your tub – taking care not to overlook the drainage hole.

Source: thermoglazing.com Click through for more

Sand
Sanding is probably one of the more tedious steps in a bathtub makeover, and one that may be tempting to skip. However, a proper sand will ensure that your newly painted tub won’t start flaking and cracking after a couple of uses. Use some sandpaper (or an electric sander) to roughen up your tub’s surface – the aim here is to remove that glossy enamel finish. Chipped paint can lead to rust or damage to the rest of the finish, so be sure to carefully sand back any bumps or cracks.

To finish off, rinse the tub with warm water and let it dry before giving the tub a wipe down with some rust guard solvent for an ultraclean finish.

Protect
Use painter’s tape to protect the tiles surrounding the edges of your bathtub from paint, and lay down some drop sheets (or rags) on the floor. Wrap the taps and faucets in some plastic bags, securing with an elastic band (or hairband) – there is nothing worse than starting a paintjob and then dealing with a leaking tap. Also, don’t forget to tape your metal drain cover (unless you want to give it a makeover too).

BEFORE
AFTER
Source: My Creative Days. Click through for more

Paint
White Knight’s Tub ‘n’ Tile consists of two parts. Prepare two sealable containers (preferably glass) – one of these containers should be large enough to hold both parts A and B. Use this container to stir together both parts for at least five minutes (yes, five whole minutes!). Pour half of this mixture into your second container, seal both containers tightly and place one of them in the fridge, leaving the other out in room temperature. After an hour, stir up the room temperature paint for another five minutes, then get ready to paint!

Starting from the bottom of the bath tub, use a bristle brush to layer the paint in a criss-cross motion. Leave the first coat to dry for at least a day to a day and a half (depending on how warm or cold the temperature is).

Pull your second container of paint out of the fridge about an hour before applying your second coat. Give this container yet another five-minute stir, then apply in the same way as the first coat.

You will have to quarantine the bathtub for a full five days before using again, and keep the plastic bags covering the taps until the tub is ready for use.

That’s it! Treat yourself to a good, long bath in your shiny new tub.

How to paint tiles

–Naomi Findlay is Australia’s rapid renovation expert, an internationally renowned renovator, award-winning property stylist and speaker.She’s an industry leader in creating healthy wealthy spaces and creating wealth and profit from renovating property. Naomi is CEO of staging company Silk Home and founder and principal of education provider, the International Institute of Home Staging (IIHS).

Categories
Expert Tips RENO ADDICT

How to: Achieve consistent style across the home

By Naomi Findlay

Whether perusing Pinterest or devouring the latest interior design magazine, you’ll note the most stylish homes have one thing in common–consistency. From paint to flooring, window treatments and hardware, there are plenty of ways to achieve aesthetic unity throughout the home.

Paint

If there’s one single renovation product that can truly unify a home, it’s paint. From warm whites to cool grey shades, running the same hue throughout an abode creates a fabulous sense of visual continuity.

Image: t01.com.au

Flooring

Whether it’s carpet, timber or tiles, it’s wise to use the same floor covering throughout your entire home for maximum consistency, flow and to make it feel more spacious too. Conversely, if you really want to combine carpet with tiles or timber, choose complementary shades to connect the spaces.

Hardware

From door handles and pulls to tapware, matching hardware is key to creating consistent style across the home. And while you may not choose the exact same shape of handle for instance, choosing the same finish will ensure a unified look throughout.

Image: onekingslane.com

Window treatments

A prominent feature in any home, running the same window treatment throughout is a great way to give a sense of cohesion and connect all the rooms. Whether it’s plantation shutters, sheer curtains or roman blinds, try to stick to one style of window treatment for maximum consistency.

Lighting

Aside from a smattering of fun feature pendant lights, try to ensure the rest of the lighting in your home is consistent. Fabulous lighting should be unobtrusive but create ambience and warmth the home.

Image: homestolove.com.au

Australia’s rapid renovation expert, Naomi Findlay is an internationally renowned renovator, award-winning property stylist and speaker. She’s an industry leader in creating healthy wealthy spaces and creating wealth and profit from renovating property. Learn more about Naomi.

Categories
Interiors Addict

How to: make your own doughnut board

Surely I can’t be the only one who has been swooning over doughnut boards on Pinterest? It was only a matter of time before I had to give it a DIY go for Interiors Addict! What do you think of my efforts? The common Krispy Kreme never looked so good, right?

image

Here’s just how simple and easy it is to knock one of these bad boys up quickly…

HOW TO

Step 1: Pick up supplies

Step 2: Cut dowel rods

Cut your dowel rod to the desired lengths and sand down the edges.

Step 3: Drill holes

Mark out where you want the dowel rods to go (make sure you leave enough room between them for the doughnuts). Make sure your drill bit is the same width as your dowel rod and drill down 3/4 the depth of the serving board. Sand any rough bits around the holes you’ve just drilled.

Step 4: Glue dowels in

Put a small amount of glue into the holes you’ve drilled and push your dowels rod in. Remove any excess glue and then wait for it to dry.

image

Step 5: Eat doughnuts!

Cake by La Petite Tarte and doughnuts from Krispy Kreme

–Kathryn Bamford is a certified interiors addict and regular contributor. You can follow her DIY and design adventures on Instagram @thedesignrookie.

Categories
Expert Tips RENO ADDICT

How to: Paint a diagonal wall design in eight easy steps

Following on from yesterday’s reveal of Dulux’s Autumn 2016 colour trend forecast, today we bring you the complementary how-to. Perfect for DIY-lovers, follow these simple steps to recreate the stunning diagonal wall paint effect you see below.

151119-Dulux Autumn-001_HighRes

Walls in Dulux Pickled and Dulux Pretty Primrose

1. Like any paint job you’ll need your usual drop sheet, masking tape and brushes. However, because we’re creating a diagonal line you’ll also need a HB pencil, an eraser, calculator and measuring tape.

2. Before you begin putting paint to plaster it’s a good idea to visualise your design first. For best results, plan your look taking into account furniture and art in the room because this will help inform your decision.

3. To make life easier, paint the entire wall in your lightest colour first. For step-by-step instructions on how to mask, cut and lay-off your wall click here.

4.Using the tape that is masking the trim, mark where you would like your diagonal line to start and finish. Once you are happy with these points use string and get someone to help by holding it taut at each end, lining up with the start and finish for your diagonal line – now mark this at increments along your wall. You could also use chalk line – this is an effective way to mark the diagonal line on the wall making it very easy to then mask it.

5.Now you’re ready to mask your line. It helps to have someone holding the tape taut from one end as you line it up with the increments you’ve marked out. Don’t forget, your tape must line up to the outside of your design – It seems obvious but it’s an easy mistake to make. Press your tape with a putty knife to prevent paint bleeding through.

6.Now for the fun part. Grab your brush or roller and begin painting your secondary coat of paint.

7.Paint the second colour in your design. Once your second coat is completely dry, carefully remove your tape at a 45 degree angle to prevent paint from peeling. If you notice any bleeds from underneath your tape you can easily patch it up with a fine brush.

8.Now all that’s left to do is tidy up and invite your friends over to admire your new look. Voila!

Click here for more.

Photography by Mike Baker | Styling by Bree Leech and Heather Nette King


Categories
Art Expert Tips Furniture Homewares

7 amateur-friendly DIY projects for your home

DIY projects can be scary (I’ve experienced enough glue-gun fiascos to know that!) but they can also be great fun, cost-efficient and even something to be proud of. Here’s 7 of our best DIY projects, and don’t worry, they’re amateur-friendly!

Buying a bed head for under $50 isn’t going to happen, so why not make one instead? Super easy (I promise) and renter-friendly, all you need is a piece of ply board, sandpaper, paint and paint brush, matte finishing spray, 3M hooks and a pencil. Follow our step-by-step instructions.

IMG_0909-640x853

If keeping plants alive is one of your life’s biggest challenges, a terrarium is the perfect answer. Not only are they easy to maintain, they are super easy to make. Follow these nine simple steps and get some greenery into your space.

terrarium_step-6-_068-640x640

While Pinterest and Instagram have their place, nothing quite beats a physical, in the flesh, inspiration/mood board. But let’s be honest, no amount of magazine cut-outs and fabric swatches can hide an ugly cork board! So create your own, with just six supplies and our step-by-step guide.

IMG_8369-640x853

When interior and event stylist Steve Cordony undertakes a DIY project you know it’s going to be good, and his upcycled sideboard does not disappoint! With a full list of products, preparation advice and instructions, he gives you all the know-how to tackle an upcycling project with confidence.

jHcifUsR_JBilLplrDi531sF7WxFMlQatShl7HelCTUUZ5kSHLs3a5iDEEZEfYwxdOfo_9JL5iEQcRFyQ-DPoQRZi_uDVL_bktMICBBjL3lkdTO30BRIBdEMBHfjZdIhM-E7aQa_v9VUFS3B01lNeR2bZmBM00k7qt_TF7nPHxjs-640x427

There’s no denying weavings are very on-trend, however, they look seriously complicated to make! But… with just a few simple techniques under your belt, creating a beautiful wall hanging is achievable. Just follow these step-by-step instructions.

Screen Shot 2015-10-07 at 4.05.51 pm

Teepees have rapidly become a staple for every kid’s room, so make sure your child doesn’t miss out! All you need is a $30 investment and in five steps, you’ll be done!

jyfgj-640x853

Original art can often be expensive, so why don’t you give it crack? Sure, you most likely won’t be the next Van Gogh, but by following these achievable steps, you can create a beautiful geometric design. All non-artsy types welcome!

Fireworks-1-640x646

We hope you liked this list. Let us know what you’d add.

Categories
Art Expert Tips

How to create your own easy original artwork

By Hayley Shaw

We live in an era where presenting your home in a modern and contemporary way has never been easier. With more shops pumping out accessories and furnishings at lower prices its easy and affordable to give your home a makeover.

Paint Tubes

[contextly_sidebar id=”GJm7eCNALwKwM98Qxzjj2QfXlyS9Fb37″]But there are still certain items which are placed on the significantly higher top shelves, for those wanting original pieces. I’m one of ‘those’ people. If I spot a vase I own on a friend’s hall table, mine will make a quiet retreat to the back of my kitchen cupboard to await the yearly house purge. Petty I know, but I can’t help it. I want to be different!

Amongst the original high-end items are paintings, and although ‘thought provoking’ art is usually worth every cent the artist is asking for, $5,000 for one piece is not going to fit into every budget. This is where creating your own original art can work beautifully. Sure, it’s probably not going to come to life like the works of Vincent van Gogh, Leonardo de Vinci or Bert from Mary Poppins, but just matching it in with the colours of your current decor items can really bring the room together.

I can sense a lot of you groaning so I’ve created a very simple, achievable example with steps, so you really can’t get lost.

Before you start, make sure you’re in ‘the zone’. You might as well enjoy the relaxation of this project so make a little me time. If the following apply, make sure the kids are happily watching a DVD, the pets are fed and watered, your other half is aware that you really need this quiet time to make you a better contributor to the relationship, then set the iPod to play relaxation tracks before putting on a pot of camomile tea. Perfect.

STEP 1 – Firstly, you’re going to need a few tools and supplies. Some of them you will probably already have in your stationery draw. For the example below I used a pencil, masking tape, a ruler, a paint brush, paint and a flat board canvas which measured 46x46cm. This technique, however, could be achieved on any sized canvas board or a canvas which has been stretched over a frame.

HOPE STEP 1

STEP 2 – I’ve chosen to leave a two-inch border around my painting. After measuring and marking the corners two inches in, use your masking tape to create the border and edge for your painting. Then using the ruler again, mark every two inches along the inside of the taped border on all four sides. I just marked it with a dot. Once this is completed you can start laying down your masking tape diagonally, matching each dot with the dot on the adjoining side. Repeat this process again on the reverse diagonal. It should now look something like this:

HOPE STEP 2

STEP 3 – Time to paint. Make sure the masking tape is well and truly stuck. If it starts lifting up the paint will bleed through underneath. Load your paintbrush up with paint and start painting, starting the stroke on the tape then onto the canvas. This also helps to stop the bleeding as you’re not pushing paint against the tape, but over and off it. In my example I’ve used orange, purple and green acrylics.

HOPE STEP 3
STEP 4 – Ta-dah! The big reveal. You can wait until your painting is completely dry before removing the tape but if you’re super eager to see your handy work remove the tape carefully. You don’t want to let any tape fall back onto the canvas as you’re pulling it off. Here’s how mine turned out.

HOPE STEP 4
As you can see on my painting above, there are a few spots where the paint has bled under the tape but once dry it’s an easy fix, just using some white paint to carefully touch it up.

Here are a couple of other paintings I created using the same masking tape idea:

barcode 1

Fireworks 1
Now all you need to do is to have it framed and hang it proudly. And the best thing of all? You’ll be hard-pressed finding any friends with the same painting!

–Hayley Shaw is an Australian abstract artist residing in Northern NSW. Her blog and artworks can be viewed on hayleyshaw.com.au

Categories
Homewares

Brisbane stylist Tahn Scoon’s latest book: The Thoughtful Home

Here at Interiors Addict there are two things we’ve always been big on: style without the snobbery (so your home doesn’t have to be full of designer or expensive pieces to look fabulous) and your home being a reflection of the people who live in it, with real personality. So stylist Tahn Scoon’s latest book, The Thoughtful Home, really appeals.

covera

Basically, the idea behind the book was to show people how to create fresh, simple and pretty interiors, even on a tight budget – it includes heaps of insider advice and a handful of super easy how-to projects,” she says.

_MG_5524web

The Queensland interior stylist and decorator, who also wrote New Vintage, shares all her insider tips and tricks on how to create thoughtful, authentic and beautiful interiors – homes that are kind to the purse, kind to the planet and a pleasure to live in.

Insider tips include how to achieve bespoke style cabinetry at a fraction of the cost, how to give children’s rooms the vintage treatment and how to professionally style your home so it’s magazine shoot ready!

FloaterTubchair-Gap

How-to projects include a designer fabric cutting cushion, crystal decanter light fitting and ‘chalk’ painted vintage frame.

While being a mum doesn’t give me much time to read at the moment, I’ve flicked through my copy and found it a lovely browse.

The Thoughtful Home is published by New Holland. Buy a signed copy online from Tahn’s website.

Categories
Expert Tips

How to: make a terrarium for your home or workspace

Adding a little bit of nature to your home or workspace can truly do wonders. Not only are plants and flowers beautiful, they can add some much-needed life to a dull, drab and dark interior. But, if like me you don’t have the best track record when it comes to keeping plants alive don’t lose hope! A terrarium is the perfect answer. Not only are they easy to maintain, they are super easy to make. Follow these nine simple steps and get some greenery into your space.

terrarium_ products _076

Materials:

  • 1 plant
  • 1 glass globe
  • 1 bag potting soil (approx. 6cm thick for each terrarium)
  • 1 bag pebbles/gravel (approx. 3.5cm thick)
  • 1 bag activated charcoal (thin layer)
  • 1 pair of gloves
  • 1 small shovel
  • 1 spray bottle

How to make a terrarium:

Step 1: Once you have decided on a container it is important to clean it, making sure there are no stickers, grime or dirt that could affect the life of your plant.

Step 2: Fill the bottom of your container with 1 to 1.5 inches of small rocks. This will collect the water drainage. Pebbles or gravel can be used as they both allow drainage of water. Choose stones that are small to allow the most effective drainage.

Step 2
Step 2

Step 3: Add some activated charcoal, not much is needed just enough to cover the rocks. This will keep your terrarium alive and healthy.

Step 4: Add potting mix as the next layer. Make sure enough is added to allow the roots of the plant to grow. It should be about 2.5 inches deep.

Step 3
Step 4

Step 5: Lightly pat it down to remove air pockets and make a level surface. Be aware of what plant you intend to use, as some require special types of potting mix.

Step 6: Using a small shovel or your hands, dig a small hole in the terrarium to insert the plant. Make sure the hole is big enough to fit the roots of the plant.

Step 7: Gently place the plant in the hole. Fill in any gaps with extra potting mix and gently pat down to secure the plant.

Step 7
Step 7

Step 8: Add any extra decorations or accessories to make your terrarium look how you want. Make sure everything is firmly placed or planted to allow growth. Moss, pebbles or sand are great to make it look like a real garden.

Step 8
Step 8

Step 9: Lightly spray your terrarium to add moisture.

All materials are available at Bunnings. For more information.

Categories
Bedrooms Expert Tips Kids Rooms

How to: make a children’s teepee for under $30!

Am I the only adult out there to be so excited by teepees? Seriously, where were these when I was a kid?! These days, going by Pinterest and Instagram, teepees are a staple for any nursery or kids room. So it was only a matter of time before we had a DIY go at Interiors Addict!

jgf

Step 1: Pick up Supplies

      Supplies:

  • 4x dowel rods (120cm each)
  • Tablecloth/ fabric (120cm x 365cm)
  • Rope (1 metre)

     Tools:

  • Drill + 6.5mm drill bit
  • Sandpaper
  • Needle
  • Cotton

If you are wanting to make a teepee on the cheap and avoid shelling out on fabric, I raided my grandmother’s linen closet and found a plethora of options. You can really use anything; bed sheets, quilt covers, curtains, the options are endless. In my case, I opted for a lace table cloth number which worked perfectly and eliminated me needing to learn how to sew. I do like a little boho vibe, so lace it was!

Step 2: Drill rope holes

Sand down dowel rods and any rough edges with a piece of sandpaper. Make a small mark on each dowel around 10cm from the top and mark with an x. Carefully drill one hole in each dowel. If you aren’t confident with power tools, ask someone to help you.

IMG_8129

Step 3: Framing

Thread the rope through all the holes (it’s easier if you wrap some sticky tape around the end of the rope to help it fit through the holes). Once the rope is threaded through, tie a knot firmly then wrap the rope around a few more times. Establish equal spacing between the dowels to make your teepee even on all sides. Once you have equal spacing, wrap the rope around a few more times and tie a secure knot.

IMG_8638

IMG_8639

Step 4: Sewing!

Drape the fabric around the outside of the structure. Once you’re happy with how it sits, begin sewing. I wrapped the fabric around each pole and sewed up the inside of the pole through the holes already in the lace so you can’t see any of the stitching. Sew up the inside of all four posts to ensure the fabric is secure.

Step 5: Style away

Set up your teepee wherever you chose and get styling! Our friends at Cotton On Kids were kind enough to lend us some of my favourite products from their latest range to help out.

jyfgj,

hgfk

If DIY isn’t your thing and you’re after a teepee Etsy has your back with a heap of choices.

–Kathryn Bamford is our girl on the ground in Melbourne; you can follow her DIY & design adventures on Instagram @thedesignrookie.

Categories
Art Expert Tips Homewares

Weaving tutorial: create your own wall hanging

When Amanda O’Sullivan shared one of her beautiful woven wall hangings during our 7 Vignettes contest on Instagram earlier this month, she wowed plenty of our readers. So we were delighted when she agreed to put together this great tutorial for us.

WeavingStyled1

There’s a weaver fever going around right now! If you are excited about weaving being cool again and you’re keen to try making your own woven wonder, you will be happy to hear that it’s not that hard. While it may look complicated, all you need are a few simple techniques under your belt and you’re ready to create your own beautiful wall hangings. Don’t despair if you haven’t got a loom, because you can make your own from an old frame or even a piece of sturdy cardboard. Today, I’m going to share the basic skills you will need to know to create your first wall hanging. Enjoy!

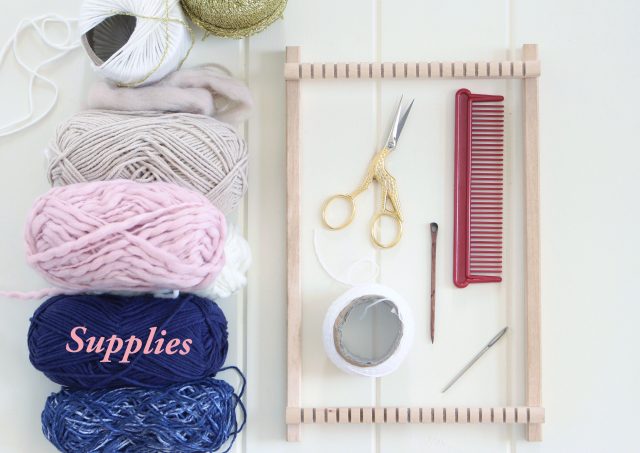
What you’ll need

WeavingSupplies

  • Lap loom
  • Wide tooth comb
  • Strong cotton for warping
  • Various yarn and fibre for the weft (the weaving threads)
  • A weaving or tapestry needle
  • Scissors
  • A stick or rod for hanging.

Step 1: Let’s get warping! Warp is the term used for the strong cotton threads that run up and down vertically on your loom. To start, wrap your cotton around the first tooth and tie it securely in place, then run the thread up to the opposite tooth at the top of the loom. Wrap the cotton around this tooth and then run your thread back down to the bottom of the loom. Continue running the thread up and down until you have reached your desired size. I’ve covered my entire loom with warping thread for this project. Tie another knot firmly around the last tooth. Finally, turn your loom 180 degrees so that the bottom (the end with the knots) now sits at the top of your weave.

WeavingStep1

Step 2: Thread your tapestry or weaving needle with yarn and cut off a workable length, as you don’t want to get yourself in a tangle! For larger weaving projects you could use a shuttle; a stick that you can load up with yarn and pass through the warps. I prefer to stick to a needle. The threads that go across are called the weft. Remember to start at the end of the loom without the knots and weave your needle over and under the warp thread until you reach the end, then return back through the warp, alternating over and under. Always leave 2-to-3 inches of tail so that you have enough length to weave in your ends.

WeavingStep2

Step 3: When weaving your thread, work a few inches above your previous row, as this will help maintain good tension. Each row of weaving is then pushed down onto the previous row with your wide tooth comb. If you run out of yarn in the middle of a row, simply pull your yarn through to the back, making sure to leave a few inches to stitch in later. Start your new yarn where your last finished and continue.

WeavingStep3

Step 4: After 5 or so rows, you may like to add some tassels to your weave. The number of pieces of yarn required for each tassel depends on the thickness of your thread. As my yarn is quite thin, I’ve used 8 pieces for each tassel. If your yarn is thicker, 8-ply or larger, you may only need 3 or 4 pieces. Don’t make your tassels too bulky as they won’t sit nicely. Layer your threads on top of each other and then weave your threads under 2 warps. Lift the threads up through the warp with your finger to create a small loop. Grab both ends of the tassel and thread them through this loop. Lift up and pull to tighten your tassel and then tug down into position.

WeavingStep4

Step 5: I’ve placed tassels all along the bottom of my weave. Continue weaving, changing colours as you go.

WeavingStep5

Step 6: If you’d like to add shapes or change colours mid loom, simple weave as normal to the point where you’d like the colour to end. Weave in between the threads of the neighbouring colour (see picture) to keep the weave smooth and connected. Continue weaving, changing colours and adding tassels as you please. Make sure you stop weaving at least a couple of inches before you reach the top, as you’ll need some length in your warp to tie knots when you remove your weave from the loom.

WeavingStep6

Step 7: Removing your weave from the loom can be a bit scary, but if you follow these instructions, your weave will remain happily intact! Carefully slip your weave off the bottom of the loom — the bottom is where you started weaving, the end without the knots. When the weave is free from the end, push your work gently to the bottom. At the top of the loom, remove the warp from one tooth at a time and cut at the top of the loop, creating 2 threads. Tie these threads together firmly into a knot. Continue removing your warp, one tooth at a time, until all of the threads are knotted. Ta-dah! Your weave is now free.

WeavingStep7

Step 8: Tuck these ends into the back of your weave using your needle. Alternatively, you may like to tie these threads onto your stick or bar for hanging.

WeavingStep8

Step 9: Now it’s time to tidy up your loose threads at the back of your weave. Simply thread the dangling yarns into your needle and pass them through about 2cm of weave at the back and snip off the ends to tidy up.

WeavingStep9

Step 10: How you choose to attach your weave to a hanging mechanism is completely up to you. I’ve loosely stitched mine onto a stick and then attached some string for hanging. Once you’ve attached yours, simply hang and admire!

–Amanda O’Sullivan is country girl with a passion for interiors, craft and design. She is the proud owner of RedAgape Guesthouse in Millthorpe and RedAgape Blog, where she showcases her creative endeavours. We think her Instagram feed is well worth a follow too!

WeavingStep10

So, will you give it a go? We’d love to see your efforts on Instagram! Please tag us if you share them!

Categories
Art Expert Tips Homewares Styling

How to: make an inspiration board for your home office

I’m the first to admit to having a serious addiction to both Instagram and Pinterest. I am a visual learner and well, there are just so many pretty pictures, how can you not be? Yet, I still find myself collecting magazine cutouts and swatches of fabric (surely I can’t be the only person out there doing this?).

I wanted to create an inspiration board for my home office where I could physically pin such finds. I had a bit of a look around online and in stores and couldn’t find anything that matched my decor, let alone any that I was willing to have on show to visitors. All I found were plain boring cork boards or, if you wanted to mix it up, half cork board/half whiteboard and let’s be honest, nothing that looked like that would be going up on my walls! So, as you do, I decided to make my own. Here is what I made and now I’m going to show you just how easy it was to whip up!

IMG_8369

Step 1: Decide on a frame and design + Pick up supplies

Being a renter, I needed something relatively light so my trusty 3m velcro strips would hold it up. This threw out my original idea of an ornate vintage frame, so I went for a lightweight and budget friendly option from my local junk shop. I opted for a monochrome pattern that was striking with a relatively easy pattern to paint (given my lack of painting skills).

  • Cork board
  • White primer paint
  • Black water-based acrylic paint
  • Paintbrush
  • Masking tape
  • Pins

image

Step 2: Time to prime

I never realised just how absorbent cork board was! It literally soaks up the primer as you’re painting, so you will need to do at least two coats to make sure you have a decent base.

image

Step 3: Mark out your pattern and paint

This is the most time-consuming part of this relatively quick project. Mark out your pattern with the masking tape. I didn’t use anything fancy, just a tape measure and a lead pencil to make sure my pattern was going to work out evenly across the board.

image

Then simply paint over the pattern. I would recommend two coats for this stage as well.

image

Step 4: Affix to wall

Once the paint is dry, remove the masking tape and ta-dah! Your pattern will all make sense. Then all you need to do is affix to your wall and get pinning!

IMG_8362

I picked up these gold pins in a pack with gold paperclips and bulldog clips from Kmart for only two bucks!

image

–Kathryn Bamford is our girl on the ground in Melbourne; you can follow her DIY & design adventures on Instagram @thedesignrookie.

Categories
Competitions Expert Tips Homewares

How to hang a picture wall with Country Road + win a $500 voucher for frames

Country Road are giving Interiors Addict readers the first look at their latest how-to video which takes you through hanging a picture wall, step by step. Even better, you can win everything you need to create your own!

If you can’t knock nails in your walls because you rent, you could always apply all the same principals but use the 3M Command Picture Hanging Strips I blogged about yesterday instead. Easy!

One lucky reader will score a great prize pack which includes:

Categories
Interiors Addict

How to: make your own terrarium

Have you been looking for a way to add some greenery to your space? Check out this eye-catching terrarium I made in half an hour the other day!

terrarium finished

The terrarium trend is not slowing down any time soon and they are a great way to add some greenery to your interior. If don’t have a green thumb but love the idea of having hassle-free plants in your home, then terrariums were designed for you (and me, as I found out)! Seriously, anyone can make one. By the end of this post you’re going to wonder why you ever considered buying one already made!

Categories
Interiors Addict

Video tips: How to style cushions on your sofa

Temple & Webster share their top tips and a helpful video.

We can’t get enough of cushions. We welcome all shapes, sizes and colours, and reserve a special place in our hearts for the unique and hand-embellished. In this welcoming and supportive environment, it’s safe to admit it: we’re cushion addicts.

The great thing about cushions is that they can be totally transformative. Want to explore a new look? Try new colours, mix patterns or follow a trend? It’s all possible with cushions, which have the added advantage of excellent bang-for-buck value. The endless possibilities are also the problem with cushions. We’ve seen a few crimes against cushionry in our time. Over-cushioning, under-cushioning, and the modern day epidemic: crazy-clashy-cushioning.

In the following video, Temple & Webster’s Head of Styling Jessica Bellef explains how to create cushion magic by following three simple rules:

Categories
Interiors Addict

29 ways to stay creative. Love it! Carry a notebook at all times! :) wearemfeo: 29 Ways to Stay Crea

29 ways to stay creative. Love it! Carry a notebook at all times! 🙂 wearemfeo: 29 Ways to Stay Crea