Categories
Homewares

Kmart hack: 2 ways to pimp your belly basket

Seagrass baskets are a versatile addition to any home chasing texture and a touch of Scandi style. For those on a budget, Kmart has made this look more affordable than ever, selling the popular woven baskets for just $12. If the natural look isn’t for you, there’s plenty of simple ways to add a little personality to this welcome home addition. Here’s two to get you started.

the two baskets together

Pom Pom Basket

What you’ll need:
2 metres of ball fringe (around $7 from Spotlight)
Craft glue
Pegs
Scissors

IMAGE 1

Method

Apply a thin layer of craft glue to first 10cm of the ball fringe.

Lift the edge of the handle and push the start of the ball fringe underneath.

Continue to wrap the ball fringe around the basket 3cm from the top, using pegs to hold it in place until the glue sets.

IMAGE 2

When you get to the other handle, cut the ball fringe and carefully push the edge of the fringe underneath.

IMAGE 3

Repeat this process until the fringe is wrapped around the entire basket.

Repeat the process for the top layer.

IMAGE 4

Ombre Basket

What you’ll need:
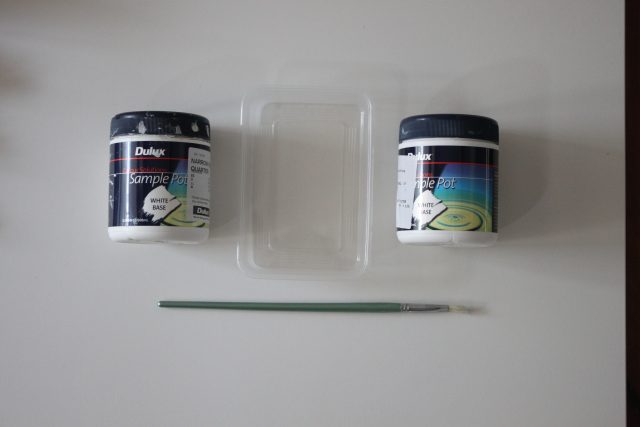
2 sample pots of paint (1 white, 1 in a colour of your choice)
Paint brush
Container to mix paint in

IMAGE 5

Method

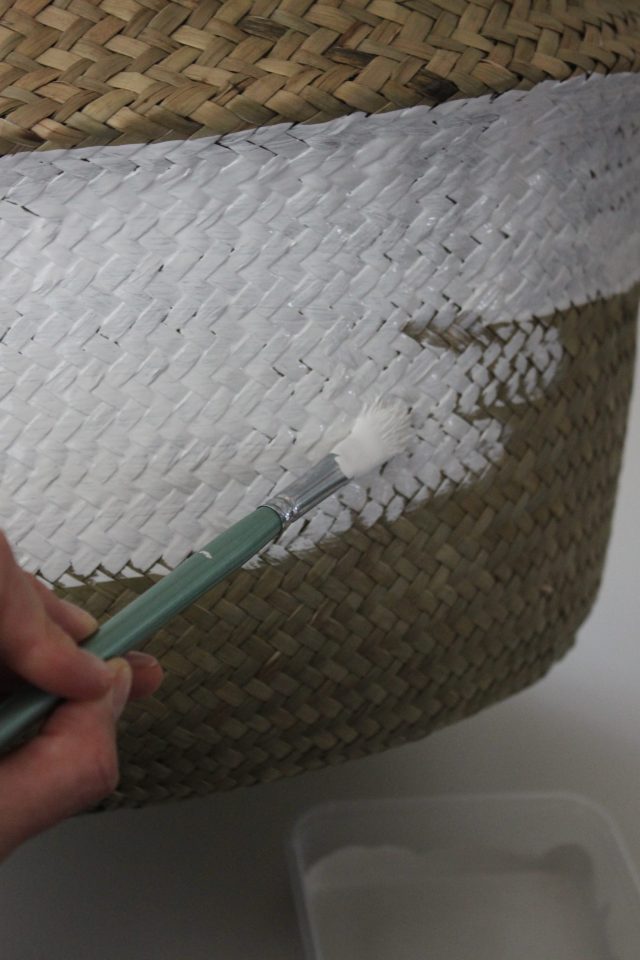
Use the paintbrush to apply a coat of white paint just under the fold line of the seagrass basket. Paint the top third of the bottom half of the basket.

IMAGE 6

In a container, mix equal quantities of the white and second colour.
IMAGE 7

Paint the middle third of the bottom half of the basket. Use the paintbrush to blend this colour with the white above.

IMAGE 8

Paint the final third of the bottom half of the basket in the second colour taking the time to blend with the shade above.

Apply a second coat, following the steps above.

When the basket is dry, flip it over and paint the base.

Optional: to complete the look, attach tassels to the basket handles.

image 9 if you think this is better

So there you have it, two DIY ideas to get you started but the options really are endless. Perhaps you could add leather handles, paint little circles or initials, or add more layers of ball fringe in a variety of colours! We’d love to see your hacks.

–Lauren Ellis is a reporter/senior producer for TODAY, the face of Interiors Addict TV and a graduate of ISCD. Follow her on Instagram @mypicketfence_

Buy the Kmart $12 basket online | Check out our pick of the best baskets

Categories
Homewares

Tara Dennis’ beautiful new Sydney homewares store

Well loved Better Homes and Gardens star Tara Dennis has opened a homewares store and luckily for me, it’s right on my doorstep in Wahroonga on Sydney’s Upper North Shore. I popped in for a visit last week, to find she’s transformed the former purple and yellow party store into a neutral, textural oasis of new and vintage furniture and homewares.

IMG_5015

It’s all happened rather quickly! Tara was actually looking for an office space in the area when husband Martyn stumbled across the vacant shop. That was just before Christmas. Within six weeks, the lease was signed, the space transformed and open for business, and with very little marketing other than word of mouth, it’s had a constant stream of customers ever since. Once you step inside, you’ll soon see why!

Tara Dennis Store 180416_042

Tara Dennis Store 180416_012

It’s not as if mum-of-two Tara, with her TV commitments, corporate work for 3M Command and own homewares range exactly had time on her hands, but now she’s inadvertently given herself a new weekend job as a shop girl! It was never something she yearned to do, but she’s really enjoying it! Tara intends to be in the shop herself, working, every Saturday, and to run different craft workshops in the space out the back too. Stocking the uber popular Annie Sloan Chalk Paint, workshops on how to transform your old furniture with this wonder product will be top of the list!

Tara Dennis Store 180416_027

Tara Dennis Store 180416_018

Custom furniture, such as timber hutches for kitchens, have been the surprise best sellers and Tara loves the fact they can offer something unique to shoppers. Also flying out of the door are vinyl door mats imported from France which look like tiles.

Tara Dennis Store 180416_020

Tara Dennis Store 180416_028

Tara, who owns a house she renovated in the suburb, says everything stocked is something she’d love in her own home.

Tara Dennis Store 180416_033

In today’s eCommerce world, I agree with Tara that shoppers still love a bricks and mortar store with an unusual offering, custom products, great service and in-store events.

It’s not set up like your average store and it’s beautifully styled, changing every few days so you’ll always find something new or be inspired by a new vignette!

Get on down for a visit; you won’t be disappointed! Follow them on Instagram and find info on upcoming classes on their Facebook Page. They’ll soon be selling online too.

The Tara Dennis Store, 33 Redleaf Avenue, Wahroonga, NSW 2076


Categories
Art Designers Homewares

Finders Keepers’ first Adelaide market launches this winter

For the first time, Adelaide residents will be able to experience the magic that is the Finders Keepers markets this winter.

unspecified-8

Arguably the country’s biggest and best design market, Finders Keepers launched in Sydney in 2008 and currently runs in Melbourne and Brisbane and too.

“The design community in Adelaide have been super keen for us to head that way since we launched, so we’re incredibly excited to be able to host our inaugural event in South Australia, “ says co-founder Brooke Johnston.

unspecified-4

Over 200 stalls are expected to set up in the historical Jubilee Pavilion at the Adelaide Showgrounds at Wayville from 12-to-14 August this year.

unspecified

“We can’t wait to see what new and unique items the creative makers of Adelaide bring to our new annual event, and we’re sure that shoppers will be immensely impressed by what’s on offer,” says Brooke.

unspecified-5

Applications for stallholders are currently open so if you’re the creator of original and creative work, independent designs or high quality handmade products, it’s the perfect forum in which to gain invaluable exposure and kick start your design business.

unspecified-3

“We provide a limited number of debut spaces to fledgling artists and designers who’d like to road test their products with the public or are keen to enlist their business into the exciting world of Finders Keepers,” says the market’s communications and sponsorships manager, Angela D’Alton.

unspecified-7

“Our market maintains a reputation as the best for designers launching their labels, for makers to meet their audience and to connect with the lovely, like-minded people of this community,” says Angela.

unspecified-6

To find out more about applying for a stall at the event, or simply information about attending, click here for more.

Categories
Interiors Addict

Unleash your creativity at new Melbourne workshop

The Windsor Workshop is Melbourne’s newest one-stop shop for all things creative – and if your New Years resolution was to stop buying and get making, then now is the perfect time to check out their workshop offerings!

The_Windsor_Workshop_Sarah_Hankinson_Beck_Rocchi_08
Fashion illustrator and Windsor Workshop co-founder Sarah Hankinson. Photo: Beck Rocchi

Whether it be watercolour painting led by one of Australia’s most in-demand fashion illustrators Sarah Hankinson (Vogue, Harper’s Bazaar, Harrods), ceramics with boutique clay-spinner Ingrid Tufts (Cumulus Inc, Ivy Muse, Safari Living), a social (and mindful) adult colouring-in session using work by well-known Illustrators such as Annie Davidson (Mozi, Grace + James) and Natalie Martin, or the opportunity to make a family heirloom with needle ninja Threadfolk, there’s something for all interests and skill levels (no experience necessary!).

The Windsor Workshop is run by a trio of creative Melbourne lasses: sisters Bree and Sarah Hankinson (also behind bespoke wedding stationery outfit Santiago Sunbird) and Belinda Galloway, formerly of eg.etal contemporary jewellery gallery. Busy mums to a collective of five kids, all are passionate about supporting local artists and nurturing creativity in others.

Belinda Galloway Bree Hankinson Sarah Hankinson The Windsor Workshop Photo by Beck Rocchi
Co founders Belinda Galloway, Bree and Sarah Hankinson. Photo: Beck Rocchi

The Windsor Workshop is also a thriving co-working space. Home to 12 desks, its clientele is made up of creatives and freelancers (think fashion designers, journalists, photographers and marketing types). If you’ve been wanting to unleash the artist within, then jump into one of these fun, wine-fuelled, relaxing workshops (the girls will feed your minds and your bellies with delicious food and wine for any half-day workshop!) – bring your friends or make some new ones!

For more information.

Categories
Bathrooms Homewares

Beci Orpin designs toilet paper you won’t mind leaving out

It’s not often (and thankfully so) that we talk about toilet paper. However, the recent collaboration between Who Gives A Crap — a sustainable toilet paper company that contributes 50 per cent of all its profits to building toilets across the developing world — and creative crafter Beci Orpin, is certainly worthy of note.

nUVhQJeYFOKicvUCOih8rVBU-k8waT6sIKOXDM--2yI,z7V7MBin5O4t8n6NiNvZAyySmTO69Nuc1PwAapuInFc

Beci, the art director of Arro Home, was given free rein to design four limited edition wrappers for the collection, along with a fifth wrapper featuring instructions on how to turn each design into a different craft project: a hanging mobile, fortune-teller, toilet roll glasses, party balls or an envelope.

Screen Shot 2015-09-24 at 9.21.33 am

“We have always encouraged our customers to turn our wrappers and cores into craft projects and we were excited to have Beci (a very talented designer and crafter) explore this phenomenon further,” says Who Gives A Crap CEO, Simon Griffiths. “It was our dream that people would be proud enough of Who Gives A Crap to display it in their bathrooms and our limited edition wrappers are about taking this to the next level.”

IKBRUC0wv_LENzr986riGO94838GCz59SBx-JRK3N3A,su6W6pHeFiZpgy5hcp5vHxt47DFo3h3rgaiGoxdd-3Q

Founded in 2012, Who Gives A Crap has continually challenged perceptions around toilet paper, transforming a formerly unglamorous and utilitarian product into a beautifully designed, environmentally friendly and ethical offering. Since its conception, sales of the product have raised enough money to give over 69,380 people access to a toilet for a whole year!

“We love toilet paper, but we exist because roughly 2.5 billion people don’t have access to an adequate toilet,” explain Simon. “WaterAid tell us that for every one dollar invested in sanitation, we see an eight dollar increase in economic productivity due to improved health, higher productivity and higher school attendance rates, especially for teenage girls.”

The limited edition collection is available online exclusively through the Who Gives A Crap.

Categories
Interiors Addict

The Etsy Design Awards winners 2015!

Ok, so they come as no surprise to me seeing as I was one of the judges, but I’m delighted to finally be able to share with you the winners of this year’s Etsy Design Awards! They’re an impressive bunch and what amazing ambassadors for Etsy!

And the winners are (drumroll please)…

Art, Illustration & Papergoods: Liz Payne, Flirting with Yellow

Screen Shot 2015-08-26 at 10.38.35 pm

Fashion & Accessories: Sarah van Oosterom, Sarah van Oosterom

Home & Living: Gwyneth and Dave Hulse, Gwyneth Hulse Design

New Talent: James Howe, Vos Kho Baby

Business as Unusual: Grace Wood, Grace Wood Design Studio

Screen Shot 2015-08-26 at 10.31.32 pm

Community Choice: Sonia Singh, Tree Change Dolls

Screen Shot 2015-08-26 at 9.41.51 pm

Representing some of the best of Etsy’s creative community across Australia and New Zealand, this year’s Etsy Design Award winners impressed us judges­ and the public ­with their sophisticated designs, ingenuity and commitment to craftsmanship. The winners have secured a host of prizes designed to help them grow their businesses and profile including a feature in Inside Out magazine.

The New Talent and Community Choice winners James Howe and Sonia Singh, will also be embarking on a once­ in ­a ­lifetime trip to Etsy’s headquarters in Brooklyn, New York. According to James (voskhobaby.etsy.com), the creative validation the Etsy Design Awards has provided is as valuable as the prizes offered. “The prize is amazing, of course, and I’m really grateful for the boost it will no doubt give my design career. But most of all, as an emerging furniture designer, it’s wonderful for my work to have some external validation. Making the change table, I spent so many hours winding on Danish cord that by the time I’d finished I had honestly lost all insight into whether it looked good or not! So for my work to be noticed by such a high­ calibre judging panel is great,” he said.

Business as Unusual winner Grace Wood (gracewooddesigns.etsy.com) agrees: “Winning an Etsy Design Award is an incredible achievement and milestone for me. I started my little business with nothing other than passion for my craft and a lot of hope that the public would like my products! I never would have dreamed that a year and a half later I would be receiving such an accolade from a company I admire so greatly, that has supported me so much right from the beginning, and given me every opportunity to showcase and promote my products.”

Etsy’s managing director Australia and Asia, Helen Souness, said she was once again astonished by the breadth of creative talent displayed by the 2015 Etsy Design Award winners. “As this year’s winners highlight so brilliantly, the talent in Etsy’s Australian and New Zealand community and the quality of the goods they design, make and curate is remarkable. We’re thrilled to be able to once again showcase some of the best of the Etsy seller community through the Etsy Design Awards and to support the continued growth of their businesses on Etsy.”

This is the second year for the competition which celebrates the people and talent that make Etsy a destination for creativity and original design. The 2015 judges included myself, Inside Out’s editor ­in ­chief Claire Bradley, National Gallery of Victoria senior curator Ewan McEoin, and Etsy’s managing director Australia and Asia, Helen Souness.

Read more about this year’s winners.

Photography by Lauren Bamford, styling by Jacinta Moore. Apart from Tree Change Dolls photo, by Natalie Mendham.

Categories
Art Designers Interviews

The Colour English: creating beautiful one-of-a-kind wool art

Being introduced by a mutual friend it only took a meal and a glass of wine for Georgia English and Rachel Osborne-Walker to know that they wanted to go into business together. What that business would be, however, was less clear.

image
Georgia and Rachel

“We were from similar backgrounds and both craving a new project but had no firm idea of how we were going to combine our talents and skills,” explains Georgia. “But we hit it off and knew we could work wonders together. We were both at a stage with the age of our children where we needed something for us and something to express our creativity again.”

image

[contextly_sidebar id=”4eSnSJT2OXcat8Jh5Hn7RJJ1LFYD3bCB”]With Georgia coming from a background in media and fashion and Rachel a career in publishing, they both shared an obsession with creating things. So when Georgia picked up a part-time job in their local wool and craft shop on the Mornington Peninsula, inspiration struck. “We met in the wool shop on Georgia’s lunch break one day and decided to buy five balls of wool each,” says Rachel. “The soft texture of beautiful wool is such an alluring medium to work with, so we then spent an evening experimenting with our new yarns and our first wool art was formed!” From there, in late 2014, their business The Colour English was born.

image

Creating one-of-a-kind wool art, each piece has its own unique personality. “We give them a name when they are finished and describe what they mean to us and how they have evolved on an individual label that is placed on the back of each piece,” explains Rachel. “Some pieces we work together on. Other pieces we work on individually.”

Inspired by colour, they create their art with no set plan but rather discuss what kind of mood they want the colours to give off. “We let the wool and colours happen freely,” says Georgia. “The soft textures of beautiful wool is such an alluring medium to work with. We are inspired by the gentle texture and the huge range of amazing yarns now available.”

image

Whilst wool is definitely their medium of choice, they are both interested in pursuing other crafts in the coming months. “Georgia has dabbled in painting with acrylics in the past and has been commissioned on a few occasions,” says Rachel. “Going forward we aim to build our brand with the introduction of original painted artworks, prints and another project that we are calling fabric art. Our framed fabric art will be created using vintage fabrics and trims.” Watch this space!

Styling by Mardi Mason | Photography by Lisa Atkinson

Shop online.

Categories
Art Expert Tips

How to create your own easy original artwork

By Hayley Shaw

We live in an era where presenting your home in a modern and contemporary way has never been easier. With more shops pumping out accessories and furnishings at lower prices its easy and affordable to give your home a makeover.

Paint Tubes

[contextly_sidebar id=”GJm7eCNALwKwM98Qxzjj2QfXlyS9Fb37″]But there are still certain items which are placed on the significantly higher top shelves, for those wanting original pieces. I’m one of ‘those’ people. If I spot a vase I own on a friend’s hall table, mine will make a quiet retreat to the back of my kitchen cupboard to await the yearly house purge. Petty I know, but I can’t help it. I want to be different!

Amongst the original high-end items are paintings, and although ‘thought provoking’ art is usually worth every cent the artist is asking for, $5,000 for one piece is not going to fit into every budget. This is where creating your own original art can work beautifully. Sure, it’s probably not going to come to life like the works of Vincent van Gogh, Leonardo de Vinci or Bert from Mary Poppins, but just matching it in with the colours of your current decor items can really bring the room together.

I can sense a lot of you groaning so I’ve created a very simple, achievable example with steps, so you really can’t get lost.

Before you start, make sure you’re in ‘the zone’. You might as well enjoy the relaxation of this project so make a little me time. If the following apply, make sure the kids are happily watching a DVD, the pets are fed and watered, your other half is aware that you really need this quiet time to make you a better contributor to the relationship, then set the iPod to play relaxation tracks before putting on a pot of camomile tea. Perfect.

STEP 1 – Firstly, you’re going to need a few tools and supplies. Some of them you will probably already have in your stationery draw. For the example below I used a pencil, masking tape, a ruler, a paint brush, paint and a flat board canvas which measured 46x46cm. This technique, however, could be achieved on any sized canvas board or a canvas which has been stretched over a frame.

HOPE STEP 1

STEP 2 – I’ve chosen to leave a two-inch border around my painting. After measuring and marking the corners two inches in, use your masking tape to create the border and edge for your painting. Then using the ruler again, mark every two inches along the inside of the taped border on all four sides. I just marked it with a dot. Once this is completed you can start laying down your masking tape diagonally, matching each dot with the dot on the adjoining side. Repeat this process again on the reverse diagonal. It should now look something like this:

HOPE STEP 2

STEP 3 – Time to paint. Make sure the masking tape is well and truly stuck. If it starts lifting up the paint will bleed through underneath. Load your paintbrush up with paint and start painting, starting the stroke on the tape then onto the canvas. This also helps to stop the bleeding as you’re not pushing paint against the tape, but over and off it. In my example I’ve used orange, purple and green acrylics.

HOPE STEP 3
STEP 4 – Ta-dah! The big reveal. You can wait until your painting is completely dry before removing the tape but if you’re super eager to see your handy work remove the tape carefully. You don’t want to let any tape fall back onto the canvas as you’re pulling it off. Here’s how mine turned out.

HOPE STEP 4
As you can see on my painting above, there are a few spots where the paint has bled under the tape but once dry it’s an easy fix, just using some white paint to carefully touch it up.

Here are a couple of other paintings I created using the same masking tape idea:

barcode 1

Fireworks 1
Now all you need to do is to have it framed and hang it proudly. And the best thing of all? You’ll be hard-pressed finding any friends with the same painting!

–Hayley Shaw is an Australian abstract artist residing in Northern NSW. Her blog and artworks can be viewed on hayleyshaw.com.au

Categories
Homewares

Brisbane stylist Tahn Scoon’s latest book: The Thoughtful Home

Here at Interiors Addict there are two things we’ve always been big on: style without the snobbery (so your home doesn’t have to be full of designer or expensive pieces to look fabulous) and your home being a reflection of the people who live in it, with real personality. So stylist Tahn Scoon’s latest book, The Thoughtful Home, really appeals.

covera

Basically, the idea behind the book was to show people how to create fresh, simple and pretty interiors, even on a tight budget – it includes heaps of insider advice and a handful of super easy how-to projects,” she says.

_MG_5524web

The Queensland interior stylist and decorator, who also wrote New Vintage, shares all her insider tips and tricks on how to create thoughtful, authentic and beautiful interiors – homes that are kind to the purse, kind to the planet and a pleasure to live in.

Insider tips include how to achieve bespoke style cabinetry at a fraction of the cost, how to give children’s rooms the vintage treatment and how to professionally style your home so it’s magazine shoot ready!

FloaterTubchair-Gap

How-to projects include a designer fabric cutting cushion, crystal decanter light fitting and ‘chalk’ painted vintage frame.

While being a mum doesn’t give me much time to read at the moment, I’ve flicked through my copy and found it a lovely browse.

The Thoughtful Home is published by New Holland. Buy a signed copy online from Tahn’s website.

Categories
Art Homewares

Online shopping fix: NickersAnne

Growing up with an avid sewer for a mother, Nicole Pollock was crafting from a very early age. Yet it wasn’t until her thirties, after going back to university to study interior design, that she began to appreciate her skills.

Screen Shot 2015-07-09 at 10.30.37 am

Purchasing a beginner’s loom, Nicole fell in love with the act of weaving, leading her to delve back into the memory bank and pull out her long forgotten macramé skills. Now a year later she creates full-time, making one of a kind wall hangings, usually woven or knotted (macramé), for her fibre art line, NikersAnne.

il_570xN.767601485_95d6

Loving texture and colour, Nicole also dabbles in dying her own yarn, designing wall hangings that are both traditional and modern.

Screen Shot 2015-07-09 at 10.29.56 am
All hand-knotted or hand-woven, they can be shipped worldwide. Shop online.

Categories
Bedrooms Expert Tips Kids Rooms

How to: make a children’s teepee for under $30!

Am I the only adult out there to be so excited by teepees? Seriously, where were these when I was a kid?! These days, going by Pinterest and Instagram, teepees are a staple for any nursery or kids room. So it was only a matter of time before we had a DIY go at Interiors Addict!

jgf

Step 1: Pick up Supplies

      Supplies:

  • 4x dowel rods (120cm each)
  • Tablecloth/ fabric (120cm x 365cm)
  • Rope (1 metre)

     Tools:

  • Drill + 6.5mm drill bit
  • Sandpaper
  • Needle
  • Cotton

If you are wanting to make a teepee on the cheap and avoid shelling out on fabric, I raided my grandmother’s linen closet and found a plethora of options. You can really use anything; bed sheets, quilt covers, curtains, the options are endless. In my case, I opted for a lace table cloth number which worked perfectly and eliminated me needing to learn how to sew. I do like a little boho vibe, so lace it was!

Step 2: Drill rope holes

Sand down dowel rods and any rough edges with a piece of sandpaper. Make a small mark on each dowel around 10cm from the top and mark with an x. Carefully drill one hole in each dowel. If you aren’t confident with power tools, ask someone to help you.

IMG_8129

Step 3: Framing

Thread the rope through all the holes (it’s easier if you wrap some sticky tape around the end of the rope to help it fit through the holes). Once the rope is threaded through, tie a knot firmly then wrap the rope around a few more times. Establish equal spacing between the dowels to make your teepee even on all sides. Once you have equal spacing, wrap the rope around a few more times and tie a secure knot.

IMG_8638

IMG_8639

Step 4: Sewing!

Drape the fabric around the outside of the structure. Once you’re happy with how it sits, begin sewing. I wrapped the fabric around each pole and sewed up the inside of the pole through the holes already in the lace so you can’t see any of the stitching. Sew up the inside of all four posts to ensure the fabric is secure.

Step 5: Style away

Set up your teepee wherever you chose and get styling! Our friends at Cotton On Kids were kind enough to lend us some of my favourite products from their latest range to help out.

jyfgj,

hgfk

If DIY isn’t your thing and you’re after a teepee Etsy has your back with a heap of choices.

–Kathryn Bamford is our girl on the ground in Melbourne; you can follow her DIY & design adventures on Instagram @thedesignrookie.

Categories
Art Expert Tips Homewares

Weaving tutorial: create your own wall hanging

When Amanda O’Sullivan shared one of her beautiful woven wall hangings during our 7 Vignettes contest on Instagram earlier this month, she wowed plenty of our readers. So we were delighted when she agreed to put together this great tutorial for us.

WeavingStyled1

There’s a weaver fever going around right now! If you are excited about weaving being cool again and you’re keen to try making your own woven wonder, you will be happy to hear that it’s not that hard. While it may look complicated, all you need are a few simple techniques under your belt and you’re ready to create your own beautiful wall hangings. Don’t despair if you haven’t got a loom, because you can make your own from an old frame or even a piece of sturdy cardboard. Today, I’m going to share the basic skills you will need to know to create your first wall hanging. Enjoy!

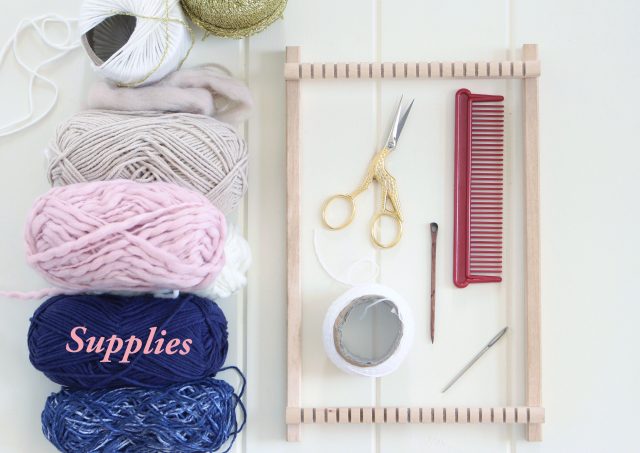
What you’ll need
WeavingSupplies

  • Lap loom
  • Wide tooth comb
  • Strong cotton for warping
  • Various yarn and fibre for the weft (the weaving threads)
  • A weaving or tapestry needle
  • Scissors
  • A stick or rod for hanging.

Step 1: Let’s get warping! Warp is the term used for the strong cotton threads that run up and down vertically on your loom. To start, wrap your cotton around the first tooth and tie it securely in place, then run the thread up to the opposite tooth at the top of the loom. Wrap the cotton around this tooth and then run your thread back down to the bottom of the loom. Continue running the thread up and down until you have reached your desired size. I’ve covered my entire loom with warping thread for this project. Tie another knot firmly around the last tooth. Finally, turn your loom 180 degrees so that the bottom (the end with the knots) now sits at the top of your weave.

WeavingStep1

Step 2: Thread your tapestry or weaving needle with yarn and cut off a workable length, as you don’t want to get yourself in a tangle! For larger weaving projects you could use a shuttle; a stick that you can load up with yarn and pass through the warps. I prefer to stick to a needle. The threads that go across are called the weft. Remember to start at the end of the loom without the knots and weave your needle over and under the warp thread until you reach the end, then return back through the warp, alternating over and under. Always leave 2-to-3 inches of tail so that you have enough length to weave in your ends.

WeavingStep2

Step 3: When weaving your thread, work a few inches above your previous row, as this will help maintain good tension. Each row of weaving is then pushed down onto the previous row with your wide tooth comb. If you run out of yarn in the middle of a row, simply pull your yarn through to the back, making sure to leave a few inches to stitch in later. Start your new yarn where your last finished and continue.

WeavingStep3

Step 4: After 5 or so rows, you may like to add some tassels to your weave. The number of pieces of yarn required for each tassel depends on the thickness of your thread. As my yarn is quite thin, I’ve used 8 pieces for each tassel. If your yarn is thicker, 8-ply or larger, you may only need 3 or 4 pieces. Don’t make your tassels too bulky as they won’t sit nicely. Layer your threads on top of each other and then weave your threads under 2 warps. Lift the threads up through the warp with your finger to create a small loop. Grab both ends of the tassel and thread them through this loop. Lift up and pull to tighten your tassel and then tug down into position.

WeavingStep4

Step 5: I’ve placed tassels all along the bottom of my weave. Continue weaving, changing colours as you go.

WeavingStep5

Step 6: If you’d like to add shapes or change colours mid loom, simple weave as normal to the point where you’d like the colour to end. Weave in between the threads of the neighbouring colour (see picture) to keep the weave smooth and connected. Continue weaving, changing colours and adding tassels as you please. Make sure you stop weaving at least a couple of inches before you reach the top, as you’ll need some length in your warp to tie knots when you remove your weave from the loom.

WeavingStep6

Step 7: Removing your weave from the loom can be a bit scary, but if you follow these instructions, your weave will remain happily intact! Carefully slip your weave off the bottom of the loom — the bottom is where you started weaving, the end without the knots. When the weave is free from the end, push your work gently to the bottom. At the top of the loom, remove the warp from one tooth at a time and cut at the top of the loop, creating 2 threads. Tie these threads together firmly into a knot. Continue removing your warp, one tooth at a time, until all of the threads are knotted. Ta-dah! Your weave is now free.

WeavingStep7

Step 8: Tuck these ends into the back of your weave using your needle. Alternatively, you may like to tie these threads onto your stick or bar for hanging.

WeavingStep8

Step 9: Now it’s time to tidy up your loose threads at the back of your weave. Simply thread the dangling yarns into your needle and pass them through about 2cm of weave at the back and snip off the ends to tidy up.

WeavingStep9

Step 10: How you choose to attach your weave to a hanging mechanism is completely up to you. I’ve loosely stitched mine onto a stick and then attached some string for hanging. Once you’ve attached yours, simply hang and admire!

–Amanda O’Sullivan is country girl with a passion for interiors, craft and design. She is the proud owner of RedAgape Guesthouse in Millthorpe and RedAgape Blog, where she showcases her creative endeavours. We think her Instagram feed is well worth a follow too!

WeavingStep10

So, will you give it a go? We’d love to see your efforts on Instagram! Please tag us if you share them!

Categories
Art Competitions

Win the ultimate craft studio for your home with furniture, accessories and the help of a professional stylist

Sponsored by Brother Australia

Inspiration can come from anywhere, but having a creative space with all the essential tools fosters the perfect environment to spark creativity and bring your ideas to life. This Mother’s Day, Brother Australia introduces the concept of the creative/sewing space, a place where all your creative ideas come together and a place where inspiration, creativity and Brother are the perfect partners. This is where the #BrotherInspires campaign comes to life.

Brother-318HighRes_Edit

Brother has partnered with highly recognised bloggers to inspire the community with projects that will show everyone how to make their ideal creative space a reality. The community are asked to pick and recreate their favourite inspiring project which can be found on the Brother projects page marked with an ‘I’.

This is not where it stops…with the #BrotherInspires campaign in mind, we have a really exciting month-long competition to announce this week, giving you the chance to create your very own, fabulous sewing or craft studio in your home with furniture, accessories and the professional skills and assistance of one of our favourite stylists, Briar Stanley from Sunday Collector.

Interior stylist and blogger Briar Stanley from Sunday Collector and daughter Sunday

To enter the #BrotherInspires Competition, all you need to do is either pick your favourite project made by one of Brother’s four influencers and recreate it, or make something unique for your sewing space.

Images of your entry must have the hashtag #BrotherInspires physically within the image to be valid. You can submit your project either via the Facebook App or on Instagram using the hashtag #BrotherInspires. An automated response will then provide you with a link to complete your entry on Facebook.

Once the projects have been created and submitted (deadline 11 May 2015), a judging panel (including yours truly!) will pick one lucky person to win an Inspirational Sewing Space valued at more than $12,000.

The grand prize will include:

    • Consultation – assess the room and chat with the winner to understand what inspires them.
    • Plan – provide the winner with a presentation of the suggested space, based on the discussion. This will include furniture and décor suggestions.
    • Process – Briar and the winner will shop for the larger furniture items to help pull the room together.
    • Completion – Briar will work with the winner to style the craft studio and complete the space!

In addition to the grand prize, there’ll also be two runner-up prizes. Entrants are encouraged to post a progress shot on Facebook or Instagram using the hashtag #BrotherInspiresWIP and #BrotherInspires for their chance to win a ScanNCut CM550DX. The grand prize and the runner-up winners will be announced on the same day: 29 May 2015.

Everyone who submits an eligible entry will also receive a copy of the ScanNCut Project and Idea Book.

Will you have a go at making this vase for your chance of winning?

With such great prizes at stake, being creative has never been easier! For full terms & conditions please visit the #BrotherInspires Competition app on the Brother Australia Facebook page.

Struggling to get started? Brother has gone one step further to provide inspiring quotes to help drive creativity and keep everyone motivated. The free downloadable quotes are available on the Brother website and perfect to put up in your home and creative/sewing space!

Categories
Expert Tips Homewares

Learn the latest craze for free form weaving

We’re seeing it everywhere lately: for sale in homewares stores and all over Instagram: weaving! If you want one of these retro style creations with a modern twist in your home, why not join this free form weaving workshop at West Elm next month?

photo5

The evening workshop on Thursday 7 May at West Elm Bondi Junction is being run by Sky Carter, a passionate weaver and textile artist sharing her love of weaving with the world! She has a studio in St Peters, Sydney, where she creates wall hangings and makes cushions full-time. “In my workshops I teach my weaving style which is a free and intuitive style using materials beyond just yarn,” she says. “They are a lot of fun.”

photo9

The cost is $120 with everything provided and you get to take home your own wall hanging. Enquire/book via email: [email protected]

photo8

Categories
Design

Check out brand new lifestyle blog, We Are Scout

A new blog launched today and I think it’s going to be pretty great. We Are Scout is a collaboration between two popular Australian design and lifestyle bloggers, Lisa Tilse (The Red Thread) and Rebecca Lowrey Boyd (Wee Birdy).

Lisa-and-Rebecca_we-are-scout
Lisa and Rebecca

With an impressive 13 years of combined blogging experience, along with many years’ experience in the magazine, publishing and design industries, Lisa and Rebecca bring a fresh and thoroughly professional edge to the lifestyle blog category. And if there’s something I’ll personally always champion it’s professional bloggers. The more of us out there, showing we’re a force to be taken seriously, the better!

Based in Sydney, both Lisa and Rebecca offer an expert global view on design, craft, interiors, travel, shopping, fashion and beauty, with a distinctly Australian voice and focus. By combining forces, the pair believe that We Are Scout will quickly establish itself as a trusted, respected and influential lifestyle blog that will lead trends and shape tastes.

Content will include:
– free DIY craft tutorials;
– free printables;
– shopping & destination guides and maps;
– a weekly newsletter with extra content.

Photo credit: Lisa Tilse
Photo credit: Lucas Boyd

Designer, crafter and maker Lisa established The Red Thread, in 2008. Her passion for living a creative life and inspiring others to embrace creativity has attracted a loyal global following.

Experienced journalist Rebecca Lowrey Boyd founded Wee Birdy during the summer of 2007 in London, and captured the attention of a global audience obsessed with shopping, fashion, design, interiors, style, travel and beauty.

What are you waiting for? Go check it out and tell the girls I sent you!

Categories
Art Expert Tips Homewares Styling

How to: make an inspiration board for your home office

I’m the first to admit to having a serious addiction to both Instagram and Pinterest. I am a visual learner and well, there are just so many pretty pictures, how can you not be? Yet, I still find myself collecting magazine cutouts and swatches of fabric (surely I can’t be the only person out there doing this?).

I wanted to create an inspiration board for my home office where I could physically pin such finds. I had a bit of a look around online and in stores and couldn’t find anything that matched my decor, let alone any that I was willing to have on show to visitors. All I found were plain boring cork boards or, if you wanted to mix it up, half cork board/half whiteboard and let’s be honest, nothing that looked like that would be going up on my walls! So, as you do, I decided to make my own. Here is what I made and now I’m going to show you just how easy it was to whip up!

IMG_8369

Step 1: Decide on a frame and design + Pick up supplies

Being a renter, I needed something relatively light so my trusty 3m velcro strips would hold it up. This threw out my original idea of an ornate vintage frame, so I went for a lightweight and budget friendly option from my local junk shop. I opted for a monochrome pattern that was striking with a relatively easy pattern to paint (given my lack of painting skills).

  • Cork board
  • White primer paint
  • Black water-based acrylic paint
  • Paintbrush
  • Masking tape
  • Pins

image

Step 2: Time to prime

I never realised just how absorbent cork board was! It literally soaks up the primer as you’re painting, so you will need to do at least two coats to make sure you have a decent base.

image

Step 3: Mark out your pattern and paint

This is the most time-consuming part of this relatively quick project. Mark out your pattern with the masking tape. I didn’t use anything fancy, just a tape measure and a lead pencil to make sure my pattern was going to work out evenly across the board.

image

Then simply paint over the pattern. I would recommend two coats for this stage as well.

image

Step 4: Affix to wall

Once the paint is dry, remove the masking tape and ta-dah! Your pattern will all make sense. Then all you need to do is affix to your wall and get pinning!

IMG_8362

I picked up these gold pins in a pack with gold paperclips and bulldog clips from Kmart for only two bucks!

image

–Kathryn Bamford is our girl on the ground in Melbourne; you can follow her DIY & design adventures on Instagram @thedesignrookie.

Categories
Expert Tips Furniture Homewares

Three interiors trends we predict will last well into 2015

By Lisa Tilse

In the world of interiors — as in fashion — trends come and go seasonally and sometimes with even more frequency. Unlike in the fashion industry though, there are often looks and colours that have longevity. These three trends are ones that I’ve seen around for a year or more and are continuing to evolve and gather momentum.

1plants_angusceleste_via_lisa_tilse_the_red_thread
Photo: Angus & Celeste

1. INDOOR PLANTS

From succulents to fiddle leaf figs and ferns, this is a major trend that isn’t going away. Whether you opt for large or small plants, groupings or standalone pots, the addition of living greenery to your home will soften the edges and make your space seem calmer and more welcoming. A bonus of lush indoor greenery is the gorgeous array of pots, buckets and hanging planters that are now available.

Clockwise, from top left: Minimal Hanging Garden – Angus & CelesteBrass Vessel – LightlyWaves Canvas Planter Bag – Elephant and BirdRomy Northover Planter – Mr KitlyHourglass Plant Stand – Ivy MuseCanvas Bucket – Lumiere Art & CoPink Pot of Gold – Pop & Scott.

1plants_trend_via_lisa_tilse_the_red_thread

2. BLACK & WHITE

Trends are all about contrast, and this one juxtaposes nicely with other current looks like the softness of pastels and the luxe of metallics. The contemporary simplicity of this monochromatic colour scheme has seen it grow in popularity over the past year or two. You can incorporate the black and white trend into your home in small ways, or be brave and go all out and remove all traces of colour!

Photo: Aura by Tracie Ellis

Clockwise from top left: Banyan Cushion – FreedomMoon Pot – Paterson & SteeleForever Print – BlacklistSea Tangle Blanket – Kate & KateOiva/Siirtolapuutarha deep plate – MarimekkoChi Pendant Lightshade – CittaWire Baskets – Lark.

2Black_and_white_trend_via_lisa_tilse_the_red_thread

3. GEOMETRICS

This is one trend that’s been around for some time now, and it shows no sign of losing its edge — we are still crushing on triangular patterns, grids and geometrics. The versatility and adaptability of geometric shapes and patterns is ensuring longevity in homewares from rugs to ceramics, tea towels to bed linen. A new variation of the geo trend is the Memphis look which is enjoying a revival from the eighties.

3geometrics_arrohome_via_lisa_tilse_the_red_thread
Photo: Arro Home

Clockwise from top left: Kaleidoscope Rug – Dan300Peach Stary Night Cushion – Pony RiderLuck of the Drawer – Family Love TreeOiva/Lamppupampula Spoon – MarimekkoLovett Side Table – FreedomBudgie Print – Studio CockatooLattice Tablecloth – Aura by Tracie Ellis.

3geometrics_trend_via_lisa_tilse_the_red_thread

Whether you embrace trends with open arms and transform your living spaces often, or you dabble and mix and match with your existing style, you can have fun with these looks. Even adding a few plants, some new homewares or a key piece of furniture can change up the look of a room and breathe new on-trend life into it.

–Lisa Tilse blogs at The Red Thread.

Categories
Interviews Styling

Little Nicki: “There’s no such thing as an average day.”

“There is no such thing as an average day in styling,” says Nicole Valentine Don, better known as Little Nicki. “Just yesterday, we were feeding cockatoos apples to get them to sit on a lounge for a shot! I’m always sitting back, looking at the situation and giggling to myself about how ridiculous some moments can be.”

6757
Styling by Jason Grant & Nicole Valentine Don. Photo: Lauren Bamford

Having been assisting in interior and lifestyle styling for the last four years, and doing solo work for the past two, Nicki is well versed in the crazy and unpredictable nature of styling. Undertaking a wide range of work from advertising to editorial to online videos and everything in-between, 2014 in particular has been a year of milestones; having her first home styling project featured in Inside Out, becoming a contributor for US lifestyle blog JB EST 1979 and winning Inside Out and The Home’s Search for a Stylist competition. This involved styling a mock Inside Out cover. Her efforts won her a senior stylist role at the online homewares retailer.

“Winning The Home’s competition means meeting new people and sharpening my skills as a stylist,” explains Nicki. “The brief was so open; it was simply to style a vignette with products from The Home. To narrow it down for myself, I decided to make it entirely my style and embrace my strengths, so I knew I had to introduce something handmade. Once I decided that ultimately I was the only person who had to love it, it became more focused and fun!”

SearchforastylistNVD
Inside Out and The Home’s Search for a Stylist. Photo: Guy Bailey

A clear lover of all things handmade, Nicki is not only a stylist but also a maker, running her own Etsy shop where she sells feather arrow sticks inspired by her time in Mexico. “I started my Etsy shop because I had just come back from a trip to Mexico City where I visited the Museum of Anthropology and loved these feather sticks the Huichol Indians made. I really wanted to find one to buy and take home, but of course, couldn’t find them anywhere. I came home and made my own interpretation, mixed with native traditions from Canada. A lot of what I make is inspired by travel.”

Nicki 2nd test-085
Photo: Fiona Galbraith

While it seems like a natural fit now, Nicki wasn’t always destined to become a creative, having spent a lot of her time as a competitive gymnastics coach in her home country of Canada. But after a stylist friend saw her knack for decorating her own home, she started referring her assisting jobs, and the first job? Assisting the legendary Sibella Court with her book, Nomad.

DIY 2-013
Photo: Fiona Galbraith

Assisting turned out to be a very valuable experience and not only led to her first solo job, fitting out the HQ for documentary feature film Storm Surfers 3D, but also gave her the skills that can only come through practice. “Assisting is essential; you might have style and a creative flare, but you need to learn the subtle nuances of making a picture perfect and do a bit of time on the less glamorous side.”

Nicki test-031 copy
Nicki’s home. Photo: Fiona Galbraith

But it’s not just assisting that Little Nicki recommends if you want to get into the industry. More than anything, she believes it’s about putting together a body of work. “My biggest tip for any budding stylists is to absolutely be producing your own work, all the time. Make friends with photographers (often assistants) on jobs that you’re on and make time to get together and shoot. Soon enough you’ll have a body of work and will undeniably be a stylist. You’ll hopefully get a whole lot better as you go and develop your own style as well.”

Find out more about Little Nicki here.

Read all our other styling stories.