When Amanda O’Sullivan shared one of her beautiful woven wall hangings during our 7 Vignettes contest on Instagram earlier this month, she wowed plenty of our readers. So we were delighted when she agreed to put together this great tutorial for us.

There’s a weaver fever going around right now! If you are excited about weaving being cool again and you’re keen to try making your own woven wonder, you will be happy to hear that it’s not that hard. While it may look complicated, all you need are a few simple techniques under your belt and you’re ready to create your own beautiful wall hangings. Don’t despair if you haven’t got a loom, because you can make your own from an old frame or even a piece of sturdy cardboard. Today, I’m going to share the basic skills you will need to know to create your first wall hanging. Enjoy!
What you’ll need
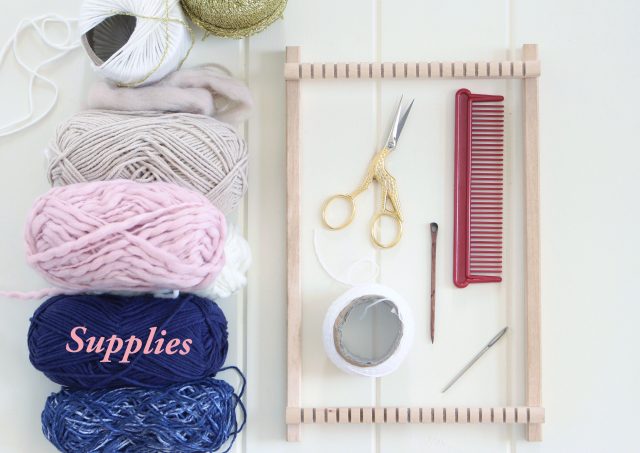
- Lap loom
- Wide tooth comb
- Strong cotton for warping
- Various yarn and fibre for the weft (the weaving threads)
- A weaving or tapestry needle
- Scissors
- A stick or rod for hanging.
Step 1: Let’s get warping! Warp is the term used for the strong cotton threads that run up and down vertically on your loom. To start, wrap your cotton around the first tooth and tie it securely in place, then run the thread up to the opposite tooth at the top of the loom. Wrap the cotton around this tooth and then run your thread back down to the bottom of the loom. Continue running the thread up and down until you have reached your desired size. I’ve covered my entire loom with warping thread for this project. Tie another knot firmly around the last tooth. Finally, turn your loom 180 degrees so that the bottom (the end with the knots) now sits at the top of your weave.

Step 2: Thread your tapestry or weaving needle with yarn and cut off a workable length, as you don’t want to get yourself in a tangle! For larger weaving projects you could use a shuttle; a stick that you can load up with yarn and pass through the warps. I prefer to stick to a needle. The threads that go across are called the weft. Remember to start at the end of the loom without the knots and weave your needle over and under the warp thread until you reach the end, then return back through the warp, alternating over and under. Always leave 2-to-3 inches of tail so that you have enough length to weave in your ends.

Step 3: When weaving your thread, work a few inches above your previous row, as this will help maintain good tension. Each row of weaving is then pushed down onto the previous row with your wide tooth comb. If you run out of yarn in the middle of a row, simply pull your yarn through to the back, making sure to leave a few inches to stitch in later. Start your new yarn where your last finished and continue.

Step 4: After 5 or so rows, you may like to add some tassels to your weave. The number of pieces of yarn required for each tassel depends on the thickness of your thread. As my yarn is quite thin, I’ve used 8 pieces for each tassel. If your yarn is thicker, 8-ply or larger, you may only need 3 or 4 pieces. Don’t make your tassels too bulky as they won’t sit nicely. Layer your threads on top of each other and then weave your threads under 2 warps. Lift the threads up through the warp with your finger to create a small loop. Grab both ends of the tassel and thread them through this loop. Lift up and pull to tighten your tassel and then tug down into position.

Step 5: I’ve placed tassels all along the bottom of my weave. Continue weaving, changing colours as you go.

Step 6: If you’d like to add shapes or change colours mid loom, simple weave as normal to the point where you’d like the colour to end. Weave in between the threads of the neighbouring colour (see picture) to keep the weave smooth and connected. Continue weaving, changing colours and adding tassels as you please. Make sure you stop weaving at least a couple of inches before you reach the top, as you’ll need some length in your warp to tie knots when you remove your weave from the loom.

Step 7: Removing your weave from the loom can be a bit scary, but if you follow these instructions, your weave will remain happily intact! Carefully slip your weave off the bottom of the loom — the bottom is where you started weaving, the end without the knots. When the weave is free from the end, push your work gently to the bottom. At the top of the loom, remove the warp from one tooth at a time and cut at the top of the loop, creating 2 threads. Tie these threads together firmly into a knot. Continue removing your warp, one tooth at a time, until all of the threads are knotted. Ta-dah! Your weave is now free.

Step 8: Tuck these ends into the back of your weave using your needle. Alternatively, you may like to tie these threads onto your stick or bar for hanging.

Step 9: Now it’s time to tidy up your loose threads at the back of your weave. Simply thread the dangling yarns into your needle and pass them through about 2cm of weave at the back and snip off the ends to tidy up.

Step 10: How you choose to attach your weave to a hanging mechanism is completely up to you. I’ve loosely stitched mine onto a stick and then attached some string for hanging. Once you’ve attached yours, simply hang and admire!
–Amanda O’Sullivan is country girl with a passion for interiors, craft and design. She is the proud owner of RedAgape Guesthouse in Millthorpe and RedAgape Blog, where she showcases her creative endeavours. We think her Instagram feed is well worth a follow too!

So, will you give it a go? We’d love to see your efforts on Instagram! Please tag us if you share them!


