Categories
Architecture Design DIY House Tours Real Renos

Apartment living with kids: interior designer shows how he does it

By Lorenzo Logi

Balancing a growing family, a new job and a renovation is no small achievement. Further complicate that with heritage restrictions on a company titled property and competing design objectives in a compact space, and you have a truly acrobatic undertaking. 

Such was the challenge facing Spanish interior designer Jesus del Toro and his family as they embarked on the redesign and build of a 1920s Walter Leslie Nielsen apartment in inner-city Sydney. After months of open houses and budget-busting auctions, and having reluctantly abandoned their hopes of finding an affordable home near the beach, Jesus and his wife Agnes were charmed by the central location and Art Deco setting of an elongated unit in Potts Point with views of St Mary’s Cathedral and the CBD skyline.

Jesus del Toro’s family of four are loving life in their tiny Potts Point apartment

The apartment was in sore need of renovation, however, with a dated, compartmentalised layout that squandered the abundant natural light. And, bound by exacting heritage conservation regulations, the task of adapting the space to the needs and tastes of a modern family of four promised to be challenging. 

“This unit was not in our brief for house-hunting,” says Jesus. “We were looking for something completely different. But this was very eccentric, urban, well-connected, and we were excited by the classical style and also the potential to do renovation works.”

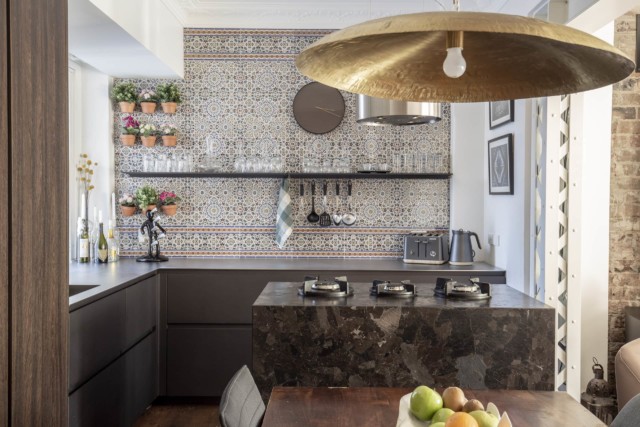
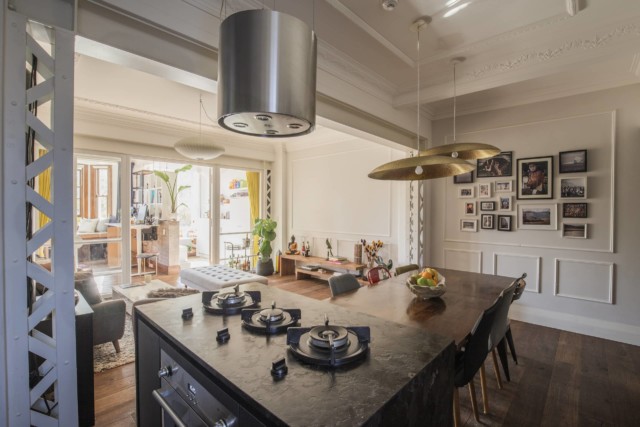
The old, early thirties layout was dark with one long corridor and single rooms. Moreover, the kitchen was designed as a cubicle to be occupied solely by household staff, and the bathroom needed decades worth of updating.

“But there was huge potential to turn it into something awesome, to flip it around and make it contemporary, while respecting the existing features and empowering them with new ones in the same style,” Jesus explains. 

Even with the freedom to rearrange the layout, the task of how to coax all the needs of a young family out of an 80sqm space remained complicated. For Jesus, however, finding resourceful solutions in limited spaces was a familiar challenge. “In my house when I was growing up, we were nine people, including my four older brothers and two grandmas. That means everything inside the house needs to do two or three things. My room was shared with one of my older brothers. I still had my little desk for studying, which doubled for table tennis and foosball. My mum or my grandma was, usually, doing the ironing or the washing in there too. It was a multi-use sort of room, with fold-down beds.”

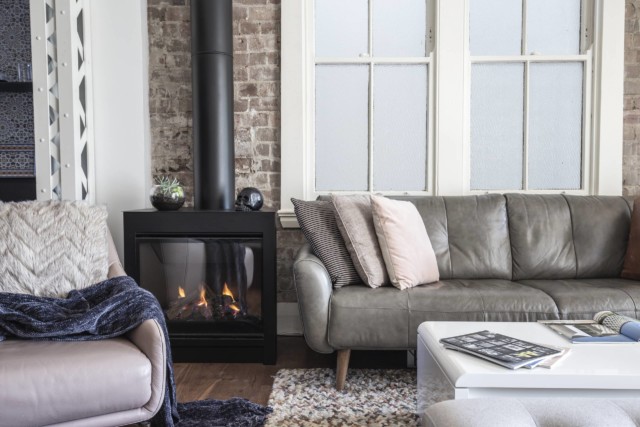
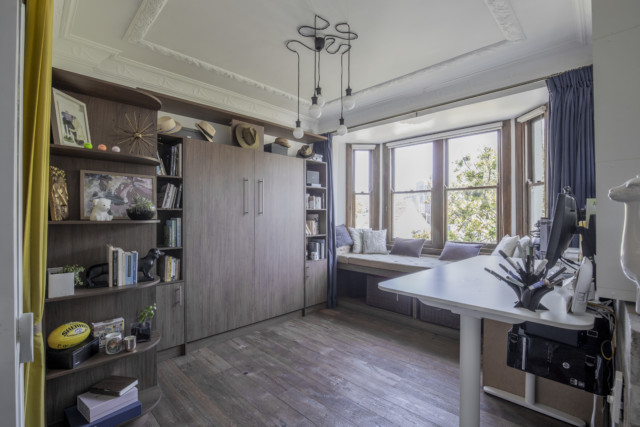
Unsurprisingly then, Jesus’ design included a number of occasional or versatile areas: “In the living space, we have a day bed, a massive standing desk and a library. Here we dry our clothes, practise yoga, play soccer, do ballet, play the ukulele, perform theatre acts for the kids and even take salsa lessons!

“Even though it may seem a little bit scary to have such an open plan home and not be able to have your own space, it is surprising how many little spots you can be in by yourself or as a family in the exact same way,” he observes. “You don’t even realise that it’s the space doing that for you. Plus we get the advantage of having the Art Deco designed glass doors with blackout velvet curtains, blocking visually and acoustically as needed.”

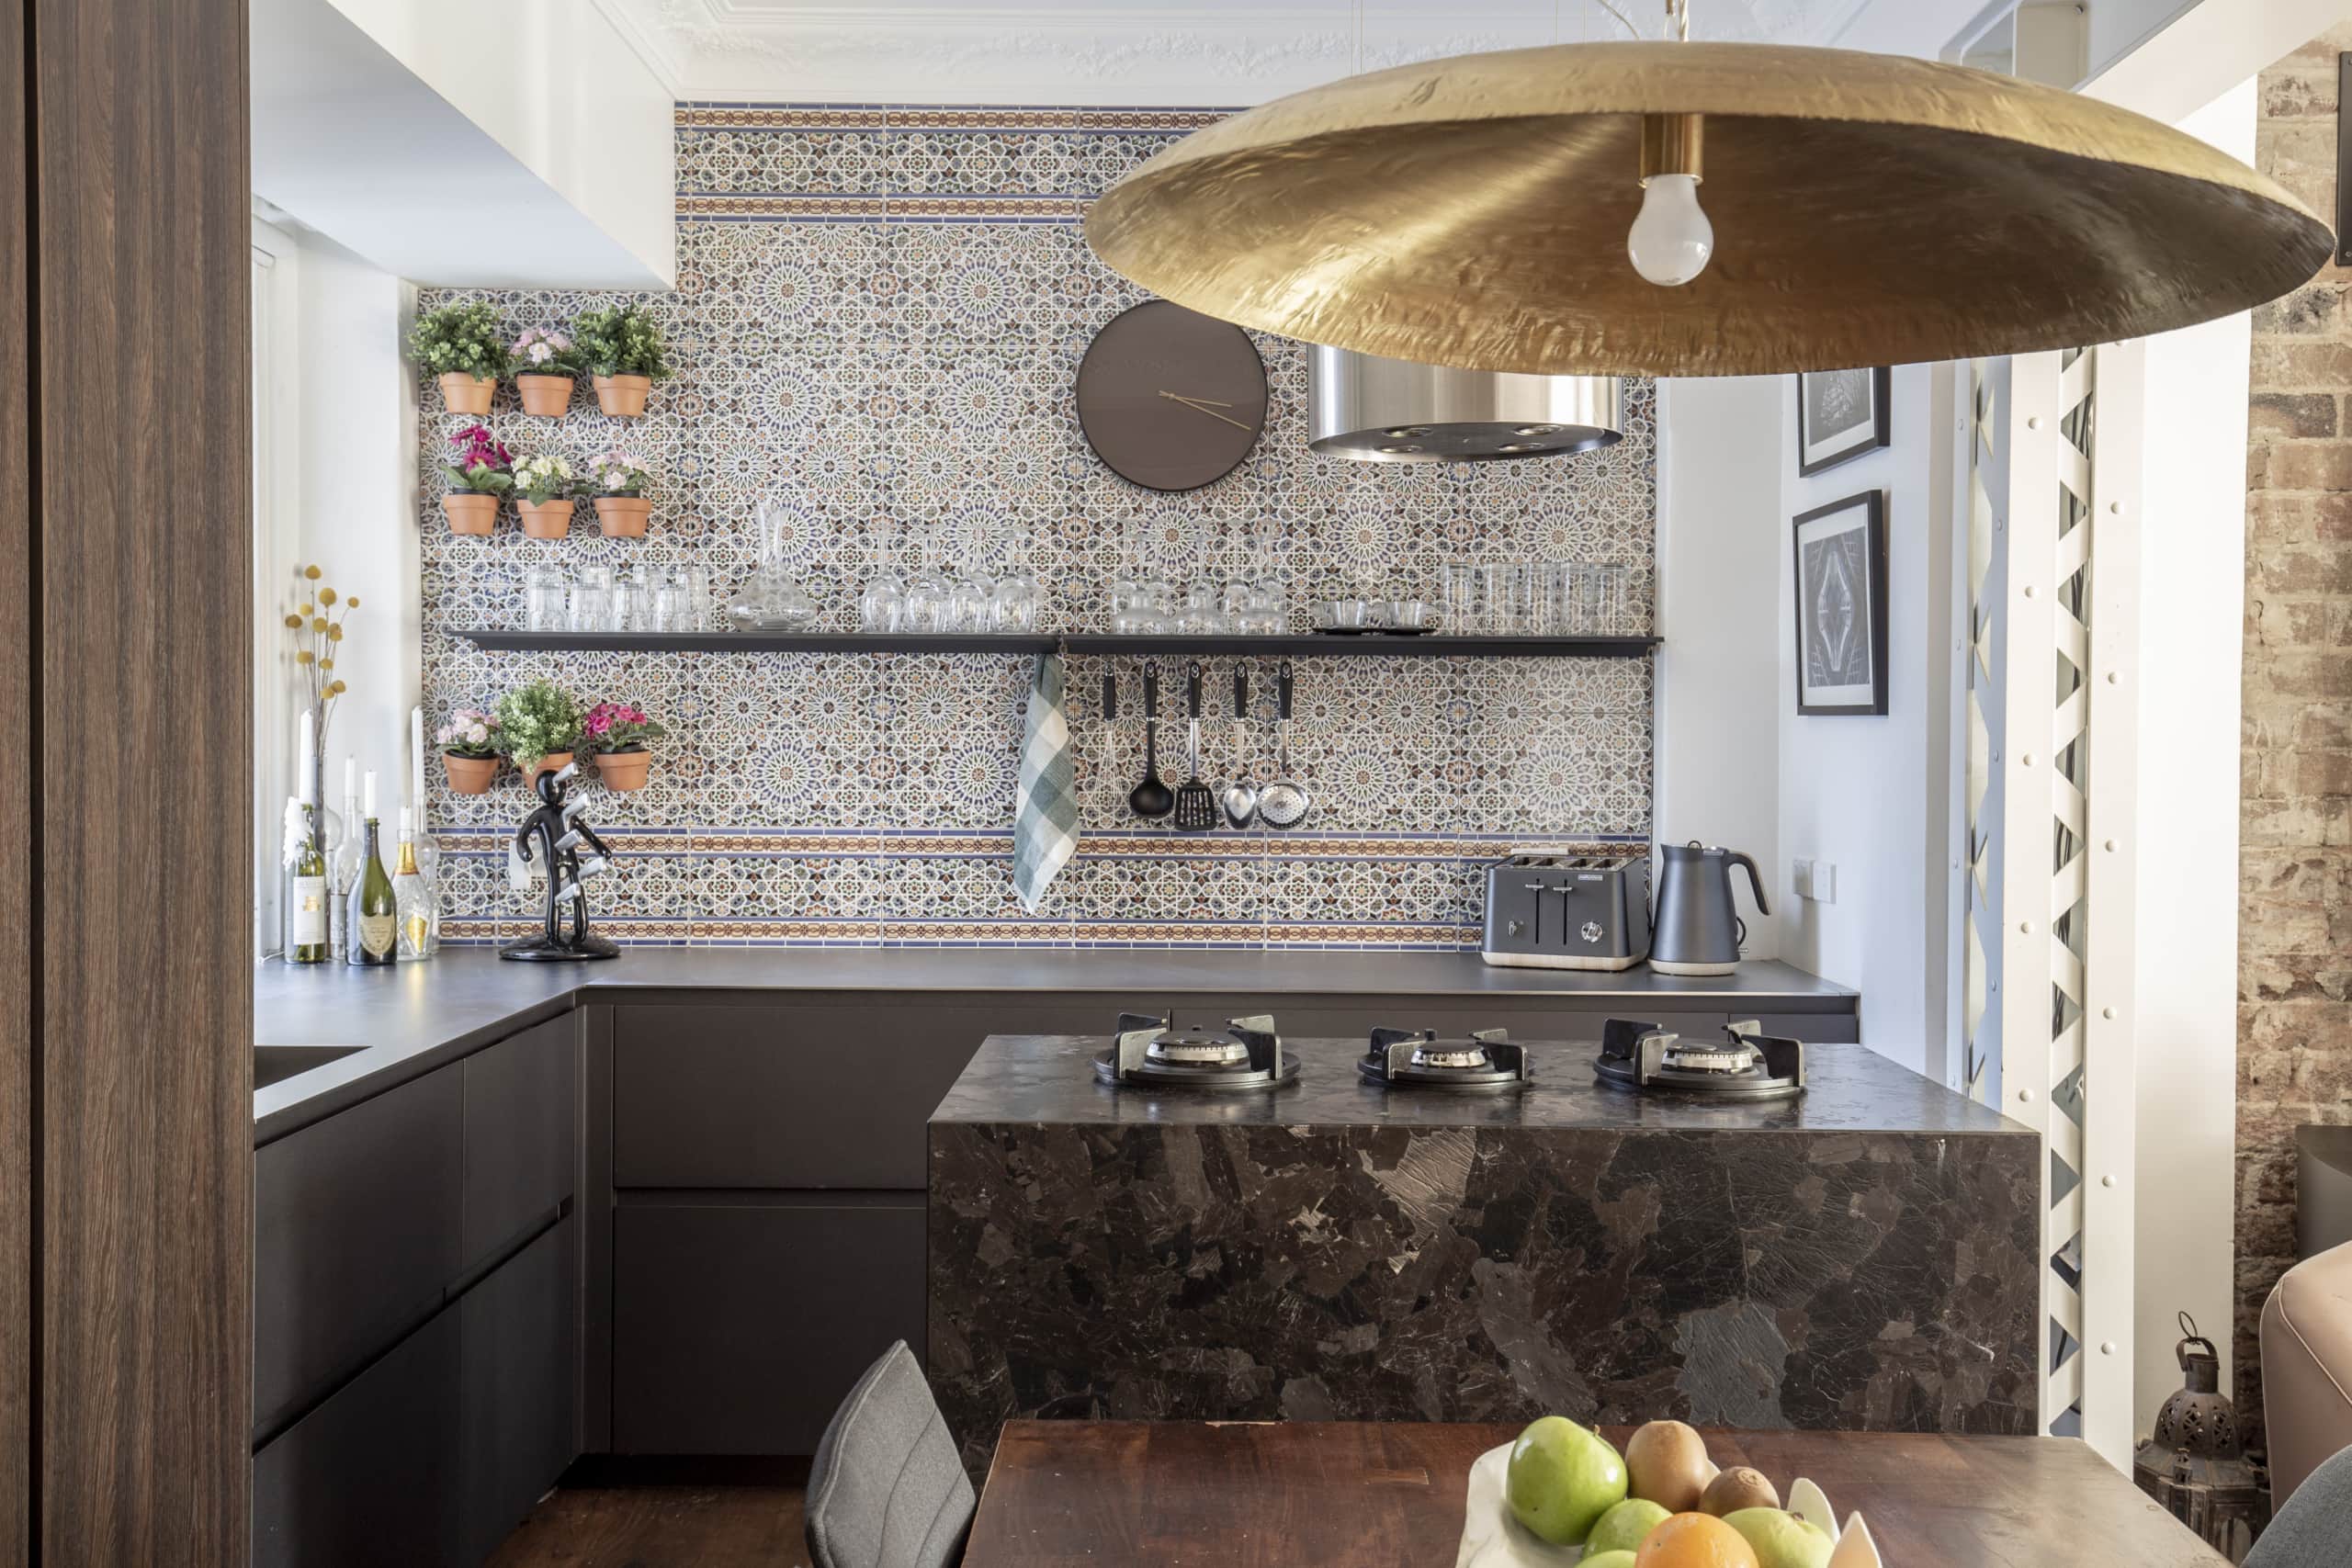
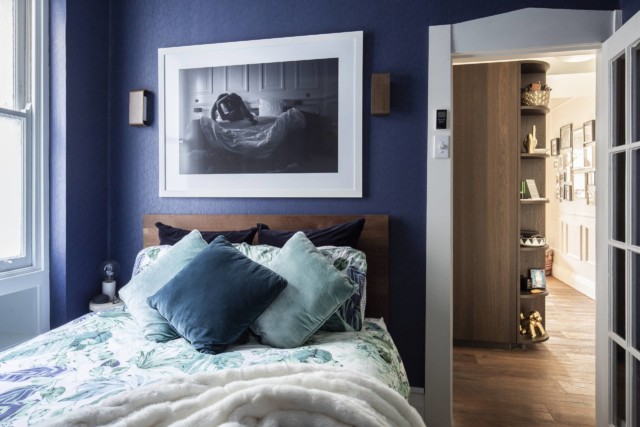
As well as pairing the constraints of the unit with the needs of his family, Jesus wanted to preserve as much of the building’s heritage flavour within the apartment as possible, sustaining elements from common areas in the unit’s interiors. From the preference for pendant lights over downlights, to the French panelling chosen to match existing cornices and ceiling bands, the rich details of the Art Deco era peek through an otherwise more contemporary, pared back aesthetic. The ensemble is completed by a lashing of industrial texture, courtesy of the exposed steel trusses of the portal frames with their Harbour-bridge evoking lattice steel motif. 

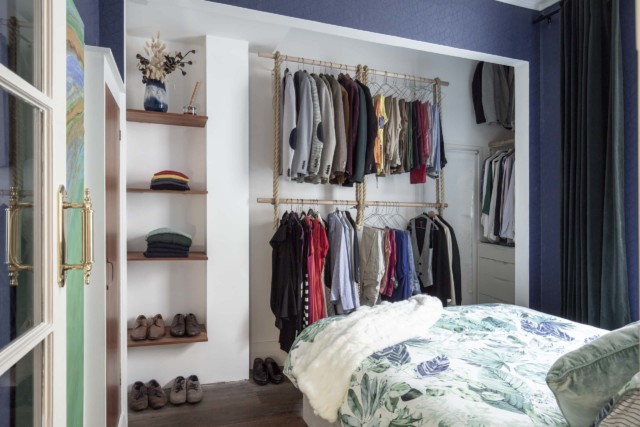
Storage has also been carefully considered and integrated wherever possible beneath or behind furniture and joinery, and the family tradition of multi-functional spaces lives on. Their four-year-old daughter Noah’s 8sqm play area morphs into her bedroom with a wall-mounted fold-away bed. The home’s spaces comfortably satisfy a variety of functions, with the added advantage of promoting an intimate, convivial environment.

Jesus was also committed to preserving a sense of fluidity and play in the apartment, especially in his daughter’s room. He chose to experiment with the ceiling, and developed a simultaneously sophisticated, simple and economical decorative feature in the form of hanging sheets of paper arranged to create a flowing, wave-like effect. 

“It adjusts its height to the shelving edge. It reacts to where the lamp is. It adjusts its curvature to the window to allow more light in. It’s one of those little exercises that is in fact really inexpensive. It’s just paper and Blu-Tack.”

The ceiling feature’s affordability and ease of execution, however, are contrasted by the masterpiece that is the bathroom! Riding a wave of creativity and inspiration, Jesus recalls how one morning he was browsing designs for tiles, frustrated at their prohibitive cost. Deep in a YouTube tile-manufacture-video rabbit hole, he was surprised to see how mechanised the allegedly ‘handmade’ process was. “They were absolutely spotless and perfect, as if they were manufactured by a machine,” he criticises. “It didn’t have the impression that it was actually made by hand.” 

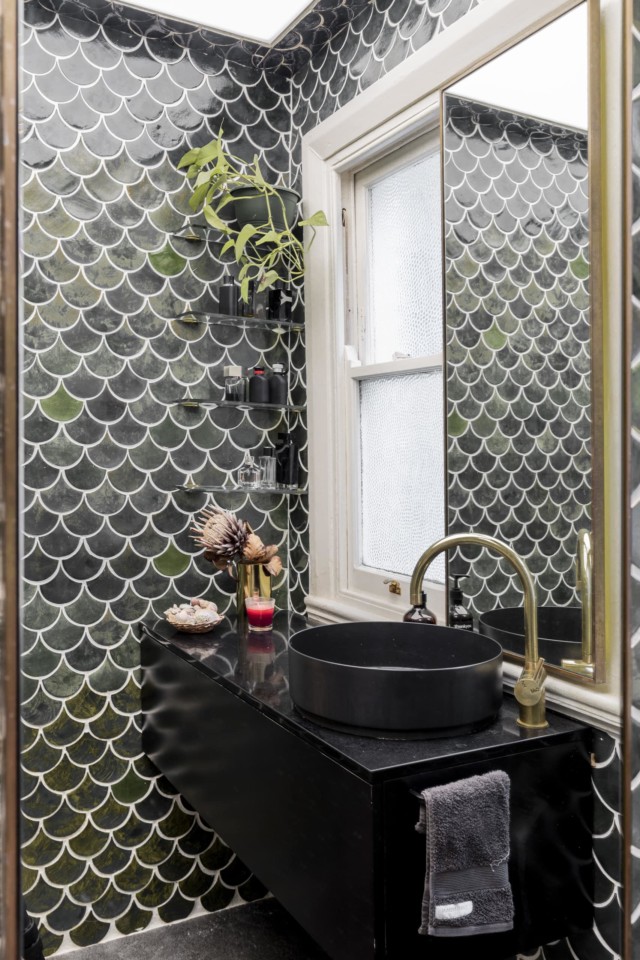
He remembers thinking, “I don’t have the budget but I do have patience”. So was born a DIY tile-making project that would see Jesus, his family and friends hand-make more than 3,000 glazed, fish scale tiles over the course of 15 weekends – including preparation and testing of clay, glazing and moulds. And, while at times he questioned his initial enthusiasm, the end result speaks for itself: the bathroom nestles among walls clad in the cool, mossy green tiles, each slightly different to the next, carrying in their warp and weft the story of their origin. With a wry smile, Jesus reflects: “It was a much more lengthy approach. It was absolutely, totally worth it.”

With its blend of modern and heritage, work and play, and its deceptive ability to accommodate a multitude of activities and moods in a limited space, the apartment is a role model for how we might intelligently and happily embrace inner-city living – an ever more pressing aim as more of us grapple with the demands of working from home. Coupled with Jesus’ attention to detail and investment of personal creativity (and time), this compact home is ready to host many years of comfortable, beautiful family life. 

Photography: Jesus del Toro

For more on this renovation

Categories
Expert Tips RENO ADDICT

15 apps to help you build your dream home

Get our FREE eBook: 10 tips to fall back in love with your home

Building a home from the ground up can be fun and rewarding, but it can also be anxiety provoking. There is good news though with iPhones, iPads and Androids offering homeowners a tool that isn’t already in their toolbox, but is necessary to every home project; the app. Regardless of what stage you are at, apps offer design inspiration, budget management, building measurements, DIY tutorials, renovation ideas and so much more. Furthermore they are time savers that can help you cut costs and work more productively.

Below is a roundup of the best apps to get your home project started and make your smartphone the top go-to tool in your box. Get inspired, get planning and get building today!

1. Houzz
All great dreams start off with inspiration and so when you’re about to build, you can’t have enough of it. Houzz is your interior design app on the go and it’s filled with a large database of design ideas, creative concepts and product reviews. The app is free, easy to use and beautifully designed to create different rooms and browse ideas. To top it off, Houzz also gives you the opportunity to look up professionals in your area, like architects, builders and suppliers to help you complete your project.

2. Palette Cam
Palette Cam is a great free tool for creating unique colour palettes and schemes using inspiration found in everyday life. The app allows you to grab colours from your camera or saved photographs – it will match them and generate individual HEX and RGB values (colour codes) for each shade. The built in zoom view gives you pixel level precision when picking colours making this a fabulous tool for creating schemes and making paint colour and textile selections.

Palette Cam

3. Home Design 3D
Home Design 3D allows you to build a 3D model of your home so you can test out ideas before lifting a hammer or fetching the toolbox.

The free app gives a floorplan and room layout which you can draw in 2D, creating openings, adding walls, changing the shape and orientation – even the thickness of the walls can be drawn up. Designing your home becomes quick and intuitive, with customised textures, 3D project modes and night/day function to show you exactly what side of the house the light will fall at different times each day. You can also select furniture and décor items to really give you a sense of the final feel.

To top it off, you can also visualise and ‘visit’ your creation in real-time 3D using the app’s brand new photorealistic 3D rendering.

Home Design 3D

4. Housecraft
Housecraft is a furniture arrangement app that uses your device’s camera and augmented reality technology to let you place fully rendered 3D models anywhere in a space. A great planning app, it allows you to feel exactly how big objects are and how they’ll fit in a room. It also lets you admire objects from any angle, in any light, as well as save room configurations and try them out anywhere.

Housecraft

5. Tape Measure
Tape Measure is an augmented reality tape measure and ruler that fits in your pocket. Featuring a tape measure, laser level, stud finer and measurement history, this handy app helps you measure anything with your phone!

Tape measure app

6. Morpholio Board – Mood Board
Called ‘addictive’ by ELLE DÉCOR magazine and awarded one of the best apps for interior design and architecture, this is a fabulous app to make your dream mood board come true. Perfect with iPhone, Mac, and iPad, Board combines your ideal inspiration, decor or furniture library with powerful mood board and collage tools to design anywhere. It seamlessly interacts with Pinterest, features a curated product library and has AR furniture capability too. Whether you’re designing kitchen, nursery or home office mood boards or just style and inspiration, this one is everything you need to be an interior designer in one app.

Morpholio app

7. Home Outside
For $4.49, Home Outside is a landscape design app with all the tools you need to mock up your garden, create new garden designs and then share them with friends and family. It’s ideal for homeowners looking to try out new ideas in their yard and it allows you to select and place over 700 hand-drawn elements including trees, gardens, pools, patios, hammocks, driveways, houses and sheds, solar panels and more. It creates professional looking 2D aerial plans.

Home Outside

8. iScape – Landscape Designs
A free app, iScape lets you visualise a finished landscape project on your property before you even get the shovel out of the shed. The app acts as a virtual garden so you can plan, plant and produce your own personal oasis and produce photorealistic renders of your outdoor spaces (augmented reality or 2D designs) that can be saved straight to your smartphone or iPad using real images and actual photographs.

The app lets you tailor your projects (you can adjust colours, add layers, text and texture) before editing and saving them. Once you have collated your ideas you can share and favourite them too.

9. Photo Measures
Photo Measures is a super easy way to save measures on your photos on iPhone and iPad. You simply just take some photos and note down the dimensions on them. Not only does this help you take accurate measurements along when you meet with trades, but you can collate all of the spaces in your phone for easy access. The app also allows you to do the following:

  • Take a photo and directly draw measures on it
  • Edit your measures with a very intuitive interface
  •  Quickly add text as comments when measures are not enough
  • Easily organise your photos by category
  • Export your annotated images as PDF or JPG

10. Rapid Reno Mate
Dubbed the ultimate renovator’s companion, the free Rapid Reno Mate is a powerful tool that can manage the business side of your renovations. Rapid Reno Mate is like your personal project manager and will help you every step of the way, making it easy and enjoyable to renovate your home.

Key features

· Plan multiple projects
· Track your budget
· Manage your trades
· Find products and your nearest suppliers
· Access exclusive offers
· Inspiration and DIY help

The app was developed by Rapid Renovation Expert, Naomi Findlay, who wanted to create a simple solution for renovators to complete successful and enjoyable renovations time and time again.

11. Dulux Colour 
The Dulux Colour app allows you to select a photo of your room and use Dulux colour to virtually ‘paint’ the area. This will give you an idea of what your finished project could look like by visualising colour on your walls. You can choose from popular colour palettes or create your own – you can even browse through the entire Dulux range on your phone.

Cleverly, the app also matches colours – just sample a part of a photo to reveal the closest digital match from over 1,100 colours. You can also save your project, share it with family and friends and compare and view multiple paint schemes.

Dulux Colour app

12. SketchUp
It used to be that interior design and architectural software was the exclusive domain of the professionals but that all changed when SketchUp came along. While it’s not strictly an app, we thought we’d include it because it’s hugely popular and for so many reasons. A highly intuitive, easy to learn 3D drawing tool, SketchUp lets you draw building plans and elevations and create animated walkthroughs and flyovers of your designs. SketchUp also has the world’s largest collection of free 3D models which means building materials, plants and real-world objects including furniture and appliances can be inserted into your designs with just a few clicks. It really has put design software in the hands of regular folk.

Sketchup

13. Airtasker
Perfect for when you’re looking for a tradie or handyman, a cleaner, removalist and more, Airtasker lets you list a task (including details of when and where) alongside a fair budget for it. ‘Taskers’ are then able to bid for the job at which stage you can take a look at their profiles and reviews and choose the best candidate. Airtasker handles the financial side of things making it one easy to use and seamless platform.

Air Tasker

14. hipages
Arguably the best place to find a tradie in Australia, hipages works similarly to Airtasker in that you can list a job and thereafter obtain multiple quotes from professional tradies. It’s a free service that instantly alerts local tradies to submit quotes and after the quotes are received you can compare profiles and verified recommendations to choose the best applicant.

hi-pages

15. Reece 3D bathroom planner
While it’s not an app per se, Reece’s 3D bathroom planner is a fabulous tool for the home renovator and it’s a lot of fun too. Who doesn’t want to plan their bathroom in 3D with just a few clicks? Firstly, you set up and design your bathroom in 2D before adding your favourite Reece products. Then you add your finishing touches (tiles, plants, wood finishes and colours) before reviewing your bathroom in 3D and saving your design. You can also browse predesigned rooms, check out the bathrooms from The Block and peruse the latest trends within the software too.

Reece

This post originally appeared in 2014 but has been updated in 2022 to provide more relevant content for readers.

Check out Reno Addict, our dedicated renovating section

Categories
Design

Why biophilic design is increasingly important right now

Renovator Ozge Fettahlioglu shares her recent experience and views on biophilic design. She explains why connecting our homes with nature is more important than ever following a lockdown and in light of potential future ones.

Image: Binyan Studio

Lockdown has changed the way we see and design our homes. I would like to share with you a new design trend that is long overdue: biophilic design.

My “I’m a city girl” motto has changed since lockdown. My soul and body respond better to soil, sea breeze and dancing bamboos. Let’s accept the fact that our metabolism is not happy living between four walls, with a pot plant in the corner and a palm print cushion. We need more than that in our homes to rejuvenate.

New trends to bring nature inside come and go all the time: vertical gardens, nature printed wallpapers, all these YouTube channels popping up about plants. I have tried many of these new trends in my own recent renovation but it still doesn’t feel enough.

1 Hotel Brooklyn Bridge Park by INC Architecture & Design | Photo by Eric Laignel

I came across a design concept called biophilic design. It is not new, in fact some of the principals are similar to the ancient Feng Shui, but I think will be more widely used after the pandemic we currently live in.

Biophilia hypothesis is the idea that humans possess an innate tendency to seek connections with nature and other forms of life. We are wired to listen to the waves, watch the fire, and smell the air after the rain. When you walk into a new space, have you ever told yourself “wow, this feels nice”? From a design perspective, biophilic design explains why some places feel great and others don’t.

I know there are many design considerations architects think very carefully about, but many come down to biophilic design attributes. Stephen Kellert seems like the father of this design, so Google him if you’d like more information.

There are six attributes of biophilic design, which be classified under three categories. We can try to reconnect with nature as much as we can, by thinking and designing around these three categories.

Image: Espresso Design

For example, if your land has a beautiful tree, you will have direct experience to nature, and placing windows capturing the best view of the tree or even building the house around the tree, is something you can consider.

The indirect experience of nature refers to contact with the representation or image of nature. Marble tiles, wood furniture or a stone bathtub are some examples.

Experience of space and place implies spatial features characteristic of the natural environment that have advanced human health and wellbeing. Think about transactions between spaces, common use of spaces, spiritual and cultural connections we have with land or opportunities for discovery.

Image: Villa Verde

Simply put: the more we think around these details, the more connected we will be to nature and the more attractive our design will be. It is similar to strategic planning for your company.

I find staring at the place I will renovate, very, very useful. Feel the light, air, water, animals, weather, plants, and anything else that is around you. I know it is hard to think and plan them all, but it looks like we will be indoors for a while, and the wellbeing benefits are all proven, so let’s try as much as we can to incorporate them in our future renovation projects.

There are many research papers but if you have read so far, you already know how you feel when you are connected to nature. Your productivity and energy level will increase, stress levels will decrease, sleep cycles will improve. You will feel calmer, happier and a sense of belonging. There are even some research papers that link biophilic design to higher self-esteem, creativity, and positive thinking.

Follow the renovation of Ozge’s new Pearl Beach home.

-Ozge Fettahlioglu’s is an expert in human resources and management, currently lecturing at UNSW and UWS. She is also a reno/architecture “maniac” and recently started sharing her last three renovations so you learn with her and from her mistakes. She is a mum of two and lives in Sydney.

Categories
Bathrooms Expert Tips

Gold bathroom accents: there’s many ways to use them!

Gold accents have been gracing the most enviable bathrooms since, well, forever. While metallic embellishments have been trending over recent years, gold is making a huge comeback in the bathroom — but there’s more than one way to get the look.

Emma Joyce from luxury bathing brand Victoria + Albert Baths shares some of her favourite gold accent bathroom designs, with tips on recreating this touch of luxury in your own home.

Dark + Moody

Designed by Heirloom Studios, this modern oasis is the epitome of a moody masterpiece. Elements like charcoal floor tiles, a deep black vanity, and ‘midnight’ mirror-framing transcend the space into a calm depth of darkness. Lightness is re-introduced through an almost full-wall window, which floods the room with a natural glow.

Design by Heirloom Studios | GG Archard Photography

The dark and deep statement pieces are offset by lighter elements, including a turquoise and black penny round mosaic feature wall, tropical plants, and of course the soft, gold finishes of the tapware and fittings. Victoria + Albert’s ios bath creates a dramatic feature as it stands pride of place in gloss white against its moody surrounds.

Recreate the look: There’s a pre-conceived idea that gold accents will create a ‘kitsch’ look, when, really, they can complement so many interior styles and are flexible to most people’s tastes. If you like a more sombre aesthetic, look to colour blocking with dark charcoal and light greys. This bathroom is a great example of using soft, warm finishes to bring life to a dark and moody space. The designer has chosen to use gold accents on the faucets, wall light, and through decorative pieces as supporting elements to elevate the ambience.

Light + Airy

Crafted by M James Design Group, this modern take on traditional Victorian design creates a ‘new age’ spa-like retreat that is all about luxury. A grand space deserves grand features, which is established here through the floor-to-ceiling marble-look walls and the gold-plated tapware finishes.

M James Design Group | Michael Hunter Photography

These striking elements are softened through the layering of flowing white sheer drapes, white and navy patterned tiles, and the striking Victoria + Albert ios bath in gloss white drawing the eye into the space.

Recreate this look: If you want to keep things neutral, a splash of colour isn’t the only way to make a space pop. Texture is key when it comes to adding depth to an interior and is an easy way to introduce different materials like marble surfaces, patterned tiles, and crown mouldings.

In this bathroom, the designer has taken it up a notch by adding finishes and fixtures with a modern golden accent. If you’re after a ‘less is more’ aesthetic, stick to the same finish throughout the space and hold back on introducing more than three shades into your bathroom’s colour palette.

Mixed It Up

The recently refurbished Orchard Cottage, an Airbnb rental property in Australia’s Blue Mountains, is the perfect embodiment of how the finer details can elevate any bathroom.

Orchard Cottage, NSW – Zoe May Photography and Inward Outward Photography

White tiled walls and a high ceiling give a feeling of light and space, while a Crittall-style shower screen in black divides the bathroom, creating a separate cocoon for shower and the York freestanding bath by Victoria + Albert.

Warmth and personality are introduced for balance through natural wood and gold brass fittings, including striking antique lights above the vanity unit.

Recreate this look: The crucial element to mixing finishes is to not go overboard, keeping to the rule of two to four varieties of gold finishes. An easy way to keep your bathroom stylish is through matching; notice how the towel hanger and taps pair nicely and the wall lights and mirror have a similar brushed gold look? This helps create a refined feel in the bathroom.

Another rule of thumb is to have a foundation palette contrasting the gold elements. For example, if you’re going to install high-shine finishes, complement this with a timber vanity or matt-finish basin or bath.

Play With Pattern

Designed by Leanne Ford Interiors, this stunning Moroccan-inspired bathroom takes the user to a luxurious Marrakesh spa. In this compact space, a sense of depth is created through the striking turquoise and white mosaic feature wall, which is surrounded by white gloss landscape subway tiles.

Leanne Ford Interiors

Personality and texture are introduced through the vintage feature ceiling light and satin brass mixer, which creates a sense of old-world luxury.

Standing pride of place on its own elevated step is the Victoria + Albert ios bath in gloss white. A modern freestanding bath brings an air of luxury to any space.

Recreate this look: If you want your space to reflect your inner ‘maximalist’, try a tile feature wall in a block colour or pattern finish. Take cues from this exquisite bathroom by adding gold exposed piping for a bold feature. If a white tiled bathroom is your dream, add subtle features by layering the tiles in a herringbone or crosshatch pattern to bring dimension to the space. Subway tiles in a landscape or vertical pattern are also making a comeback.

For more on Victoria + Albert’s luxury bathroom collections

Categories
Expert Tips

Buying the wrong house: 5 steps to avoid an expensive mistake

By Michelle May

Buying a house is one of the biggest decisions you will ever make. It is daunting, and when it comes to a house which you intend to make your home, emotions can get involved very quickly. This often sees potential buyers jumping in feet first, based on an emotional attachment to a property without really considering if the home has everything they really need or really want. Going in with a game plan is the best way to make sure you avoid the trap of buying a property which really just isn’t right for you.  Here are my tips to help you along your journey. 

Buyers agent Michelle May
  1. Don’t be swayed by the bank’s pre-approval offer.

First things first, know your expenses, be brutally honest with yourself and stick to your budget. A good broker will be able to talk you through factoring in ALL your expenses (that includes those late night Uber Eats and daily coffees you may have been forgetting about!) and any interest rate changes on a potential loan to see what is actually doable for you. It is very easy to get excited when your mortgage broker gives you a figure for pre-approval which is above what you were expecting, but beware that there can often be a very big difference in what the bank thinks you can afford and what you know your personal budget will allow for. I don’t need to remind you that owning a home is a big long term financial responsibility. 

  1. Know what your non-negotiables in a home are.

We have all heard of the phrase “it has to tick all the boxes” but before setting off to purchase a home, it is crucial to know what those boxes are for you, and also what those deal breakers might be. Take it from someone with over 20 years of property buying experience; no matter what budget you may have, there is no such thing as a perfect home and some compromises will have to be made along the line. 

I would start with the things you cannot change, such as location. You cannot change being on a really busy road but those scatter cushions you fell in love with at the open home – you can buy those! Side note: do not fall for the styling in a home, this is not a pair of shoes you’re buying. Look beyond this.

Internal light is another one of those deal breakers. In a house there may be options to improve the internal light but in an apartment you are pretty much stuck with what is there. 

Realism and practicality are key, you need to look at what you envision your life being in the next five-to-10 years and what the property may need to do for you in that time i.e. will you have children or perhaps even be empty nesters? If you have a never-ending list of requirements being prepared for whatever life throws at you, I would advise that you take your mind back to practicality and realism.  

You must organise a building and pest inspection, or review a strata report if you’re buying an apartment, to look at the property. They will be able to uncover any underlying issues that could be costly for you in the short or long term. Then you can assess if the home stacks up or if you should put it in the ‘no’ pile. 

  1. You aren’t just buying a home; you are buying into the neighbourhood. 

OK, so you have mapped out a couple of suburbs you are keen on, now you really have to take the time to get to know your potential neighbourhood. After all, when you walk out the door and go and grab that coffee, it might be nice to see likeminded people, and feel like you’ve found your tribe both for you and your family. Other more practical questions would be – have you thought about how long the commute will take to work? What are the local schools like? 

For specifics, are there some particular pockets of the neighbourhood you would prefer to purchase in? Mark them out on a map, keep an eye on this when listings arise and make sure your buyer’s agent (if you have one) knows this would be your ideal spot. They should also be able to think outside the box and suggest other suburbs, with a similar lifestyle but perhap a more affordable price point. 

  1. Desperation could lead to disaster.

In today’s market, many listed homes in the most sought-after locations in Sydney are going to auction in the hopes of securing the best price for the sellers. Auctions can be really competitive; you need to go in with a game plan and stick to it. There’s no room for impulse decisions in property. The last thing you want to do is go to an auction and either spend more than you should have or purchase a home just because of the fear of missing out on securing one. The best game plan for an auction is to stick to your finances and needs and wants list. A buyers agent can also help you wrangle at an auction; they ready the play, take the emotions out of it for you and can bid on your behalf. 

  1. “I bought it but now I hate it” – financial downsides to selling shortly after purchase.

Even after careful and rational consideration, mistakes happen. But before you put the ‘For Sale’ sign out the front, really consider the financial implications of selling when you have not owned the property for long. Think about the fees and charges for deciding to offload your home, not least stamp duty. Whilst there are concessions for first home buyers, did you know in NSW stamp duty on a $650,000 home is in the vicinity of $24,000? We aren’t talking small change here. 

Other financial aspects to consider are the agent fees or commissions involved in the sale of the home, the cost of relocating again and any legal/bank fees that would become payable. The general consensus is if you decide to sell within the first five years of your purchase, you would have been better off renting to begin with. Sure, sometimes the desire to move is so strong that whether or not you come out ahead financially is not at the forefront of your priority list, but it is important to understand what the implications will be on your bank balance if you choose to re-list not too long after purchase.

Considering all of the above, if you add up all the costs, could this money be put to better use in a renovation towards your current home instead? 

It goes without saying that knowledge is power and the more research you do and the more time you take to take to really understand what you are looking for in a home, the better position you will be in. 

Michelle May is a buyers agent and co-host of Sydney Property Insider.

Categories
DIY Expert Tips RENO ADDICT

DIY tiling: don’t try it before reading these tips from the tradie!

As we spend more time at home, Aussies are picking up their tools and diving into DIY reno projects of all shapes and sizes. But knowing where to start can be daunting for even the savviest of renovators, and tiles can be especially tricky if you’ve never tiled before. 

Kyal Demmrich on the job

As a renovation expert, carpenter and The Block alumni, Kyal Demmrich has spent his fair share of time diving into DIY renovations with his wife Kara. “We have completed more than 35 reno projects now, and over that time I’ve found that knowing what our end goal is, including the style we’re going for, really does help with the rest falling into place,” Kyal says. With the right information and the right tools, most renovations are relatively easy, particularly when you follow a few simple tips. 

With tiling, once people have landed on design elements like choice of tile and laying pattern, most of the hard yards have been run – though caution needs to be taken to avoid missteps such as using unsuitable adhesives, tiling on surfaces that are not dry, and failing to measure and cut accurately.

“There is a great saying in the trade: Measure twice, cut once. That’s my golden rule for all things tiles and DIY,” Kyal says. “From calculating how many tiles you need, through to the cuts and configuration of the tiles themselves, never underestimate the importance of a good old tape measure and solid forward planning.”

Other tile ‘tricks of the tradie’ offered by Kyal:  

Dry surfaces: Before you start, your surface should be dry, clean, and smooth. If you are tiling in a wet area, it must be waterproofed correctly before you commence tiling.

Clean tiles are a must: Tiles should be dry and completely clean. Any loose powder on the backs of tiles should be removed to avoid contaminating the adhesive. A fine bristle brush is good to help with this.

Not all adhesives are created equal: Do not skimp, and make sure you choose the right adhesive for the surface and type of tile. There are many brands of adhesive out there, and they are all designed for specific types of tiles and tile surfaces.

Size does matter for the novice DIYer: Tiling with big tiles is tough, even for seasoned pros. Large format tiles are heavy and are expensive to replace if mistakes are made, so DIY novices should aim for tiles no bigger than 300 x 600mm.

Start with the grate: The secret with tile layout is starting from the floor grate (either inside or outside the shower) and working your way outwards. Draw up a plan of your floor/wall/splashback and map out where your tiles will go. At this point, you should also check that you have the correct fall to the grate. This ensures that your water will drain away correctly.

Dry laying is everything: Dry laying tiles first ensures you have the correct number of tiles as well as creating a vision of how they will look. Dry laying is also the perfect time to confirm whether you are happy with your tile choice, or if you need to make last minute changes. 

Lay tiles carefully: Tiles that are placed unevenly create an uneven joint (or ‘lip’) which could be a trip hazard – there are levelling products out there to help with this. Make sure you tile the floor before your wall – wall tiles should slot neatly above your floor tiles. Where silicone is used, leave a 2-3mm gap where walls and floors meet.  

Peel and place technologies: A fantastic product to make your tiling even easier is BT-Instalay CTU by Gripset. This flooring system is a game-changer and can prepare a surface for tiling in only four quick and easy steps. BT-Instalay CTU is also 10 times lighter than cement sheets, making it an ideal flooring system for DIYers. It is also a waterproofing membrane if you are using it in wet areas.

Grout is a gift: Follow the manufacturer’s instructions exactly. Wait at least 24 hours after laying before grouting and protect the tiles from any water or weather conditions by covering them with old clean sheets. Do not grout where walls meet floors or where two walls meet. Instead, apply silicone when the surrounding grouted area is dry. Epoxy grout is a fantastic option due to its durability and stain resistance. It is a breeze to clean and perfect for outdoor or wet areas, making it an exciting alternative to cement grout.

Kyal is an ambassador for Beaumont Tiles, Australia’s biggest retailer of tiles and bathroomware with 118 outlets across most states.

Categories
Styling

Home happiness: 5 design elements that affect it

With Australians spending more time than ever in their homes, it is interesting to consider the impact our interior has on our wellbeing and how it makes us feel. The subtleties of interior design often impact upon our happiness in ways we don’t understand. From colour combinations to squeaky floorboards, The Design Paddock share five interior design elements that influence the happiness of our homes.

“It is generally accepted that Australians spend 90 percent of their time indoors. This
is an enormous portion of time so it’s imperative to consider the impact the built
environment can have on our wellbeing,” says Millie Alison, co-founder of The Design
Paddock.

  1. Lighting

“Don’t underestimate the impact that lighting can have on your mood, emotions and
wellbeing,” says co-founder Katrina Garrett.

Lighting in a room can either provide illumination for the entirety of a space or it can highlight specific elements. Having different lighting styles such as ceiling lights, wall lights and table lamps allow you to be able to alter the lighting to shift the mood. Flooding a room with natural light can instantly lift the mood, allowing a connection
to the outside. During the evening however, we also need darkness to create a cosy
environment with softer light – candles and dimmable lights are a great way to create
this calming ambience.

2. Colour psychology

The colour palette you select for your home should have a positive psychological
and emotional effect upon you. Colour choices in soft, neutral, warm
tones are not only timeless but also calming and relaxing, particularly when used in
living or bedroom spaces. White is such a popular choice for people as it often feels
‘safe’, but people need to be mindful of how much white they use as it has the
potential to make a space feel cold and clinical.

Colour palettes for homes have the ability to energise or make you anxious. It can soothe or motivate – depending on the colours and combinations. Red and oranges can stimulate, while blue hues are calming. We suggest using the same colours, tones and textures in connecting areas, such as hallways and stairways to give the home a sense of continuity.

3. Sound

Is there anything more annoying than squeaky doors and cupboards,
or creaky floorboards? These sounds can agitate, and a simple spray of a lubricant
can fix this daily annoyance. If footsteps on the hardwood floor are disruptive at night,
put down a runner with an underlay. On the other hand, music in the home can have a positive impact on those in the space. Music can be incorporated throughout the home discreetly by installing speakers in the ceiling of your living areas both inside and out. This can create a lovely ambience when entertaining.

4. Textures

Textures and finishes can offer both tangible and visual experiences which can be
associated with a variety of feelings and it is important to create a balance between
the two. Mixing up patterns in loose furnishings such as cushions, throws and rugs
in the same colour palette, varying textures and layering with different shapes to make the space interesting but not visually overwhelming. The best rooms are those that are restrained and not too over decorated.

Incorporating texture can elevate the overall spatial experience and ignite the senses without you even knowing it. Texture works in a similar way to colour, rough textures are more likely to make a space feel intimate and grounded whilst the smoother bring a sleek and more luxurious vibe. We like to balance the two by incorporating different materials, different weaves and different levels of softness such as a leather to create a more seamless space.

5. Express your personality

Ultimately the interior of your home should be a reflection of your story and the people living within it. Following trends won’t necessarily bring you happiness
in your home and sometimes the things we think we want don’t actually make us feel at home. When you create spaces in your home with things you love, that’s a gateway
towards a happy home.

The Design Paddock is a unique interior design and decorating company that revamps interior landscapes for people in the bush and beyond.

Millie and Katrina from The Design Paddock

Imagery: Sheri McMahon Photography

Categories
Expert Tips

Storm proof your home: 10 tips

By Stuart Tucker

Following the storms across NSW last week, online tradie platform hipages observed a 71% increase week-on-week in storm-related job requests.

Worker sweeping leaves and sticks from a valley of a roof.

This included a 185% increase in roof repair requests, 90% increase in gutter cleaning jobs and 29% increase in window repairs with these figures expected to grow as clear weather sweeps across the state.

Whilst Australia’s wild weather is inevitable, there are ways you can prepare your home and your household for when a storm hits, minimising damage and ensuring your safety.

Secure your home
If you’ve heard reports of expected storms in your area, the first thing you should do is ensure your home is as secure as possible. This includes putting away outdoor furniture or play equipment and ensuring there is no debris in your garden or surrounds including branches or wood. It’s also best to park your car under cover if possible as well.

Survey the area
If you have a tree located close to your home, this could pose a risk of damaging your home and roof during a storm. Trim back branches and remove any trees that pose a danger to avoid thousands of dollars worth of damage to your home. Consider doing this quarterly to ensure you’re not scrambling at the last minute. With services like hipages offering tradies on-demand, hiring a local licensed arborist is easier than ever meaning you can stay on top of jobs ahead of storm season.

Keep the roof over your head
Your roof is one of the most vulnerable areas of your home in a storm so you need to keep yours well maintained throughout the year. Prior to a storm rolling through, ensure there is no pre-existing damage to your roof like loose tiles or sheets. If there’s any physical damage, repair this as soon as you can. Remember if your roof is in poor condition it’s much more likely to succumb to the ravages of a storm.

Clear your gutters
Gutters are your home’s first line of defence protecting against leaks. Gutters should be checked regularly but even more so before a storm to ensure they are clear of any debris or obstructions to avoid water overflowing into the eaves of your roof.

Fix your fence
It’s important to check your fence for unstable bases, damaged slats and loose and/or damaged screws and hinges which could cause serious problems. If you identify any of these issues, call in a professional tradesperson to make repairs, securing your fence against storms and high winds.

Secure your doors and windows
Some of the most common damage to occur during a storm is to doors and windows, typically due to a failure of the closure system. For peace of mind, it’s important to know that your windows and doors are strong and safe enough to withstand a storm. Do so by hiring a licensed handyman to install sturdy hinges and locks on your doors and windows.

Have a solid foundation
Storms can lead to floods, which happens more often in some states across the nation. Flooding can cause homes to collapse due to inadequate foundations. If you’re concerned about your home, have a structural engineer inspect your foundations and make any required repairs or reinforcements to keep it standing strong for years to come.

Structural property damage
Any damage caused by heavy storms can have serious implications to the structure of your home and make it more at risk in future. Following extreme weather, check for cracks appearing in walls and windows or doors starting to jam. If you see any of these in your home, call in a qualified structural engineer to help to repair these issues promptly.

Create an emergency kit, just in case!
Some storms can lead to blackouts and other disruptions to your usual homelife. If you know a storm is coming, prepare an emergency kit including torches, candles, matches, canned food, a can opener, bottled water and potentially first aid supplies to get you through until power is reconnected to your home.

Have a plan
Creating a home emergency plan can help reduce any stress should you and your family need to evacuate in the case of a severe storm. This should outline the safe exit points in your home, an agreed meeting point and a way to stay in contact should you become separated from each other. It is also a good idea to have emergency evacuation bags packed with food, water and clothes, particularly if you’re in flood prone areas.

-Stuart Tucker is Chief Customer Officer at hipages

Categories
Design Expert Tips

How lockdown’s made us reassess what we want from our homes

Janelle Miles, interior designer for Porter Davis Homes Queensland’s World of Style, talks us through how new home buyers and builders are changing their approach since Covid-19.

People craving more light and open areas are opting for dramatic voids in double-storey homes, and choosing double-storey to give them more garden space.

While we’re all hopeful this is only a temporary situation, customers who are building a new home are taking steps to future proof themselves.

Below are some of the trends that we at Porter Davis have seen.

Let there be light

We’re all spending a lot more time indoors than we’re used to, and more customers are now craving large, airy spaces. A great way to bring light and air in a double-storey build is with a void, which works to bring in natural light and opens up a room to create more space, without actually needing to expand the size of the floorspace.

Customers are also choosing dramatic voids to create a sharp contrast between the main living areas and the rest of the home. The living room has now become the sanctuary, and we’ve seen customers put more thought into how to turn their living room into a beautiful space that their family can retreat to at the end of their day.
This helps create a mental disconnect between work or school and life, which is so important now that we are not necessarily physically leaving our offices at the end of the day.

Study and work zones

Office workers and students who regularly commute to work or university have now had their lifestyle significantly impacted by the increase of the working/studying from home movement. Never before have we had so many conversations with our customers about study zones and work zones.

No longer is it enough to simply pop a desk in a bedroom. In fact, many of our customers would prefer to move away from this completely to ensure they aren’t cooped up in a single room all day.

When it comes to creating a dedicated work or study space, we have seen customers opting for these to be on the ground floor, but removed from the central hub of the home. This enables each family member to have their own space, while also being able to take time out and socialise with others when they need a mental break.

Inclusion of ‘nooks’

We’re also increasingly building small ‘nooks’ off areas in the kitchen or lounge, where customers can keep a laptop set up for any after hours school or office work, or to pay bills and do other life admin.

These nooks allow children to do homework while their parents cook, or allow parents to do work in the evenings without having to remove themselves and go to their home office.

Dual-purpose rooms

Another trend we’ve noticed is that customers are wanting to get more out of their rooms. Rather than creating a room for a specific reason, they’re creating multipurpose rooms that can change from day to night, to cater for different needs. For example, we’re now building rooms that might be a study zone during the day, and easily convert to a home theatre at night and on the weekends.

Creative use of space

A trend we weren’t surprised to see is more customers wanting larger blocks of land, so they can have gardens and increase the amount of outdoor space they have at home. Unfortunately, modern development blocks are usually limited in land size. Due to this, we’ve also seen an increase in demand for double-storey homes to make the most of their grass space, and we predict this trend will continue.

Customers are also getting creative with the space they’ve been given. Some are opting to close in outdoor terraces upstairs to create a space where they can separate themselves from the hub of family life. We’ve seen this especially in those working in corporate roles, who need a quiet and private space for confidential business calls and to ensure their children don’t pop up in the background of their Zoom call.

-Janelle Miles is an interior designer for Porter Davis Homes’ Queensland World of Style. Porter Davis Homes was awarded the 2019 Housing Institute Association – Australian Professional Major Builder of the Year award, which they have won six times in their 20-year history. They build homes across Queensland and Victoria.

Categories
Decorating 101 Expert Tips

White paints: how to choose the perfect shade

A fresh coat of white paint is one the easiest ways to make a room look and feel brand
new! Whether you’ve just moved into a new home that needs a refresh, are preparing to sell or just feel like a change, adding a coat of white paint is a quick and cost-
effective solution. However, with so many different shades of white paint available, what first felt like a simple project can suddenly seem daunting. To help you make your choice, British Paints’ Product Manager, Nick Walsh shares his expert tips for picking the perfect white paint every time.

  1. Learn to distinguish between ‘cool whites’ and ‘warm whites’

Understanding that white paint isn’t just white paint is the most important factor in achieving a brilliant end result. Each shade of white has a different undertone, and this will influence whether it is a ‘cool white’ or a ‘warm white’. Cool whites tend to have grey, blue, green or even purple undertones. These whites will create a crisp, modern look and are well suited to contemporary homes and rooms that get lots of sunlight. In comparison, warm whites will have yellow, peach, pink, red or brown undertones. These whites add warmth and cosy vibes to a space. They’re well suited to older homes, like Victorian and Edwardian styles, as well as spaces that don’t receive as much natural light.

If you’re finding it difficult to tell the difference between whites, start by holding a sample against a sheet of white printer paper. This will help you see the undertones of the colour and how it contrasts against a pure white.

2. Consider your home

Before you start selecting shades and testing out samples, pause for a moment to consider your existing home and the look and feel you’re hoping to create. White paint is a great choice as it will go with just about any flooring, but it is important to also think about your existing cabinetry, furniture and artwork as the colours here will play a role in the exact shade of white you select. If your space is already very colourful and bright, then a cool white may work best. Alternatively, if the room is fairly neutral or slightly darker, then opting for a warmer white may be more suitable.

3. Test, test, test

There is no such thing as too many sample pots! Head to Bunnings to pick up samples of your top white paint colours. If you’re unsure whether a cool or warm white is better suited to your space, now is the perfect opportunity to try both. Once you have your sample pots, paint a large piece of paper in each white and adhere to the wall or surface you are painting. Observe the different shades multiple times throughout the day and in the evening to see how your favourite colours look in different lights.

4. Washable whites win

Unlike darker colours, white paint can more easily show marks or mess so choosing a resilient washable white paint is really important!

-Nick Walsh is a Product Manager at British Paints, an Australian paint company that has produced high quality products for more than 80 years.

Categories
Kitchens RENO ADDICT

Half price kitchen? How to reno an expensive room for less

By Tamara Wrigley

The kitchen is the heart and soul of a home. It’s where families and friends come together to talk about the day, cook meals for the family and is generally the centrepiece for entertaining friends – so it’s no surprise that a kitchen is the most renovated space in Australia.  

Tamara Wrigley

In most cases, kitchens and bathrooms are also the most expensive part of a new build or renovation – costing the average Australian around $20,000. The thing is, you can do a beautiful kitchen overhaul for as a little as $10,000 or less. Done well, an updated kitchen adds even more value to your home when it comes time to sell.

If you have champagne taste but are on a beer income, here are some tips on how to update your kitchen on a budget – and get more of what you want for less:

1. Budget

THE most important tip of all. Creating a budget is an essential part of your remodel so before you start the kitchen remodel or replacement, determine how much you are willing to spend on your kitchen. Never start a renovation with an open-ended budget; you’ll end up blowing out and it will lead to unnecessary expenses. Once you have a budget, put in a contingency allowance as no doubt through the process you may want to change and tweak a few items, or you could come across some unexpected structural issues. Water damage, termites or rotten timber are all too common in old kitchens, walls and sheeting. If you have little backup funds, this won’t be so gut-wrenching when you have to spend more money than expected. Keep in mind that kitchen cabinets usually take up about one third of the typical remodel budget.

2. The triangle

While we all want a tasteful kitchen that looks amazing, don’t compromise on functionality. The ‘triangle’ is still fundamental in any redesigned kitchen plan. What is the ‘triangle’? It’s the busiest and most functional area in your kitchen where you should be able to draw a triangle between the kitchen sink, the stove/oven, and the refrigerator. Easy access from all points is a must.

3. Restore/rejuvenate/recycle

Renovate with a big emphasis on sustainability and protecting mother earth, and be aware of how long items you dump will remain in or on our earth (or end up in the ocean) until they break down. I like to use what I have and, if possible, repurpose it. If you like your kitchen the way it is but it just needs refreshing, check out Dulux’s Renovation Range. Refreshing your kitchen space has never been easier as it requires no primer on most surfaces and is easy to apply. Use the power of paint for cupboards, benches, tiles, and flooring.

If your heart is set on a new kitchen, look at places like Facebook MarketPlace as you can often find a great kitchen for a third of the price of purchasing a new one.  

Other great places to look are bric-a-brac shops. Some people would rather just ring up a charity shop or junk yard to collect their old kitchens rather than paying for the cost to remove and dump them. You know what they say – “one man’s trash is another’s treasure”. The simplest one of all is to ask a friend or family member if they know of anyone renovating and removing kitchens – again, you could score a kitchen for next to nothing.

By restoring or recycling, you are doing your bit to stop wastage and scrap being bulldozed into landfill.

4. Keep it simple

It’s pleasantly surprising, the difference a new paint scheme can make to a space, but more importantly, you’ll be amazed how much of a difference changing minor things like powerpoint covers, light switches, handles, and tapware makes. Mix that with new lights and you have just transformed your kitchen space for as little as $1,000 or less. While it’s inexpensive, making these little changes will modernise a property and lift it to the next level.

5. Flatpack

There, I said it. The “F” word most of us hate, and which also leads to high levels of anxiety, stress, and arguments between partners – FLAT PACK! If you don’t mind some good old fashioned elbow grease and instruction-reading, then buying your kitchen online from places like IKEA, or Bunnings which has the Kaboodle range, or another favourite of mine, diy.com.au, could save you some serious coin. All I would suggest is to know your measurements and the layout of your kitchen.

Get some graphite paper and draw your kitchen out first. Usually, in designing, 1m equates to 1cm when drawing. Some companies will offer free design apps. When visiting in-store, take advantage of their knowledge too. Once you know your design and measurements, then order away and wait for those boxes to arrive. I’ve been told wine may help the building process… just saying.

All that’s left to do now is get creating your new or revamped kitchen space.

-Media personality Tamara Wrigley has been a property developer for more than 23 years. Tam purchased her first property at the age of 21 and now has an empire of 30+ properties worth millions. To keep up to date with Tamara’s renovations, follow her on Instagram

Categories
Designers Expert Tips Outdoor & Exteriors

Jamie Durie on designing and building homes of the future

By Jamie Durie

Most of us will design our homes with current décor or renovation trends in mind. However, now more than ever before, sustainable living has become an increasing priority for many Australians across all areas of life, including the home.

I’ve partnered with Allianz Australia and UTS to release the Future of Living Report – which explores the many ways we might see our future homes adapt and change, in light of the growing responsibility many Aussies feel towards the environment.

We might choose to offset our carbon emissions when travelling, eat a little less meat throughout the week or try to use less plastic. However, research has found that Aussies will be making permanent changes within their homes to embrace a more sustainable lifestyle.

The report identified the five biggest changes we can expect to see in our homes over the coming years:

Living in Nature: Native sustainable plants will take over Aussie homes, inside and out.

Shared Living Spaces: With the ‘sharing economy’ taking over everything from accommodation to cars, we can expect to see this trend transforming our concept of ‘living arrangements.’

Sustainability: Sustainable materials and neutral carbon footprints are no longer seen as ‘fringe.’

Timber Homes: Timber will be the material of choice for Aussie homes, over brick.
Austerity Chic: Mismatched furniture made from a mix of flatpacks and second-hand stores will be the leading style of modern homes.

Sustainable living and future-proofing our family homes is something I am incredibly passionate about. So much so, that I’m building my very own prefabricated eco-home as I write this.

For any savvy home buyer or builder, it’s important to think about how you are creating a home that has value today and tomorrow. By building sustainably, not only can you add value to your property, you can do our earth a favour and feel good about improving our children’s futures while you’re at it.

So, I have created some simple steps that will help you feel better informed about how you can future-proof your next home, without breaking the bank.

Start Simple with Solar
A simple and very achievable goal is creating a ‘solar passive’ home. This is my number one tip for two major reasons. Firstly, it reduces your carbon footprint by saving millions of tonnes of carbon emissions by allowing cool air into the building and hot air to escape, and secondly, you can expect to see your electricity and gas bills decrease significantly. In any project, it’s all about making an achievable goal for your new home. Solar panels are a great way to start your sustainable journey and don’t cost as much as you might think. Simply put, if every home in Australia installed solar panels, we would be able to rely significantly less on fossil fuels.

Use Sustainable Materials
There are a number of ways you can lighten a new home’s impact on the environment, and one of the most logical alterations is asking your contractors to use sustainable materials. We’re starting to see the building industry coming to the market with wonderfully innovative and accessible products, all available at your local hardware store. Products like solar roof tiles, low VOC (Volatile Organic Compounds) paint and textiles, or even insulated bricks made of recycled paper. It’s also important to proactively use everyday materials that are environmentally friendly, such as using FSC (Forest Stewardship Council) certified timber.

Wood has been increasingly recognised as a global solution to climate change through its ability to store carbon and reduce carbon dioxide emissions into the atmosphere. Findings uncovered in the Future of Living Report also indicate that in the future, the exterior construction of our homes will prioritise wood over brick or concrete.

Create a Smarter Home
Have you ever thought about how much energy it takes to keep your hot water tank ready for when you want to take your next shower, 24 hours a day, seven days a week? It’s a lot – potentially hundreds of litres of water per day, per household. Think of it like we’re boiling a giant kettle all day, which results in hot water systems being the second biggest carbon emitter in the home, next to the car. As it is often hidden under the house, it is often forgotten about when thinking of our energy output. Where possible, Australians should install an inline hot water system that heats the water only as it is required, and where possible, install a solar panel hot water system.

Additionally, panels and cladding with high thermo insular properties that block out the maximum amount of heat are very easy to purchase, preventing the need for unnecessary use of an electronically sourced cooling system. The Future of Living Report demonstrates that these sustainable material innovations and merging the latest technology together with our local climates, will soon become the way we stay comfortable in our homes. So why not get ahead of the curve, while dramatically lowering your electricity bill?

The Secret Garden
Our gardens can play a pivotal role in helping us to reduce our impact on the environment, while also providing the perfect opportunity to celebrate our beautiful Aussie flora and fauna. It’s not just what we build the house out of, it’s also what we surround the house with. Planting dense foliage around the side of the house, such as Australian native plants, can stop hot weather from infiltrating the house and you guessed it, reduce energy costs too!

Instead of planting expanses of grass that have zero positive impact on the environment, I urge you to consider pollinator-attracting plants, such as bottlebrush or grevillea, so that we are increasing the bee population instead of suppressing it. This is a landscaping decision I highly encourage Australians to consider, especially given the recent devastation to our local wildlife caused by the bushfires.

Embracing nature and native plants will soon begin to blur the inside and outside lines of modern homes. The Future of Living Report indicates that plant-friendly interiors and exteriors will become a pivotal trend in homes of the future.

These are just a few thought-starters to hopefully inspire and encourage any new homeowner or builder who is looking to renovate a little more sustainably. It is so important to create a home that is fit for the future. It is not only your families most valuable asset, but the environment’s too.

For more information on the Future of Living report commissioned by Allianz Australia, in partnership with UTS.

-Jamie Durie is an international award-winning landscape designer, author and TV personality, and Allianz Sustainability Advocate.

Categories
Outdoor & Exteriors

An outdoor oasis all year round: how?

As we firmly step into winter, the lure of venturing out to the backyard may not be as enticing as it is during summer. But this should not be the case! The alfresco is perfectly positioned to celebrate the outdoors and integrate the indoor dining and living areas of your home. With an abundance of style and functionality, the undercover alfresco is ideal for entertaining or a perfect space to unwind and relax, regardless of season. Cameron Fordred, Henley’s landscape designer, shares his insights on having an alfresco oasis all year round and how to maximise the space for you and your family.

Couch and dining comforts

To ensure you keep your outdoor furniture in great condition for use all year round, you need to make sure it is protected against the elements. If your furniture is not kept undercover, the best way to keep your exposed furniture safe from weathering and discolouration is by using a heavy duty exterior outdoor cover when it’s not in use. With a wide range of covers available to suit outdoor lounges, dining settings and umbrellas, there is definitely one to keep you covered!

Just remember, outdoor furniture is made for the elements but it still needs to be looked after. Try protecting your furniture with an external grade protectant spray like Scotchgard Outdoor Fabric Protector. It not only protects it from water damage but it also resists stains and makes clean-up easier and quicker when accidents occur.

The heat is on

There are a range of outdoor heaters available on the market from the freestanding patio heaters or small tabletop units to the larger wood burning fire pits. There are options to ensure everyone is kept warm.

Ceiling mounted radiant electric heaters are a great option for a covered area. Their subtle, minimalist and sleek design ensure they can be placed directly above your entertaining space. If nothing beats toasting marshmallows over a roaring, crackling fire, you can’t go past a wood burning cast iron fire pit or bowl. These bowls come in a range of sizes and designs. If you just want the look without all the hassle of chopping wood, perhaps consider a bioethanol burner. From tabletop size to something that creates a dramatic effect, there are lots of options to give you that warm, cosy feeling.

For the budget conscious, look at a group of freestanding refillable bamboo torches available from your local hardware store. Scatter these throughout your backyard and they are a great way to create ambience. Please remember that unattended fireplaces can cause accidents, always ensure that all fires are supervised.

Sizzle on the BBQ

Who doesn’t love a BBQ? Live your best life outdoors with a fully integrated outdoor kitchen. BBQ, side burners, fridge, drawers and cabinets. State of the art materials and technology allow for year-round entertaining. BBQs, smokers, that little slice of Italy with a pizza oven, built in, compact, freestanding, portable the options are endless. Why not try the latest craze- meat smokers including; offset, drum, cabinet, and egg, fuelled by gas, electric, pellet and solid fuels, are perfect for these cold winter days. 

Hot on trend

Making waves in the back yard at the moment include hanging chairs, beans bags and industrial finish cement tabletops.  The table tops feature powder-coated aluminium frames, hardwood tops, are 100% UV resistant and waterproof and boast modern colour combinations including Matte White and Gun Metal Grey. Enjoy inviting friends over and having everyone relaxed, comfortable and making memories that will last a lifetime.

The Cohen 22, featured in the Cranbourne Display Centre, has a stunning pizza oven on show in the Alfresco area.  Perfect for weekend entertaining or weekday dinners, it may provide further backyard inspiration for culinary delights.

Mistakes to avoid

Try not to clutter the space. You may feel the need to have a table and outdoor seating but this can lead to the area feeling tight and uninviting. Go for a larger table with plenty of seating, ensuring everyone feels comfortable. Avoid using indoor furniture outdoors as this outdoor environment will ruin your furniture.

Cameron Fordred is a landscape designer for Henley, one of Australia’s leading homebuilders with over 30 years of experience in the building industry.

Categories
Design Designers Expert Tips

How to start a design or decoration business – your first steps

Dr Clare Le Roy is an award-winning interior designer, educator, mum of three and founder of The Little Design Corner. Her projects have been featured in many of Australia’s top interior publications. She also has a PhD in business but left the corporate world eight years ago to pursue her dreams of starting her own interior design business. In that time, she has gone from working for free for a few friends to creating a seven-figure business that now makes money while she sleeps. Clare is passionate about helping other people start, grow and scale their own design businesses and she shares some of her best advice here.

Nearly eight years ago I started a design business completely from scratch, with no design training, no clients – nothing! My business started from humble beginnings as a small blog where I shared ideas and tips about design and has eventually become the business I have today that has given me the freedom to create a life that I love, do something I am passionate about and (most importantly) provide me with a stable income that helps support my family.

But I remember how hard it was when I first got started in business. There were two things in particular that held me back for a long time:

  • I was scared and I felt like a fraud
  • I felt like I didn’t know the steps I needed to take to start my business.

In relation to the first reason for not taking action on my business – everything is scary until you do it, but creating a business doing something you love will change your life – take my word for it! And in relation to the second reason for taking action, that’s what I would love to share with you in this post; the first few steps you should be taking in order to move past your business just being an idea in your head to becoming something you start taking action on.

I’ve helped so many people start their design businesses, either through my free resources or via my online courses and workshops. So let me share the first few steps you should be taking if you want to get your own design business up and running.

Step 1: Identify your ideal client

The first step before you do anything else is to think about who you want to be serving in your new business.

This may seem like a strange place to start. What about creating a website or setting up social media? Yes, all these things are important, but they come later. You can’t create a website that will speak to the right person unless you first identify who that person is.

Knowing who your ideal client is means you can drill down and really work out who they are and what problems they have. You are going to be thinking about this ideal client at every step of the way while you build your business. Every time you create an Instagram post, a blog post, a newsletter, an email and, most importantly, a sales page for your products and services – you want to be thinking about your ideal client.

So try and be specific here and really describe who this person is. The better you know them, the easier you will find it to create products and services that will meet their needs. In fact I want you to understand your ideal client almost better than they understand themselves.

You want to know basics about them – how old are they, do they have kids, are they married, what sort of income do they earn, do they work? But you also want to know what fears and concerns they have. What keeps them up at night? How do they think and feel? The more work you do on understanding everything about your ideal client, the more you will end up creating products and services that speak directly to them and make them want to coming running to purchase from you.

Perhaps your ideal client is a busy mum who is about to renovate her family home? Or it might be a wealthy lawyer who wants to refurbish his home but has no time to think about it? Or perhaps it is a young couple who have just bought their first home and are looking for some help on a tight budget?

Whoever it is, get out a piece of paper and describe them in as much detail as you can.
That way you will always be creating content, products and services that they actually want and need.

Step 2: Identify the problems that your ideal client has

Let’s now move on to the problems your idea clients have. At the end of the day, your ultimate goal in business is to be solving problems. And the more specific the problem you can be solving, the better. Once you know who you want to be helping and serving, you need to work out what problems they have. And once you know their problems, you’ll be able to create solutions to those problems – in the form of the services and products that you offer.

So take out a piece of paper and write down all the problems and challenges they have. Be as detailed as you can and write out as much about how they might be thinking or feeling as you can.

Here’s an example to get you thinking. If your ideal client is a busy mum who is about to renovate her house, some of the problems and challenges she might be having include:

  • She feels worried about making the wrong design choices
  • She doesn’t have enough time to go to thousands of tiles shops to select her tiles
  • She feels overwhelmed by all the choices and where to start
  • She worries about the budget and how they are going to afford everything
  • She feels the weight of the renovation process on her shoulders – will she make all the right decisions? Will her partner be happy with what she decides?
  • She is nervous about working with trades. She hasn’t done it before and is worried they will ask her questions she doesn’t know the answer to.

These are just a few of the worries and challenges this particular type of ideal client is likely to be having. There would be heaps more than just these – but hopefully this gives you some ideas for where to get started with this step.

Step 3: Identify your passion, area of expertise and skills

The next step in getting your business started is to look inward at yourself and think about what you are passionate about, what you have skill in, what you like doing and what you feel confident to help people with. Again, write these down in as much detail as you can.

Once you’ve done this you also want to make sure that you have some kind of external validation that you are good at these things. If you aren’t yet getting that yet then you may not have found the skill that people will want to pay you for and you may need to think about more about it.

So on your piece of paper I want you to put at least three examples of where you have external validation about your skills or passion. Examples might be:

  • people asking you for free advice to help them with that skill
  • people complimenting you on your home design
  • people asking to ‘pick your brain’ about your passion topic
  • study you have in the area (with good marks)
  • work experience you have done in the area (e.g. for another company)
  • people already offering to pay you to do work in this area.

There’s lots of ways that you can document external validation of your skill set and I want you to have at least three validation examples in order to move forward with your business idea. If you don’t have them yet then think about how you might be able to get them (e.g. can you do some work for free for friends and get their feedback on how it went?).

But most importantly, do not move forward with your business idea unless you have this external validation. Why? Because if nobody except you has confirmed that your passion or skill set is something that they want or need then you may find this is more of a hobby than a viable business idea. So think carefully about this step and be honest with yourself. You don’t want to be putting all the hard work in to start your business only to find that nobody really wants or needs the idea that you have.

Step 4: Define your niche

There’s a saying you’ve probably heard: “The riches are in the niches”, and you are going to want to work out what your niche area is in order to make sure that you focus your business and marketing efforts towards a particular person in a particular niche.

You probably already have a general idea that you want to become a designer, decorator or stylist. But have you given much thought to your business idea beyond that? Defining your niche is really going to be the intersection between what we have already talked about above:

  • who your ideal client is
  • the problems they have, and
  • what you are passionate or skilled in (and that you have external validation that you are good at).

So again, take out a piece of paper and start to write down what these areas might be.

So, for example, if your ideal client is a busy mum who is renovating her house and she is worried that she will make all the wrong design decisions and you have skill and expertise in working with families to design functional homes – then your niche area might be design and decoration for families.

This niche will become your reputation and point of difference in the marketplace. As you build your brand, you want to become known for something specific. The more specific you can be about who you are helping and what you are helping them with, the easier it is for people to be able to make a connection with you.

If you take the steps outlined in this article then by now you will have a really great idea of who your ideal client is, what problems they have, the skillset you can bring that will help them with these problems and, ultimately, you will have defined a niche area that you would love to work in.

The great news is that there are plenty of opportunities to start a career in design and plenty of opportunities to specialise and find a niche that fits your skills and experience perfectly. These include interior design, wardrobe organisation, children’s room design, kitchen design, bathroom renovations, creating SketchUp models for clients, home decoration, home organisation and planning, product sourcing – the possibilities to specialise are endless.

And what I have laid out in this article are the most important foundational steps you can take to get your business up and running. I rarely see new creative businesses do these steps well. Instead, people tend to get started with the wrong things – such as creating their website, naming their business or setting up their social media accounts. But without having done the steps we have looked at in this article, how can you create those business assets? Knowing who you want to be working with and the niche you will be working in is massively important for being able to create the right kind of website or give your business the right name.

Starting a business is incredibly rewarding but you are going to have to work hard, be committed, be flexible and adaptable and perhaps even start out doing things you don’t necessarily always want to do. But if you persist and move forward, bit by bit you will start to build up something that has value and that you can keep steering in different directions until you find exactly what you want to be doing.

So make a commitment to yourself – even if it feels overwhelming or scary – and take these first few steps towards getting your amazing new business started!

Want to learn more?

If you have found this post helpful, check out Clare’s free training all about how to start a design or decoration business. In this online workshop she outlines a full step by step plan for how you can start a new design, decoration or styling business from scratch. Plus you’ll get a completely free 18-page PDF launch plan with an entire system laid out for you for how to get your business up and running. Sign up for the workshop and select a time that suits you.

She also offers an online course, Passion to Profit, that will teach you an entire foundational system for how to get your new business up and running. This comprehensive self-paced program will walk you through how to set up your business, how to find your first clients, how to market your business, the legal side of doing business plus it will teach you systems for how to improve your productivity and how to work with clients (plus much more as well!). Find out more.

Categories
Design Designers Expert Tips

Neale Whitaker on ignoring trends while paying attention to how your home feels


Interior design expert and TV personality, Neale Whitaker, discusses his approach to trends and how to create a home that’s truly you.

Neale at home

When it comes to styling a room, Neale Whitaker certainly knows a thing or two. Having visited the interior design trade show, Maison & Objet in Paris, before Covid, he found the exhibition reinforced big-picture trends shaping the industry. The primary players were sustainability, multi-functionality within smaller-scale living and bricolage – a trend towards mixing styles and eras, shapes and textures for truly unique interiors.

“I approach trends as macro and micro,” says Neale. “Macro are those around for extended periods of time, with no view of going anywhere anytime soon, like sustainability. Alternatively, micro trends are more like shapes, the styles – the things that come and go more quickly. Bricolage would fall under micro trends, as would other current themes like artisan-made natural fibres including rattan, jute and wicker, and global-nomad with influences of the Middle East and Asia.”

Neale’s homely kitchen

However, ironically, Neale’s first piece of advice when it comes to styling is to throw away the trend book. “I live my life by that line,” he said. “When it comes to the home, it’s always good to know what the trends are and why they are, but I do believe your home is all about you.” Neale says one of the biggest considerations in your home should be your emotions.

“People often don’t consider how a space makes them feel,” says Neale. “It’s easy to open a catalogue and simply pick out a theme to replicate, but if your space doesn’t suit that theme, it simply won’t feel right. Your home is yours, so make it your own. Merge trends, and don’t be afraid to mix and match styles within your room.”

Neale suggests you go slowly and have confidence in your own taste and style.

“Most of the current trends are quite neutral, and can be easily added into existing decor themes, like the inclusion of a rattan-backed chair, or a group of ceramic vessels, similar in shape or colours. My favourite interiors are always the ones that blend different styles, different tones, different periods, different colours.”

Neale’s veranda at home

Open up spaces by maximising natural light. Neale says this will instantly elevate the mood, and when completed with the right window dressing, can have a big impact on the way a room looks and feels. A bright room with lots of light is the perfect starting point to creating warmth in a home.

Layering is another key factor in creating warmth in the home. “Aside from lamps, which are wonderful for illuminating spaces softly, and using rugs and soft furnishings to create warmth, layering art that you love, your personal photographs, mementos, books – the things that tell your story – will add depth and turn a house into a home.”

Neale’s standout piece of advice, however, is to trust your instincts and remember that rules are meant to be broken: “I’m a great believer in creating homes with spirit, soul and individuality, and that, to me, is as important as comfort and functionality. Don’t be afraid to mix things up a little and remember that things you love are more important than things that are on trend.”

-Neale Whitaker is a brand ambassador for Luxaflex Window Fashions. With over 65 years’ experience, Luxaflex has proudly become the market leader in stylish and innovative window covering solutions.

Images: Luxaflex

Categories
Bathrooms Design Designers Travel

Hotel bathrooms: take inspiration from some of Australia’s best!

As restrictions continue to ease across most states, many Australians are beginning to plan their next domestic weekend escape to relax and rejuvenate. Even if you’re not getting away, you can take inspiration from some of the best Australian and New Zealand hotel bathrooms for your next reno.

Image: Halycon House by Kara Rosenlund. Design by Virginia Kerridge

Emma Joyce from luxury bathing brand Victoria + Albert Baths, shares some of her favourite hotel projects, with tips on recreating a luxurious hotel feel in your own home.

Bryon Beach Abodes, Byron Bay

Nestled in the picturesque Northern Rivers beach town of Byron Bay, Byron Beach Abodes offers guests six unique, boutique holiday homes. Designer Taliah Lowry has captured the raw beauty of the Australian bush that surrounds the abodes and has brought the outside in to create a tranquil escape.

Image: Byron Bay Abodes by Jessie Prince. Design by Taliah Lowry

The peaked recycled timber ceiling and striking window that encompasses almost an entire wall afford a sense of light and space, while a marble vanity and concrete flooring centre the room through their earthy feel. These strong elements are softened through the layering of flowing white sheer drapes, soft towels, and the striking Victoria + Albert Terrassa bath, situated on its own mezzanine to create a dramatic centrepiece.

How to replicate this look:

When creating your own dream bathroom, look to bring natural light into the space through oversized windows and skylights. When looking for the perfect bath, look for a shape and scale to suit the space, and ensure it is comfortable for you – always try and sit in a bath before buying.

If you are looking to incorporate stronger visual elements into your space, such as polished concrete floors and recycled timbers, offset these harder textures with sheer flowing curtains, soft white or cream towels, and touches of flora.

El Questro Homestead, The Kimberley

Located in the picturesque Australian Kimberley region, El Questro Homestead offers nine suites and luxurious exclusivity to guests seeking a desert hideaway.

Design by Troppo Architect, image by Timothy Burgess

Created by Troppo Architect, the homestead literally takes the inside out, featuring a stunning Victoria + Albert Napoli bath on the quintessentially Australian wrap-around veranda. An awning over the veranda provides just enough protection from the elements and allows guests to bathe and immerse themselves in the stunning scenery, no matter the weather.

Recreate this look:

Look outside for your next bathroom renovation. Outside bathing is a trend sweeping Australia due to our stunning climate, and represents the ultimate in spa luxury. Weather conditions are something to be mindful of when creating your outdoor oasis, so try having your outdoor bathroom under an awning or pergola.

Halcyon House, Cabarita Beach

Known as Australia’s most unique beachside property, Halcyon House is located within the beachside surrounds of Cabarita Beach on Australia’s East coast – almost halfway between the Gold Coast and Byron Bay. Designed by Virginia Kerridge, Halcyon House offers an eclectic cross between classic Hamptons and Australian beach house style through its use of vibrant blues and tones of white.

Image: Halycon House by Kara Rosenlund. Design by Virginia Kerridge

This continues into the bathroom where a striking blue-and-white Moroccan tile feature is the space’s centrepiece. Warmth and personality are brought into the space through the layering of timber-framed mirrors, metallic tapware and striking white landscape subway tiles. Cocooned in its own private space is the Victoria + Albert Amiata bath, standing in pride of place. A traditional freestanding bath brings an air of luxury to any space.

Recreate this look:

This is the perfect example of ‘less is more’. The eclectic bathroom tiles create their own statement and are complemented by finer details. When trying to recreate this look, choose your statement tile first and decide where you want it to be featured. This could be a full bathroom floor tile, or a full or half-wall tile.

Victoria + Albert’s recently launched 100% matt finish is available on a range of their baths and basins. This unique finish absorbs and diffuses light and feels gentle against the skin, adding a softer, human touch to a minimalist space.

Matakauri Lodge, Queenstown, NZ

Nested alongside the sparkling shores of Queenstown’s internationally recognisable Lake Wakatipu, Matakauri Lodge offers luxurious suites and villas, each with a private patio offering unspoilt views of snow-capped mountains and expansive views of the iconic lake.

Matakauri Lodge

Created by the owner of Matakauri Lodge, the stunning villa bathrooms ensure the spectacular scenery is the main feature of the space, with a floor-to-ceiling window. Delicately framed, oversized mirrors provide functionality, but also double the feeling of space in the room by reflecting the window and the breathtaking view.

The Ravello Victoria + Albert bath creates a stunning centrepiece to the space while still blending into its surrounds with its refined shape. Protected from the elements, guests can still enjoy the natural beauty of the New Zealand landscape from the warmth and comfort of the tub.

Recreate this bathroom:

When choosing a bath, make sure it reflects and works for the space. A freestanding bath doesn’t always have to feature in the centre of the bathroom; it can create just as much impact off to one side. Think about the size and functionality of your space. If you’re working with a smaller floor space, place the bath to the side and up against a window. This allows for a functional space while also creating atmosphere for your bathing experience.

QT Melbourne

QT Melbourne offers perfectly groomed, boutique accommodation in the heart of the city. Designed by Indyk Architects, QT Melbourne was crafted to reflect the unique identity pertaining to the city that surrounds the five-star hotel.

QT Melbourne by Brett Boardman

The QT is heavily influenced by art, fashion design and music, and features a strong presence of local contemporary art. The open plan bathroom-into-bedroom space exudes personality through creative art pieces, deep timber details, and electric blue features. The open plan brings the bedroom’s personality into the bathroom through the inclusion of the Victoria + Albert Monaco bath with a striking black finish.

Recreate this bathroom:

This bathroom is all about art and personality. When looking to create a similar space, consider the various ways in which you can incorporate art or colour. Look to empty walls within the space to feature artwork, either through framed pieces or a tiled artistic feature wall.

Add drama and personality into a space through colour. Specify your bath or basin — or both — in a bold, glossy colour, and set these elements against a cool, neutral bathroom for maximum impact. For example, match a mint green basin with a white marble benchtop and matt black tapware for a perfect combination.

To ensure your bathroom’s seamless fusion with the rest of the house, take cues from the colour palette throughout the rest of your home and inject the commonly featured shades into your bathroom as well.

Categories
Bedrooms Designers Expert Tips

Sleep tips: Change your home and improve your snooze!

Swedish-born, Sydney-based interior based interior designer Anna-Carin McNamara, who specialises in high end Scandinavian style interiors, shares her tips for improving your sleep by improving your home and habits.

Eliminate clutter: Research has shown that excess clutter is one of the main reasons household members argue. So, if we feel agitated it can also be hard to switch off. I also suggest testing how you switch off and how you sleep after you have tidied up and cleaned your bedroom, then test how you sleep when your bedroom is messy and dirty – you may be surprised what a difference a little cleaning can make.

Visualise yourself as someone else: It’s a little different but I often advise people to decide WHO you want to be in your home – envisage the ideal person then think about what someone like that would do when they are home – would they hang up their clothes, would they tidy up the kitchen before going to bed, would they invite people over and what would they cook? Then create habits around how you organise your home based on that ideal person.

Consider a calming colour palette: Rudolf Steiner’s Colour Theory states that certain colours evoke and support certain feelings and activities. For example, red is active and fiery, green is calming and soothing, yellow is cheerful, while blue inspires thinking and the intellect. So, if you want to inspire a happy and calm home environment to help us switch off, go for yellows and greens.

Opt for white bedding: Based on the Colour Theory, the same rules apply to the colour of our bed linen – if you want to feel calm, don’t opt for red bed linen. I’ve also heard that what is closest to the body when we sleep should always be white, to help purify the body while we sleep.

No TV in the bedroom: I am absolutely against TV in bedrooms, it damages the quality of our sleep. Most of us spend so much time in front of screens day-to-day, let the bedroom be free from them. The bedroom should be for relaxation, rejuvenation and sex, I believe it is a myth that TV helps us relax. Prevent the TV from being the centre of your home by removing it from the bedroom entirely.

Dedicate a room for relaxing in: Try dedicating one room to being predominantly for relaxing, my pick is always the bedroom. If you have to set up a desk there and work during the day, make sure to set up rituals that transition the room from being a place for work to being a place to relax. Change the lighting, air out the room and then burn some incense at night time to clear the energy. The living room is used for much more than relaxing as it is also for socialising and connection, so it needs to be flexible and accommodate many activities, while the bedroom does not need to be used in the same way.

Chores become rituals: Start calling chores rituals, instead of chores – rituals to nourish yourself and your family sounds so much better and inspiring than doing chores. Little things every day prevents bigger jobs from building up. Make some tasks non-negotiable every day, for example, never go to bed without first cleaning the kitchen sink. Wipe down the basin in the bathroom while you brush your teeth, keep a cleaning cloth in the shower to wipe the surfaces while you shower. It’s these little clues that help make these rituals seem effortless.

Make an effort to really switch off: Switch off is called switch off for a reason – try to switch off all electronics after 9pm, including all the ceiling lights. Light a candle and put on some mellow low tunes. Allow the natural rhythm of the body to kick in and wind down with soft light and soft music. You will sleep like a baby.

-Anna-Carin McNamara is a Sydney interior designer and Electrolux ambassador. The new Electrolux Pure Q9 handstick vacuum (PG91-3PGF) is a lightweight and powerful 2 in 1 vacuum that is perfect for hard floors, as the PowerPro fluffy nozzle picks up fine dust through crevices, as well as larger particles.

Categories
Expert Tips

Sustainable living: 6 ways to build a greener home

Building a more sustainable and low maintenance home requires careful planning but the payoff can be huge. From style to cost-effectiveness, longevity to eco-sustainability, it can often be confusing and overwhelming to consider the right materials.

A stylish and sustainable home in Merri Creek, VIC

To help us navigate the road to sustainability, Brett Ward from Brickworks takes us through six simple ways you can build with sustainability in mind. Implementing passive solar design principles with the right materials can be all it takes.

  1. Prioritise thermal performance

Thermal mass (the ability of a material to absorb, store and slowly release heat energy) is key to creating an energy efficient home. Building your home with heavy, dense materials such as brick helps to insulate it by absorbing and storing heat energy to slow down its transfer. The thermal mass of brick has the potential to keep a home cool in summer and warm in winter, minimising the need for artificial heating and cooling.

Brick acts like a thermal battery that can moderate internal temperatures, as well as averaging out day and night extremes to maintain a comfortable air temperature. By using less energy, this can help you save up to two tonnes of carbon pollution each year. By combining the thermal mass of bricks with insulation, you can lower the carbon footprint of your home, with the added benefit of reducing your heating and cooling bills by up to 40%.

2. Use concrete or terracotta roof tiles

Roof tiles boast an incredible amount of environmental benefits, from their thermal
performance, to their low embodied energy and recyclable capabilities. The roof is one of the largest external facing surfaces of a home, and so the choice of roofing material plays a major role in determining the internal living temperatures, household energy usage and the overall energy efficiency of a home. According to the Australian Greenhouse Office, 39% of household energy costs come from heating and cooling the home, so by opting for roof tiles you can expect to save on your electricity bills, all while saving the environment!

3. Design for your climate

Designing your home to suit your climate is a great way to minimise energy use. This
practice, known as Passive Solar Design, takes into account your local environmental
conditions, including the building’s site, climate and materials, to create a home that
optimises the sun’s natural energy. The orientation of your home plays a huge role in the way sunlight enters your home, thus impacting the internal temperature. North-facing windows will welcome light and warmth into your home, while overhanging eaves can create shade and provide relief from the harsh sun.

4. Install a solar system

Solar energy is a renewable source of energy that is clean, sustainable and does not emit any greenhouse gas when producing electricity. Installing a solar system allows you to capture energy from the sun and convert it into electricity, so you can reduce your reliance on the power grid and save hundreds on electricity costs.

5. Embrace products that last a lifetime

Choosing products with a long lifespan is a great way to decrease your impact on the
environment and the energy used to maintain your home. Building your home with brick ensures it remains weatherproof, durable and attractive for years to come. Unlike less durable lightweight materials, which can be costly and time consuming to maintain, brick doesn’t need painting, rendering or any other coating to maintain its good looks. Choosing bricks is a smart one-off investment that pays dividends now, and in the future.

6. Use certified carbon neutral products where possible

Where possible, you should incorporate carbon neutral products into your home. You can now choose bricks knowing that their manufacture results in zero net emissions of greenhouse gases into our atmosphere. A product certified as carbon neutral has been assessed and approved against the Australian Government’s National Carbon Offset Standard.

Making sustainable decisions in the design process and material selections of your home allows you to make a big impact on the environment without thinking too much about it. With each of these steps you are investing into the future of the environment, with the added benefit of creating a cleaner, more comfortable and cost-efficient home for you and your family to enjoy.

-Brett Ward is the general manager of international marketing at Brickworks, a group of Australian companies that specialise in building products for residential and commercial markets.