“This ol’ gal with her timber benchtops, exposed canopy rangehood, above bench microwave hood and glass fronted overheads was due for a facelift. She’d been the backbone of the family for many years, however it was now time for her to take a starring role again,” says interior designer Silvia Roldan, who recently transformed this kitchen for her clients without changing the layout.
Before
After
“Our client’s brief was simple: retain the layout, location of all appliances and the gloss white 2Pac joinery. Everything else was open game!”
With an elegant combination of colours and textures, Silvia set about transforming the kitchen. With natural stone benchtops, organic Moroccan tiles and antique brass finishes on the tapware and joinery handles, it was instantly updated.
“Materiality is paramount for us, so selecting the right stone for the benchtops meant the new design would have longevity and a timeless character,” said Silvia, owner of Studio Esar.
Before
After
The glass fronted overhead cupboards were given an overhaul with more contemporary 2Pac doors and the grey on grey of the overheads and natural stone benchtop in New Grey Tundra created a tonal harmony. The open wine rack underneath the island bench was concealed behind new door panels.
“To signify the end of the kitchen, we removed the hood where the microwave was housed (and relocated it to inside the pantry) and replaced this with new overhead joinery consisting of a cupboard and open shelves. This not only opened up the area but created a quaint end to the rear bench and allowed our client to display some of her collected ceramics,” said Silvia.
Before
After
“Each space we create is highly tailored and rather than following trends, our studio is led by emotion and mood as we understand the power an interior can evoke. We pride ourselves on having an eye for detail and with this precision, we create textural and colourful spaces that are contemporary and classic,” said Silvia.
Last updated in the 90’s, this grand Edwardian-era Melbourne home has just been renovated again with interior designer Jessica Viscarde, of Eclectic Creative, at the helm. “The home had undergone an extension in the late 90’s and the existing conditions of the kitchen, living and dining, as well as the laundry room, did not fit the style of the home, nor meet the needs of the family,” says Jessica, who set about updating the circa 1914 abode with clever space planning, lovely new design features and a neutral yet textured materials palette.
BEFORE kitchenAFTER kitchen
While Jessica updated the entire living, dining and kitchen, perhaps the most striking aspect of overhaul is the integrated meals table that is nestled into the kitchen island bench. “We proposed this layout as our ‘wild card’ option and were thrilled our clients chose it as their favourite. Our clients preferred the ability to sit down comfortably in chairs rather than having an oversized, and perhaps under-utilised, island bench with bar stools.” says Jessica of the unique design that is a natural gathering space in the room.
AFTER kitchen. The integrated meals area is a unique feature.
The kitchen’s beautiful original window area is now complemented by a ceramic double farmhouse sink, Brodware mixer and integrated dishwasher and bins. The cabinetry was extended to frame the original windows and Spanish hand-cut tiles imbue the space with gorgeous texture. Nearby, the fridge was repositioned to free up space that now houses a substantial oven, cooktop and upper cabinetry. As for materials, the kitchen combines natural stone, porcelain and timber with VJ panelling and slimline shaker cabinet profiles.
AFTER kitchen
“We decided to zone designated areas within the expansive open space to incorporate both living and dining, whilst creating an additional sitting area encased by those lovely bay windows,” says Jessica. The living area features custom joinery that was designed to complement the kitchen and neatly store tech away. Powder-coated perforated metal allows for the use of remotes and open timber shelves are the perfect spot to house personal touches.
BEFORE loungeAFTER lounge
“A custom sofa was designed especially for the space and made locally in Melbourne. It’s paired with a stunning green wool area rug to add a soft layer and zone the living area in the open space,” says Jessica.
AFTER dining
The bay window area off the kitchen now houses a lovely reading and relaxing zone to take in the established gardens and sun. UV-friendly fabric was specified for the armchairs and a hand-knotted custom rug from Hali Rugs completes the scene. A David Trubridge pendant light complements another version of the light in the dining area, while working to link the two spaces.
From Samsung’s latest innovations to sleek Scandinavian inspired washbasins, upgrade your kitchen and bathroom this winter with our latest roundup.
Bunnings Cibo Design Bathroomware: For the past few years, CIBO Design has worked hand-in-hand with Bunnings to deliver on-trend bathroomware that’s high on quality but accessibly priced. These vanities come in wall-hung or full-height styles and five popular sizes to cater for a wide range of bathrooms. All versions including soft-close doors and drawers with finger-pull handles. There are four basin colours to choose from including gloss white and matte pale pink.
Concrete Nation Petite Valencia Bathtub: With limitations on travel, bathrooms have become spa-like sanctuaries and the Petite Valencia, meticulously handcrafted by Concrete Nations’s team of artisans at Burleigh Heads, is set to bring a sense of absolute luxury. Small in size but big on style, the Petite Valencia retails for $5190.00 and is available in 13 signature colours.
Samsung French Door Refrigerator: Samsung Electronics Australia have expanded their French Door Refrigerator range, announcing six new models. The 7000 Series is packed with smart innovations, such as the new Beverage Centre with Autofill Jug that automatically refills every time it’s placed back into the fridge, making empty water jugs a thing of the past.
Samsung Electronics Australia Smart AI Washing Machine & Dryer Range: They’ve also extended their Smart AI Washing Machine and Dryer range, bringing out three new washing machines and three new heat pump dryers in a range of sizes and a new black colourway. Available now at leading retailers.
Smeg Bean to Cup Coffee Machine: The latest must-have for every coffee lover, Smeg’s Bean to Cup fully automatic espresso coffee machine offers a simple and convenient solution for espresso, cappuccino, and latte enthusiasts. Create the perfect aromatic coffee at the touch of a button, while not compromising on flavour.
Hisense Australia Dishwashing Range: Designed and manufactured in Europe, the new freestanding units are available in white, stainless steel and black, starting from $1,099.
Paco Jaanson Glam Wash Basin Range: Whether you’re seeking a built-in, counter top or wall mounted basin, the Glam range by Paco Jaanson creates a refreshing and minimalistic addition in any bathroom. It comes in 14 circular, square and rectangular styles.
Australia’s best kitchens: 7 stunners to inspire your next renovation
With the finalists in the Belle Fanuli Interior Design Awards 2021 announced earlier this week, we thought we’d gather together all the residential kitchen finalists for you! After all, it…
Designer bathrooms: be inspired by 7 of Australia’s best
There’s nothing like awards season to give us all some designer inspiration for our own homes. The Belle Fanuli Interior Design Awards 2021 finalists were announced last week. Today, we’re…
“Don’t get me wrong, the old kitchen wasn’t terrible but what you don’t see is how the drawers were falling apart, the lack of functionality in the pantry, and how dark it was. And don’t even get me started on the beige!” says Melbourne interiors and lifestyle blogger Krystal Giardina of House of Harvee. She recently updated her circa 2011 kitchen, elevating it from a rather pedestrian affair to something much more beautiful. The result is one of the best ‘before and afters’ we’ve seen which is saying something as we’ve seen plenty!
BEFORE kitchen
AFTER kitchen
The new kitchen marries a gorgeous array of materials including white shaker style doors, pink marble kit kat tiles and plenty of fresh white in the form of Dulux Lexicon Quarter. The result certainly seems to fit Krystal’s design brief – she wanted a light, bright and modern farmhouse feel. “I wanted a wow factor too,” says Krystal who worked on the design herself creating seven sketches and a moodboard in the process.
BEFORE kitchen
AFTER Krystal’s chic pantry space is on the other side of the arch
“I really wanted more natural light and was hoping to live out my ‘skylight in the kitchen dream,’ however because of the way the home was built it wasn’t a possibility,” says Krystal. One fairly simple solution to the claustrophobic and dark feel was the removal of the bulkhead in the kitchen – it was brought up to normal ceiling height which made a huge difference to the amount of light that permeates the space.
“The minute we took the bulkhead off I knew it was going to be amazing! It automatically felt like a bigger, brighter and much more grand space,” says Krystal.
BEFORE kitchen
AFTER The removal of the bulkhead made a huge difference
The kitchen cabinetry was built by MKR kitchen renovations and features internal hardware from Hettich including soft close doors and drawers. Arguably a standout within the space, the pink marble tiles that clad the island bench were sourced from Perini Tiles. Another unique feature is the pot filler above the cook top. “I sourced it through Beckar Studios and I knew my kitchen just had to have one,” says Krystal.
AFTER
“I’m so proud of how beautiful it looks and how the new kitchen flows perfectly with the whole style and design of the home. Before the the colours were dull and didn’t scream ‘me’ at all. Now, the space is ‘Krystal’ in a kitchen!”
Hamptons style house: An amazing before & after in Queensland
Located on the Sunshine Coast hinterland, this original Queenslander was built in 1940 and while it’s been renovated over the years its latest makeover is arguably its grandest, with its…
We love an affordable DIY renovation solution around here so when Dulux shared a couple of budget kitchen makeovers with us recently, we couldn’t click through fast enough. Created for just $700 each with the Dulux Renovation range, the results are rather impressive. And with the average kitchen renovation costing around $21,000, and taking upwards of a month to complete, it’s no surprise that many of us are turning to paint for a fast and inexpensive solution.
BEFORE
AFTER. Dulux Five Fingers Peninsula is paired with Dulux Whisper White.
A water-based interior paint range, the Dulux Renovation range is ideal for wet and high-use zones such as the kitchen. The formula is tailored to cabinets, tiles, benchtops, grout and floors making it the ideal solution for a budget kitchen reno. And rather than waiting for lengthy cabinetry installs or bench top and tile replacements, the product lets you renovate a kitchen over a few days.
BEFOREAFTER
And when it comes to colour selection, Dulux colour and communications manager Andrea Lucena-Orr has plenty of advice for would-be kitchen renovators. “Whether it is a high-end, luxurious look and feel you wish to create (as might be seen in your favourite restaurant) or a more relaxed, lived-in space for the whole family to enjoy, the right colours and products can make all the difference,” says Andrea.
For those who favour classic looks, Andrea suggests pairing Dulux Domino or Malay Grey on the benchtop or tiled floor and pairing it with a warm white like Dulux Natural White on splash back tiles. “This creates a classic and sophisticated look that can be tweaked over time with kitchen accessories and stainless-steel appliances,” says Andrea.
BEFOREAFTER. This kitchen’s bench tops were transformed with Dulux Malay Grey
From navy to teal and cornflower, blue kitchen cabinetry has been steadily increasing in popularity of late and it’s a look that is fairly easy to achieve according to Andrea. “Mid-tone blues, reds and pinks can be used for a daring and playful effect in the kitchen. For example, cornflower blues on cabinets or cabinet doors, complemented with soft grey on handles, can be tied together with a warm white like Dulux Whisper White on the tiles and walls for a statement look,” says Andrea.
Trendy and timeless: Designers share this year’s kitchen trends
Five respected designers have shared their thoughts on the ideas and inspirations currently shaping kitchen design across Australia this year. Whilst there may not be many surprises, it is reassuring to…
Originally built in the 90’s, this home’s original kitchen was in dire need of some love when Melbourne’s Haus of Cruze design studio began overhauling it recently. Completed as part of the Bunnings ‘Make it Yours’ web/tv series, the kitchen makeover is rather impressive. Particularly when you consider that it was completed within just two days, with a budget of $5,000 that included the nearby dining room too.
BEFORE kitchenAFTER kitchen. Quite the transformation!
“We capitalised on upcycling projects such as the cosmetic updates to the bench tops and joinery. We used the fabulous Dulux Renovator Range products and ensured we didn’t introduce any costly structural changes,” says Haus of Cruze’s Jamie House who adhered to a ‘classic coastal meets California cool’ design brief. “We wanted to create a casual Australian flavour that speaks to the quintessential Australian lifestyle – casual, unfussy, calming, natural and lived in,” says Jamie’s business partner Az De La Cruz.
BEFORE kitchen and diningAFTER kitchen and dining. Painting the cupboard fronts in Dulux Tirau Double was a cost-effective solution.
Arguably the hero of the space, the kitchen bench was renovated with a Tasmanian oak half round dowel feature panel; an impressive DIY project that preserved the budget and allowed the team to inject more money into the flooring. “We assembled it in just a few easy steps, and it really helped to elevate the space by bringing in some warmth and texture,” says Jamie.
The new flooring was a huge improvement on the original also; it’s now comprised of Smart Flooring waterproof hybrid vinyl planks in Highland Grey. The pantry door was overhauled with Easycraft EasyVJ Panel and the room’s paint colours were updated in the form of Dulux Tirau Double on the cupboard fronts and Dulux Panda Pod on the walls.
BEFORE kitchenAFTER kitchen
Rather than purchasing new furniture, the team sourced one-off pieces from Facebook Marketplace to upgrade the kitchen bench area. Vintage rattan bar stools add unique character and allowed the team to add feature pendant lighting above the bench and sheer curtains to the room.
BEFORE kitchenAFTER kitchen
“We’re really proud of the feature dowel under the kitchen bench. It really set the tone and lifted the space with a nod to luxe living. Overall, I think we created cohesion and harmony between both spaces and really nailed the brief.”
Watch it come to life below:
A coastal farmhouse style kitchen renovation on the Gold Coast
Part of a wider home renovation (that interestingly was managed entirely online), this Gold Coast kitchen was the final room to get the makeover treatment. “The only room letting down…
Part of a wider home renovation (that interestingly was managed entirely online), this Gold Coast kitchen was the final room to get the makeover treatment. “The only room letting down the style and functionality of the home was the kitchen,” says interior designer Mel Hoekstra who was responsible for the overhaul.
And although it wasn’t falling apart, the size and layout of the room didn’t suit the home’s occupants (a family of three) and nor did it allow space in which to entertain family and friends.
The new kitchen features a large and functional island bench
Tasked with creating a coastal farmhouse style kitchen that complemented the rest of the renovated home, Mel started the job with some clever spatial planning. “We doubled the kitchen space by extending into the double garage, which our clients only used for storage. We also removed a small entry wall giving us much needed space for a large stone island bench,” says Mel.
Positioned in the centre of the kitchen, the island allows for serving, working and homework as well as acting as a space for the family to congregate and interact. It’s a far cry from the home’s previous kitchen which was only large enough for two people to be cooking in the space.
Another key design feature is the room’s new breakfast bar which is located near the back door. “It’s a space for overnight guests to feel comfortable making themselves a drink or coffee while the owners are cooking or washing up,” says Mel. That kitchen zone was designed to make everyone feel like they had space.
The ‘breakfast bar’
Neutral cabinetry was paired with matte black handles and taps for design continuity. And two of Mel’s favourite design aspects include the ‘floral’ cut-outs at the top of the tall cupboard doors, the timber shelves (which are ideal for ever-changing shelfies) and the classic glass feature pendant lights that hang over the island.
The tall cupboard doors feature pretty floral cut-out detailing at the top
The kitchen also features a secret door to the laundry chute, that looks like it’s part of the wall while another ‘cupboard’ is actually a doorway into the garage storage area. “It is these quirky and unique features that have helped to personalise the kitchen for our client’s lifestyle, and they couldn’t be happier!”
Textured concrete basins, accessories inspired by ancient Greek architecture and Dolce and Gabbana‘s latest SMEG collaboration, this latest bathroom and kitchen looks are an eclectic bunch. Concrete Nation RAW collection:…
Seasoned renovators Ash and Simon Vos are on a journey to transform their Coffs Harbour abode into a modern Californian dream home. As one half of The Block 2014 winning duo with his brother Shannon, Simon’s latest project with wife Ash has been one of the most challenging.
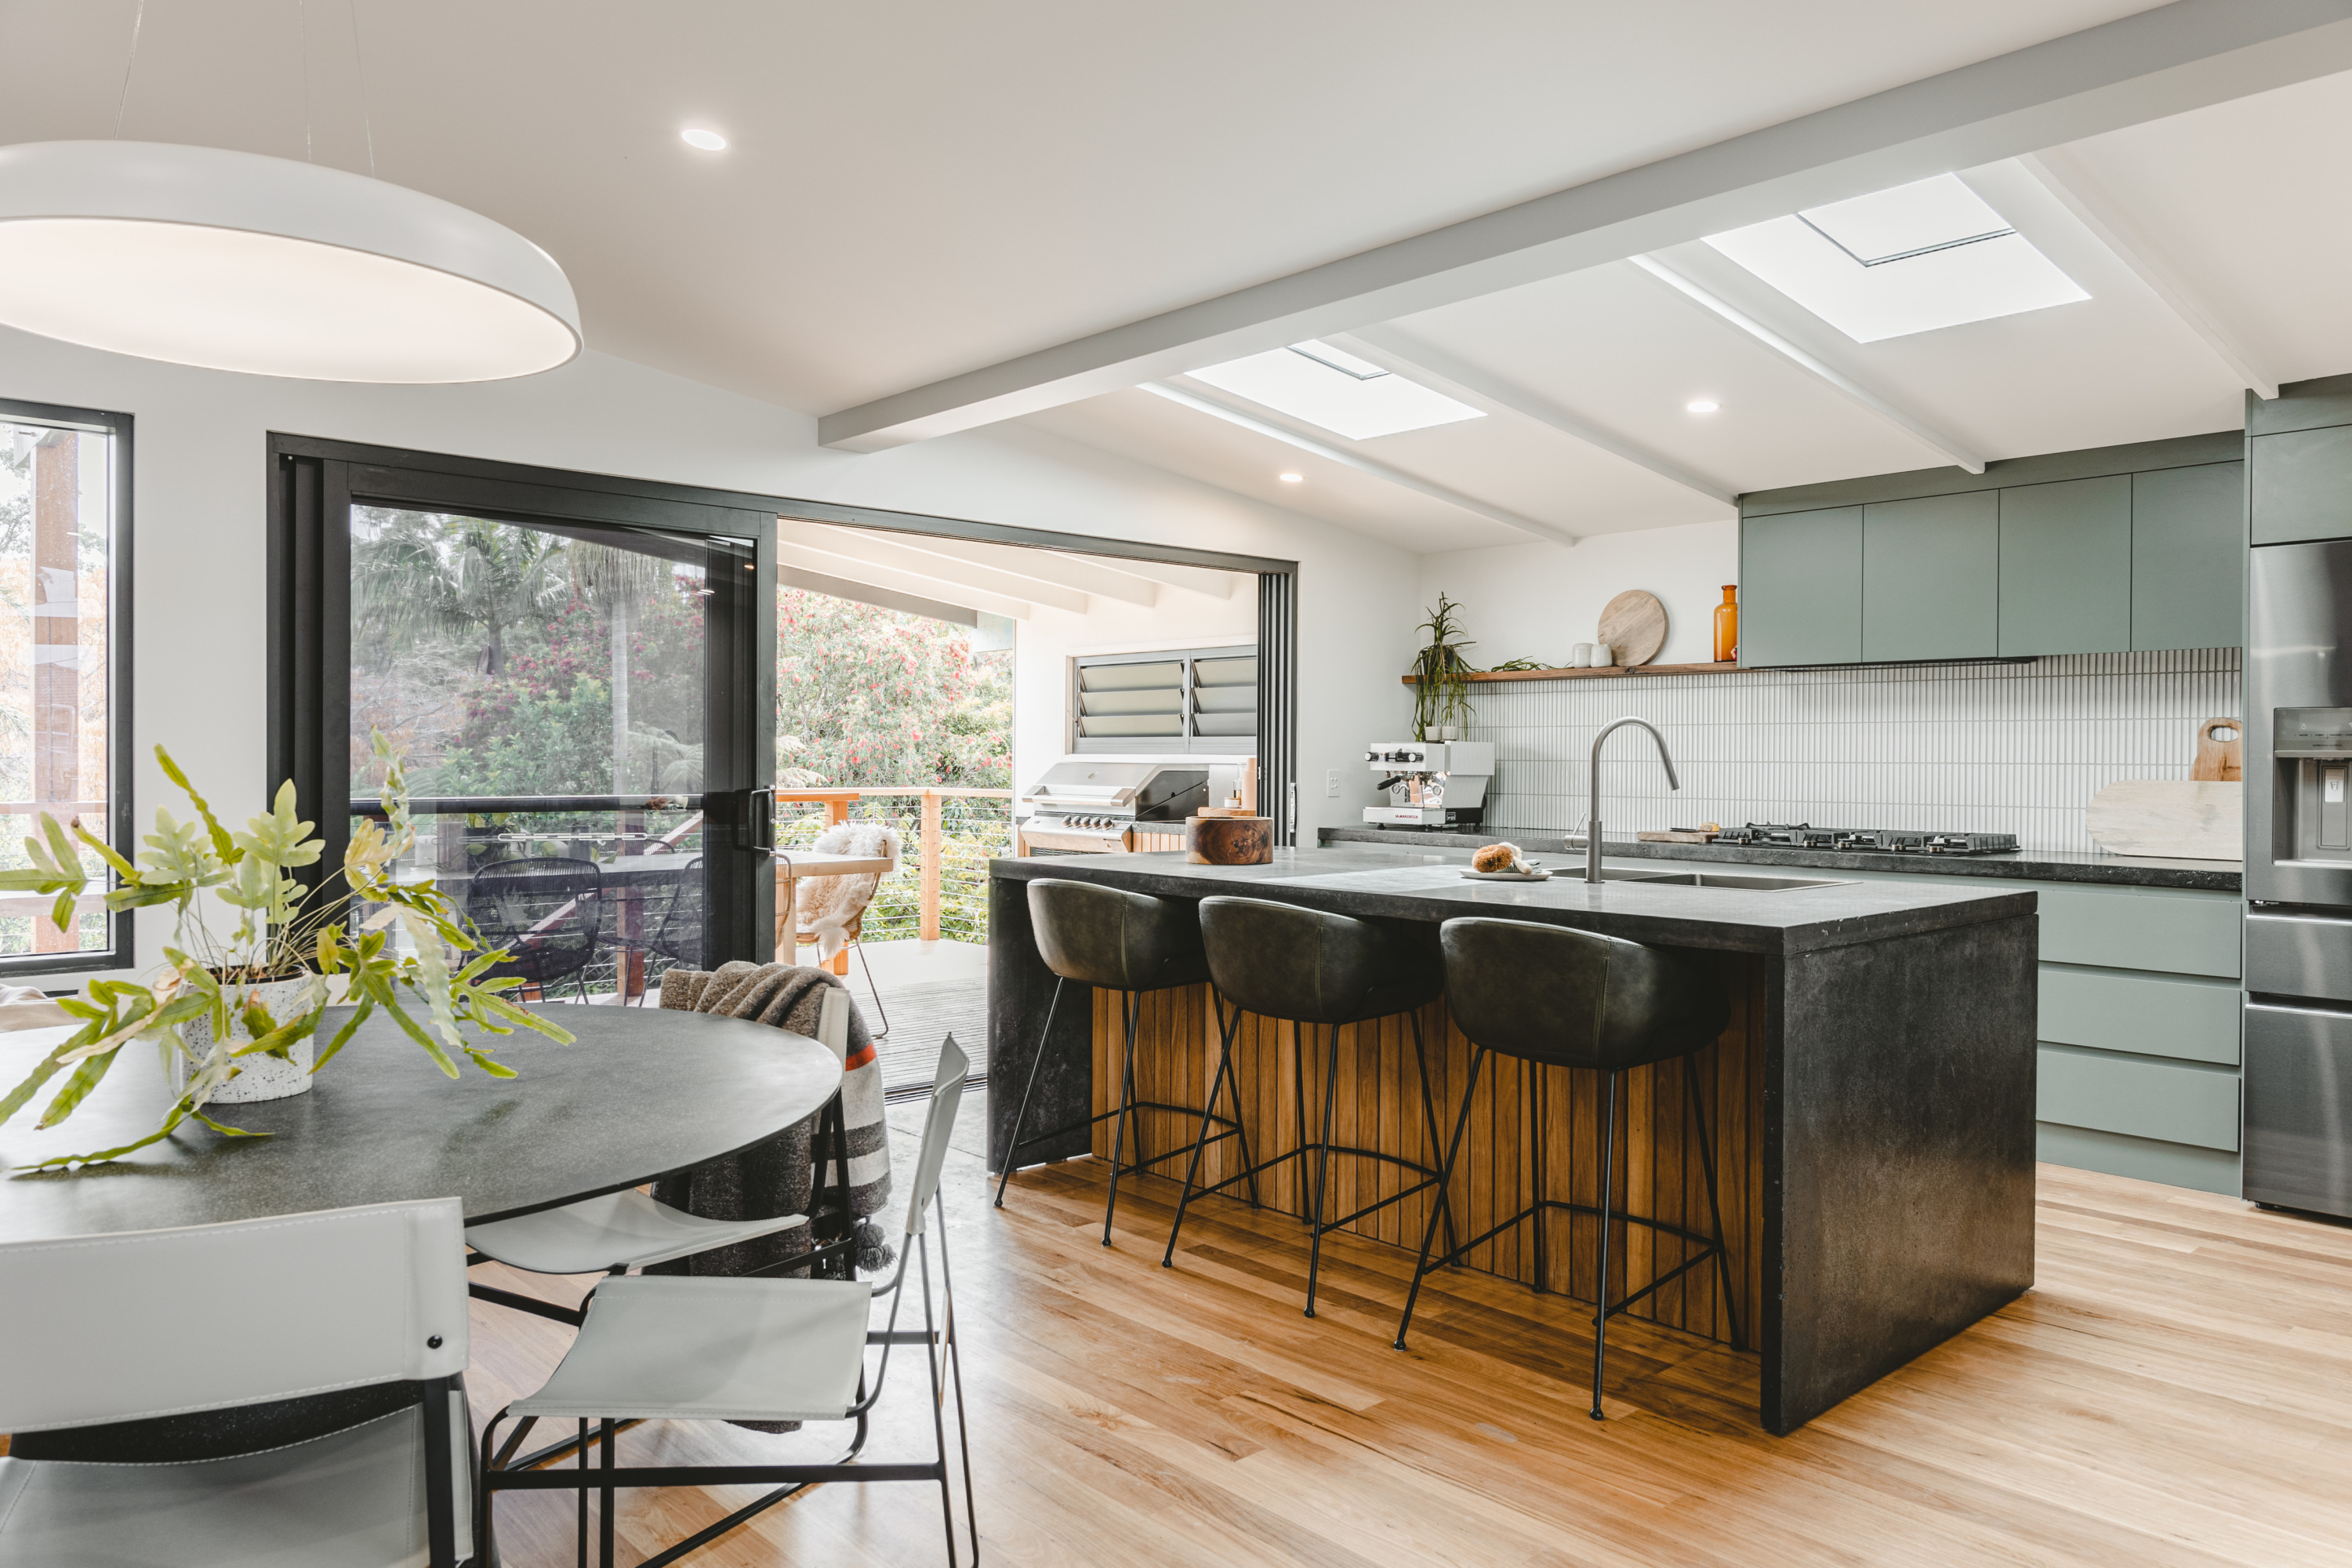
With Simon’s building skills and Ash’s keen eye for design, the pair have transformed a once small space into a large, liveable kitchen that takes inspiration from their stunning surroundings, with calming green tones and touches of mid-century modern that play into the home’s contemporary Californian elegance.
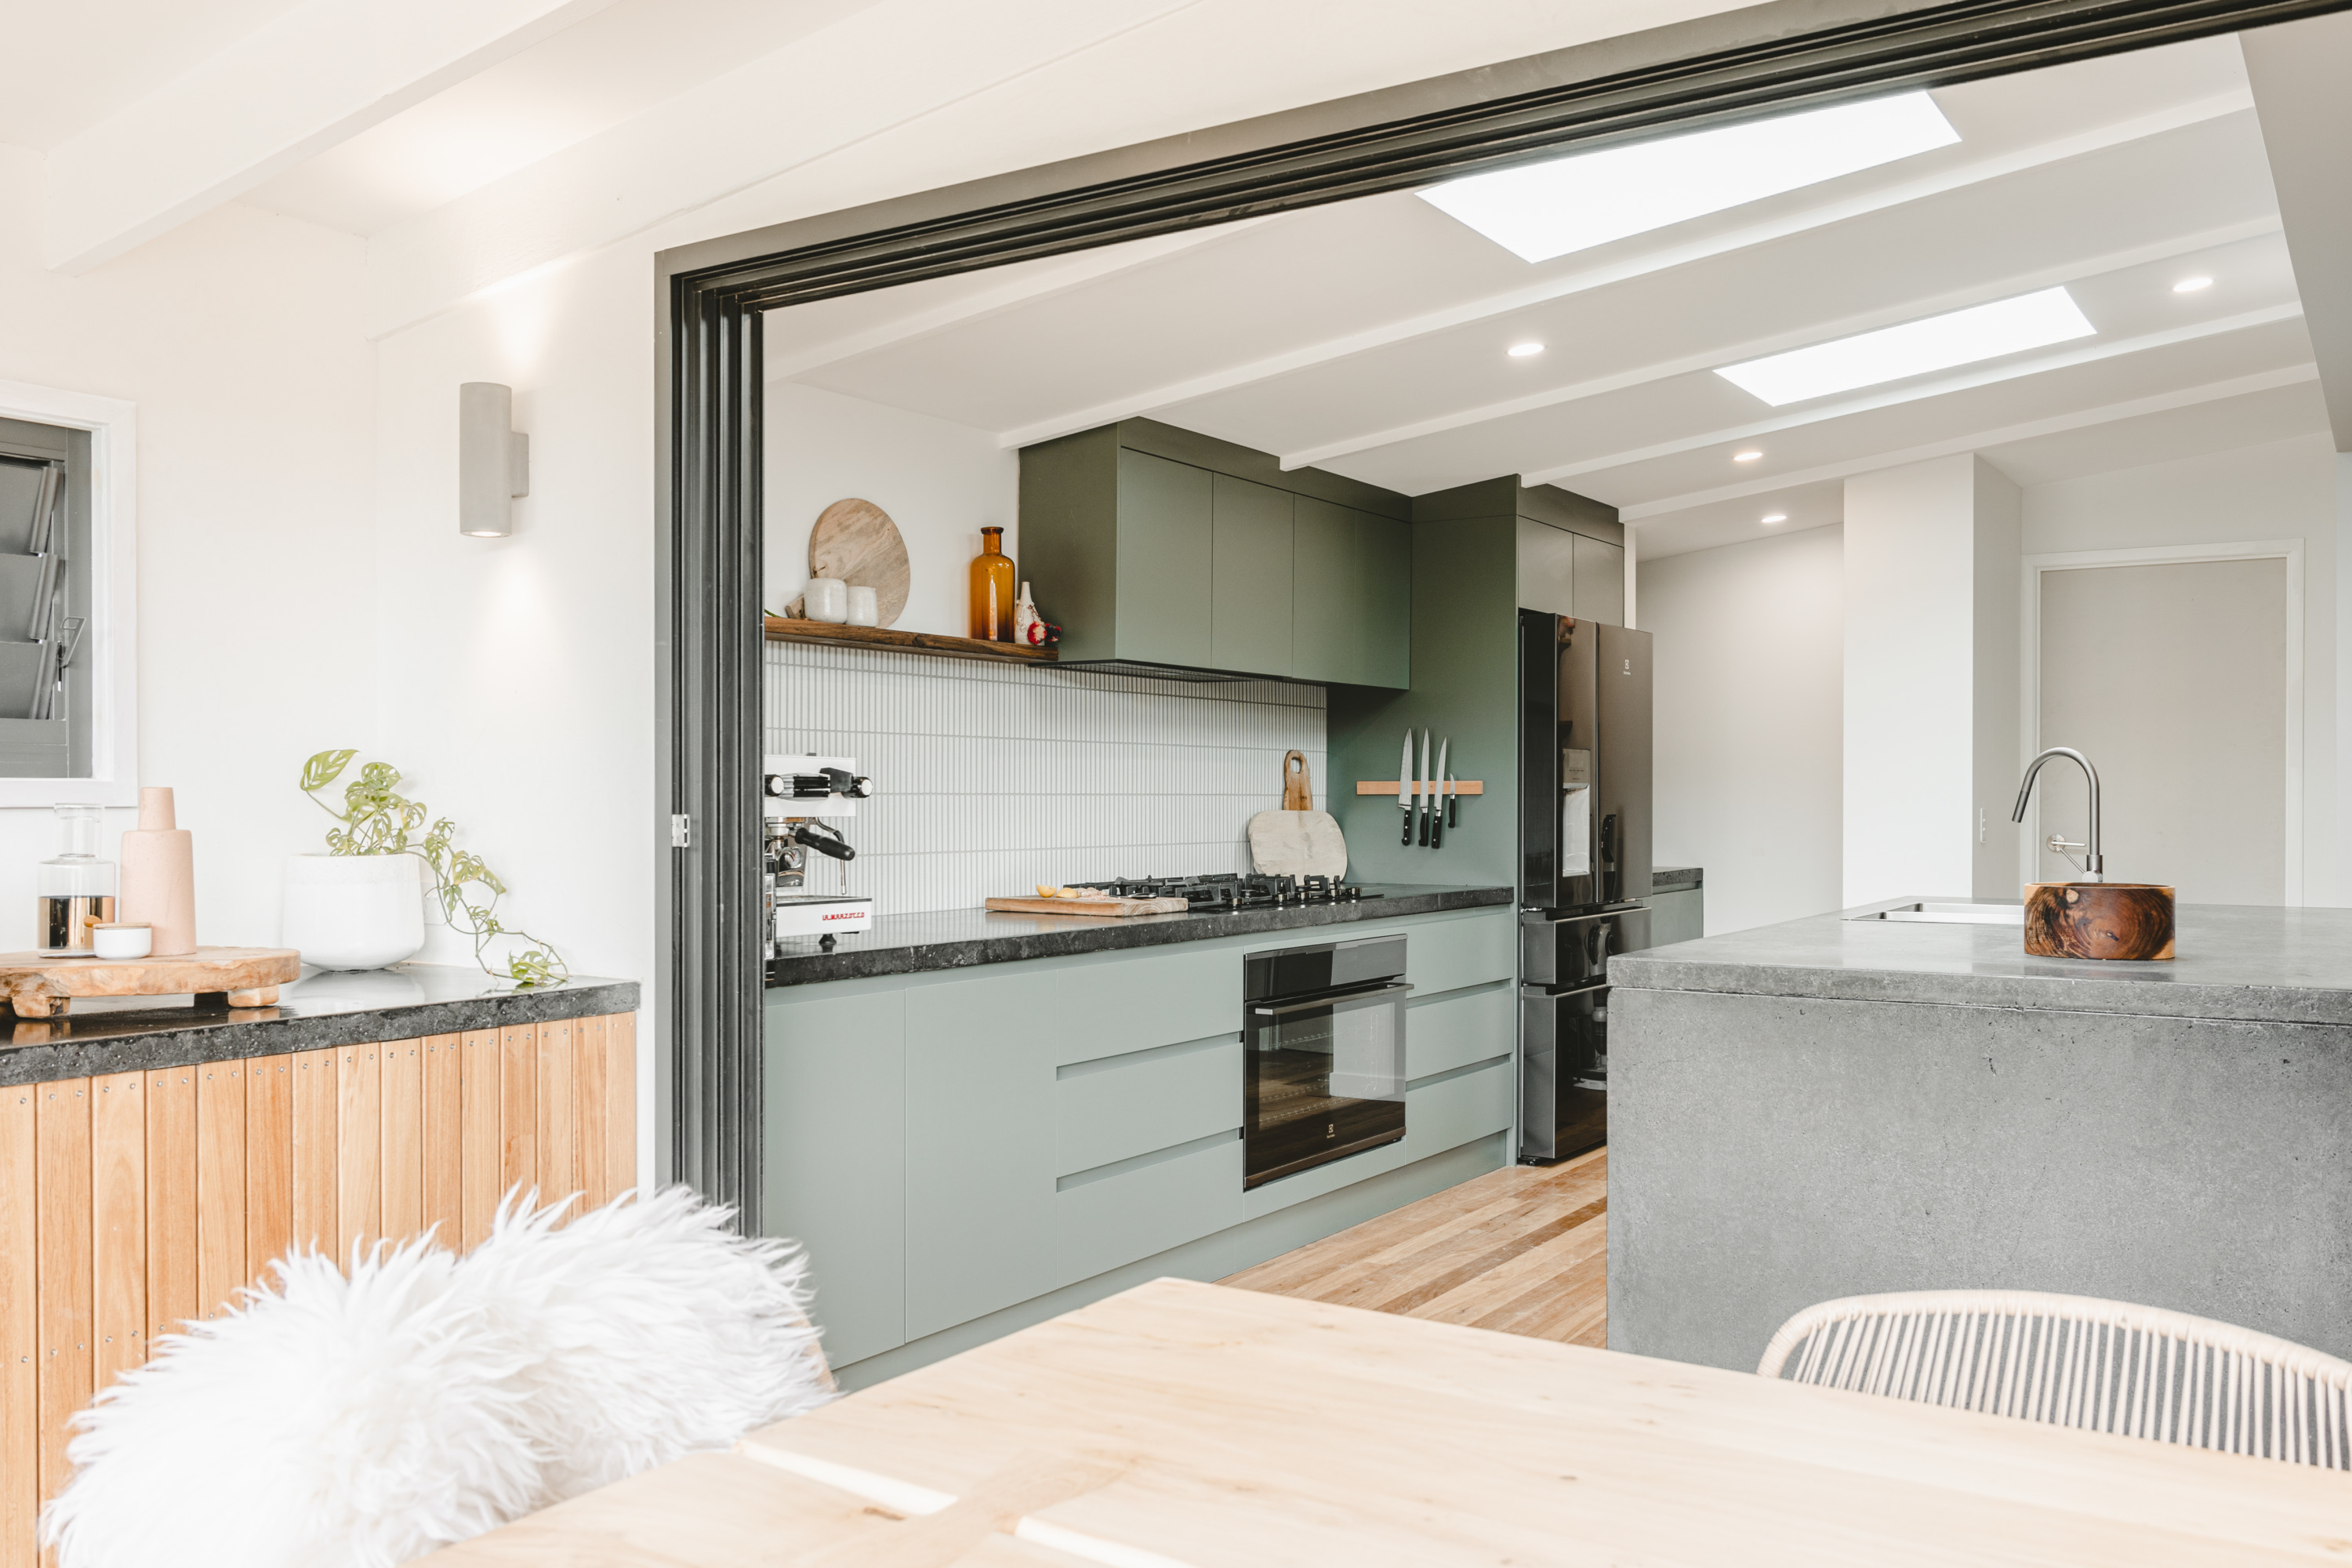
Ash says: “We are both really inspired by nature when it comes to design, and the view at our home has dictated so many of our colour choices. We wanted to feel connected to nature on the inside of the home just as much as the outside – we have a stunning north-facing deck that really captures the charm of the area. We definitely have a preference towards mid-century modern furnishings and finishes, and love the timeless appeal of the era.”
The couple share the top tips and tricks that enabled them to create the kitchen of their dreams.
Don’t be disheartened by a small space
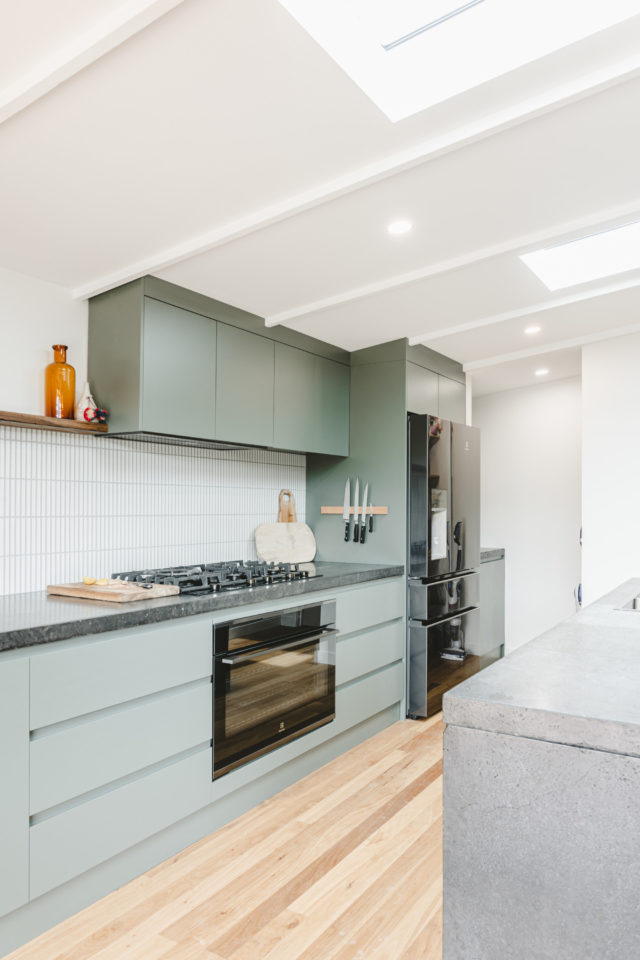
“The most challenging aspect of our kitchen was making a small space feel large, and having the vision to plan for it when all the previous walls were still there!” says Ash. “We created space by moving the island bench towards the larger living area and creating a wider walkway between the back wall and the island. We also maximised storage by having an open pantry that is hidden from view, which allowed us to remove some cupboards in the original plans and have a timber shelf for styling and coffee mugs.”
Discuss your non-negotiables
Ash explains how she and Simon remained aligned with the feel they wanted to create for the kitchen, using wish lists to decide what the finished space would include.
“My wish list included a butler’s pantry, double door fridge, a dishwasher, and a wide oven. Simon wanted a water/ice dispenser in the fridge and a gas cooktop. We created our non-negotiables from our combined wish list!”
It’s all in the details
Ash and Simon’s kitchen looks out onto the Great Dividing Range, so their vision was for the kitchen to reflect this view.
“We opted for green tones for the cabinetry and other finishes which looks stunning against the landscape,” says Ash. “We chose muted tones for the hardware and appliance colours to give the space a luxurious feel while blending in a little with the concrete benchtops. We chose’kitkat’ sculptural tiles for the splashback, and a timber shelf which also adds some character to the space.”
Appliances matter more than you think
“We spent some time choosing appliances, I think it is one of the things most people get wrong in a kitchen,” Ash says. She and Simon actually built the cabinetry around the appliances they wanted, as opposed to finding appliances that worked with the cabinetry.
“For couples like us with little time,” Ash continues, “the appliances in a home can give you back time through integrated solutions like apps and customised settings. Appliances should add value to your life.”
Every kitchen needs a highlight
“The stand-out features in our kitchen include the Electrolux 681L dark stainless steel French door fridge. It’s the most high-tech fridge-freezer we’ve ever seen, you can monitor the temperature from your phone via an app,” Ash explains.
“We also love our custom benchtops that Simon poured. They add character to the space that a conventional manufactured benchtop couldn’t.”
From laundry to studio: A former Blockhead’s impressive small space reno
“We got really inspired by small space living trends and how people all over the world have downsized and created sustainable spaces where you have what you need, but not…
The Block’s Darren Palmer shares his own kitchen reno
When The Block judge Darren Palmer renovated his former home in Sydney’s Edgecliff, he faced all sorts of challenges. You’d never know it to look at the beautiful finished space…
The Aussie radio and television personality Chrissie Swan upgraded her Melbourne kitchen recently resulting in a much more functional space for her family of five, that looks fabulous too. “The…
The kitchen is the heart and soul of a home. It’s where families and friends come together to talk about the day, cook meals for the family and is generally the centrepiece for entertaining friends – so it’s no surprise that a kitchen is the most renovated space in Australia.
Tamara Wrigley
In most cases, kitchens and bathrooms are also the most expensive part of a new build or renovation – costing the average Australian around $20,000. The thing is, you can do a beautiful kitchen overhaul for as a little as $10,000 or less. Done well, an updated kitchen adds even more value to your home when it comes time to sell.
If you have champagne taste but are on a beer income, here are some tips on how to update your kitchen on a budget – and get more of what you want for less:
1. Budget
THE most important tip of all. Creating a budget is an essential part of your remodel so before you start the kitchen remodel or replacement, determine how much you are willing to spend on your kitchen. Never start a renovation with an open-ended budget; you’ll end up blowing out and it will lead to unnecessary expenses. Once you have a budget, put in a contingency allowance as no doubt through the process you may want to change and tweak a few items, or you could come across some unexpected structural issues. Water damage, termites or rotten timber are all too common in old kitchens, walls and sheeting. If you have little backup funds, this won’t be so gut-wrenching when you have to spend more money than expected. Keep in mind that kitchen cabinets usually take up about one third of the typical remodel budget.
2. The triangle
While we all want a tasteful kitchen that looks amazing, don’t compromise on functionality. The ‘triangle’ is still fundamental in any redesigned kitchen plan. What is the ‘triangle’? It’s the busiest and most functional area in your kitchen where you should be able to draw a triangle between the kitchen sink, the stove/oven, and the refrigerator. Easy access from all points is a must.
3. Restore/rejuvenate/recycle
Renovate with a big emphasis on sustainability and protecting mother earth, and be aware of how long items you dump will remain in or on our earth (or end up in the ocean) until they break down. I like to use what I have and, if possible, repurpose it. If you like your kitchen the way it is but it just needs refreshing, check out Dulux’s Renovation Range. Refreshing your kitchen space has never been easier as it requires no primer on most surfaces and is easy to apply. Use the power of paint for cupboards, benches, tiles, and flooring.
If your heart is set on a new kitchen, look at places like Facebook MarketPlace as you can often find a great kitchen for a third of the price of purchasing a new one.
Other great places to look are bric-a-brac shops. Some people would rather just ring up a charity shop or junk yard to collect their old kitchens rather than paying for the cost to remove and dump them. You know what they say – “one man’s trash is another’s treasure”. The simplest one of all is to ask a friend or family member if they know of anyone renovating and removing kitchens – again, you could score a kitchen for next to nothing.
By restoring or recycling, you are doing your bit to stop wastage and scrap being bulldozed into landfill.
4. Keep it simple
It’s pleasantly surprising, the difference a new paint scheme can make to a space, but more importantly, you’ll be amazed how much of a difference changing minor things like powerpoint covers, light switches, handles, and tapware makes. Mix that with new lights and you have just transformed your kitchen space for as little as $1,000 or less. While it’s inexpensive, making these little changes will modernise a property and lift it to the next level.
5. Flatpack
There, I said it. The “F” word most of us hate, and which also leads to high levels of anxiety, stress, and arguments between partners – FLAT PACK! If you don’t mind some good old fashioned elbow grease and instruction-reading, then buying your kitchen online from places like IKEA, or Bunnings which has the Kaboodle range, or another favourite of mine, diy.com.au, could save you some serious coin. All I would suggest is to know your measurements and the layout of your kitchen.
Get some graphite paper and draw your kitchen out first. Usually, in designing, 1m equates to 1cm when drawing. Some companies will offer free design apps. When visiting in-store, take advantage of their knowledge too. Once you know your design and measurements, then order away and wait for those boxes to arrive. I’ve been told wine may help the building process… just saying.
All that’s left to do now is get creating your new or revamped kitchen space.
-Media personality Tamara Wrigley has been a property developer for more than 23 years. Tam purchased her first property at the age of 21 and now has an empire of 30+ properties worth millions. To keep up to date with Tamara’s renovations, follow her on Instagram
Renovation on a budget: where to spend & where to save
Save money, stay realistic and remain on budget in your home renovation with these top tips from Zou Build’s Christal Fysentzous. While embarking on a home renovation is likely to…
Customise your IKEA kitchen with designer fronts
We’re always thrilled when we discover new ways to customise IKEA products, without breaking the bank. And while there are plenty of overseas companies filling the void, Aussie options aren’t as…
It’s not often we see a reno-related product and we think ‘how has nobody thought to do this before?!’ But KitchenPod is one of those and we couldn’t wait to share it with you!
Matt Michel’s KitchenPod for hire
It’s the temporary kitchen you hire when you need to be rescued from your kitchen renovation. Just wheel it into your house or apartment, plug it into a regular powerpoint and continue to cook and even wash up (and use a dishwasher), while your actual kitchen is ripped out and remodelled around you! No more living off takeouts and paper plates (I’ve been there!). And no more having to wait to renovate until summer when you can more easily live off salads and barbecues!
Typically located in your dining room or garage, KitchenPod works in both houses and apartments due to its modular method of getting onto site. It allows you to continue to have a functioning kitchen in your home, preparing all your own meals for the duration of your renovation. All you need is a standard cold water tap and powerpoint nearby and they set it all up for you.
It’s the brainchild of Matt Michel, a kitchen, bathroom and interior designer on Sydney’s Northern Beaches. The idea was born out of a genuine need he saw from his clients. They were stressed out about feeding their families for the duration of a kitchen renovation while still living on the premises. And after searching for temporary kitchens for hire to help them out, he discovered no such thing existed anywhere in the world!
Having a degree in Industrial Design, Matt set about developing a system using suitable standard appliances in a modular assembly that can be wheeled onto site, and adopting a simple plug and play setup.
So what does it actually include? The Cooking Pod offers a cutlery/utensil drawer above a full size 60cm oven with a two-burner ceramic electric cooktop. The Preparation Pod comprises an easy clean solid surface preparation bench with a separate powerpoint for your own toaster or kettle. There’s even an integrated microwave with griller and Fisher and Paykel Dishdrawer underneath, which clients often say is the most important feature.
The Cleaning Pod comprises a full size stainless steel sink with separate drainer, hot and cold water mixer and pump for waste water up to 25 metres away. Inside is a separate safety circuit board which connects to a standard 10-amp powerpoint. There is even a backlit splashback if you set up in a garage.
Since developing an initial prototype in conjunction with some likeminded cabinetmakers in 2014, many clients have enjoyed the convenience and affordability of Matt’s KitchenPod, for as little as four weeks right up to 11 months. A full patent was awarded in 2018 and the finessed version is proudly designed and manufactured here in Australia and available for anyone to hire, from $290 per week.
Matt continues to design kitchens, bathrooms and interiors all over Sydney, but he can now offer the rental of the Kitchenpod to make clients’ lives easier during their reno.
Kitchenpod is now available for hire to other designers and architects, kitchen companies, builders and their clients, throughout the Sydney metro area (although they are hoping to extend this in the future).
For your chance to win four weeks’ KitchenPod rental (you must live in the Sydney metro area), complete the form below by midnight AEST on Wednesday 15 July 2020. This competition is only open to people renovating in the Sydney metro area and is subject to to availability.
Move out during renovation or live through it? That is the question!
To move out or stay living in? That is the question when renovating. Stay and navigate your way around a barrage of builders walking through your home (risking dust and…
The big kitchen reveal
Photography by Jacqui Turk I am so excited to finally share my new kitchen with you today! Seeing these beautiful pictures makes the last two months of mess and chaos…
It can be hard to add character to a brand new kitchen but Melbourne interior designer Georgia Ezra makes it look easy in this stunning space.
A love of Mediterranean style and a predilection for handmade and natural finishes were the inspiration for her family home.
An historic building, untouched for decades, gave Georgia the scope to introduce a contemporary U-shaped kitchen with an inspired mix of pale timber, Moroccan zellige ceramic tiles (which she herself imports and sells), Caesarstone quartz surfaces, hemp burlap and limewash paint.
The palette is one of warm, earthy tones that exudes natural and handmade, yet overall the look is tailored and refined. “I wanted to create a bespoke look, inspired by two of my favourite places on the planet – Morocco and Spain. But overall, functionality was at the forefront of the design,” said Georgia, of Studio Ezra.
The kitchen’s traditional work triangle encompasses lush garden views from the sink and has at its focal point a solid oak work island. The minimalist cabinets are inlaid with a sutble grasscloth that softens some of the other harder materials.
Caesarstone Topus Concrete
The benchtops are Caesarstone Topus Concrete, a beautiful soft oatmeal hue with a patina comprising mineral formations found in nature – the sublime, almost delicate surface belies its strength and durability.
“I chose Caesarstone for its resilience – I can relax about the everyday wear and tear that comes with a young family and not worry about damaging or staining of the surfaces,” said Georgia. It’s both heat and scratch-resistant, easy to clean and will never require sealing.
Unless you’ve undertaken a kitchen renovation, it can be difficult to understand just how many steps are involved, and just how long they take. But this is where the experts come in and today, interior designer Sarah Nolen, of Birdblack Design, gives us an in-depth look at what to expect.
A recent Birdblack Design kitchen. Photography: The Palm Co
First steps The first port of call when looking to renovate, or build, is to determine your inspiration and preferred styles. Scrolling through Instagram, scouring website galleries and perusing interior designer YouTube channels can assist in discovery. Some basic questions may be: What colours do you like? Are you after a sleek, contemporary kitchen, or a traditional ornate Hampton’s inspired kitchen? Or, do you prefer a fusion of styles?
It is important to highlight likes and dislikes as this will come in handy later on when you think about functionality and practicality. Another trick of the trade is to consider storage requirements – structure and organisation can make your dream home a reality!
A Birdblack Design kitchen renovation
Sourcing an interior designer Like any other profession, interior designers are required to study in order to gain qualifications. Their profound knowledge and industry experience are not to be equated with reading kitchen renovation articles every weekend.
As qualified professionals, interior designers are going to be able to advise you in many ways. They will provide answers for questions you haven’t even thought of before; they will have a wealth of experience under their belt in terms of spatial planning, entrances, wasted spaces, dead corners and creating functionality. Their creativity and knowledge will be well utilised in ticking off wish-list items, sourcing quality materials, and creating cohesion across your space in terms of textures, pattern and colour. By engaging a professional designer, you are guaranteed minimal surprises and a final result that you adore.
The relationship between a client and interior designer can be quite intimate – after all, you are inviting them into your home and into your mind, so that the result will be a true reflection of you and your personality. After all, you will be the one living there, after the job is done! Find a designer you click with – you will be spending a decent amount of time in communication and on-site together. Trust is imperative between designer and client.
Be sure to check their portfolio and social media to ensure they produce the standard and style you are after.
Helpful hint: Meet with your interior designer prior to signing up, simply to familiarise yourself with the design process.
This Birdblack Design kitchen renovation included window seating to take in the coastal view. Photography: The Evoke Company
Client briefing/site measure Every interior design firm will have different processes. There should always be a client briefing. It’s in this first briefing that the overall style will be identified. Your designer should ask a list of detailed questions, ensuring all the client’s needs are met and every detail is considered at this very first brief.
A site measure should be undertaken for renovation projects. Your designer should take note of surrounding rooms. More often than not, a simple wall change could result in more functional space without compromising the overall home layout.
Spatial planning/elevation detailing Interior designers are experts at spatial planning. Oftentimes, new and fresh layouts are presented to clients, broadening their horizons for what can actually happen within their home. Once clients have settled on a particular layout, elevation detailing takes place, including custom joinery design.
Finishes, fixtures & fittings selection Shopping! Woo-hoo! The next step is taking excursions to showrooms and suppliers in order to select your tiles, tapware, handles and joinery finishes. This process can often be overwhelming when there is no guidance, though the process can be exhilarating with a professional by your side, guiding the shopping expedition for overall cohesion and continuity.
Final detailing of drawing and selections schedule After shopping decisions are complete, all the selections are scheduled in and final drawings are confirmed. This is essential as it will be these final drawings that the builder and all the tradespeople will work from. Accuracy and precision are paramount.
Select a builder/project manager & lock them in Now that all your documentation is ready for quoting, make contact with builders and project managers. Together, consider the works you are requiring to be undertaken.
As interior designers, we completely take care of this stage for you. Working with tradespeople daily allows your designer to select the best fit in terms of builder and tradies for your individual project. As they say, sometimes it’s not what you know, but who you know. In our case, though, it’s both!
Demolition
First on your builder’s agenda is to inspect the existing space and determine what materials it was built from. During demolition, the installation of structural beams to support wall changes or new windows will also take place. Of course, the timing of this will vary, depending on the scope of the work involved.
The demolition process can be rather anxiety-provoking!
Plumbers & electricians ‘rough in’
Once the bare structure is established by the builder, your plumbers and electricians can get involved. They will begin their ‘rough in’ of the plumbing points in the walls and floor, and the wiring for the electrical work.
Sheeting
The walls and ceiling are ready for sheeting and this process commences.
Flooring
What did you decide regarding flooring? Are you going ahead with new flooring or is your existing flooring experiencing a new start in life?
Joinery measure
Once all your walls are sheeted, your joiner will be ready for the on-site measure. This step is crucial in the joinery process. During construction, dimensions slightly change in comparison to drafted drawings. Keep in mind the difference between a drawing and real life. Every millimetre counts!
Joinery installation
After a few weeks of manufacturing in the workshop, your brand-new kitchen is ready for installation. This may take multiple days, depending on the size of your kitchen and the availability of your joinery company. Your kitchen will now look like a kitchen!
Joinery installation
Benchtop measure
Once your joinery has been installed, now is the time for a benchtop measure. Likewise with the joinery measure, every millimetre is crucial. Whether you have opted for stone, concrete, or terrazzo, all surfaces require measuring. The final locations of stone joins require confirmation. The last thing you want in your brand new kitchen is a stone join which unpleasantly draws the eye!
Benchtop installation
Hurrah! The installation of benchtops is a nail-biting process to watch! The details and precision are impeccable.
Splashback tiling (if required)
When tiling splashbacks, be certain your grout colour suits your tile selection. The wrong grout colour has the ability to change the overall look of the tile.
Electrical & plumbing ‘fit off’
It is all starting to come together! With the connection of GPO’s, appliances and lights come to life. Additionally, you now have running water and gas!
Painting
The final layer: the colours you chose! This will include all your walls, ceilings, doors and trims.
With all this in place, is time to invite your family and friends over and time to get cooking. Enjoy!
It’s no secret that we’re rather addicted to ‘before and afters’ around here but today’s is pretty impressive, even by our lofty standards. Located in Victoria’s Mt Eliza, the original kitchen was a cramped and dated 1970’s ‘mission brown’ delight before Kinsman Kitchens stepped in to create a bright, spacious and unrecognisable (in a good way!) new space.
BEFORE
AFTER What a transformation!
“Our old kitchen was outdated, lacked cupboard space and it was very brown and small when what we really wanted was something open plan, minimalist and modern yet timeless and functional,” says the home’s owner Erin Burns.
AFTER
First up, Kinsman redesigned the kitchen’s layout to create a more functional, open plan space. By knocking out an interior wall, the new design turned what was a pokey space into a spacious L-shaped layout that allowed for the inclusion of a large island bench that features large soft-closing drawers for convenient storage of crockery, pots and pans.
BEFORE kitchen window
AFTER The timber kitchen window frames were replaced with new black ones. The kitchen pendant lights are from Beacon Lighting.
As for the colour scheme, the family wanted something modern and timeless. “We chose Kinsman’s Essendon White in satin and paired it with super matte black cabinetry and some timber for a modern touch and a hint of warmth,” says Erin.
AFTER The new kitchen has an extra storage area too
There’s no denying that the change in flooring has had a significant impact – the lino was replaced with 12 millimetre laminated Australian blackbutt floating floorboards. A white subway tile splashback with contrasting grout, black accessories and black door hardware round out the stylish, monochrome mix.
AFTER In the new design, the dishwasher has been integrated into the cabinetry, hiding it away neatly under the sink.
The family also engaged Kinsman Kitchens to update their laundry. The former space was rather cluttered and is now more functional given it features plenty of enclosed storage plus a bench top for folding towels and clothing. For continuity, the clean laundry colour scheme mirrors that of the kitchen.
BEFORE laundry
AFTER laundry
Photography: Marcel Aucur | Styling: Alex Shimmin at White Room Interiors
Located in Orange NSW, this kitchen renovation was completed just prior to last Christmas when the project’s interior designer Christine Ghrayche, of One X One Interiors, handed it over to her excited clients. “The brief for this project was all about functionality. Prior to the renovation, the kitchen was small and pokey, and simply didn’t provide enough space for a family of five. The renovation also had the goal of future proofing for when my client’s children reach their teenage years,” says Christine.
BEFORE kitchen
AFTER kitchen
“It was a massive transformation that included the demolition of a wall and it also included the removal of ugly orange timber veneer that was replaced with contemporary black and white joinery,” says Christine of the home that was built in 2008 in traditional country homestead style.
The new kitchen features a Caesarstone marble bench top and splash back
“My client’s dream wish list included induction appliances, double ovens, double dishwashers and my client Sarah loves to bake so she wanted more preparation space for cooking. She also wanted clean lines, a repurposing of the linen press, and a style that complemented the traditional country style of the house,” says Christine.
Classic features aside, the kitchen certainly has a seamless vibe courtesy of its integrated dishwashers and custom-made cavity sliding door that leads to the adjacent mudroom. “We had it made in the same profile as the kitchen panels,” says Christine.
The custom cavity door to the right leads to the adjacent mudroom
Christine also made sure to keep the family’s many bench top appliances out of sight with the addition of some clever storage. “My favourite aspect by far has to be the hinge up doors that sit below the open shelves. Both cabinets have power installed in them and they house everyday items such as the toaster and kettle.”
Kitchen appliances are stored behind hinge-up doors inspired by this one. Image source: Design Dazzle
We’ve highlighted the talents of Brisbane pianist turned builder Rachael Turner before and today we’re bringing you one of her latest renovations – a fabulous kitchen. As with her last video, today’s is full of the amazing renovating tips and tricks that we’ve come to expect from Rachael, but first let’s look at the before and after pics of the overhaul.
After: The new cathedral ceiling has worked wonders in the now light-filled space
The transformation of this kitchen is so profound that it’s almost difficult to believe that the ‘before’ photograph is the same room.
The dark and dingy BEFORE
It’s a big call but the most notable difference would have to be that stunning cathedral ceiling that was achieved by removing the existing trusses and roof and replacing it with exposed rafters. The addition of skylights means the hub of the home is now flooded with natural light too.
One of the other design details that contributes to the kitchen’s new sense of loftiness is the bulkhead that sits above the overhead cupboards. One of Rachael’s top kitchen design tips, cupboards left bare on top are not only magnets for dust but also the eye which is drawn to that harsh line which only helps to close in the space. Where possible, always finish off your kitchen cupboards with a bulkhead above.
The gorgeous sea foam coloured tiled splash back is a soothing choice
Watch the video as Rachael takes you through what she did and why and also her top five kitchen tips:
Grab yourself a cuppa, as we’re sharing a fantastic IKEA kitchen hack by Front Porch Properties in these videos today!
AFTER: Clever carpentry has made this flatpack kitchen look more custom
These videos are absolutely loaded with tips and tricks for little things you can do to make a flatpack kitchen look more expensive and unique. As a flatpack kitchen owner myself (take the tour), I always love seeing how other people personalise and give character to theirs!
If you ever thought an IKEA kitchen wouldn’t suit an older home, you really need to check this out for inspiration! I particularly love all the clever uses of space and the way they’ve used the old kitchen cabinetry in the new laundry.
THE BEFORE
Rachael Turner of Front Porch Properties
This clever ‘island’, at the same height as the surrounding benches, doubles as a dining table because the house doesn’t have a dining room
Now watch the videos as Rachael takes you through what she did and why:
PART ONE
PART TWO (almost finished!)
We hope you’re feeling inspired for your next reno!
It’s been a few months since we finished our kitchen and I’m still completely in love! We have added a few things, like navy linen blinds, and my next project will be to add a bit more colour and a few more styling elements (that’s for another post!) because it still looks a little too much like a show kitchen (like that’s a bad thing?!).
There’s been so much interest and wonderful feedback on this room and we were over the moon to be featured in House & Garden as a before and after. But pictures only show so much of the overall picture so I thought I’d take you on a video tour to give you a bit of a better idea of the room. I hope you enjoy it.
As ever, if you have any questions about the reno or where things are from that I haven’t covered, please ask them below.
Where to start, how to plan and how to stay in budget according to ILVE’s Daniel Bertuccio.
Start with research
The most common thing that is often forgotten is research. With so much excitement that happens around renovating, people tend to walk into a store ready to start picking fixtures and fittings without deciding what they actually want and how the space will work. To avoid wasting time and blowing budgets, set a brief and list what you want to achieve. The average household will renovate their kitchen every 10-to-15 years and there are a lot of trends that will come and go in that time, so get an idea of what you want, first. Are you upgrading, are you making it bigger, are you changing the style, do you want a better cooking experience or do you want something open plan? Once you can answer a lot of those questions, you can start making concrete decisions.
Jen’s kitchen
Map out the space
We all would like a walk-in pantry but is that realistic? When planning to renovate the kitchen, know the space you are working with. For new homes, map out with spray paint the kitchen measurements on the floor, so you can visually see the space you are working with and the cost that comes with it. For renovating existing kitchens, map it out with string or a tape measure. It’s best to get a grasp on the size and location of various sections first.
Decide your budget
Be ambitious but stay in your lane. This lends itself to doing your research first and measuring out the space. Reason being, if you have searched everywhere for what you like the look of and what you want the size to be, it’s likely that you have figured out what is beyond your price point and what sits nicely within it. Keep a live document where you list your outgoings, track what is blowing and what is under so you know where you can splurge.
Find cost effective alternatives
A gold plated sink would be amazing, but will it break the budget? Probably. If you see something you love, there is most likely an alternative finish that will look very similar. There are a lot of styles, textures, finishes and ways to create a glamorous kitchen space that are not only cost effective but as durable as some of the more expensive finishes. Shop around and don’t commit till you know you’ve checked everywhere.
This gold sink bargain was from Bunnings
Essential big ticket items
Keeping within budget is the goal, a great way to do so is to plan out all the necessities or ‘big ticket items’ that you absolutely need. Be sure these are planned for at the beginning, as they will make or break your whole kitchen experience. Over-allocate funds to these bigger items and if you under spend, it can go to the extras you’d like to have.