Australia’s leading bathroom and accessories supplier, Highgrove Bathrooms, have added a couple of sleek new options to their range this month. Brushed nickel is the latest option in their most popular SPIN tapware collection and there’s a new European bath waste option too.
Gone are the days of all-chrome bathrooms with the myriad options now available making it even easier to make your bathroom unique and to your personal taste. The only downside is it may be harder than ever to finalise your accessory choices! Here at Interiors Addict we believe those finishing touches, the icing on the cake, make all the difference.
Brushed nickel is both timeless and elegant, adding a statement to any bathroom or kitchen without overpowering existing textures or surrounding patterns. Stylists love it for its ability to complement almost any coloured cabinet or bench. For those who aren’t into brass, brushed nickel is a more modern take on chrome for something a bit different but not too different!
“It was a natural extension for us to add brushed nickel to our most popular range, which will also have matching accessories including towel racks and robe hooks. The versatility of brushed nickel means it will continue to trend for years to come,” said Highgrove Bathrooms director, James Sinclair.
The SPIN collection features a rounded contemporary design that that can easily transform a tired bathroom without the need for a complete renovation. Like all Highgrove Bathroom tapware products, it’s WELS approved (Water Efficiency Labelling and Standards) ensuring water conservation and sustainability, and comes with a seven-year parts warranty.
Also new at Highgrove, and exclusive to them in Australia, is the Casa Lusso Turn-Down Bath Waste collection. Your bath waste is just one more finer detail which can make a big difference to the end look and feel of your room. Functionality, design and practicality are all important when it comes to your bath waste, and indeed your overall bathroom style.
The Turn-Down Bath Waste style is Italian by design and popular in Europe, but relatively new to Australian shores. European bath lovers can testify to its streamlined design which is it at home in both traditional and contemporary bathrooms.
The wastes simply pop up and down at a push, without the need for a chain, and have a flat, streamlined design.
“We are thrilled to be the sole distributor of the Casa Lusso Turn-Down Bath Wastes, and like all our products, can guarantee the best when it comes to quality manufacturing, design and pricepoint,” says James.
The Casa Lusso Turn-Down Bath wastes are made from solid brass and designed to suit the Highgrove Bathrooms range of bath tubs. They are available in four elegant finishes: chrome, gloss white, matte black and matte white and come with a five-year replacement warranty for products and parts.
Highgrove Bathrooms offer quality products making them a trusted choice amongst tradesmen and home renovators since 2004. Being at the forefront of bathroom design, Highgrove Bathrooms always offer the most on-trend fixtures and accessories to help customers turn the bathroom of their dreams into a reality.
Interiors Addict bathroom reno 2: what I chose and why
There is so much to share about my recent bathroom reno and I couldn’t possibly fit it all into the reveal post, so I’m sharing a little more detail today,…
Bathroom vanities: what’s hot right now
We’ve noticed some gorgeous new bathroom vanities on the scene lately so I’m here to share some of my favourites and some of the great customisation options available. The ability…
You know how they say that if you want something done you should assign it to a busy person? Well, that maxim certainly holds for one Melbourne homeowner who carried out a DIY bathroom renovation recently, while working as a full-time frontline health worker.
“This project was done during Tomi’s days off and it was his way of unwinding during a difficult period,” says Anri McHugh of his partner Tomi Ahonen who took four weeks to renovate the couple’s bathroom with a budget of $8,000. The couple purchased the beachside 1970s Elwood apartment three years ago and have been slowly renovating it since.
BEFORE bathroom
AFTER bathroom
The bathroom’s brown tiles and peach fixtures were replaced with a chic mix of matte black fixtures, grey paint, white penny round tiles and a luxurious freestanding bath – ‘city farmhouse’ was the design brief. “It’s a style that blends cosy farmhouse charm with traditional wood panelling and contemporary elements in an urban environment. It fits in with the rest of the apartment’s look and feel,” says Anri.
Tomi carried out all of the renovation, aside from the plumbing, while Anri was on hand to help with painting and general labour. Tomi stripped out all of the tiles and fittings, laid the pennyround tiles and installed the Easycraft wood panelling too – incredibly, it was the first time he had ever done any of those things!
Stripping the existing bathroom was no mean feat
Novice DIYer Tomi laying tiles for the first time in his life
Arguably the most onerous task was removing the original cast iron bathtub as it had been cemented into the wall. “We had to use an angle grinder to remove it which created lots of dust. We live on the top floor with no lift so getting it down two flights of stairs was also pretty difficult,” says Anri. The bathroom tile disposal was an equally arduous task.
The bathroom vanity was made from an upcycled bedside table found on Gumtree
Essential to the brief, the freestanding bathtub is a highlight of the room. “There’s something pretty special and indulgent about a hot bath on a cold winter’s night in Melbourne. It just feels like an escape and a place to shut out the world and relax. We created a sanctuary that we can retreat into when the world gets too much.”
One last look
What’s new in bathrooms: April 2021
With overseas travel still out of reach (well aside from the New Zealand experiment!), many Aussies are creating resort and spa-like bathrooms at home. From sumptuous stone-like porcelain panels to…
When writer, stylist and former magazine editor Alexis Teasdale bought her 1920’s Tudor-style home in Adelaide a few years ago it was with a view to renovating it. But with three small children and no clear renovation direction as yet, she decided on a low-cost DIY main bathroom overhaul in the meantime.
“The bathroom is in a bit of an odd spot and comes off a living space that you can see from the kitchen. It’s also the logical bathroom for guests to go to, which is why it’s been high on my makeover list,” says Alexis of the space that is part of a nineties extension to her heritage home.
BEFORE vanity
AFTER vanity
Completed for just $550 (which includes the purchase of two lots of paint after Alexis wasn’t happy with her first choice), we love how she’s managed to transform the space on such a modest budget. “The plan was never for this to be anything fancy. I really wanted to just paint the tiles and do the floor. Then it occurred to me that I could easily change the handles and the mirror, and once I found the black arch mirror it all came together,” says Alexis.
AFTER
A key renovation component was the flooring – after agonising over paint colours for weeks, Alexis opted for Winton vinyl floor tiles from Bunnings instead. Having used them in another area of the home, she felt confident to use them again. After watching several YouTube videos, she scrubbed, sprayed and washed the original tiles with mould protector before fixing the new vinyl ‘tiles’ on top with adhesive.
The most challenging part about using the vinyl tiles was cutting them to fit around door jambs and the toilet. “You need extra tiles on hand because that is so easy to mess up. And don’t tile over the drain in the middle of the bathroom as it’s hard to go back and cut it out. Take it from me!” says Alexis.
BEFORE
AFTER: Alexis gave the ‘tiles’ a light sand to take the glossy edge off and so that her children wouldn’t slip
Next up Alexis painted the bathroom’s wall tiles and benchtops with Dulux Renovation Tiles and Benchtops Paint in ‘Snow Season’ – not an easy job given her family needed to use the bathroom throughout. “This was not ideal, but I chose some really hot days for quick drying time and I will say the paint dries remarkably fast!” says Alexis.
AFTER: Alexis sourced the wall shelves from Kmart for $19 each
Floor and wall paint aside, it’s the finishing touches that really elevate the room. These include handles, a towel ring, toilet roll holder, towel rail, bathroom shelving, mirror, accessories and plants. “My favourite buy was the Kmart arch mirror which was an absolute last-minute decision,” says Alexis.
The Mondella towel ring was $24 from Bunnings
“I am shocked by how happy this little space makes all of us. I’m also really proud of myself for having a go. It could have all gone pear-shaped, but it would have been easy to fix, so why not have a try at DIY. You might just surprise yourself!”
Real reno: This incredible bathroom makeover cost just $2,000!
It’s fair to say that we’re privy to plenty of renovation projects here but there’s something about this one that really piqued our interest. Aside from its stunning good looks,…
How to paint tiles and save a fortune!
By Naomi Findlay It’s no secret that kitchens and bathrooms are the highlights of the modern home. A tacky blue tile in the shower or 70s floral design can make…
Before & after: A fab bathroom reno for under $2000!
Located in the Melbourne suburb of Cheltenham, this dated brown bathroom received the makeover treatment recently at the deft hands of Amelia Boal from Soleil Styling and Design. Inspired by…
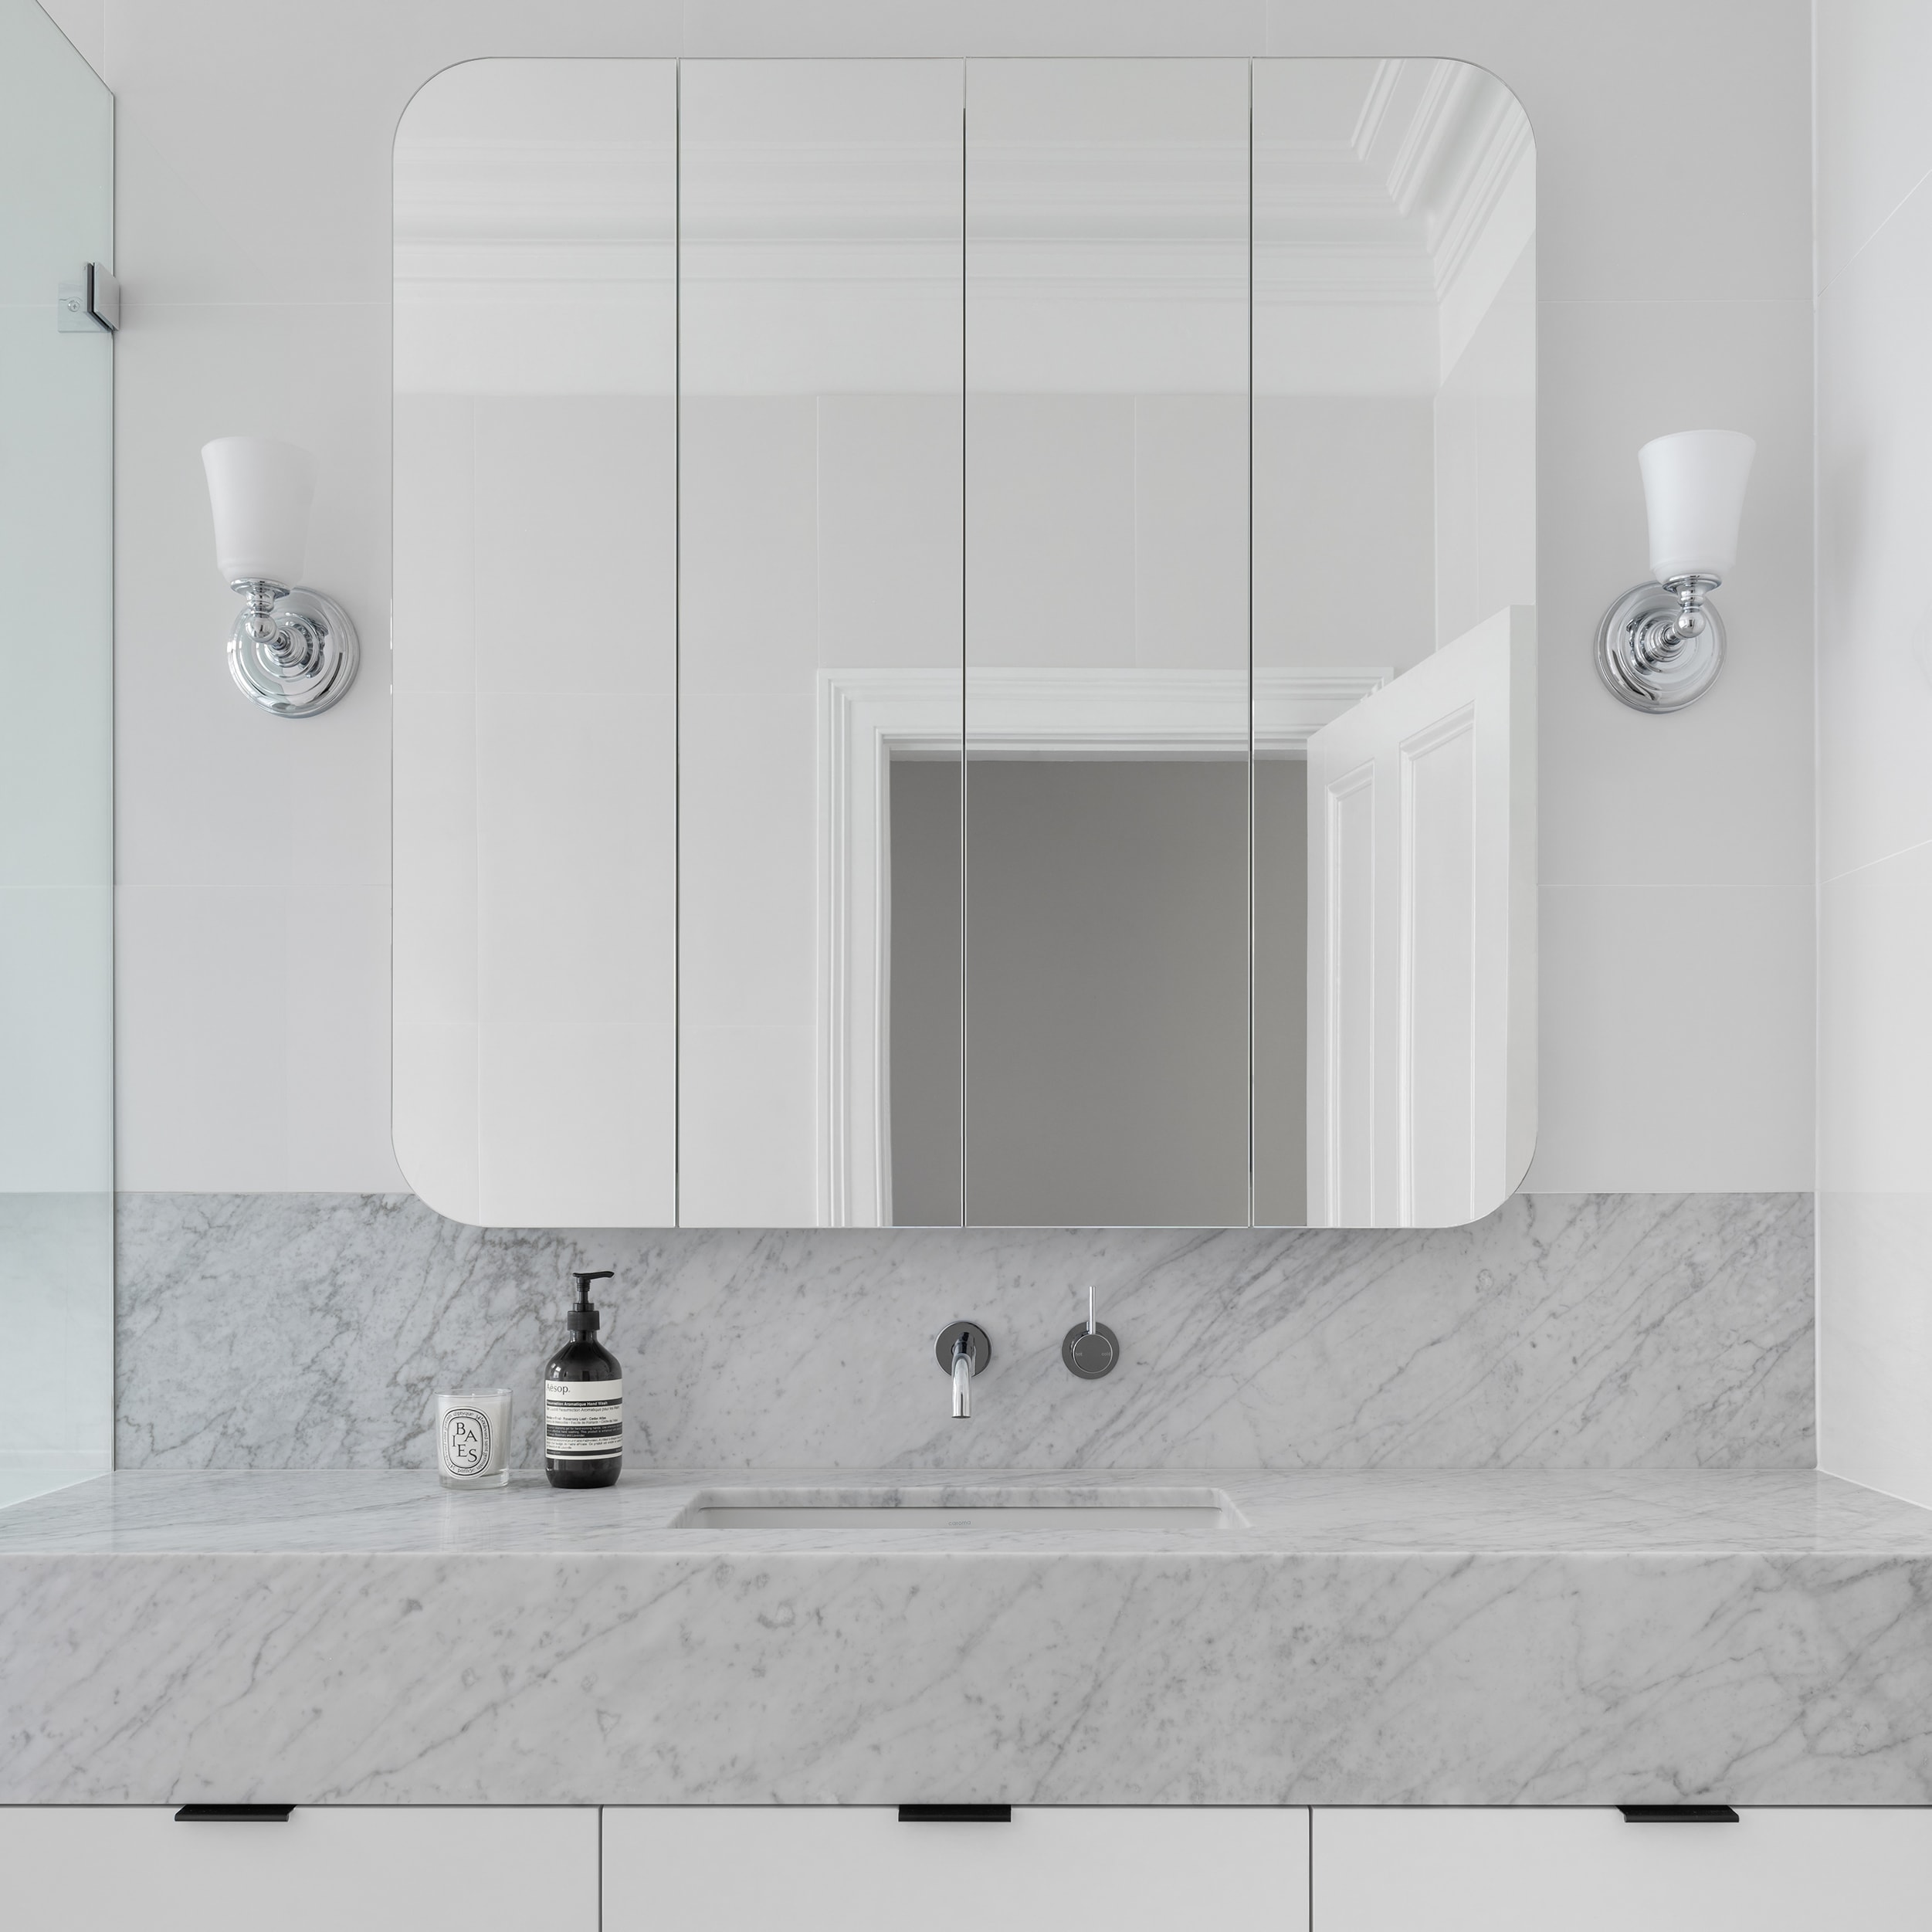
Award-winning interior design firm Joanne Green Landscape & Interior have completed a stunning transformation of a tired, awkwardly laid-out bathroom in a federation home on Sydney’s lower North Shore. Blending functionality with a spa-like aesthetic has created a contemporary and family-friendly space that seamlessly suits the style of the home.
Interior designer Angela Neylon worked closely with the client through several iterations of the design, from modern concepts to classic layouts; deciding on a contemporary version aiming to create a sense of space.
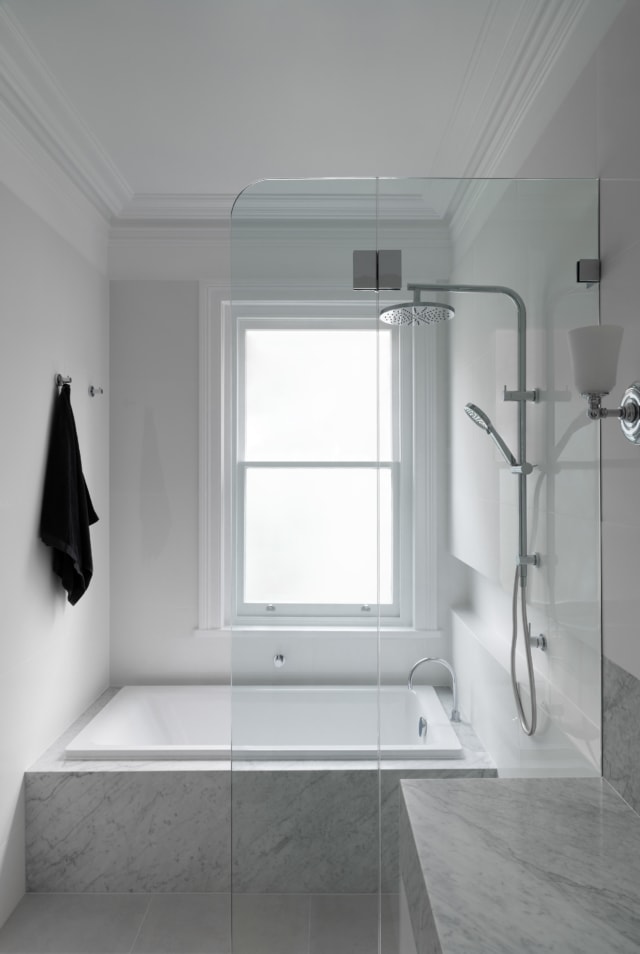
“The existing layout was a traditional and common 1980s arrangement that unfortunately led straight into the shower and emphasised the toilet. In this long, narrow space it was critical to get the layout right and it was certainly a challenge to fit everything in while creating a light, bright and spacious atmosphere,” says Angela.
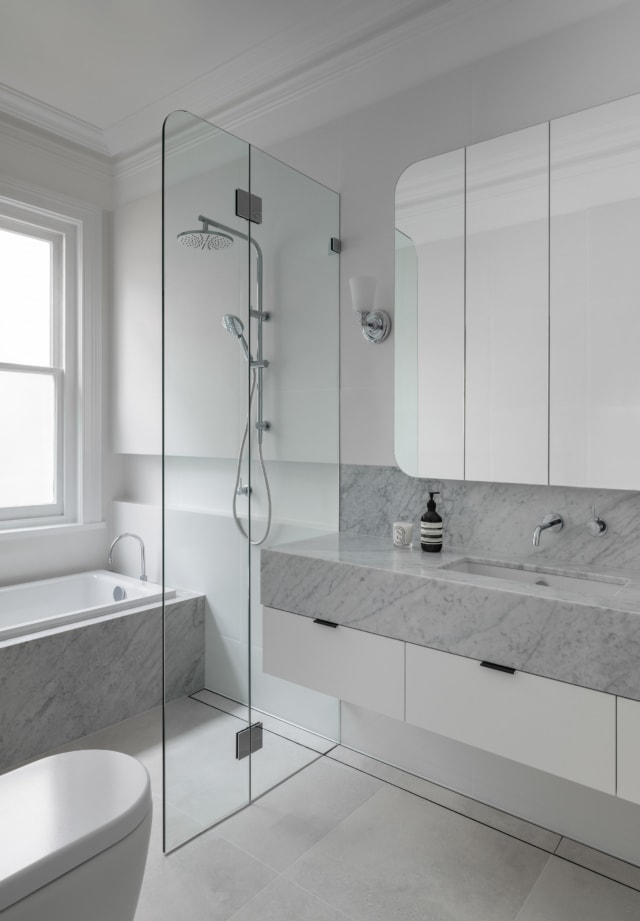
The clever design simplified the layout, repositioning the bath and shower to create a wet area against the window, and elongating the vanity for visual appeal upon entry. Choosing a timeless white and grey palette, Calacutta marble was selected to be the major feature as it adds a spa-like, luxurious feel to the family bathroom.
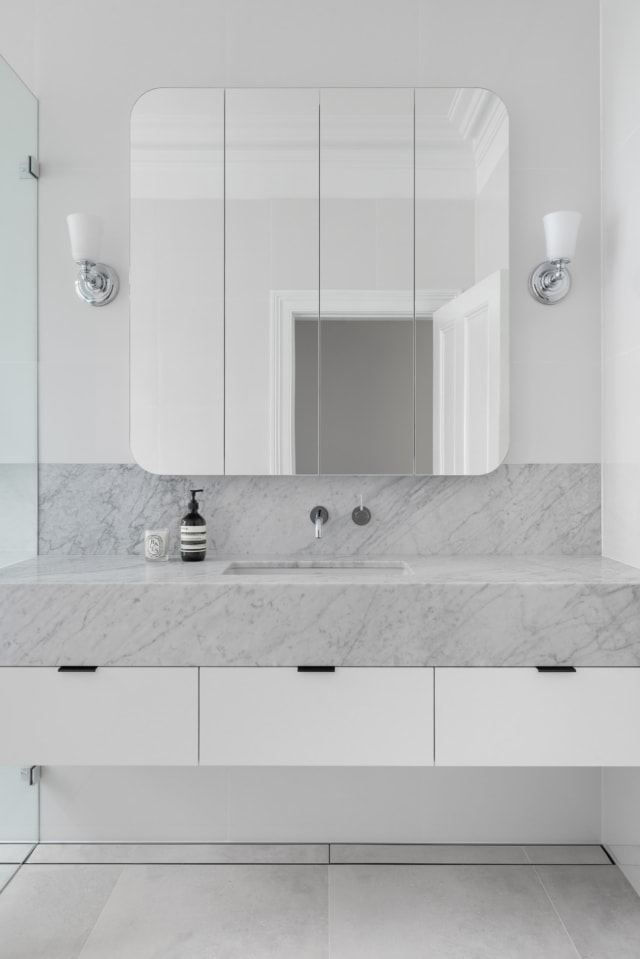
The entire bathroom was demolished and re-built with an impressive attention to detail. A challenge for the team was lining up the 20mm marble to meet the 12mm thick tiles, ensuring a seamless façade without an overhang, which helps to visually enlarge the space. A recessed, mirrored cabinet and oversized wall-hung custom vanity answers the client’s need for additional storage.
Right from the initial consultation, Angela’s focus was very much upon the practicality of use within the space, as well as its aesthetic qualities. “As the family’s main bathroom, it was essential that the finished result was both beautiful and functional. The layout, palette and materials were all carefully considered to sit cohesively within the magnificent federation home,” she says.
Details such as the clear shower door and minimalist fixtures help achieve the client’s vision of an airy, open space. The careful combination of curves and angles also adds dimension and visual interest, without cluttering the space or detracting from its simple elegance. This project truly shows the impact that a clear and clever design plan can have when updating and modernising a space.
DIY decorator Kristine attempts first brand new bathroom
Kristine Franklin is the queen of the budget DIY makeover so, faced with designing her first brand new bathroom, she was a little anxious! Thankfully she ended up enjoying the…
Bathroom styling 2020: the finishing touches that matter
A drab bathroom can be more depressing than a wet flannel, but with a few stylish touches, your bathroom could end up being the sexiest room in the house! The…
Bathroom vanities: what’s hot right now
We’ve noticed some gorgeous new bathroom vanities on the scene lately so I’m here to share some of my favourites and some of the great customisation options available. The ability…
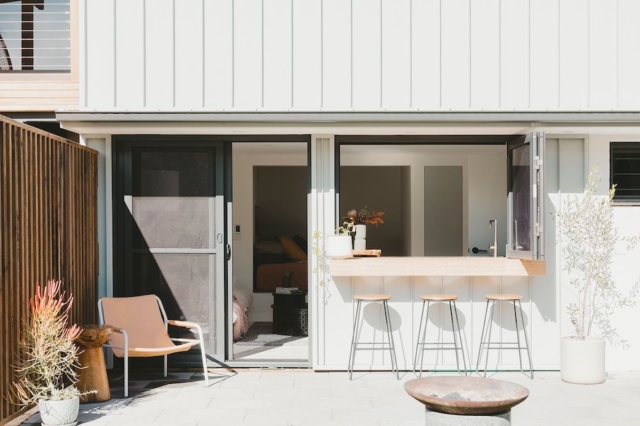
“We got really inspired by small space living trends and how people all over the world have downsized and created sustainable spaces where you have what you need, but not in excess,” says Ash Vos, wife of former Blockhead Simon, when discussing the couple’s latest project, a studio created out of a laundry and existing small bathroom at their Coffs Harbour home.
The new studio
“We lived in the attached house for two years as we designed and planned the renovation and lived in the renovated laundry-to-studio while we did the demo and structural renovations upstairs in the main house,” says Ash.
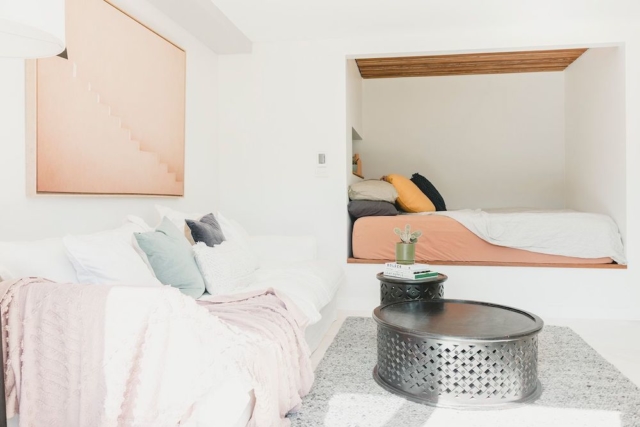
Lounge room
With increasing house prices, it seems everyone is looking to get the most out of their square meterage without investing too much, and this project is a great example of that. “Most people want to add extra value to a home, or increase its liveable footprint, without making too many structural changes,” says Ash who worked within the laundry’s existing shell to create a highly functional, useful addition to her home.
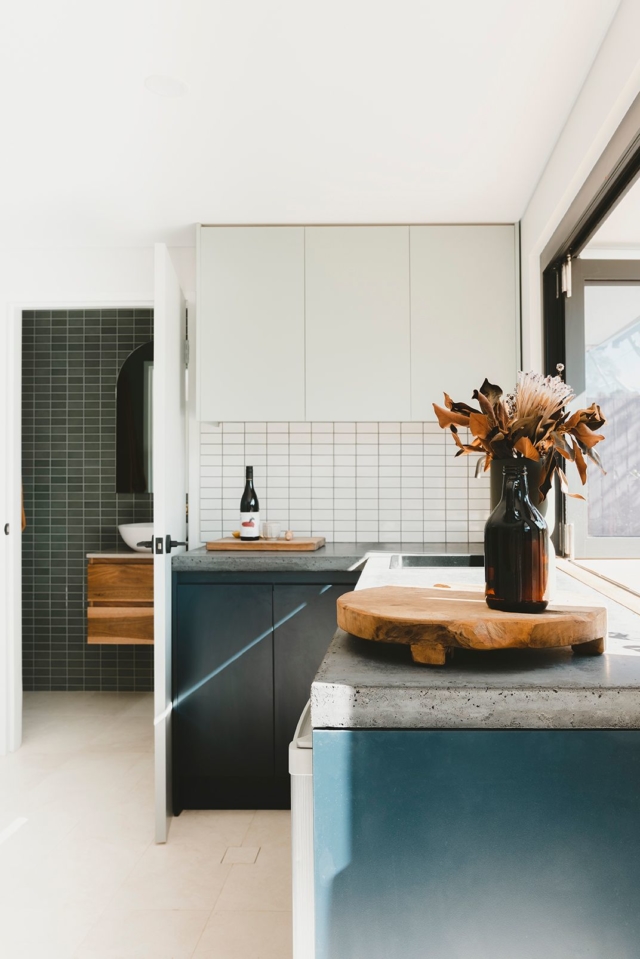
Kitchen
As for the studio’s initial design vision, it was conceived when the couple first bought the home. Very large in size for a laundry, and with an existing bathroom plumbed in, it was an obvious space to add value. From additional income to a fabulous guest area for family, the small but gorgeous space shows just what can be achieved if you maximise a home’s existing features effectively through renovation.
“Our building designer Dan Bowland came up with the idea to build the bed (at rear) off the frame and that was a little ‘aha’ moment in the design process,” says Ash.
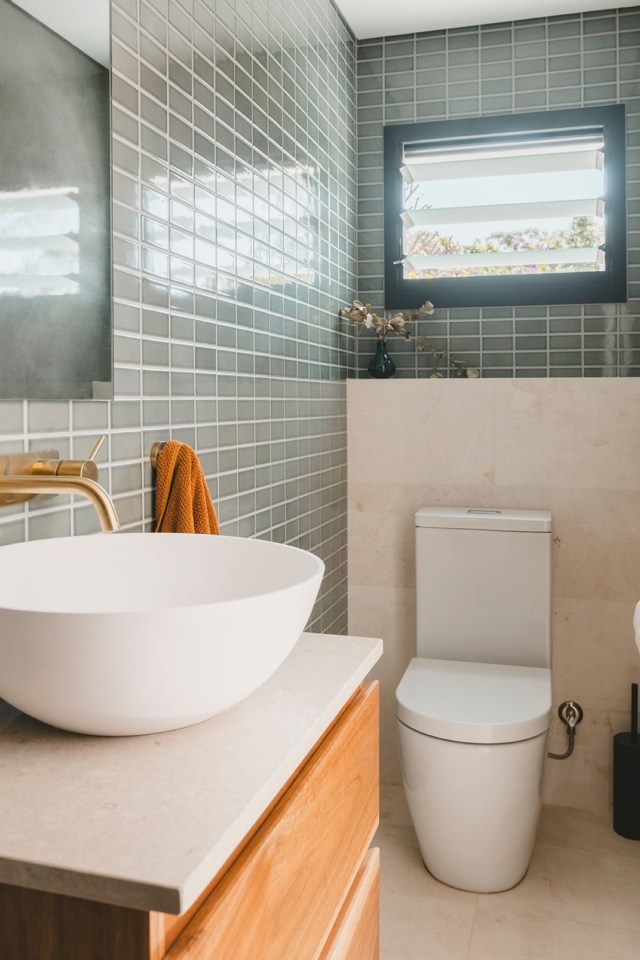
As for the aesthetic, Ash describes it as an Australian take on Palm Springs. “Sort of mid-century modern with lots of colours,” she adds. Intrinsic to the overall feel is the gorgeous solid timber joinery that features throughout; a nod to the hardwood timber floors that came with the original home.
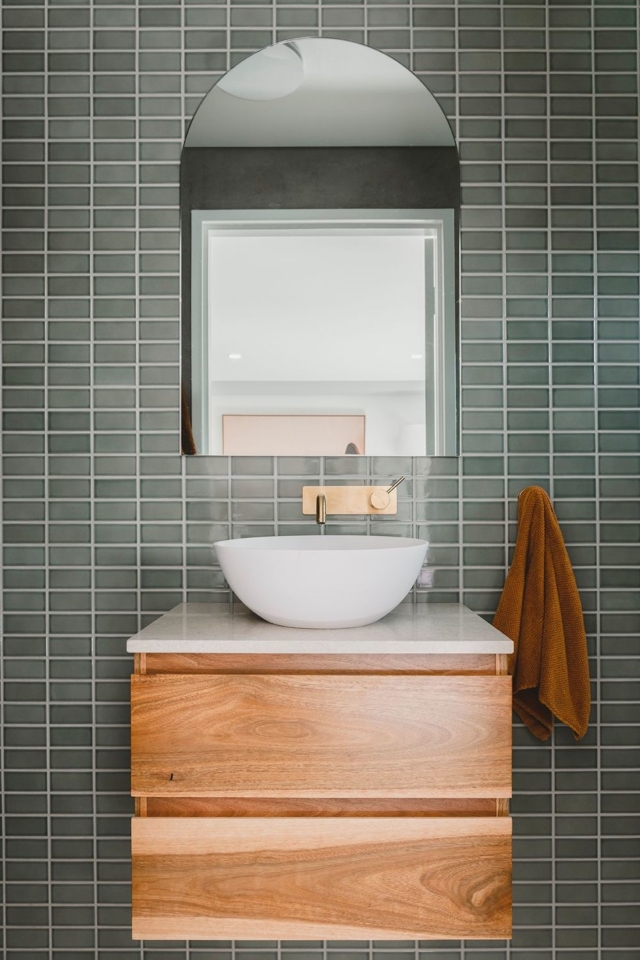
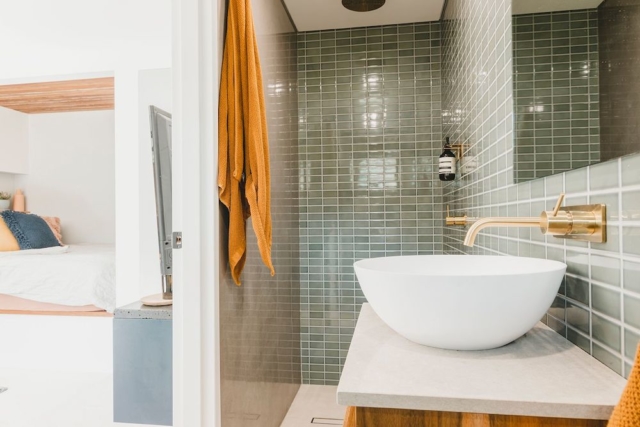
The ensuite’s custom timber vanity is beautifully offset by those gorgeous sage green tiles.
“For us, timber is both beautiful and timeless. It’s a natural finish that adds character and stands the test of time,” says Ash who engaged Loughlin Furniture to create the studio’s custom vanity which, with more than adequate storage, makes the most out of the small bathroom space.
Ensuite
Constructed out of spotted gum, the timber finish underpins the natural palette and modern Australian feel the couple were going for. “The spotted gum had the right colours to complement the green tiles, and we were able to customise the size to fit the small studio area.”
Shower
Photography: Ben Adams at Blank Ave Studio
Small space design ideas: a beautiful apartment reno
Size, as they say, isn’t everything, and Anju Designs made the most of every inch in this stunning Brisbane apartment makeover. We take a closer look at all their clever…
Beauty influencer Leigh Campbell, as you might expect, has a lot of skincare! So the original seventies bathroom and ensuite that came with her apartment weren’t cutting it. The overflow had to be kept in baby Alexander’s room! But her new bathrooms are storage heaven and a lot more stylish!
Managing to combine husband Rich’s industrial taste with her love of Moroccan/Turkish vibes, they’re serene but small spaces, where every inch has been maximised. Leigh splurged on handmade Moroccan feature tiles and saved on Bunnings tapware to achieve the reno, which wasn’t really in the budget.
“The original bathrooms were typical of 50 years ago: cream mosaic tiles (not in the good way), thick frosted glass shower and tiny vanities. Storage was dire,” says, Leigh who is executive editor at Mamamia, where she presents the very popular You Beauty podcast. When Leigh reviews makeup and skincare, whether it’s budget or luxury, people sit up and listen! But buying a home when you’re 37 weeks pregnant and then moving in with a newborn, isn’t something she recommends!
“We renovated the kitchen right away because it was unliveable but hadn’t planned on doing the bathrooms so soon after. Then we were heading overseas for a wedding so figured it made sense to do them (and the laundry) while we were already going to be out of the home and the cats would be in boarding. Two birds with one stone and all that.”
“I really needed a lot of face-level storage. I kept asking for it to be bigger! Before we renovated I had secondary storage in my son’s room. He’s one now and accumulating ‘stuff’ of his own so I really needed a proper solution in the bathroom.”
They moved the toilet in the main bathroom so they could accommodate a bigger vanity and also changed the separate bath and shower to a shower over bath. “Not the chicest option but good for resale and the spot for the bath before was simply too small.” Leigh couldn’t handle the thought of cleaning behind a freestanding tub, but getting rid of it altogether was never an option as she enjoys a relaxing soak.
Beauty cupboard goals!
While Rich definitely had a say in the reno of the three-bedroom apartment in Sydney’s Randwick, he left most of the decisions to Leigh. “He stopped me when I wanted a teal concrete sink though, so I knew my limits!”
If the reno newbies had their time again, they’d have done the kitchen, bathrooms and laundry all in one go, before moving in, for cost and consistency. “Renovating when the apartment has your things in it is not ideal. I am still cleaning dust off surfaces, mostly inside my wardrobe, every single day,” Leigh, 38, says.
The improved storage has been the best improvement to the functionality of the bathrooms, and a bigger bath to bathe Alexander too. And while those handmade feature tiles were $200 per sqm, Leigh says they make her heart sing and you can’t put a price on that! “All our matte black tap ware is Mondella from Bunnings; really good prices but still with a 10-year warranty, which was important.”
The Concrete Cloudburst Ceasarstone vanity tops with their textured finish, are another favourite element. Leigh no longer cringes every time she takes a shower, and her evening bath has become much more enjoyable and spa-like.
When it came to the laundry, she had the ingenious idea to incorporate a built-in kitty litter for her two much-loved cats. “Before, we had a huge plastic dome in the laundry for their kitty litter. Not chic. When I was designing the space, I opted for a shallow basin so I could fit their toilet underneath. A doggy door was cut into the cupboard door and there you have it: a built-in kitty toilet.”
While the multitude of decisions can make bathrooms one of the most stressful rooms to renovate, Leigh’s a woman who knows what she wants, and the hardest thing for her was actually wait times. “That’s a lesson learned for next time.”
With everyone likely to be spending a lot more time at home in the near future, we want to help you fall in love with your space. We’ve put together…
Small bathroom ideas: An incredible before & after
Home to Pinterest partner manager Kim Hollis, is it any wonder that this luxe Sydney bathroom renovation has serious design cred? But creating a moodboard was just the beginning of the…
5 plumbing tips for small bathroom renovations
A plumber only plays a small part in a bathroom renovation. But the plumbing in a bathroom plays a vital part, because if it’s not installed correctly it can be…
Concrete and brass bathroom update is luxe and warm
Nestled in the Sydney coastal suburb of North Curl Curl, this 20-year-old bathroom got a stylish upgrade recently by interior designer Deanne Crowther, of Bathrooms by Oldham. And while there…
It’s a myth that interior designers live in perfect homes, and Donna Allen waited a long 15 years to get her dream bathroom renovation, complete with a bold waterproof wallpaper!
While the 1970s bathroom had had a few cosmetic changes, like removing the original mauve wallpaper, she lived with it for much longer than she anticipated, but it was worth the wait! “As interior designers we can be our own worst client. If only I had several homes to indulge in all of my favourite things!
“In the end though, renovating my own home is a privilege for several reasons. It gives me the opportunity to push design boundaries that may be difficult to do with a client, it allows me to experience first-hand what it is like to live through a renovation and therefore better support my clients through the process, and it gives me a chance to even more closely collaborate with my suppliers and trades.”
BEFORE
Donna has a bit of an obsession with new and different materials and how they can be successfully incorporated into a design, so when she came across the waterproof wallpaper at a trade fair two years ago, she knew she wanted it for her bathroom. The challenge was in selecting the design from the many available options!
AFTERBEFORE
She also consciously chose a majority of Australian products. “We are so lucky to have access to the calibre of designers and artisans in Australia that we do and I am keen to support and showcase them whenever possible, both personally and in my business.”
With such a statement wallpaper (Arctic Wind by Wall & Deco, from Pure Interiors), Donna, who owns The Space Within, says the room needed some strong supporting players for balance.
“More subtle but equally stunning are the terrazzo floor tiles from Barefoot Living. The colours of the aggregate are soft but the large chip size gives the tile substance. The other hero is the freestanding Amélie bath from Rogerseller. It is a modern take on a traditional clawfoot bath and the fluid lines mirror that of the wallpaper.”
Ensuring the existing slab was structurally sound was one of the biggest challenges at the outset of the project. “Our original plan was to replace the slab completely but as we demolished the existing bathroom, we realised that because of how it was tied into the walls of the house, we wouldn’t be able to. We had to bring a structural engineer who advised that the full slab needed reinforcement from underneath.”
A few small but strategic changes were made to the layout to get the most out of the space. By moving the toilet to the opposite wall, Donna created room for a separate shower and freestanding bath. She also changed the hinged door to a cavity slider, which created much more circulation space. “The bathroom feels larger now even though we didn’t change the footprint.”
Donna and her husband Chris love the end result. “It’s a space that is both calming and refreshing at the same time. Stepping into the room is like taking a swim in the ocean on a hot summer’s day. It’s such a luxury to have a long, deep bath to relax in!”
Donna shares some expert tips for anyone embarking on a bathroom renovation, which can be stressful, expensive and take several weeks, if not months!
“A bathroom renovation encompasses almost all of the trades that a full home renovation would require, often in the smallest of spaces so it is expensive and can be stressful. Engaging a trusted team is paramount. If you don’t have a trusted builder, ask for recommendations from people you know who have recently renovated.
“Start your planning by pulling together your scope. Be clear on what things are must-haves, what are nice-to-have and what you definitely do not want. Then talk to your builder and/or trades to determine what opportunities and constraints you have. Questions to ask include: can you move the plumbing relatively easily, can the footprint be enlarged, if necessary, and, if your wish list includes something like a freestanding stone bath, are structural changes required to accommodate it?
“Then, working to scale, play with the layout so that it works for how you like to live. Only then should you begin selecting your fixtures, fittings and finishes.”
While many people bang on about resale and making design choices that appeal to broad markets and aren’t polarising, Donna, controversially, says resale is just an excuse to play it safe!
“The only time I think the question of resale should get a vote is if you are renovating specifically to sell. Otherwise, make the decisions and choices that are going to create a space you love. It’s your home, and one of the biggest investments you’ll ever make, after all!”
This isn’t the only room in Donna’s house, on Sydney’s Northern Beaches, to feature wallpaper. She’s just installed a wall mural from Kingdom Home in the laundry, she has a bold leopard design in her home office from These Walls and Banksia from Porters Paints in the dining room.
She describes her aesthetic as coastal cool. “It’s an eclectic mix of edgy industrial and modern beach with a dash of traditional. I believe a great interior is like a delicious recipe – start with high quality key ingredients then add the right mix of spices and herbs to bring it to life.”
Home to Pinterest partner manager Kim Hollis, is it any wonder that this luxe Sydney bathroom renovation has serious design cred? But creating a moodboard was just the beginning of the road for Kim, who engaged interior designer Agnes Sweijer to bring her Pinterest board to life. “I hired a designer as I felt very daunted about what could be done in such a small space. I’m so glad I did as it was money well worth spending!”
Before
After
While Kim had some non-negotiables for inclusion in the new space (a laundry, bath, sliding door and better lighting), she enjoyed handing over the reins to a professional. “Agnes somehow worked out my style and did a great job of working through the details for functionality as well as design. She also saved me so much money and time! She had the experience to estimate that things would be expensive and knew where I could save,” says Kim of the renovation that cost $50,000 in total; around $20,000 in design fees and materials and $30,000 for builders and trades.
Before
After
The bathroom’s timeless palette of white, grey and black is complemented by the stunning mirror and feature light combo that hang above the vanity. “I hadn’t expected how useful they would both be and how much they would add to the space in terms of design,” says Kim of the items that serve to open up the internal room that has no natural light.
The feature light, from Montauk Lighting Co., and mirror are a highlight of the bathroom
A bath was another one of Kim’s must-haves which wasn’t the easiest thing to achieve in such a compact space. “Initially Agnes warned me that the cost and ease of build would be better with a shower, but I still really wanted a bath. It was tricky to get a smaller size for my apartment but it’s a key feature for me and it’s luxurious to use,” says Kim.
Taking place over five weeks, and carried out by Ironbark Carpentry and Construction, the renovation was not without its challenges. The location, in inner-city Potts Point, meant limited parking for builders and the transformation was subject to myriad strata rules including restricted times of work, restricted use of the lift for deliveries and reliance on approvals by the building’s manager.
“Every apartment building has its struggles with height restrictions, delivery times, approvals and working in and around neighbours. But this one’s city location also didn’t help given suppliers were not around the corner,” says Lachlan Illingworth, director of Ironbark.
For any apartment dwellers looking to renovate, timing, planning and a hefty dose of patience are absolutely crucial. “There is timing and then there is timing in apartments. It’s essential that all fixtures and fittings are on site or in stock so there are no additional holdups on site. There are often delays with trades, deliveries and suppliers so being able to adjust and take it all in your stride is essential,” says Lachlan, who explains that a bathroom generally takes four-to-six weeks to complete.
He is also careful to warn clients that what may look best on paper may not always be the most practical and achievable solution on site; having plans is a great starting point and communication is essential. “Sometimes you need to work on the fly to ensure what is able to be achieved still works with the initial concept and overall theme of the space.”
Reece Bathrooms’ Daniela Santilli weighs in how long a bathroom really takes…
There’s no doubt about it, The Block contestants completed a phenomenal amount of work each week. Of course, that is because they’re dedicating 100% of their time and effort to the task; not letting a day job or even sleep get in their way. If The Block has inspired you to tackle a bathroom makeover, you’ve probably wondered how long your own renovation will take. Here, I outline the key stages involved in building a bathroom, whether you’re starting from scratch or renovating.
Mitch and Mark’s Block bathroom, via Reece
Stage #1: Defining your vision
The start of your bathroom renovation will be marked by the creation of your vision for your project. Gathering inspiration on and offline, creating a mood board and collecting samples of fixtures, fittings, hardware and finishes will help you define your style, and what you want your bathroom to look like. This is something you’ll continue to revisit and refine throughout the design process.
“Having a clear vision of your bathroom renovation will definitely set up the process to run as smoothly as possible. Spend the time looking at your budget and working through the costings. Always add in a buffer for unforeseen issues, as they always arise,” says Alisa, one half of former The Block winners and interior design duo, Alisa and Lysandra. “We also find it vital to order all the different samples and place in a mood board, to give the overall feel of the project.”
Stage #2: Pre-Build
Once you have the design locked in, it’s time to order your bathroom products, confirm relevant permits and find and book the right tradespeople – obviously something that can prove to be contentious on The Block! It typically takes around 10 weeks to decide on products and materials, get your paperwork in order, and meet and book in your tradies.
“Bathroom renovations are often the busiest as they can require a variety of tradies that need to work at all different stages. When booking your tradies, make sure to do your research and finds ones that come recommended and shop around with quotes. Make sure to communicate clearly on all the details and timelines,” says Lysandra.
Stage #3: Meeting your team
While there’s an element of ‘making it up as you go’ on The Block, to avoid that kind of pressure it’s important to communicate the finer details before the work begins. Hold a meeting with your project manager and/or tradespeople to discuss your design – everything from grout colour, tap and vanity height to power point locations. This will ensure everyone is on the same page and your vision is expertly realised.
Elise and Matt’s Block bathroom via Reece
Stage #4: Preparing the build
The Block is a 24-hour worksite, your home isn’t. Your tradespeople will need 2-to-4 days to set up the site, sequester the area they need to work in and, most importantly, check that all your products have arrived and are correct.
Stage #5: Building your new space
The next stage is when everything starts to take shape, with waterproofing then tiling, and fixtures and fittings being installed. This usually takes between 8-to-10 days on site. Earlier this season, we saw what happened when Jesse and Mel went full steam ahead with their guest ensuite; their desire to race to the finish line meant that things were missed and, ultimately, led to an unfinished bathroom. While Jesse and Mel may have been bound by a tighter deadline than a renovation off The Block, this lesson in process and procedure is one to remember in any bathroom project.
Stage #6: The finishing touches
Work should slow down at this point, but this means that the details are being perfected. It’s these little details that really matter, because they’re what makes the space uniquely yours. By taking the time to install them correctly, things like robe hooks, toilet roll holders and towel rails will be perfectly placed for your needs. Expect this to take 4-to-5 days.
Stage #7: Sign off and handover
Instead of a mad dash to the finish line, you’ll have a couple of days to inspect all the amazing work your team have done and sign off the job with your builder. Check if there are any snags in the tiles that have been laid, or that the tap pressure and flow is adequate, for example. It’s not something we see on The Block regularly, but it’s an important element of creating a bathroom that’s better than you imagined.
Creating a bathroom is a really rewarding experience if you follow the right steps. Remember, it’s not a race or a competition. Unlike The Block, it’s best to take your time, prepare yourself for every stage and avoid the drama.
From creating your moodboard to managing your bathroom build, The Bathroom Kit has everything you need to create a bathroom better than you imagined.
What do you think of the above advice? Does it fit your own experience or expectations?
There is so much to share about my recent bathroom reno and I couldn’t possibly fit it all into the reveal post, so I’m sharing a little more detail today, with why I chose the things I did and how those decisions have (thankfully!) worked out really well. Phew!
TILES: In some ways, this is the starting point; the blank canvas! In the 2.5 years of saving up and waiting to do the bathroom, I was sure I’d go for a feature patterned floor, therefore keeping the walls simple. And feature floors certainly only got more popular during that time. But when it came to it, because we were knocking the WC and bathroom together and trying to get so much (i.e. separate shower and 1700mm bath) into a still quite small space, I decided it wouldn’t be the best idea. A simpler floor has, I’m sure, given the illusion of more space. And with the other choices I made, I was very conscious of not having too many heroes (hello gold tapware and hardware, solid timber vanity and big tub!).
In my last bathroom, we used subways but I wanted something a bit different as subways are definitely everywhere! I loved the smaller and uneven look of the tiles we chose and the size makes them a bit different to the more popular larger format wall tiles. So although we went for white tiles with white grout, I felt there was enough texture there for it to still look interesting. And I couldn’t love the end result more! Until the grout went in I was a little worried it was looking like a public toilet, and I did question and re-question the decision to have them stacked rather than laid in a brick pattern. But all’s well that ends well! I also almost went for a feature tile in the niche (probably a pastel coloured version of the same tile) but with the brass trim on those, I felt that was enough. Restraint is hard though, let me tell you!
I knew I wanted something matte and simple for the floor and I love these (they’re more greige than grey although the name of them is grey). So far, they’re hiding dirt and a variety of hair colours very well! They also dry quickly which is a consideration with an open shower.
TILE TRIM: Probably one of the cheapest things in the bathroom, but one that gets a heap of comments and compliments, is the brass tile trim, which I found online. It caused me a fair bit of angst because although chrome would never have worked, it was quite a brave choice and I knew it wouldn’t match perfectly with the tapware. But white wouldn’t have looked half as good! And without a feature tile in the niches, they needed this little je ne sais quoi!
I’m totally okay with the two golds not being exactly the same too!
BATH: I cannot rave enough about this bath! I have always been against squashing a freestanding bath into a small space because I don’t think it looks great visually, not to mention the issue of cleaning behind it. So when I started to see a few of these back-to-wall or D-shape baths on the market I knew straightaway this was my perfect solution! So while it is technically freestanding, it is right up against the wall on one side.
We had a hob bath in my last bathroom which we tiled up the side of and I didn’t like how many right angles there were! Here I love that we have the curve of a freestanding tub without it really being one. It definitely adds to the sense of space as well. And a curve is always a good thing in a room full of squares and rectangles, which a bathroom usually is by default.
So there’s technically still a gap at this end to clean around, but you can’t have it all when you’re working with a tight space!
Regular readers will know I love my baths and have a soak almost every single night, summer or winter! I really wanted to have a decent sized bath if we could manage to fit it. And this one is so deep and amazing! The good thing about a deep bath is that you can lie back against it, without your head being above the top of it. It’s like a bedhead in the bath, if that makes sense! We switched out the waste it came with for a tiger bronze one from Meir to match the taps and shower.
VANITY: After getting custom blackbutt solid timber vanities from Ingrain Designs in our last bathroom, I didn’t even consider getting the vanity for this room from anywhere else! But while blackbutt is quite a statement, knotty timber, I wanted something more subtle here so we went for reclaimed Tassie oak (more on this in a future blog post).
The clever and stunning handle-free design of the vanity was a very easy choice! And the matching shaving cabinet above is a larger version of what we had in the old place and has so much storage (seriously, we must have increased our storage ten-fold from the old bathroom) it makes me very happy! And yes, all our regular toiletries live in here while only the fancy stuff is allowed in the bath and shoer niches. We’ll see how long this rule lasts…
I knew the timber would warm up the all-white space and work beautifully with the warm tones of the tapware and other hardware. It’s a real showstopper!
TAPWARE & SHOWER: This was one of the easier choices because I’d already used a Meir tiger bronze tap in my kitchen and I love it! And as well as wanting to make the bathroom somewhat consistent with the kitchen, I was always going to choose gold! If you’ve seen the rest of our home, that will be obvious!
My selections:
Meir Tiger Bronze round wall mixers, round combination shower rail, round curved spouts, round toilet roll holder, bath popup waste, square floor grate and robe hooks (instead of towel rails).
TOILET: I’ve never cared much for fancy toilets or putting much thought into which one I’d like, but that changed with this bathroom. Bringing the WC and bathroom together meant, obviously, having a loo in the bathroom. and because space was tight it ended up right next to the bath and there was no space for a nib wall or anything like that to disguise it (although it is behind the door, so when the door’s open and you walk past, you don’t see the toilet).
This wall hung one not only adds to the sense of space, but it is so simple and compact, it just blends in. And you don’t really want to make a feature of your toilet! The white glass flush plate also adds to the streamlined and subtle look. I can’t believe how excited I got about this toilet with its in-wall cistern! Who knew?! And it’s a Philippe Starck collaboration. What more can I say?!
BASIN: I love a lot about this basin, from its generous size to its white ceramic waste (so sleek) to its beautiful and simple curved shape (see above under bath choice regarding curves!). I also learnt from my last bathroom reno that it would be best to right align rather than centre it, giving more useable space to the left side. It’s a large sink (600mm wide) but it works perfectly on the 1200mm vanity. You can’t go wrong with an established brand like Duravit and once I told the staff at Bathe what I was after, they helpfully shortlisted a few for me and it was love at first sight!
I have so much more to share about choosing and working with our builder, our electrical choices (mostly fancy lighting!), getting the floorplan right from the start, but I’ll leave it here for today! I hope you find this useful!
You know that old cliché about saving the best until last? I think we may have just done that with our family bathroom! This was the last major (indoor) project in our house and it’s been a long wait; 2.5 years to be precise. For quite a while now, it’s no longer been the “Nanna house” we purchased but a really nice house with a terrible bathroom (and WC) and a very average exterior. Now those two rooms are one beautiful, surprisingly spacious, elegant and sanctuary-like space. It’s a dream come true and I couldn’t be happier with it!
I’ve written before about how I’m an anxious renovator. I overthink everything, not least because I’m Interiors Addict, and I shared this whole process with you from start to finish (not just the pretty after photos) so there’s some pressure with feeling like 92,000 people are watching on Instagram and the fear that something will go wrong or it may just not turn out that well!
I picked the Eden back-to-wall bath from Highgrove Bathrooms for the look and soft curves of a freestanding bath without having to clean behind it!
There really was never any question of knocking the WC and (tiny) main bathroom together, although a previous builder’s quote did suggest we’d have to keep them separate if we ever wanted to afford to get it done! I’m so glad we went ahead and did it properly though (and for less money with a different builder), because a bathroom the size it was really didn’t do justice to a four-bedroom family home.
Little details like the ceramic waste in our Duravit basin from Bathe make me happy! We have a gold waste in the bath which matches the Meir tapware.
So we knocked down the wall between them and moved the doorway so it would open into the centre of the bathroom. It still didn’t create a huge space though, and I was determined to have a decent-sized bath (regular readers will know I’m in the tub every single night!), so we needed to make the most of every millimetre of the room (2700 x 2500mm to be precise). I called on the help of my clever friend Kathryn Bamford to get the floorplan just right. It took many many revisions and I’m probably lucky I can still call her my friend! I’m also pretty confident to say (after many sleepless nights about how the 1700mm bath would fit) that we nailed that layout!
The build went like a dream, despite a few hiccups thrown up such as very wonky walls (like everywhere in our home it seems!) that needed a lot of packing out and a lot of old timber formwork under the house getting in the way of the new plumbing, which had to be cut out and removed. What I loved most about our builders was that they always had a solution and having worked on so many other older homes, none of this came as a surprise to them and they were so experienced it made me feel at ease.
The beauty and craftmanship of the vanity and cabinet from Ingrain Designs speaks for itself, not to mention SO MUCH STORAGE!
Having an open shower proved key to the layout working and feeling spacious.
The reno would have been done in an impressive six weeks, but for our vanity getting damaged by a forklift on the way from Melbourne. But listen up folks, six weeks is good! The absolute biggest misconception out there is that bathrooms shouldn’t take as long or cost as much. When you live through one (and this is my second), you see why they take so long and cost so much. You still need to make sure you get multiple quotes though! In the end, ours took more like eight weeks while we waited for the vanity to be fixed and delivered, and then final touches like silicon. As they all say, it was all worth it!
I never knew I could love a toilet, but I love this one, (and its white glass flush plate) from Bathe. I love that it tucks behind the door and when you open it, you can’t see it (but a doorstop stops the door banging into it). The fact it is wall hung gives the illusion of more space and it just, well, blends in!
The tiles couldn’t have turned out any better. I knew I wanted an organic looking, handmade tile and something a little different to the ever popular subway (did them in my last bathroom reno) so I went for a square and white grout. I was visualising walls of white with texture and light bouncing off the gloss finish, and that’s exactly what I got! Keeping the floor tile simple has definitely added to the sense of space. The design of this bathroom was a lot about restraint, like choosing not to have a feature tile in the niches, but instead going for a brass tile trim.
LED lighting in the bath niche and under the vanity (on a sensor so it comes on when you use the bathroom at night) were the builder’s idea but I’m so glad we spent a bit more on these features.
The tapware from Meir was a no-brainer as we have the same in our kitchen, but the shower really is something else!
I also wanted to show you the difference we made to the light in here by installing an Illume “skylight”. There was previously an old skylight in the bathroom. It did the job but it wasn’t exactly a looker! We put in a new, lower ceiling in this bathroom and didn’t have budget to install a real skylight. So we opted for an Illume, which is basically a solar-powered LED light which you can have on all the time and gives the look and feel (and most importantly light!) of a skylight. I am so impressed with how it exceeded my expectations, we’ve put a big one in the hallway too. I’ll share more about Illume in a separate blog post soon.
The Illumes have an isolation switch so even though they’re solar-powered, you can turn them off if you wish.
I chose robe hooks over towel rails
I have so much more to share with you about the bathroom, including why I chose everything I did, what has surprised me most, the things that were worth spending a bit more on, how to choose a builder and how to live through a reno, but for today I just wanted to share some of these photos with you because hooray, it’s finished!
All the best finishing touches can be found at Oliver Thom
Would I change anything? I actually wouldn’t! Thanks for coming along for the reno ride. I hope you like the finished bathroom and I’m happy to answer any questions in the comments. I’ll be sharing lots more details soon but the suppliers can all be found below. Let me know what you’re interested to hear more about too.
But let’s just remember what this space, as two separate rooms, used to look like. I can barely believe it’s the same!
Just when you thought the ALDI buyers couldn’t get any savvier, the next round of Special Buys is centered around bathroom renovation and it hits stores next Saturday July 20. From a toilet and freestanding vanity ($299 each) to a heated light and exhaust fan ($169), heated towel rail ($99.99), on-trend matte black round countertop basin ($79.99) and matching basin mixer tap ($69.99), I’d get there in the early hours to beat the stampede. And in a genius move, the clever folks at ALDI have also factored in installation for some of the items too!
The ALDI Bathroom Refresh Special Buys range
“A bathroom reno is a great way of adding value and comfort to your home, but the costs can escalate quickly when you add up all the items and factor in the labour. What we set out to do with the Bathroom Refresh Special Buys is give ALDI customers everything they would need for a bathroom reno on a budget, without compromising on quality,” says Nathan Thompson, buying director at ALDI Australia.
This toilet is just $299 including installation
Round countertop basin, $79.99
And the installation process is as straightforward as you’d expect from the practical German brand. You simply make your purchase in store, take your items home and then log on online to book your installation – this service is available within a 20km radius of your nearest ALDI store. Next up, a licensed tradesperson will remove your existing item, install your new one and they’ll even dispose of your old goods for a $30 fee.
This hand shower rail is available in black or chrome, $79.99
Four-bar heated towel rail, $99.99
As is typical of the superstore, the collection draws on the latest trends – white, timber and black round out the mix for the bathroom series. “Over the past decade, bathrooms have risen from their utilitarian roots and blossomed into luxurious sanctuaries. When it comes to bathroom design for the coming year, we’re seeing calm spaces awash with natural timber, stone and light, as well as spa-inspired style and statement accessories,” Nathan says.
Heated light and exhaust fan, $169 (including installation)
Key pieces aside, you’ll also be able to purchase a range of tools and accessories to undertake a DIY reno. There’s a tile cutter, plumbing tools, 360 degree cross line laser level with tripod, caulking gun, silicon and adhesive cartridges and a clever inspection camera that has a one metre long cable, should you need to take a look at something that’s a bit hard to reach.
Basin mixer (available in black or chrome), $69.99
Freestanding vanity (available in natural or white), $299
Located in Sydney’s lower north shore, this once tired Roseville property was given a timeless makeover by Integriti Projects. In just five months, the team transformed the entire interior of the house, focusing on creating a beautiful, functional home for a growing family.
Going into this refurbishment, there was a key focus on renewing the once rundown main and ensuite bathrooms and breathing new life into each with a modern and fresh design. While it was important to achieve a stylish design, the team wanted to ensure they were making good use of both spaces and delivering a product that was also very functional and included adequate storage.
The design brief behind the main bathroom was to create a warm, spacious area that allowed the children to store all their essentials out of sight. The team added a custom made vanity and concealed shaving cabinet but there is also plenty of space for multiple people to be in the bathroom at once; an issue that faces many families when children are getting ready for school!
Before
After
The soft lighting assists in bringing out the relaxing nature of this space while the earthy tones create an effortless flow between rooms, and the theme created throughout the rest of the home.
Continuing the earthy stone statement, the ensuite features deep grey chevron pattern titles that draw the eye up the wall. As with the main bathroom, storage was crucial for this room so two shaving cabinets were added above the toilet and vanity. It is the perfect place for the parents to unwind and indulge in some pampering.
The bathrooms, along with the entire family home, exceeded the owners’ expectations and they were absolutely delighted with the refurbishment. With such a stunning interior, the owners have now decided to upgrade the exterior of their house including an external living area, new driveway, new roof, re-painting and landscaping of the gardens.
Located in the Melbourne suburb of Cheltenham, this dated brown bathroom received the makeover treatment recently at the deft hands of Amelia Boal from Soleil Styling and Design. Inspired by seeing our story on tile painting, Amelia was able to give the bathroom a dramatic facelift for less than $2000. Impressive!
Bathroom BEFORE
Bathroom AFTER
The bathroom renovation was part of a whole home makeover that was undertaken before the sale of the home. “The owners had gone through the whole process of planning and seeking approval for a complete renovation and extension of their home, which they had outgrown. Then once plans had been finalised and approved, they realised it was a huge thing to take on with two busy careers, two young daughters and a big old Labrador, and decided they’d be better off selling and buying something to fit them,” says Amelia.
Shower BEFORE
Shower AFTER
With just two weeks to transform the home, and a modest budget, Amelia set about transforming the bathroom from a dated brown space to a much brighter and whiter one. “When planning the vibe for the whole house I set out to add as much natural and artificial light as possible, as it was quite dark. But I didn’t want it to fall flat so we ran with a palette of white, grey, black and soft green and added in a lot of texture throughout,” says Amelia whose favourite design feature of the bathroom makeover is the soft green feature tile used on the front of the bath.
Bath AFTER
The new bathroom floor features new tiles laid over the original ones and the wall tiles were painted which helped keep the renovation within budget. “I was definitely inspired to try tile spraying thanks to a story on your site. I had heard of it over the years but always been put off by what I heard through others so when this project came up I jumped at the chance,” says Amelia who explains that the process did unfortunately suffer due to her choice of trade. “The contractor who did the work had some issues and had to come back several times and ended up stripping it back and doing it all again, but it ended well. I can’t say I’d use this particular gentlemen again but I’d try it again for sure though. Plus, he didn’t charge us due to the inconvenience,” says Amelia.
AFTER The project is testament to the power of white!
Breakdown of bathroom costs:
Tile resurfacing: $800 (this was waived)
Tiles and tiling : $427.25
Painting: $250
Tap/shower/bath fittings and towel rails and installation: $500
With the average bathroom renovation costing anywhere from $5,000 to $20,000, it’s not a task to be taken lightly, which is why we looked to Wesley Sinclair from Highgrove Bathrooms recently for his best bathroom budgeting advice. “Before the renovating even takes place, it’s important to make a plan and set a budget. The costs of fixtures, tiling, plumbing and electricals can really add up if you don’t plan ahead. Always allow for a 10 percent buffer for any unexpected costs that may come up along the way,” says Wesley.
“For a full bathroom renovation, a rough guide would be to spend 40 percent of your budget on fixtures, 35 per cent on tiling, 20 percent on plumbing and the last five percent on electricals.”
Fixtures
“Accounting for nearly half of your renovation budget, the fixtures and fittings you choose can make or break the look and feel of your bathroom,” says Wesley who advises splurging on fixtures such as your cabinetry, toilet and bathtub if you are having one. “Ample storage space is a must for every bathroom, so choosing the right vanity and shelving for all your bathroom essentials is vital. Opting for a wall hung vanity will free up floor space and give you the illusion of a bigger bathroom too.”
When it comes to toilets, Wesley says that it’s important to think about WELS water efficiency ratings as well as how easy they are to clean. “Wall face toilets eliminate the need to reach around and clean behind your toilet, and rimless toilets provide a more hygienic flushing experience,” says Wesley.
When it comes to saving on fixtures, he warns against blowing your budget on expensive mirrors, robe hooks, tapware, basins and towel racks given there are so many attractive, affordable options on the market. “Quality, affordable accessories that can coordinate your whole bathroom look are readily available and can be updated later when you’re ready for a refresh.”
And when it comes to your bath tub, Wesley is a fan of the freestanding options for that high-end finish. “They add that extra touch of luxury while maximising available space.”
Tiling “The amount of your budget spent on tiling will be determined by the size of your space and how high you want your wall tiling to go. Floor to ceiling wall tiles are a luxury bathroom trend we’ve seen emerge over the last five years and they can instantly add value to your home,” says Wesley.
And with tile prices ranging anywhere from $30 to $200 per square metre, your tile spend depends largely on how luxe you go. “Complex designs like mosaics and herringbone patterns are more expensive and can cost more to lay too. On top of the price of your tiles, the actual installation can set you back around $40 per square metre when you consider things like site preparation, labour, glue and grout,” says Wesley. One area in which no shortcuts can be taken is waterproofing. “Make sure you professionally waterproof the areas around your toilet, vanity, shower and bathtub to protect the integrity of your floors and walls.”
And sometimes a bathroom renovation doesn’t require new tiles at all. “If your tiles are still in good condition, you could consider re-grouting instead of completely replacing them. Opting for a bit of facelift rather than a complete overhaul will save you lot of money, and in some cases, that fresh white grout is all that’s needed for a brand new look!”
Plumbing
There are plenty of ways to save money when renovating your bathroom, however, plumbing isn’t one of them. “Don’t skimp when professionally fitting your basin, toilet, shower and bathtub, as poor plumbing can lead to many problems later down the track. A leaking tap or busted pipe will cost you so much more to fix than the initial installation fee,” says Wesley. It’s also worth noting that some products are only covered by warranty if they’re professionally fitted.
Plumbers charge an average of $80 per hour, though some will charge per task. “To completely renovate and rearrange the space, your plumber will need more time to extend and change the current layout to suit your new bathroom plan. Always get a quote and avoid changing your original plans if possible!” says Wesley.
Electricals
“The electrical elements in a bathroom can sometimes be overlooked when planning a renovation – think exhaust fans, downlights, LED Mirrors, heated towel rails, power points and light switches. Always plan your electrical layout before doing any tiling as it’s much easier to run the necessary wires and cables that way,” says Wesley.
Task lighting is key in a bathroom too and he recommends wall sconces or an LED mirror to help illuminate the area. “You want your lighting to be effective enough to carry out daily activities like shaving, applying make-up and brushing your teeth.”
Heated towel rails are another consideration, just make sure to select a timed eco wall switch as an energy efficient option. “Talk to your electrician about having the wiring run before you install your tiles though as these need to be hardwired and professionally installed,” says Wesley who advises selecting a good quality exhaust fan also, toeliminate moisture build up.
According to recent market research by Beaumont Tiles, choosing fixtures and fittings for your bathroom, cost blowouts and not knowing where to start are amongst the biggest challenges facing Australian renovators. Big ticket projects like bathrooms, can be particularly daunting, and leave renovators opting out of picking up the tools.
The solution? Beaumont’s strategic design team have created a series of bathroom packages that combine quality products and provide renovators with peace of mind. Priced from under $4,000, they’re available in all Beaumont Tiles stores.
“The key to alleviating reno stress is having access to transparent costs and inclusions. That’s what we’ve provided with our bathroom packages,” says Beaumont Tiles strategic designer Vanessa Thompson. “All our packages have been mindfully designed to reflect Australia’s current top 10 trends, and include everything from the cabinetry, tiles and taps, right through to the tub. Our local stores will even help you find the trades to do it!”
With over 16 packages to choose from, she shared some of her favourites and her tips on styling your newly renovated bathroom:
Modern
Clean monochrome lines complemented by tiles configured to create a spatial illusion has been kept front of mind when curating the looks for this package, with options available for both warm and cool lit spaces.
“To complete this look, create playful balance with the inclusion of elements that draw the eye upwards. Always remember to soften a modern bathroom with scented candles, trendy vases, and brushed metal elements,” adds Vanessa.
The modern bathroom package
Classic traditional
This package features a dark tile floor, with lighter wall tiles to draw the eye upwards and out. Further complemented by added texture with a feature wall tile and matching fixtures and cabinetry.
“To finish off this bathroom, add touches of drama with glass, metallic and floral elements,” says Vanessa. “Think owl feather embellishedtowels softened with a gorgeous glass vase with tulip or other classic bloom.”
The classic traditional bathroom package
Scandinavian
This package is all about simplicity and economic use of space that is as beautiful as it is functional – with loads of thoughtful storage.
“In both package options we’ve selected a central focal point, then provided opportunity to add colour and layers. I recommend styling with natural elements such as a timber stool and indoor plants with geometric motifs to add theatre.”
The Scandinavian bathroom package
Coastal
“Coastal styling is all about bringing the outdoors in, to complete this bathroom I would opt for clean furniture in lighter shade neutrals or sea blue,” says Vanessa. “Then use indoor plants, rattan mats and seascape artworks to bring the outdoors in.”
It’s no secret that kitchens and bathrooms are the highlights of the modern home. A tacky blue tile in the shower or 70s floral design can make your home look tired and dated. Before you take out a second loan and throw a sledgehammer at those eyesores, there is a quick and easy way to freshen up your bathroom – without leaving you shower-less for a month or hurting the hip pocket.
The budget-friendly fix? Tile paint. If your bathroom tiles are free from chips, cracks and other major damage, a simple refinish with White Knight tile paint can quickly turn your bathroom from drab to “va-va-voom” (as Neale Whitaker would say). Not only will you give your tiles a new lease on life, you will also help the environment by keeping them from becoming landfill.
Click on the image to see more of this amazing bathroom transformation using tile paint by The Painted Hive (before photo below).
The before
Clean, repair and prepare
Before you crack open that tin of paint, remember: preparation is the key to success. A DIY refinish can quickly turn into a DIY disaster if you decide to skimp on the pre-painting steps. Think of this as an essential ingredient to the perfect cake – miss it, and the whole cake won’t turn out.
As clean as your tiles may look, a thorough spray and scrub using White Knight’s tile and laminate cleaner will ensure your tiles are squeaky clean and ready for their grand makeover (think residual soap scum or bath oils). Zap away any pesky mould with bleach, and fill in any grout or tile cracks with fresh grout or poly filler. If a tile is badly damaged, replace it with a tile of the same size – you don’t have to worry about matching the colour as it will be painted over anyway!
Use tape (you can go fancy with painter’s tape or use any masking tape you may have lying around) to protect non-tiled walls and taps, and lay down drop sheets (old blankets and rugs will work) in the bath tub and floor. The goal is to protect these parts from an accidental paint makeover.
Measure up
Before you can begin sprucing up your bathroom tiles, you need to calculate the amount of paint required for your DIY. Since everybody’s bathroom (and the amount of tiles in it) is different, buying a tin and hoping for the best is probably not the right way to go. Luckily, there is an easy way to determine how much paint you will actually need to use. Just multiply the length and height of the tiled walls, divide everything by 12 and voila! The final number is the amount (in litres) of paint that you will need.
Prime
Once your tiles are clean and any cracks and gaps have been filled in, it is time to prime. White Knight’s tile and laminate primer provides a base coat that helps your final coat of paint stick to the tiles and prevents peeling and scratching (ensuring your DIY efforts aren’t wasted when the kids knock the tiles during bath time). It also contains an anti-mould ingredient to further protect your refreshed tiles.
Use a roller to zig-zag the primer across your tiles, finishing off corners and edges with a paint brush. Avoid painting straight from the tin, otherwise you will ruin the primer for future use – use a rolling tray instead. The key here is to focus on small sections at a time to ensure good coverage. Just two coats of primer four hours apart, a light sand after each (wait for the coat to dry first!), and you are ready to paint.
BEFORE (Pic source: Littlepinknotebook.com)
AFTER
Paint
The beauty of White Knight’s tile paint is that you can tint it to whatever colour you want, as well as enjoy either a traditional glossy finish, or opt for a satin effect (with their laminate paint option). Apply your paint in the same manner as your primer: use a roller and tray, and paint brush for corners and edges. Zig-zag your first coat, leave to dry for six hours, then finish off with a light sand before applying the second coat using long strokes. Stir your paint every now and then – it will prevent streaks and help you achieve a smooth finish. And remember: two thin coats are better than one thick one!
Your beautiful new tiles will be fully cured in a week, so take extra care to avoid bumps or harsh cleaners. If you would like to create a little contrast between your tiles and grout, simply apply White Knight’s grout pen to the grout.
Clean up
With so much focus on preparing your tiles and bathroom, it can be easy to forget about the actual equipment you use. Paint brushes, rollers, sponges and trays should be washed as soon as you are finished with them – unless you don’t mind throwing them out after one use! However, after your bathroom revamp, you might just get itching to make over your kitchen tiles next!
–Naomi Findlay is Australia’s rapid renovation expert, an internationally renowned renovator, award-winning property stylist and speaker.She’s an industry leader in creating healthy wealthy spaces and creating wealth and profit from renovating property. Naomi is CEO of staging company Silk Home and founder and principal of education provider, the International Institute of Home Staging (IIHS).
Whether big or small, bathroom projects can come with a lot of questions. So Reece – together with some of our favourites fromThe Block – have tackled the four biggest bathroom questions and giving us all the answers.
1. What’s the best way to plan a project?
Everyone is different, and the way we work is too. What is easy for you may be hard for someone else, and that’s okay. Bathroom renovations are the same, so play to your strengths. Whether you’re an experienced renovator looking for a smooth process, or someone new to the game in need of a helping hand, a personalised plan will help you get the most out of your project. Check out Reece’s Bathroom Creator Quiz to help determine your strengths and the My Project Planner to start planning like a pro.
2. How can I get the latest look for the best value?
5 star luxury doesn’t have to mean a 5 star budget. By splurging on the important areas and saving in others, you can achieve any look, in any home, on any budget. Don’t compromise on the quality of products you touch and feel daily, like tapware. But save on areas like tiling and accessories for an achievable, affordable result. Block contestants Julia and Sasha recommend saving on tiling by not tiling every wall; while judge Shaynna Blaze says not to spend too much on floor tiles and instead save the impact for the walls.
3. How can I add luxury to my bathroom?
Your bathroom is a personal sanctuary; a place for escape, relaxation and rejuvenation. Create a destination of delight with strong surfaces and elegant, organic shapes. A space where you love to start and finish your day. For true luxury, treat yourself to the absolute best in materials, technology and function. Shaynna suggests embracing extravagance with black tapware and textured tiles: “Bevelled edges reflect light beautifully.” And to get the luxury look for less Blockheads Alisa & Lysandra recommend choosing a hero product and building around it.
4. How do I choose the right colour for my bathroom?
Colour is an extension of your personality. Colours have meaning and can change the way you feel, so choose the colours that speak to you. Some bathroom trends will have colours that work better than others; Scandinavian themed bathrooms are generally washed with a muted or pastel scheme, while contemporary bathrooms gives you the license to lean toward something bolder.