Made entirely out of Kaboodle flat pack furniture, Brisbane builder Rachael Turner, of Front Porch Properties, created a very impressive looking custom built-in TV unit recently that we just had to share. “I’d rather a built-in than a standalone piece of furniture as it looks much sleeker and more custom,” says Rachael and we couldn’t agree more.
It’s hard to believe that built-in was created out of flat-packs!
1. Buy Kaboodle flat packs from Bunnings (and assemble them) First up was purchasing the flat packs and Rachael selected overhead kitchen cupboards from Kaboodle due to their shallow depth. “Because the fireplace is 600mm deep we wanted the cabinetry to be set back a bit,” says Rachael who used 300mm deep cupboards to create the custom piece.
2. Build a plinth “We made a plinth out of framing timber and put it under the cupboards, so they had something to sit on. This was covered with a kick panel after the timber floor went in,” says Rachael.
3. Install the bench tops When it came to the bench top, Rachael pre-ordered a 400mm deep Kaboodle one (in ‘Hazelnut’ which is a rustic oak shade) from Bunnings and it took about a month to arrive. “If you give Bunnings the measurements, they will cut it to size for you! They send it out pre-cut and they even did a mason’s mitre on the return,” says Rachael referring to the corner where the cabinet wraps around and meets the fireplace.
“Kaboodle also sent a bench join kit which resulted in a much nicer finish than having a standard butt join,” says Rachael.
5. Install the doors Next up was the installation of the cupboard doors which were finished off with Kaboodle black mushroom shaped knobs.
6. Timber panelling “We finished off the wall above the cupboards with grid patterned panelling to complete the entertainment unit area and remove the blandness of a plain wall,” says Rachael who painted it in a dark charcoal shade to disguise the TV.
Timber panel installation – the TV now hangs on this wall
7. Floating shelves
Sitting to the right-hand side of the stone-clad fireplace, the floating shelves really complete the entire entertainment nook and Rachael accessorised them with baskets and greenery to lift the space.
If you’d like to know more you can check out the step-by-step video guide to the project below.
Seasoned up-cycler Natasha Dickins of Little Red Industries is back today with a very fun DIY interior makeover that sees a very tired bedroom door get a new lease of life courtesy of Marimekko’s iconic Unikko print fabric.
“This makeover gives an average entryway a point of interest. Rather than paint the hollow-core door, I used it to showcase one of my favourite patterns!” says Natasha who warns that while this project is relatively simple you need to allow two days to complete it due to drying time.
1. Remove the door To cover the front of your door, as I have, mark around the jamb before removing it so you can ensure the moulding is positioned to allow it to close.
Remove the handle and strike plate with a drill or screwdriver, then remove the door and the hinges, taking off on the bottom one first, so the door doesn’t fall on you!
Natasha removing the doorNatasha removing the door hardware
2. Prepare the door and frame To make the frame, position the moulding just inside the pen marks then cut and check one corner at a time using the mitre box and hand saw then sand smooth.
Lightly sand the door then apply two or three coats of specialty paint for doors and trim using a microfibre roller, making sure you can see the pen marks. Also paint the frame pieces.
Natasha preparing the door and frame
3. Cut and glue the fabric To show off the pattern I ran the flowers down the centre and positioned it so there was black around the handle.
Measure your fabric to fit just inside the pen lines of the door and cut with sharp scissors.
Tape the bottom half in position to work at the top, folding it back to apply a light, even coat of adhesive over the door using a mini foam roller.
Smooth down the fabric and push out any air bubbles with a print roller or rolling pin then repeat with the other half of the door and leave it to dry.
Natasha smoothing down the fabric onto the door
4. Seal the door To seal and protect the fabric while creating a tactile surface, apply the first coat of the water-based varnish using a microfibre roller and leave to dry thoroughly.
Cut out the hole for the handle then apply the second coat, sealing around the edges to prevent fraying.
Natasha sealing the door
5. Attach the frame Position the frame pieces, starting at the top and tapping in nails at least 50mm from the ends to avoid splitting, and about 300mm apart.
Trim any escaping frayed edges with a sharp utility knife then use a small paintbrush to hide the nail heads and touch up around the outside of the frame to cover the pen marks.
Natasha reattaching the frame
6. Hang the door While there is clear access to the jamb, give it a quick coat of paint and leave to dry.
Use a timber off-cut to lift the door into position it, securing the top hinge to the jamb first.
Check the door closes without hitting the frame then install the new handle and strike to make an entrance!
You can check out Natasha’s step-by-step video of the DIY project below.
Since its inception in 2015 The DIY Decorator has amassed an impressive online following. Almost 90k people tune into Perth-based interior decorator Zoe Gilpin’s Insta-feed and blog to take advantage of her keen eye for bargains and learn how to style fabulous spaces on a budget – rooms that look a lot more expensive than they are. Today, Zoe shares her top five tips on how to create stylish spaces without breaking the bank.
Styled by Zoe, all of the items in this room are from Target. The Easycraft wall panels from Bunnings were a DIY project that Zoe undertook.
Shop smart: Plan before you spend
“Going into a home decorating project without a plan can be costly,” says Zoe who thinks it’s worth spending time creating a digital mood board to this end. “Planning exactly what you need not only helps you stay within budget but avoids having to return or swap items that aren’t working in the scheme,” says Zoe.
A moodboard by Zoe
And while it sounds like strange advice when budget is top of mind, you should refrain from buying too much in the first instance. Start with bare minimum of items and work up from there – as is often the case, less really is more “Minimal often works best. My tip is to work out what each large furniture item needs. For example, how many cushions does the sofa need? Or how many decorative items should sit on the entertainment unit?” says Zoe.
A Kmart bedside looks rather luxe when paired with a Beacon Lighting lamp and a piece of Darren Palmer Collection coral from Myer
Mix pricier items with budget ones Like the savviest of fashion girls, Zoe is a fan of mixing high-end pieces with high-street finds and even second-hand pieces. “This is my top tip for creating your own unique style that suits your home and doesn’t look like a copy of a catalogue,” says Zoe.
“An interior created with items from all walks of life – designer, budget and small business – tells a far more interesting tale,” says Zoe who explains that this technique is a great way to balance the books too. “Spent too much on that coffee table? Even out the budget by spending less on the items to go on it,” says Zoe.
Zoe salvaged this cane chair from the side of the road and the cane chest from a second hand store. The rug, plants and planters are from Bunnings.
Spend on larger items & save on smaller ones When it comes to dividing up your funds, it’s best to channel more of your dollars towards the larger items – think furniture pieces such as beds, sofas and dining suites. Not only do cheaper products usually not stand the test of time, but quality pieces have a greater resale value.
Conversely, Zoe advises spending less on the smaller finishing touches. “To save a few dollars, opt for cheaper products when it comes to items such as vases, cushions and lamps. These items don’t get used and are simply to look at, so their quality isn’t as important,” says Zoe.
Top tip: Upgrade an inexpensive cushion by swapping out the original insert with a feather one for an instantly more luxe result.
Embrace DIY Given the name of Zoe’s blog, it’s no surprise that she’s a big proponent of DIY and not only do they impart a sense of achievement, but they are a great way to save a few dollars too.
Again, Zoe recommends browsing second hand stores, scrolling Facebook Marketplace and Gumtree to find unique items and give them a second life. “Whether it be a paint project or an upholstery project, it only takes a few inexpensive products from a craft or hardware store to help you create your DIY masterpiece,” says Zoe.
This bedroom features a black Kmart mirror that Zoe painted gold to suit the scheme
Go green
That the explosion of indoor greenery took place at a similar time to a global economic downturn is no coincidence. A pop of greenery is a fabulous, inexpensive way to really lift a room.
Greenery styled by Zoe
“Buying a nice plant, large or small, and popping it in to a planter that suits your home decor style, instantly adds life to a room. If you like a more natural look consider housing your plants in decorative baskets. When it comes to choosing the plant, it can be a simple green leaf plant or something with flowers,” says Zoe who cites easy-care plants such as devil’s ivy, giant elephant ears and rubber plants as some of her favourites.
“At around 14 years old it’s only a relatively young house with good bones and lots of potential. There was certainly nothing offensive about it though there wasn’t anything special either. It just looked like any other slightly dated, somewhat neglected house in the neighbourhood – particularly the one right next door which happened to have the exact same colour scheme!” says DIY decorator Kristine Franklin (of The Painted Hive) who gave this Melbourne home a facelift for a friend recently.
BEFOREAFTER
The home of her friend’s late father, Kristine offered to help get it ready for sale by working on it over a three-month period – primarily on weekends. “Mainly we just wanted to make the most of what we already had on as small a budget as possible! Given the house has quite a simple classic design, and is located in a semi-rural area, I wanted to bolster the subtle cottage feel in a fresh, contemporary way,” says Kristine of her design choices.
The process began with a thorough declutter where Kristine cleared the old decor, removed the dated security screen door and removed the aluminium shade from the sidelight. She then painted the front door a lovely shade of blue (Dulux Duck Egg Blue), installed a new light fitting and added some stylish accessories too. “The front door was a virtual black hole prior and now it’s bright and welcoming and one of the highlights of the facade. It’s probably my favourite little area,” says Kristine.
BEFORE front doorAFTER front door
“Although faux plants aren’t usually my thing, I wasn’t keen on forking out a small fortune on a feature tree for beside the front door given the house is unoccupied and nobody would be caring for it regularly. The fiddle leaf is actually artificial though it looks amazing and is guaranteed not to die throughout the entire sales campaign!” says Kristine.
AFTER faux plants and stylish pots now accessorise the front door
Another integral part of the renovation, Kristine painted the original mottled stone coloured bricks using Dulux ‘Texture Medium’ in Antique White USA. “I’m sure some people will wonder why I decided to paint the brick. To be honest, it was never awful however it does look much better in most of the before pics than it did in reality. It actually presents as almost an earthy sandstone when it was actually a mottled cream/yellow with dirty brown mortar. Plus, the house next door has the exact same brick which is never a great thing when you’re looking to sell. I wanted a fresh start,” says Kristine who chose a white paint colour to contrast with the home’s black trims.
AFTER the wall baskets are from Early Settler
A master at DIY, Kristine also built the gable pediment and decorative shutters herself – the latter was painted in the aforementioned Dulux Duck Egg Blue. “All up they cost less than $60 and add the perfect touch of charm and character I was after,” says Kristine.
AFTER Kristine built the gable and shutters herself
And while Kristine originally wanted the garage door to be replaced with a black alternative, she’s happy with the way the timber-look steel Gliderol one from Bunnings turned out. “I love the simple panelled design and warm timber-look finish. It complements the other timber elements and duck egg accents perfectly, as well as helps warm-up all the white,” says Kristine.
BEFORE garage doorAFTER garage door
“This is the first full facade transformation I’ve ever worked on and I learned a lot! It was so lovely to have several neighbours walk by as I was taking the ‘after’ photos and comment on how good it looks now,” says Kristine.
The latest offering from Carpet Court is, rather interestingly, all about walls! ‘Elevate’ is a new collection of purpose-built timber wall panels that has been developed with the DIY market in mind. Perfect for adding warmth and texture to a space, each lightweight plank is created from sustainably-sourced plantation timber and features an adhesive backing allowing you to simply peel and stick them onto most wall and ceiling surfaces. It’s the perfect Easter long weekend project, don’t you think?
Carpet Court’s new Elevate timber wall panels in ‘Storm’
“Wooden wall panels can help elevate a room lacking atmosphere, as well as add a little formality to new and modern homes. The panels are perfect for ‘zoning’ open plan homes, such as reception areas like hallways and stairways, as well as living spaces like dining areas,” says Carpet Court style ambassador and interior designer Darren Palmer. The panels each measure 1210mm x 128mm x 5mm thick and retail for $69 per square metre.
BEFOREAFTER
“For an understated approach, the panelling can add visual interest on the risers of a kitchen island bench, or act as a natural bedhead feature in a bedroom. Best of all, they can hide a multitude of imperfections, such as uneven surfaces and are strong enough to hold your valued pictures and artwork,” says Darren. The range offers 10 wood stains with both warm and cool tones and an array of wood grains in the mix.
The planks come with easy to use adhesive backings
“Proportion is key. Vertical panelling, or even wrapping one-wall panelling on to the ceiling, is an effective way to make ceilings appear taller. Conversely, horizontal panelling can widen the appearance of a narrow room,” says Darren who warns that if you’re going to use panelling in more than one room in your home you should stick to one style and colour for the sake of continuity.
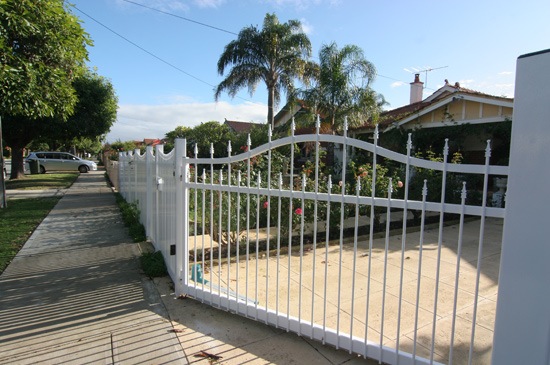
If you’re looking to install new driveway gates, automatic gates can be a convenient way to take control from the comfort of your car and increase your home’s security. But installing DIY automatic gates isn’t as simple as knocking a few posts in. To determine if automatic gates are the right DIY job for you, here’s what you need to know before you put shovel to dirt.
A problem with DIY automatic gates is that many online kits are of variable quality. Sub-standard gates jeopardise security and lack aesthetic appeal because of the lower quality materials supplied. Flimsy steel, plastic parts and hinges that wear prematurely will result in an electric gate that looks cheap and won’t last the distance.
Instead, source a supplier who uses quality materials and components. Reputable suppliers can design and manufacture an automatic gate for you to install yourself, rather than a cheap online kit. Higher quality gates are more resistant to weather, pests and damage, and can provide a safer security solution for your home. Choose custom-design for greater versatility.
DIY automatic gates require specialist skills
Installing an automatic gate is a highly specialised task. If you are tackling the job without a fencing contractor or installer, you will need building and electrical skills.
Homeowners attempting to do their own installation with a DIY kit and little experience could face additional costs if the task is not completed correctly. However, costs can be reduced by doing the groundwork yourself and hiring a reputable installer to do the final wiring and setup. It’s recommended that automating your gate should be done by an electrician or qualified installer.
Poor installations may void warranties and guarantees if defects are caused. To reduce risks, be wary of potential problems such as slope issues and fixing underground motors, which can be problematic if underground drainage is hampered. Contours and slopes can introduce installation issues and should be marked out as part of your planning process. Calculate the length of the boundary before you begin.
Local council regulations
Risks can also be reduced by ensuring your automatic gate abides by local council regulations. In Australia, there are strict guidelines and minimum requirements regarding the spaces between panels and measurements of the fence and gate. You will also need council approval before installing.
Cost vs time
Before deciding if automatic gates are the right DIY job for you, consider the cost savings of supply only versus supply and installation, and how much your time is worth.
Homeowners who are trade qualified can benefit from an affordable solution with a supply only kit. Savings are usually in the installation costs. But you’ll need to weigh up the liability and risks involved before choosing the DIY path.
Swing automatic gates are the most commonly used for residential properties because they’re practical and easier to install. However, they won’t function if it swings towards an upwards slope. Driveway length, room for cars to park and traffic on your street should also be considered before choosing a swing gate.
If space is an issue or you have a driveway incline, sliding gates are an ideal solution as they can be installed on an angle and take up less space. However, installing sliding gates isn’t recommended for the average DIY enthusiast. Sliding tracks need to be embedded into concrete to work smoothly.
Once you have chosen a preferred gate type, determine its automatic access and how it’ll be powered.
How to choose
Although visual appeal will help dictate which gate option is best for your property, the final decision usually comes down to space, driveway type and installation. But style is still an important consideration and the type of gate chosen should also complement the property.
Picket-style gates pair with Hampton houses. Modern homes can benefit from the clean and minimal appeal of slat fencing and gates. Alternatively, if you have an older property consider steel or aluminum gates with intricate tops like ‘gothic’ for detail and character.
Author Bio This article is written by Jayde Ferguson who recommends Fencemakers in Perth, Western Australian for the manufacture of automatic gates and installation by skilled contractors. Catch Jayde on LinkedIn.
Titled ‘Repair,’ the latest instalment of the 2019 Dulux Colour Forecast has arrived in time for autumn and the nature inspired palette is full of gorgeous green and gold shades. “Repair is my favourite palette of 2019. Its rich greens and accent of burnished gold feels comforting and uplifting and together they create a wonderful backdrop for interesting collections and spaces that tell a story. The colours are drawn from nature and plug into our collective desire to slow down and reconnect with the natural world,” says Dulux colour and communications manager, Andrea Lucena-Orr.
Paint colours: Dulux Wash & Wear in Sea Creature, Plasticine and China White
“Striking combinations, such as verdant green, chocolate, umber and sienna set a playful, optimistic tone, while soft, green-based grey has emerged as the neutral – and the ideal pairing for these nature-based hues,” says Andrea.
Paint colours: Dulux Wash & Wear in New Neutral and Cornstalk
And there’s no doubt that the cooler months demand a different approach inside – particularly as we’re inclined to spend more time there. “Evenings snuggled up on the sofa or entertaining friends around the dinner table take on a whole new appeal. The colours and textures we surround ourselves with play a huge role in creating that warm and cocooning vibe that we crave,” says Andrea.
Paint colours: Dulux Wash & Wear in Ohai Half and China White
“There’s a sense of quiet luxury to this look, but it doesn’t come down to extravagant finishes or accessories,” says Andrea who suggests layering natural colours and textures to recreate it. Think richly grained timber, aged leather, cork and velvet. “There’s also a mindful appreciation of the humble and handcrafted simple pieces – whether they’ve been collected on your travels or found in vintage stores,” says Andrea who shares her autumn styling tips below.
Paint colours: Dulux Wash & Wear in Golden Grain and China White
ANDREA’S AUTUMN STYLING TIPS
Combine natural finishes: Warm timber, leather and woven rattan can create a cosy and eclectic feel.
Add a twist: Paint a bedhead or feature wall in an exhilarating shade of blue-green or ochre to spice up this palette’s warm green and earthy tones.
Create interesting displays: Scour antiques fairs and second-hand stores for unusual collectibles.
Layer up textures and prints: Think cosy knits, aged leather, velvets and block prints.
Introduce concrete: This finish will add an interesting twist to green tones and timber. Use Dulux Concrete Effect paint to upcycle small accessories or to create a feature wall.
Set up a cosy corner: A comfortable armchair or a window seat with a few soft cushions is the perfect spot to spend an autumn afternoon with a good book.
Dial down the lighting: Reduce harsh overhead lighting at night and set a cosy mood with a variety of table and floor lamps.
Finish off with greenery: A trailing devil’s ivy on a bookshelf or a large, potted long-leaf fig in the corner of a room can provide a sense of calm and reinforce a natural element.
Colours: Dulux Wash & Wear in Sea Creature, Plasticine and China White
I’m a massive fan of wallpaper. When it comes to making a relatively inexpensive statement, you can’t really go past it and aside from the obvious feature walls there are myriad ways of using it according to Graham & Brown’s design and trends expert Paula Taylor. From the stairs to the ceiling, lampshades and more, we caught up with Paula recently to talk all things wallpaper.
Graham & Brown Hula Swirl wallpaper in gold noir
Stair risers
“Stairways are often ignored and unloved as they are a means to getting somewhere else and they’re not a place we tend to linger. With a little bit of effort however, they can look really beautiful. Using wallpaper livens up the forlorn and creates a conversation piece, which will intrigue your guests,” says Paula who believes anything goes when it comes to wallpapering stair risers. “When wallpapering stair risers, either stick with one pattern, or create a hotchpotch of pattern and colour,” says Paula.
Stair risers styled by Andrea Groot
The ceiling Wallpapering the ceiling is a trend I’ve noticed appearing more and more and Paula is a huge proponent. “Along with the stairs, the ceiling is another commonly overlooked area when decorating. The truth is, a beautifully patterned wall above you can create mesmerising interior impact. Don’t be daunted by thinking it will be a hard task. Graham & Brown’s ‘paste the wall’ technology means that this can be created with ease so it’s time to stop neglecting the ceiling,” says Paula.
Graham & Brown’s Kingdom Lion wallpaper looks fabulous on both the walls and ceiling in this powder room
Door panels
“Wallpapering your door panels is a great way to add a little colour and pattern to a room. Adding wallpaper to the panels creates a picture frame around the pattern, changing it from a simple door, to a piece of art,” says Paula.
Graham & Brown’s Yasuni lush green wallpaper has worked an upcycled treat on this set of white drawers
Lampshades
“You can apply wallpaper to the inside or outside of lampshades, or both!” says Paula who favours this technique for continuity of design. “It’s a great way to create a truly customised coordinated feel to your mood lighting,” says Paula.
Styling by Emma Fishman
Decoupage
A classic upcycling technique, decoupage involves decorating an object by gluing paper cut-outs onto it. “It’s a great way to reuse wallpaper and create stunning bespoke pieces of furniture. It can reinvent tired old pieces or liven up new inexpensive furniture and create something completely new and beautiful,” says Paula.
Our friends at Dulux got in touch with us recently to share a couple of simple yet stunning DIY projects that will seriously boost your home’s kerbside appeal. From a statement front door to upcycling a pot, stand and bench seat, Dulux colour expert Andrea Lucena-Orr has plenty of experience and expert tips to impart when it comes to freshening up your home’s exterior. “Paint is a powerful tool and one that’s surprisingly addictive,” says Andrea who believes creating a grand entrance is only one paint pot and a weekend away!
An interesting choice, I love the paint colour on this home’s front door: Dulux Aquanamel in Very Terracotta
“Working tonally with blacks and greys on doors against contrasting whites can animate the home in a classic and elegant way. To add a sophisticated highlight to this monochromatic scheme, include a green, such an emerald coloured bench or potted plants on the porch,” says Andrea who always encourages people to think outside of the box when it comes to colour.
A closer look
“Once you start experimenting with colour, you’ll find you can never go back. And best of all, you can easily change the exterior accent colours down the track when you feel like something new,” says Andrea.
An upcycled emerald green bench seat makes a front porch statement. Paint colour: Dulux Aquanamel in Green Paw Paw
“For a trend-driven look, try apricot or terracotta coloured accents on the door and verandah accessories against a predominantly white exterior with black or charcoal trims. At dusk, the soft sunlight can create a metallic-like effect with some tan and apricot tones, which can add another layer of depth and dimension to the scheme,” says Andrea.
An upcycled pot and stand can be all the front door needs
A ridiculously easy pot and pot stand DIY 1. Prep the pot for painting by sanding to remove old flaky paint and mould. Follow the can instructions for further information.
2. Select your preferred Duramax Dulux colour and apply in multiple light mist coats.
3. Enjoy your transformation!
Statement bench seat DIY 1. Ensure the surface has been properly prepared prior to starting to paint. Follow the label on the can for more information.
2. Commence painting by cutting in around the edges of the furniture piece.
3. Apply Dulux Aquanamel to the surface using short, horizontal brush strokes.
4. Once you’ve completed an area, while the paint is still wet, lightly smooth over the painted section with long brush strokes – but don’t overdo or reload the brush – a few brush strokes will smooth the surface.
5. Allow two hours to dry, then give the surface a light sand with 400 grit sandpaper.
6. Repeat steps 3 and 4 for the second coat.
Photography: Dulux Australia | Styling: Bree Leech
“The kitchen of this city apartment looked boring, and this was made worse by a lack of storage invariably leading to clutter accumulating on the bench,” says journalist and stylist Sarah Heeringa of one of the many DIY projects that feature in her new book ‘Upcycling with Style,’ a step-by-step workbook brimming with practical, upcycling inspo and lots of pretty pictures.
BEFORE kitchenAFTER kitchen
“Sometimes the solution really is as simple as adding a decent set of shelves – and the perfect set to use here were a set of old wooden shelves previously removed from a 1960s bungalow. The upcycled shelves were basic, but made with solid wood, and slightly tapered in shape, making them less overbearing when mounted on the wall,” says Sarah who added a few rows of butcher block tiles above the bench top and painted the walls before installing the shelves. “At $625 for the entire project, the cost was very low for the dramatic change in effect,” says Sarah.
AFTER kitchen
As a contributing editor of Good magazine and the author of ‘Reclaim That’, Sarah is well versed in the art of upcycling with plenty of hands-on experience acquired through renovating four old houses alongside her husband. “While doing this we used as many found and recycled materials as possible. Much of the furniture in our home has been stripped, repainted, reupholstered or otherwise reconfigured to suit our changing tastes and our family’s changing needs. We took this approach to save money, but also because the end result can be so much more interesting,” says Sarah.
This gorgeous macrame step-by-step features in Sarah’s book
“You can choose to go to a big box chain store and buy everything you need to fill your house, but the quality may not be that great or the products very sustainably sourced. Incorporating retro items or upcycled materials into your home can take imagination and a bit of effort but the reward is a home with far more personality,” says Sarah.
A DIY photo wall by Sarah
Sarah has a particular interest in sustainability which is one of the major drivers behind her passion for upcycling. “It’s about making the most of the things we find around us. It can involve giving things we have a new look or picking things up from second hand stores and adapting them to suit our tastes. Upcycling can be very varied – involving painting, sewing, re-upholstery, woodwork or various other techniques depending on the project,” says Sarah.
BEFORE wardrobeAFTER wardrobe
“Upcycling can also help us to become more creative because unlike painting, for instance, where you might start with a blank canvas, upcycling starts with something that is unwanted, discarded or broken. You can give yourself permission to try anything, to experiment and to make mistakes. This can be very liberating. Along the way, we can also learn new skills and techniques. And at the end you have something that is better than it was,” says Sarah.
Upcycling with Style, New Holland Publishers RRP $35.00 available from all good book retailers or online
Husband and wife lifestyle and travel bloggers, Meghan and Dominic Loneragan of Citizens of the World overhauled their tiny laundry on a budget recently, turning it into a much more functional and beautiful space. The renovation was driven by the arrival of the couple’s first child Lachie and all the laundry he creates. “The laundry was designed around the AEG washer and dryer, which was an upgrade in size from our pre-child days. I feel like we do laundry 24/7 now!” says Meghan of the room that measures just 1.7 metres by 1.9 metres.
BEFORE laundryAFTER laundry – quite the transformation!
Designed by Dominic and built by him and his father, the laundry went from purely utilitarian (and even that could be debated given the previous lack of storage) to a lovely monochrome and clutter-free zone that is now the user-friendly workhorse of the home. “We wanted it to be clean, easy, tidy and have plenty of storage. We’re very big on having clear benches. You know what they say, ‘a clear bench is a clear mind’, or something like that!” says Meghan.
And with cost-cutting high on the agenda, the family undertook most of the work themselves and sourced thrifty but chic wares with which to do it. “The laundry is so easily forgotten when it comes to renovating but we feel like it’s the most satisfying when completed. But cost cutting was high on the agenda for us as our washer and dryer are on the premium side. The tiles were left over from our kitchen and the matte black door handles were $1.50 each from Bunnings but to the untrained eye, who’s going to know?!”
The laundry is now a much more functional space for the young family
“At roughly $2000, our laundry renovation was extremely cheap although that figure doesn’t include the washer and dryer,” says Meghan who explains that plumbing comprised half the cost. “The major expense was the plumbing which was $1000 but we built and sourced everything else. We could have easily tripled the overall cost by outsourcing the work to someone else,” says Meghan.
Citizens of the World’s Dominic, Lachie and Meghan Loneragan
When it comes to hassle free upcycling, there’s no doubt that Annie Sloan’s chalk paints have been the go-to for DIY enthusiasts for many years. But that may be set to change with the arrival of American newcomer Jolie Paint. The product is water-based, non-toxic and quick-drying and in most cases you can apply the paint directly over previously treated surfaces eliminating the need to sand or prime making it ideal for upcycling furniture, walls, floors and accessories.
“Everyone deserves a home and personal space that brings beauty to their everyday lives. We’re excited to provide Aussies and Kiwis with the support and tools to bring new life to their space and create something beautiful,” says Lisa Rickert, Jolie Home founder and CEO who was inspired to create the brand while rebuilding her New Orleans home after Hurricane Katrina.
The range contains a series of top coats, brushes (signature, flat and wax) and 40 mixable paint colours that allow you to create your own custom colours. There are six finishes (basic, smooth, textured, distressed, washed and dry brush) and the line-up also includes a number of embellishment products including finishing wax, floor varnish, gilding wax and metal leaf.
The foundation of the range is the ‘Signature Neutrals’ palette – there’s a cool white (Gesso White), greige (Swedish Grey), pure black (Noir), mid-tone navy with grey undertones (Classic Navy) and a deep, dark, chocolatey brown (Espresso).
The ‘Signature Neutrals’ palette
“Our Signature Neutrals include five classic colours that are staples in any home. These five are likely your fashion favourites as well – colours that you are comfortable with and want to use over and over again. Our neutrals can be paired with virtually any colour in the Jolie colour range,” says Lisa.
“Jolie helps you personalise your home and create something beautiful, whether that means cohesive and balanced interiors or elevating your style. Everyone deserves a space that offers beauty and peace to their everyday life,” says Lisa.
There’s no denying the importance of a home’s kerbside appeal – first impressions right? Some studies even suggest that it accounts for up to 10 per cent of a home’s value which is hugely significant, particularly in these testy real estate times. And if there’s one kerbside deal breaker it’s a shoddy driveway but White Knight DIY renovation expert Cherie Barber has a simple and inexpensive panacea for that!
“Driveways are often the first thing people see, but the last you’d think to renovate. Transforming this area is as easy as any paint project and much more affordable than resurfacing, giving an uplift in value for a minor investment. Some additional finishing touches like plants, mailboxes and house numbers, can also help spruce your home up instantly,” says Cherie who shares a driveway paint step-by-step below.
BEFORE: DrivewayAFTER: driveway
Prep “Preparing the surface correctly will ensure long-lasting results, so a crucial first step is to high pressure washer clean your surface, then allow to dry for 24 hours before painting,” says Cherie.
“If you’re painting smooth concrete such as garage floors or new concrete around a pool, use White Knight Ultra Pave Concrete Etcher to roughen the surface and help the paint bond to the concrete. Mixing half a kilo with five litres of water, evenly pour the dissolved mixture over the concrete and scrub with a broom, leaving it to foam up for a couple of minutes being careful not to let it dry,” says Cherie.
Prime
Before you start painting, prime your driveway by giving your surface another good sweep and make sure you have a paint brush, paint pots, roller tray and an extension roller. Cherie favours a roller with a 10mm nap to achieve a professional finish, easily.
“I chose White Knight Ultra Pave Quick Dry as it’s touch dry in just 30 minutes and can take a second coat in just a couple of hours. To help the first coat stick, mix the paint with 20 per cent water in a paint pot, a litre at a time, and mix in the pot before transferring into your roller tray,” says Cherie.
Cherie at work
Paint
“Choose a colour that will complement your exteriors. For a modern look I like to use dual grey tones, with the darker shade on the paths and drive. For this project I used White Knight Ultra Pave in Smoke Storm, it’s modern and impactful and one of my favourite colours to transform a drab driveway,” says Cherie.
“Paint all the edges first with a paint brush, and any joins in the concrete, then paint the remaining area using a roller with an extension pole. Wait two hours before applying your second coat. For added grip, or if you’re on a slope, add White Knight Ultra Pave Topcoat Grip Additive to your second coat, pouring one litre of paint into a roller tray and as you stir, add 2-3 scoops of the grip additive per litre of paint. The second coat is now ready to apply, in a similar way that you applied the first, painting the edges with a brush then using a roller for the remaining area,” says Cherie.
Transform “With just a few finishing touches and a makeover of your drive, you can make a real difference to the façade of your home,” says Cherie and independent real estate expert Bernadette Summers agrees. “First impressions are hugely important in real estate, not just for buyers but also for agents who look at the exterior as the first step in their evaluation of a property,” says Bernadette.
“Before a potential buyer comes to view your home, there is a chance they’ve already driven past and made a judgement call. Having kerb appeal can make all the difference between a property that instantly sells or lays in wait, as viewers see the exterior as a reflection of the inside,” says Bernadette.
Bostik Boys, tradies Mark Menagatti (AKA Spaghetti) on the left and Adrian Franchina
Spring is certainly the season to renovate and shows like The Block are inspiring many of us to change things up in our own homes. Even though there are lots of DIYs you can easily do yourself, there are certain things you should leave to the professionals to avoid a reno disaster.
We spoke to real life tradies Mark Menegatti and Adrian Franchina from Bostik, who helped glue together The Gatwick on the latest season of The Block. They gave us some advice regarding DIY tasks you should leave to the pros.
Bostik Boys, tradies Mark Menagatti (AKA Spaghetti) on the left and Adrian Franchina
Electrical work should always be carried out by a licensed electrician and upon the job being complete, they should provide you with a certificate of electrical safety and compliance.
Certain types of plumbing work, like the connection of gas appliances and hot water services as well as installing toilets, split system air conditioners and moving taps or drains, should be done by a licensed plumber, who should issue a certificate of compliance once the job is complete.
Another job that requires a certificate of compliance is waterproofing. If not completed correctly, issues that may arise from inexperienced waterproofing, may result in an unsealed permeable membrane application, with a potential repercussion of leaking/seepage into the below structures. This can cause rot and damage, which over time can progress to big structural issues that are expensive to fix.
As we know, asbestos is a highly dangerous material and removal should only be carried out by licensed asbestos removers under the strict rules and standards prescribed by that industry.
Last but not least is roofing. Adrian is an experienced roofer and has seen some daunting cases of people trying to attempt this themselves. Even if it’s only a repair to the roof, the roofer should hold a minimum of a DBL-K license.
By leaving the above to the professionals, you can make sure your renovation experience won’t be a daunting one and instead focus on things such as installing timber flooring, painting and grouting.
When deciding to renovate or refresh a room, the first points of focus tend to be the walls, the floors, the doors and even the tiles. The ceiling is an important element that is often overlooked until everything else has been updated. This ‘fifth wall’ needs to complement the rest of the space, otherwise it can completely change the look and feel of your room.
Prepare and protect
Painting a ceiling isn’t too different to painting any other wall in your home. A professional-looking DIY job will depend on the careful preparation you do beforehand. Since most light fixtures are located on the ceiling, even the smallest of bumps can attract attention. Take a look at the previous guide on preparing a room for tips on patching up existing damage.
Remove any furniture or fixtures that can be removed, and cover the rest – lights, ceiling fans and cornices, for example – with drop sheets, rags, and painters tape.
Consider and calculate
Before you rush off to buy the first tin of white ceiling paint you find, give it some good thought. Your ceiling doesn’t need to be white. Consider what colours and textures would complement the rest of the room; an exposed concrete look or a bold pop of colour could be the antidote to a boring and dated design.
Once you have decided on colour, you will need to calculate how much paint you will actually need. Taubmans have a very handy online calculator that will take the guesswork and calculations out of the equation – leaving you with the perfect amount of paint.
Paint
If you are dealing with brand new plasterboard, be sure you seal it before applying your coats of paint. Otherwise, give your paint tin a good stir, and get ready to paint!
It will take about half an hour to paint an average-sized ceiling – give yourself enough time to coat the whole surface without rushing. Starting with the cornices, use an angled paintbrush to apply the paint along the edge of your ceiling. Once you have coated around 10 centimetres of the edges with paint, use a roller and roller tray to coat the rest of the ceiling.
After coating the roller in a small amount of paint, tap each side thoroughly to get rid of any extra paint. Ceilings are a little trickier to paint as, unlike walls, they are located above you. This means painting can get tiring and messy very quickly – hence why it is super important to ensure your roller isn’t going to drip every time you dip it into the paint tray.
Attaching the roller to a pole will help you easily reach the ceiling. Apply the paint in small sections in a ‘W’ or ‘M’ motion, keeping the roller flat against the surface at all times. When you are halfway through, go over the already painted area with a very light coat of paint – this will help create a smooth finish and remove any dripping paint.
Allow the first coat to dry for a full two hours before starting on the second coat.
Whether you’re planning to stay or sell, painting the interior of your home is one of the easiest ways to transform it from tired to bright and fresh. However, the mere thought of covering every inch of wall, ceiling and cornice with fresh paint is often exhausting enough to put off even the most enthusiastic DIYer…
But fear not, with some serious planning and preparation you can have beautiful walls in no time (and keep your sanity)!
Get prepared
Solid preparation is the key to painting success. Neglecting the sandpaper and soapy water may save time in the short term, but it will come back to haunt you when your hard work is peeling off the walls…
The lesson here? Always invest in the preparation of your walls. Remove the furniture, cover the floors, wash down the walls, fill in gaps and sand any shiny or rough surfaces.
Pick your paint
Now for the fun (and often overwhelming) part – choosing your paint colours! If you are preparing your house for sale then neutral tones work best. If you’re staying put then feel free to experiment with your palette and don’t limit yourself to just one colour throughout the entire house. The key here is to choose shades that work well with your existing furniture and be sure to opt for good quality paint that will stay fresh for years to come.
The next step is to do the math and work out how much paint each room will require. There are plenty of online calculators to take the guesswork out of this part but as a general guide, most interior paints cover about 15 square metres per litre. Keep in mind that most walls will require two coats to look professionally finished and don’t forget to add ceiling and trim (enamel) paint into the equation. Add your paint brushes, rollers, an extension pole and a paint tray to the shopping trolley and you are ready to paint!
Get to work
Before dipping your paint brush in, be aware that painting your whole home is not a project for one weekend. It will most likely take a couple of weeks to finish off the ceilings, walls and trims, so don’t feel tempted to rush. Break down the project by starting with a particular type of paint or tackle one room at a time. My advice is to always begin with the ceilings and work your way down to the walls, finishing off with the doors, window frames and trims.
Drying time
Make sure you leave enough time between each coat and each type of paint to allow them to cure properly – leaving doors and windows open will help ventilate the area and speed up the drying process (unless of course it’s raining…).
The transition from tween to teenage years heralds a significant and often expensive personal style overhaul. During this time of rapid personality growth, how your teen styles their bedroom is just as important in expressing their newfound tastes as the clothes they wear.
Cherie Barber and 11 year-old Ava in her new roomAFTER
With a combination of creativity, clever ideas and White Knight’s craft and decorative paint range, White Knight DIY and Renovation Expert Cherie Barber shows that it is possible to restyle your tween’s bedroom into an ideal teen space in less than a day, and all for under $500.
To transform 11-year-old Ava’s pastel coloured room into a modern, tropical themed paradise fit for any teen, Cherie recommends upcycling as much furniture as possible, explaining that “the regeneration of old with new is the key to the creative vision of an eclectic and practical room.”
AFTER
Here Cherie explains her step-by-step makeover process to achieve the ultimate tween to teen makeover;
1. From single to double
Kicking off the bedroom overhaul was the all-important move from a single to a double bed. After finding an old metal bed frame at a local garage sale, Cherie used White Knight’s multi-benefit spray paint Squirts in Gloss Fuschia to inject some colour. As a two-in-one primer and paint, Squirts is easy to apply and bonds well to a multitude of surfaces including metal, wood, plastics and ceramics making it an ideal for both interior and exterior use. With over 40 colours available, the quick-drying formula is touch dry in 10 minutes, meaning Cherie was able to move on to her next project in no time at all.
2. Adding the tropical wow factor
To add excitement to the room and bring in the tropical theme to the top of Ava’s existing study desk, Cherie used White Knight Squirts in Lemon Yellow. When applying, Cherie suggests holding the can about 20 cm from the desktop surface and using a sweeping motion to ensure an even finish from several light coats. This way, you’ll achieve a beautiful, bright desk that makes studying so much more fun!
As an easy way to transform Ava’s wardrobe doors, Cherie used White Knight Strokes to create a flamingo shape using stencils printed from a website. Cherie says: “I’ve chosen the White Knight Strokes for this feature as it’s a high gloss paint that is touch dry and ready for a second coat in 4-to-6 hours. White Knight Strokes is also an oil-based enamel, making it super hard-wearing for those areas which often take some wear and tear, and the pretty pink tone is ideal to further integrate the tropical theme.”
Using White Knight Squirts again, Cherie recoated Ava’s current chair to give it a new lease of life. Bringing in the tropical yellow tone, Cherie easily converted what was a once a tired looking piece of furniture, to a refreshed one which makes a cool addition to Ava’s relaxation area.
3. Get scribing on your personal message board
To help with the busy schooling and social lives that teenagers lead, they need somewhere to scribble notes. White Knight’s Chalkboard paint provides a hard-wearing finish that transforms surfaces into a fun and functional chalkboard. To do this, Cherie picked up a piece of melamine from a local hardware store and painted it with a coat of White Knight’s Chalkboard paint in Black, creating the ideal message board and perfect solution for this teen room.
BEFORE Ava’s room was pretty in aqua but she wanted something more grown up
4. Bringing the room together – the final touch
By using the pieces that are already owned, Cherie managed to stick to the budget yet create a completely new space fit for any teenager. With the help of White Knight’s Craft and Decorative range, Cherie has upcycled many of Ava’s tween fixtures and brought life to inexpensive furniture. With the addition of a range of tropical- themed décor such as bedsheets, wall pictures and the all-important pineapple cushion, Cherie’s stylish and affordable bedroom upgrade is complete for under $500.
White Knight paints are available from Taubmans Professional Trade Centres and Bunnings nationally.
Inspired by grand old Queenslander homes, but adapted to suit life in cooler climate New Zealand, this family home took just six months to build and came in on budget which as many of you will know is no mean feat. Inhabited by a young family of four, the build included many DIY elements to help keep costs down. From upcycling furniture to landscaping themselves, Rachael and Andrew Gowling (of Lover Dreamers) have plenty of experience in sticking to a budget, without sacrificing on style.
The home’s exterior
“Our goal with the design of this beach house was to create a practical and functional space for our family, whilst maximising the beautiful ocean view. We wanted to create an environment that felt calming, relaxing and cosy. We love entertaining, so a lot of consideration went into our living areas and a big focus went into the indoor-outdoor flow of the house,” says Rachael of the home that is located just north of Auckland and was designed by the couple in collaboration with their architect and builder.
Rachael in her kitchen
The financials First up, Rachael recommends that you really do your homework before engaging a builder. “There can be many hidden or unknown costs with new builds. Finding a builder that will give you a fixed priced contract can save a lot of money and headaches,” who believes it’s possible to get a bespoke finish on a budget.
Master bedroom
“It is possible to achieve an architecturally designed house within a similar budget to a group build company. It’s just a matter of finding the right builder. It may take a bit of time to find the right builder but the end result will be worth it. This gives you a lot more freedom in the design of your home to achieve a home that is going to suit your needs without paying a fee every time you want to alter a group floor plan design,” says Rachael who also recommends choosing an architect that your builder is comfortable working with to make for a smoother process.
The hanging chair was bought in Byron Bay and carried to New Zealand in Rachael’s hand luggage
DIY “Once the house was complete there were many DIY jobs we enlisted ourselves to do,” says Rachael who landscaped the garden as well as upcycling furniture including a 2.5 metre dining table bought for just $70.
The dining room features a DIY upcycled table
“Undertaking the very labour intensive job of landscaping included creating a landscaping design plan, moving over 10 tonne of soil and rubbish, clearing the site, preparing garden beds, building and painting fences and our letterbox, rolling ready lawn, building a clothes line area, creating pathways, and planting 325 plants and mulching. It was extremely hard work, especially with two little kids in tow, but they loved being involved in the landscaping too,” says Rachael.
Rachael has a word of advice on the landscaping front and that is to make sure you have the right tools. “I would never again attempt to complete the landscaping without the right tools and equipment! This resulted in over 10 tonne of dirt being dug with a shovel by Andrew!” says Rachael.
Lounge room
Styling “Try not to buy too many styling items before you move in. It’s always a good idea to get the large items in place first and then decide on the smaller items as this way you achieve more of a cohesive look and will find you won’t over-buy things that you figure out later on, you don’t actually need,” says Rachael.
Boy’s room
“Styling and furnishing your family’s home doesn’t have to be expensive. There are many cheap, quick and easy ways to use furniture paint products out there now. It’s amazing what a quick coat of paint can do to an old and tired looking piece of furniture. The results can look fantastic without breaking the bank. Take our dining room as an example!” says Rachael.
Girl’s room
“I mostly seek out a bargain. There are many furniture and homeware items in our home that I had my eye on for months and waited until they came on sale. I also love finding old furniture to upcycle and give a new lease of life to. There is nothing we own that is really high end. We have young children and I don’t want to be too precious with them about ruining expensive items. I always want our home to be homely and to be lived in,” says Rachael.
Be wary of trends “Spend money on items that are important to you. After all, it’s your house! However, my suggestion is beware of the latest trend as trends come and go. Choose your long lasting, permanent fixtures carefully. Kitchens, bathrooms and flooring for example are very expensive items and should be chosen carefully as they need to last many years are often too expensive to change. I like to keep the tones neutral in kitchens, bathrooms and flooring and spend a little more on quality products to ensure longevity,” says Rachael.
The custom designed reclaimed barn door was one of Rachael’s splurges
“As trends come and go you can easily change your wall paint colours, add feature wallpaper, change your furniture and soft furnishings to add colour or to change your style or look of your house completely. That is a much more cost-effective way to update the look of your home over time,” says Rachael.
Photography: Helen Bankers (courtesy of NZ Your Home and Garden magazine)


