Categories
Bathrooms Before & Afters DIY Interviews Real Renos RENO ADDICT

VJ panel bathroom: beige seventies to spa sanctuary for just $8000

You know how they say that if you want something done you should assign it to a busy person? Well, that maxim certainly holds for one Melbourne homeowner who carried out a DIY bathroom renovation recently, while working as a full-time frontline health worker.

“This project was done during Tomi’s days off and it was his way of unwinding during a difficult period,” says Anri McHugh of his partner Tomi Ahonen who took four weeks to renovate the couple’s bathroom with a budget of $8,000. The couple purchased the beachside 1970s Elwood apartment three years ago and have been slowly renovating it since.

BEFORE bathroom
BEFORE bathroom
AFTER bathroom
AFTER bathroom

The bathroom’s brown tiles and peach fixtures were replaced with a chic mix of matte black fixtures, grey paint, white penny round tiles and a luxurious freestanding bath – ‘city farmhouse’ was the design brief. “It’s a style that blends cosy farmhouse charm with traditional wood panelling and contemporary elements in an urban environment. It fits in with the rest of the apartment’s look and feel,” says Anri.

Tomi carried out all of the renovation, aside from the plumbing, while Anri was on hand to help with painting and general labour. Tomi stripped out all of the tiles and fittings, laid the pennyround tiles and installed the Easycraft wood panelling too – incredibly, it was the first time he had ever done any of those things! 

Renovation period
Stripping the existing bathroom was no mean feat
During the renovation
Novice DIYer Tomi laying tiles for the first time in his life

Arguably the most onerous task was removing the original cast iron bathtub as it had been cemented into the wall. “We had to use an angle grinder to remove it which created lots of dust. We live on the top floor with no lift so getting it down two flights of stairs was also pretty difficult,” says Anri. The bathroom tile disposal was an equally arduous task.

The bathroom vanity was made from an upcycled bedside table found on Gumtree

Essential to the brief, the freestanding bathtub is a highlight of the room. “There’s something pretty special and indulgent about a hot bath on a cold winter’s night in Melbourne. It just feels like an escape and a place to shut out the world and relax. We created a sanctuary that we can retreat into when the world gets too much.”

One last look
One last look

Categories
DIY Furniture Homewares House Tours Interviews Outdoor & Exteriors Real Renos RENO ADDICT Styling

Sustainable renovations: couple’s home transformed with Gumtree bargains

While environmental and sustainability issues are something that most of us think about, for some people it’s truly a way of life. Take Ali and Clay McNaughtan who found a charismatic 1915 Queenslander and transported it to their farm 300 kilometres away before renovating it almost entirely with secondhand finds.

“We have always had a strong passion for ethical consumption and sustainability, so building a ‘secondhand home’ was something we always dreamed of,” says Ali, who scoured Gumtree and elsewhere for secondhand timbers, windows, doors, decking, light fittings, furniture, tools and shed materials to bring the home back to life. 

This gorgeous bathroom is filled with secondhand pieces

Clearly a rewarding process, Ali explains the unique appeal of vintage finds and the role they have played in the home’s resurrection. “I love living in space where everywhere you look you can see your hard work pay off. It’s a lovely thing to look around home and think, ‘Oh I sanded that, I painted that, I made that beautiful again!’ It feels great to save old things.” Standout items include a lovely old cast iron bath, a pedestal seat, a gorgeous old cupboard and some elegant light fittings.

Dining room
Dining room
Kitchen
Kitchen

Owned by one family for its entire life, the home was in largely original condition when the couple took ownership of it. Major works on the home took place over a year – a new roof was installed, the back of the home was rebuilt to meet Queensland cyclone ratings, the house was rewired, the bathroom rebuilt, and insulation was installed in the roof and behind all the walls.

“The only new products we bought were the roofing and insulation,” says Ali who completed a lot of the handiwork herself, with YouTube tutorials proving invaluable to the process.

Old mirrors and a beautiful cupboard filled with old finds give the home so much character
Old mirrors and a beautiful cupboard filled with one-off finds impart so much character

“We’ve learnt that good quality materials and beautiful, timeless pieces don’t need to cost a lot of money, and we want to share that message with others. Whilst money isn’t a key driver for us anymore, our secondhand home has cost us about a third of the market price of a home like ours.”

Ali and Clay on their new verandah that was restored with timber salvaged from demolition yards

Ali & Clay’s top tips for buying secondhand

  • Just start doing it! Get to know what there is out there, where you can look for second-hand things and just look around, get a feel and it sounds silly but to go slow has helped us. 
  • Buying new things happens quickly, whereas when you’re looking for secondhand you need to be patient.
  • Try it out – it’s not a huge financial investment, but there’s so much you can learn.
  • In the beginning you don’t know what skills you have until you give it a go. 
  • The Instagram community has helped us, doing the same thing, they support each other. Helpful in terms of tips for building. You can also pick up new skills from YouTube tutorials.

Follow Ali and Clay’s journey

Categories
DIY Outdoor & Exteriors RENO ADDICT Reno Products Shopping

The great first impression you can even DIY with ModularWalls

Sponsored by ModularWalls

There’s a lot of talk about kerb appeal with good reason. Never underestimate the difference an impressive front facade can make to your home. And with ModularWalls’ EstateWall you can erect a beautiful front fence in a few easy steps which will look a whole lot more expensive than the reality!

EstateWall customised with tiles and lighting

With their largest posts yet, ModularWalls’ EstateWall solution is for those looking to make a sophisticated statement that’s sturdy and won’t cost a bomb. This alternative to a masonry wall can even be installed yourself over a few days for those who are a bit handy!

It’s perfect for front wall, entry walls, premium boundary walls, feature walls and security perimeters. And to give you an idea of the many ways you can use it, we’ve rounded up three case studies for you here:

Coastal barn dream

Lauren Cecil loved the way the product gave a grand entrance to her driveway (above). “I also had the opportunity to play around with it and make it more personal by adding tiles and rendering the walls to make it more our own.”

Details

Lauren talks more about why she chose EstateWall in this short video:

Hamptons Farm Estate

Interior designer Natalee Bowen, of Indah Island, used EstateWall for the boundary of her impressive Hamptons style farm estate in WA. “On driving up to the estate, one of the first things you see is this incredible EstateWall. It just encompasses the whole design of the landscape and gives it that huge, beautiful designer resort feel,” she says.

A DIY front wall

The owner of this Melbourne home, Darren, says: “We looked at a few different wall systems and liked EstateWall the best — as well as the fact that it looked easy enough to do ourselves, it emulated a rendered brick wall with the thickness but was super easy to DIY.”

More about EstateWall from ModularWalls

Australian designed and made, EstateWall offers privacy, security, and noise-reducing capabilities. But if, like us, you’re just as interested in the aesthetics and creating something a little personalised to you and your home, you’ll love the ability to put your own stamp on it too. Let’s face it, it’s not that often you can customise your fence, especially when it’s something modular and easy to install, rather than a more expensive custom solution.

Your only limit is your imagination in some respects! You can add tiles, render, slats, or lighting (from your choice of third party suppliers) and even colour match to the paint of your home’s exterior. ModularWalls themselves also sell a selection of letterboxes and gates.

EstateWall can either be professionally installed or delivered for DIY installation, with installation guides and a customer hotline for any installation questions. 

Could be just the thing for the upcoming long weekend…

For more information

Categories
Bathrooms Interviews Kitchens RENO ADDICT

Peel & stick tiles: An affordable kitchen & bathroom reno solution

When Yiwen Ling bought her home recently, she loathed the kitchen’s green tiles, but her budget didn’t stretch to a complete renovation. And after exploring many reno options including spraying the tiles or retiling, Yiwen stumbled across the world of peel and stick 3D tiles and from there her business, Stick on Luxury, was born.

“The green splashback was a complete eyesore but having emptied our bank accounts buying the house, we had no more budget to do up the kitchen. A re-tile quote was $2,000 and I found that spray painting was going to cost thousands too.” She ended up revamping the space with peel and stick tiles for less than $300!

BEFORE: Yiwen loathed the green tiles
BEFORE: Yiwen loathed the green tiles in her kitchen
AFTER
AFTER: White peel and stick tiles significantly refreshed the space

Heat-resistant and waterproof, the Stick on Luxury range is available in several formats – subway, hexagon, mosaic, herringbone, fish scale, penny round and a Moroccan lantern inspired design. “At the moment we’re simply importing them, but we’re slowly beginning to manufacture our own designs,” says Yiwen who explains that the business will be rolling out a kit kat design very soon too.

Before
BEFORE laundry
AFTER
AFTER laundry

The product can be adhered to wooden surfaces, painted and smooth walls, glass, acrylic panelling, stainless steel, ceramic, aluminium and plastic. The range is also easy to install (all you need to do is clean the surface and stick the product on), making it perfect for DIY-ers. “The great thing is that anyone can do it themselves without paying for labour. I’m amazed at how easy they are to use,” says Yiwen.

BEFORE: Caravan kitchen
BEFORE: Yiwen also found the product to be a great alternative to real tiles in her caravan kitchen.
AFTER: Caravan kitchen
AFTER

You can also try before you buy with sample packs starting from $9 – a fee that is fully refundable if a purchase over $199 is subsequently made. The Stick on Luxury site also has a handy calculator making it easy to figure out surface area requirements before you buy.

Sample pack
Sample pack
AFTER
AFTER

“I noticed a lot of people might be in the same boat as us – people that have dated tiles at home, are complete DIY noobs, yet don’t have the budget to do a full reno at the moment. We have made it our mission to help!”

Shop online 

Categories
Bathrooms Before & Afters DIY Interviews Real Renos RENO ADDICT Styling

Before & after: A fabulous $550 DIY bathroom makeover in Adelaide

When writer, stylist and former magazine editor Alexis Teasdale bought her 1920’s Tudor-style home in Adelaide a few years ago it was with a view to renovating it. But with three small children and no clear renovation direction as yet, she decided on a low-cost DIY main bathroom overhaul in the meantime.

“The bathroom is in a bit of an odd spot and comes off a living space that you can see from the kitchen. It’s also the logical bathroom for guests to go to, which is why it’s been high on my makeover list,” says Alexis of the space that is part of a nineties extension to her heritage home.

Before
BEFORE vanity
AFTER vanity
AFTER vanity

Completed for just $550 (which includes the purchase of two lots of paint after Alexis wasn’t happy with her first choice), we love how she’s managed to transform the space on such a modest budget. “The plan was never for this to be anything fancy. I really wanted to just paint the tiles and do the floor. Then it occurred to me that I could easily change the handles and the mirror, and once I found the black arch mirror it all came together,” says Alexis.

AFTER
AFTER

A key renovation component was the flooring – after agonising over paint colours for weeks, Alexis opted for Winton vinyl floor tiles from Bunnings instead. Having used them in another area of the home, she felt confident to use them again. After watching several YouTube videos, she scrubbed, sprayed and washed the original tiles with mould protector before fixing the new vinyl ‘tiles’ on top with adhesive.

The most challenging part about using the vinyl tiles was cutting them to fit around door jambs and the toilet. “You need extra tiles on hand because that is so easy to mess up. And don’t tile over the drain in the middle of the bathroom as it’s hard to go back and cut it out. Take it from me!” says Alexis.

BEFORE
BEFORE
AFTER
AFTER: Alexis gave the ‘tiles’ a light sand to take the glossy edge off and so that her children wouldn’t slip

Next up Alexis painted the bathroom’s wall tiles and benchtops with Dulux Renovation Tiles and Benchtops Paint in ‘Snow Season’ – not an easy job given her family needed to use the bathroom throughout. “This was not ideal, but I chose some really hot days for quick drying time and I will say the paint dries remarkably fast!” says Alexis.

AFTER: Alexis sourced the wall shelves from Kmart for $19 each

Floor and wall paint aside, it’s the finishing touches that really elevate the room. These include handles, a towel ring, toilet roll holder, towel rail, bathroom shelving, mirror, accessories and plants. “My favourite buy was the Kmart arch mirror which was an absolute last-minute decision,” says Alexis.

AFTER
The Mondella towel ring was $24 from Bunnings

“I am shocked by how happy this little space makes all of us. I’m also really proud of myself for having a go. It could have all gone pear-shaped, but it would have been easy to fix, so why not have a try at DIY. You might just surprise yourself!”

For more on Alexis

Categories
DIY Expert Tips RENO ADDICT Reno Trends

DIY? When it’s illegal, dangerous or just not worth it.

By Zak Saboune

As anyone who’s been through a home renovation knows, cost is a huge factor. After making what feels like thousands of decisions over the course of a reno, it can be tempting to default to the cheapest option. Much of the time, this means forfeiting hiring a trained professional and doing jobs yourself. 

It’s easy to see why people often go down this route. Bunnings is filled to the brim with almost any part you could need for any given project, and YouTube provides the answer to almost any renovation-related project. After all, isn’t that what DIY is all about?

However, in reality, there are some jobs that are simply too challenging for anyone but a licensed professional to handle. Just because you can physically purchase all the tools you need to do the job, it doesn’t mean you have all the skills and knowledge to complete it safely and securely. 

In Australia, our laws on DIY electrical and plumbing work are much stricter than other countries, and with good reason. Throughout our time as emergency home service providers, we’ve seen floods, voided insurance policies, and potentially fatal wiring all as a result of dodgy DIYs. Most of the time, the cost of fixing these mistakes is far higher than if they’d simply hired a professional to do the work in the first place. 

So how can you tell the DIY jobs from the ones that require a licenced professional? Often, it’s as simple as looking at the label. The majority of the products that need to be installed by a licensed tradesperson will say so on the label or in the T&Cs. 

If you’re watching a video on a particular installation, they’ll usually note that the job needs to be done by a licenced professional… even if they then go on to give you a step by step guide of how to do it.

Light fittings and power points

Light fittings are one of the most common things that people believe they can install themselves. They’re at Bunnings, you’ve seen a family or friend do it themselves… so why can’t you? Australian law says you need a professional to install your light fittings for a reason. Get it wrong, and you could be putting yourself at serious risk.

The same is true of moving a power point to a different wall or into a different room – it’s illegal to do it yourself, and could cause serious injury or even death. It’s definitely not worth the small amount of money you’d save on hiring someone to do the job for you. 

Ceiling fans

Over time, we’ve seen a lot of issues where people think that they can simply unplug, disconnect and reconnect the cabling in new ceiling fans. Like light fittings, it’s one of those jobs that seems simple, but is actually far more complicated than it looks. We’ve certainly had more than a few disaster jobs sent through from dodgy ceiling fan DIY projects. 

Taps and pipes

Taps are another common area that people attempt to install themselves. But if you use the wrong feeding, there’s a very real risk of flooding your house, or even causing a gas leak. We’ve seen people using water piping on a gas line, or attempting to install gas fittings on water lines. In many cases, we have to pull the entire thing out and start again – which ends up costing more than if we’d simply been able to install it correctly in the first place. 

Ultimately, if things go wrong, you run the risk of voiding your insurance. Insurers usually want to go after whoever completed the installation and therefore caused the damages. If you don’t use a licenced tradesperson, who will be covered under their own insurance, you’ll run the risk of not being covered. So unless you’re prepared to pay out-of-pocket to clean up a flooded house or worse, then hire a professional. 

Put simply, if a job has got anything to do with water, sewage, or electricity, don’t attempt it yourself. In the long run, it’ll cost you far less in time, frustration, and hard-earned dollars. 

Zak Saboune is a licenced plumber and founder of Service Today, one of Australia’s leading emergency home service businesses, with over 180 employees in Sydney, Melbourne and Adelaide.

Categories
Design Interviews RENO ADDICT

Before and after: 70s house from neutral to colourful and fun

“Whites and pale neutrals might feel like the safe choice, but they might not always be the best choice,” says Andrea Lucena-Orr, Dulux colour and communications manager. And we couldn’t agree more. While white paint is virtually fail-safe, it can be uninteresting which is why we we’re pretty taken with this before and after when it landed in our inbox this week.

Dining BEFORE
Dining BEFORE

Using a palette drawn from the Dulux Colour Forecast 2021, stylist Bree Leech transformed a neutral 1970s home into one with so much more personality. Oceanic shades, sage green and dusty terracotta all combine to fabulous effect.

Dining AFTER
Dining AFTER

“I wanted to show how you can create an entirely new look with little more than a paintbrush. The colours in the Reset palette have a fun, retro feel that’s perfect for this 70s family home,” says Bree. Luckily for Bree, the home was light-filled and already brimming with character features (a pitched, timber-lined ceiling and arched doorways to name just two) when she commenced the overhaul. “Whilst the all-white interior was neutral and unassuming, adding colour helped highlight the home’s best features and really brought the rooms to life!” says Bree.

The home’s most dramatic transformation took place in the dining room where Bree chose an uplifting deep blue-green (Dulux Wash&Wear in Daintree) which really elevated the previously white space. “This dramatic hue gives the room a distinct mood and enriches the space. The features of the room, such as the rustic brick wall, archway and timber lining, are all amplified through the use of colour and a backdrop is created to contrast against the crisp white pendant light,” says Bree.

The nearby living room was also given the makeover treatment but in a less bold fashion. Bree chose a gentle tranquil green (Dulux Wash&Wear in Light Ceramic) to highlight the hero of the space – the wall hung shelving unit. She then added a stylish edit of artworks and vessels in tonal shades of peach and terracotta alongside pops of red and green to complement the dining room palette.

Living room before
Living room BEFORE
living room AFTER
Living room AFTER

“A plump, vintage velvet sofa adds curves and a touch of retro cool to the space. A patterned rug adds softness underfoot and helps zone the living area in the open-plan space,” says Bree.

Inspired by the home’s original chili red oven, Bree chose Dulux Wash&Wear in Gold Pheasant to imbue the kitchen with warmth. “Painting the feature brick wall in Dulux Wash&Wear Gold Pheasant added that extra warmth I was after without taking away from the best feature – the oven. The accents on this wall didn’t need to contrast, so I painted the shelving to match the wall and added an eclectic display of artwork and vessels in tonal shades,” says Bree who also painted the rangehood a lovely blush colour (Dulux Wash&Wear in Treeless), to soften the contrast between the feature wall and the white paint in the room.

KITCHEN before
Kitchen BEFORE
Kitchen AFTER
Kitchen AFTER

“I completed the look by swapping out the black timber bar stools for seating in aubergine and blush. I chose styles with soft cushioned seats to encourage those in the household to sit, linger and connect in the kitchen.”

Styling: Bree Leech | Photography: Lisa Cohen

For more

Categories
DIY Expert Tips RENO ADDICT

A little bit of DIY can be very empowering!

Sponsored by Selleys No More Gaps

I’ve never been known for being handy. I’m not a crafter or a DIYer. I may own an interiors blog but my skills in that department are more along the lines of having a vision for what looks good. I can use a tape measure and a level and I’ll have a go at painting but anything that sounds like a handyman job? Well, I have a great handyman on speed dial and I basically save up all those little jobs until I have a day’s work for him!

I’m basically a tradie now!

It’s not laziness, I’m just not very handy or confident with that stuff and Damian isn’t either, although I will say he has improved greatly since we bought this house.

Selleys however, challenged me to have a go at one of those little jobs: gap-filling to make for perfectly prepped walls for painting. Ordinarily I’d say no way because that involves using one of those caulking guns and they look way out of my league! But being that No More Gaps Multi-Purpose Gap Filler comes in a new easy tube version, I thought sure, I’ll have a go. And I found it totally doable! And very satisfying!
So much so I’ve now been all round the house looking for anything else that needs filling around door and window frames and skirting boards. It’s addictive!

No scary caulking gun required!

Watch me show those gaps whose boss in this video:

It’s actually so empowering to know I can do this job now and not have to call on my handyman, Michael! Not to mention how much better a room looks once those pesky gaps are filled. You don’t realise how they bring down the overall look until you see how much better and more finished things look when they magically disappear! And if there’s one piece of advice that seems to be given over and over again in those advice articles about how to paint like a pro, it’s preparation is everything, right?!

It’s THIS easy:

  • Find a gap!
  • Start with a clean and dry surface.
  • Cut the top off a tube of Selleys No More Gaps Multipurpose at a 45-degree angle.
  • Simply squeeze out the product and press it into the gap.
  • Smooth over it to remove any excess with a wet finger or spatula (told you it was easy!).
  • Just 30 minutes later, you can paint over it (with water-based paints).

The product gives a long-lasting, crack-resistant finish and each tube contains up to 4 metres worth! It’s great for small jobs and hard to reach spots.

This is definitely a case of if I can do this, so can you!

I’m off to fill some more gaps…

For more on Selleys No More Gaps

Categories
Expert Tips RENO ADDICT

15 apps to help you build your dream home

Get our FREE eBook: 10 tips to fall back in love with your home

Building a home from the ground up can be fun and rewarding, but it can also be anxiety provoking. There is good news though with iPhones, iPads and Androids offering homeowners a tool that isn’t already in their toolbox, but is necessary to every home project; the app. Regardless of what stage you are at, apps offer design inspiration, budget management, building measurements, DIY tutorials, renovation ideas and so much more. Furthermore they are time savers that can help you cut costs and work more productively.

Below is a roundup of the best apps to get your home project started and make your smartphone the top go-to tool in your box. Get inspired, get planning and get building today!

1. Houzz
All great dreams start off with inspiration and so when you’re about to build, you can’t have enough of it. Houzz is your interior design app on the go and it’s filled with a large database of design ideas, creative concepts and product reviews. The app is free, easy to use and beautifully designed to create different rooms and browse ideas. To top it off, Houzz also gives you the opportunity to look up professionals in your area, like architects, builders and suppliers to help you complete your project.

2. Palette Cam
Palette Cam is a great free tool for creating unique colour palettes and schemes using inspiration found in everyday life. The app allows you to grab colours from your camera or saved photographs – it will match them and generate individual HEX and RGB values (colour codes) for each shade. The built in zoom view gives you pixel level precision when picking colours making this a fabulous tool for creating schemes and making paint colour and textile selections.

Palette Cam

3. Home Design 3D
Home Design 3D allows you to build a 3D model of your home so you can test out ideas before lifting a hammer or fetching the toolbox.

The free app gives a floorplan and room layout which you can draw in 2D, creating openings, adding walls, changing the shape and orientation – even the thickness of the walls can be drawn up. Designing your home becomes quick and intuitive, with customised textures, 3D project modes and night/day function to show you exactly what side of the house the light will fall at different times each day. You can also select furniture and décor items to really give you a sense of the final feel.

To top it off, you can also visualise and ‘visit’ your creation in real-time 3D using the app’s brand new photorealistic 3D rendering.
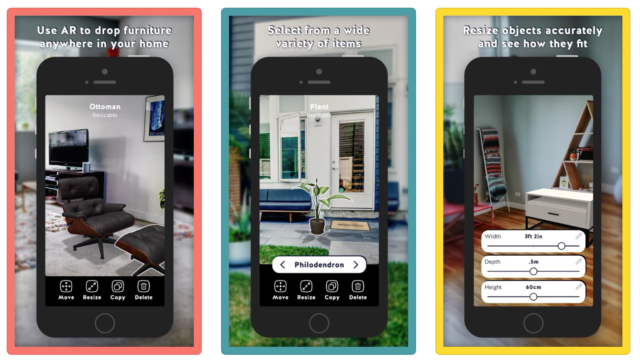
Home Design 3D

4. Housecraft
Housecraft is a furniture arrangement app that uses your device’s camera and augmented reality technology to let you place fully rendered 3D models anywhere in a space. A great planning app, it allows you to feel exactly how big objects are and how they’ll fit in a room. It also lets you admire objects from any angle, in any light, as well as save room configurations and try them out anywhere.

Housecraft

5. Tape Measure
Tape Measure is an augmented reality tape measure and ruler that fits in your pocket. Featuring a tape measure, laser level, stud finer and measurement history, this handy app helps you measure anything with your phone!

Tape measure app

6. Morpholio Board – Mood Board
Called ‘addictive’ by ELLE DÉCOR magazine and awarded one of the best apps for interior design and architecture, this is a fabulous app to make your dream mood board come true. Perfect with iPhone, Mac, and iPad, Board combines your ideal inspiration, decor or furniture library with powerful mood board and collage tools to design anywhere. It seamlessly interacts with Pinterest, features a curated product library and has AR furniture capability too. Whether you’re designing kitchen, nursery or home office mood boards or just style and inspiration, this one is everything you need to be an interior designer in one app.

Morpholio app

7. Home Outside
For $4.49, Home Outside is a landscape design app with all the tools you need to mock up your garden, create new garden designs and then share them with friends and family. It’s ideal for homeowners looking to try out new ideas in their yard and it allows you to select and place over 700 hand-drawn elements including trees, gardens, pools, patios, hammocks, driveways, houses and sheds, solar panels and more. It creates professional looking 2D aerial plans.

Home Outside

8. iScape – Landscape Designs
A free app, iScape lets you visualise a finished landscape project on your property before you even get the shovel out of the shed. The app acts as a virtual garden so you can plan, plant and produce your own personal oasis and produce photorealistic renders of your outdoor spaces (augmented reality or 2D designs) that can be saved straight to your smartphone or iPad using real images and actual photographs.

The app lets you tailor your projects (you can adjust colours, add layers, text and texture) before editing and saving them. Once you have collated your ideas you can share and favourite them too.
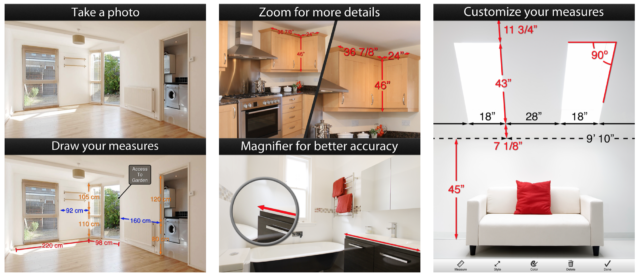
9. Photo Measures
Photo Measures is a super easy way to save measures on your photos on iPhone and iPad. You simply just take some photos and note down the dimensions on them. Not only does this help you take accurate measurements along when you meet with trades, but you can collate all of the spaces in your phone for easy access. The app also allows you to do the following:

  • Take a photo and directly draw measures on it
  • Edit your measures with a very intuitive interface
  •  Quickly add text as comments when measures are not enough
  • Easily organise your photos by category
  • Export your annotated images as PDF or JPG

10. Rapid Reno Mate
Dubbed the ultimate renovator’s companion, the free Rapid Reno Mate is a powerful tool that can manage the business side of your renovations. Rapid Reno Mate is like your personal project manager and will help you every step of the way, making it easy and enjoyable to renovate your home.

Key features

· Plan multiple projects
· Track your budget
· Manage your trades
· Find products and your nearest suppliers
· Access exclusive offers
· Inspiration and DIY help

The app was developed by Rapid Renovation Expert, Naomi Findlay, who wanted to create a simple solution for renovators to complete successful and enjoyable renovations time and time again.
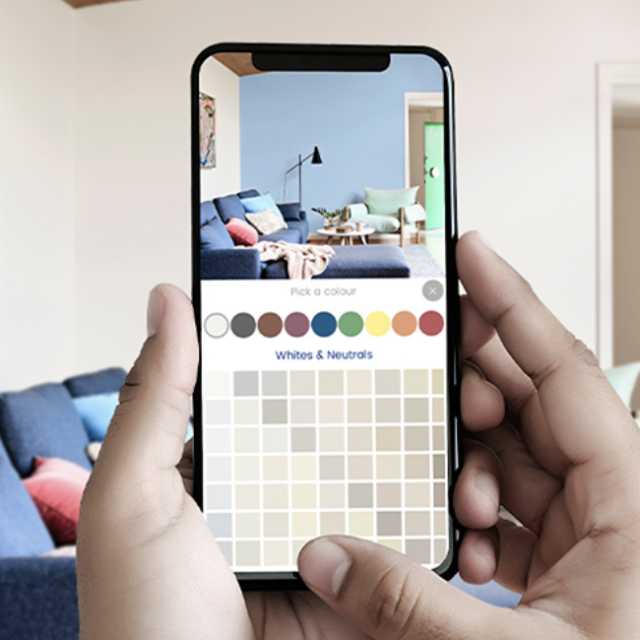
11. Dulux Colour 
The Dulux Colour app allows you to select a photo of your room and use Dulux colour to virtually ‘paint’ the area. This will give you an idea of what your finished project could look like by visualising colour on your walls. You can choose from popular colour palettes or create your own – you can even browse through the entire Dulux range on your phone.

Cleverly, the app also matches colours – just sample a part of a photo to reveal the closest digital match from over 1,100 colours. You can also save your project, share it with family and friends and compare and view multiple paint schemes.

Dulux Colour app

12. SketchUp
It used to be that interior design and architectural software was the exclusive domain of the professionals but that all changed when SketchUp came along. While it’s not strictly an app, we thought we’d include it because it’s hugely popular and for so many reasons. A highly intuitive, easy to learn 3D drawing tool, SketchUp lets you draw building plans and elevations and create animated walkthroughs and flyovers of your designs. SketchUp also has the world’s largest collection of free 3D models which means building materials, plants and real-world objects including furniture and appliances can be inserted into your designs with just a few clicks. It really has put design software in the hands of regular folk.

Sketchup

13. Airtasker
Perfect for when you’re looking for a tradie or handyman, a cleaner, removalist and more, Airtasker lets you list a task (including details of when and where) alongside a fair budget for it. ‘Taskers’ are then able to bid for the job at which stage you can take a look at their profiles and reviews and choose the best candidate. Airtasker handles the financial side of things making it one easy to use and seamless platform.

Air Tasker

14. hipages
Arguably the best place to find a tradie in Australia, hipages works similarly to Airtasker in that you can list a job and thereafter obtain multiple quotes from professional tradies. It’s a free service that instantly alerts local tradies to submit quotes and after the quotes are received you can compare profiles and verified recommendations to choose the best applicant.

hi-pages

15. Reece 3D bathroom planner
While it’s not an app per se, Reece’s 3D bathroom planner is a fabulous tool for the home renovator and it’s a lot of fun too. Who doesn’t want to plan their bathroom in 3D with just a few clicks? Firstly, you set up and design your bathroom in 2D before adding your favourite Reece products. Then you add your finishing touches (tiles, plants, wood finishes and colours) before reviewing your bathroom in 3D and saving your design. You can also browse predesigned rooms, check out the bathrooms from The Block and peruse the latest trends within the software too.

Reece

This post originally appeared in 2014 but has been updated in 2022 to provide more relevant content for readers.

Check out Reno Addict, our dedicated renovating section

Categories
Design DIY Expert Tips Interviews RENO ADDICT

IKEA hacks Australia: DIY built-in HEMNES cabinetry how-to

Would you love built-in cabinetry in your living room but balk at the cost? Well, you know we love an IKEA hack and this one, part of Naomi Findlay’s Carrington House reno, got us excited! So we asked her to share all the details!

Armed with some IKEA HEMNES glass door cabinets ($499 each), some trusty trades, pretty floral wallpaper and a whole lot of creativity, Naomi created a very expensive looking built-in cabinet in her design studio space for a fraction of the price of custom joinery. Here, she walks us through just how she did it (with a little help from her friends!).

The room before
Before
During
After
Naomi walks us through it with her builder Josh Ferris

Naomi’s detailed step-by-step:

1. First up you need to measure and then measure again. What is the width, height and depth of the space in which you want to install the cabinetry?

2. Find cabinetry you want to use and then look at how many units you can fit across the space. In my case, I didn’t have walls in place so had to account for all the extra centimetres that would be created before I could install the cabinetry.

3. Make sure to include a small amount of space (an extra 2cm onto the width of each unit) as you can always pack it out, but you cannot shrink your cabinets!

4. Prepare your walls. In this property, one wall was framed out and then gyprock was installed. For the wall on the other side, I had compressed cement sheeting direct stuck to the exposed brick. Why you ask? Well, I wanted four cabinets across the wall but wasn’t sure I had enough width. By direct sticking one of the walls it gave me the extra 30mm that I needed to get what I wanted. A great reminder that, when it comes to renovating, there is always a way around things.

Naomi with her builder

5. Get it wired. Light gives life to everything! And these cabinets were always going to be beautiful but functional too. So, I had our electrician wire up four library lights to sit above the top shelves and illuminate the cabinets.

I also wanted to minimise clutter in the rooms, so I had GPOS wires put into the locations where the bottom shelves are sitting.  When the cabinets were installed, I was then able to pull these through the back wall of the cabinets. This is a great way to have charging docs and devices tucked away from sight, along with all the cords and mess.

6. Build the cabinets and set them in place along the wall.

7. Frame down the bulkhead from the ceiling to provide the support and opening needed for open shelves above the cabinets. Make sure you chat with your builder to check if you need a central support across the opening. You want to make sure that the shelves can support lots of your favourite heavy books and magazines.

8. Block out in between the legs of the cabinets (if they are on legs), with some simple framing timber to make sure you have something solid to fix your skirting board to.

9. Get the plasterers back to gyprock, set and sand the open shelving above the cabinets.

10. Attach the skirting board to the front of the cabinets and fix it into the framing timber blocks inserted as above. I used Intrim Primed FJ Pine 135mm x 18mm SK498 profile skirting board for this job.

11. Putty up the nail holes in the skirting to ready it for sanding and painting.

12. Get some gold metallic spray paint and spray each of the handles gold. Once they are dry fix them in place on the cabinets.

14. Next step is to deal with the small gaps between each of the units. To do this you have to make sure that whatever you use does not impede the doors opening and closing. I chose a simple D mould that was glued and tacked in place.

15. Paint, paint and paint! I used a low sheen option to match the walls on all the shelving, except for the timber trims where I used a semi-gloss oil-based paint. I find the latter takes the wear and tear of heavy use that little bit better.

16. Adding wallpaper is the final touch that will give that real wow factor and a truly personalised feel. Remove all the shelves from the inside of the unit, then following manufacturer’s instructions, apply your favourite wallpaper to the back surface of the glass door section. Replace the shelves and you are done!

For more on Naomi’s Carrington House reno

Categories
Decorating 101 DIY Expert Tips RENO ADDICT

When not to DIY. And when it’s ok!

Stuart Tucker, Chief Customer Officer at hipages, talks about when to DIY and when you really need to hire a tradie.

As a nation, we are obsessed with renovating and research from hipages has found that Australians have been spending an approximate $70 billion each year on trades to complete jobs around the home. While we are all homebound, now is the perfect time to get onto those home maintenance items lingering on the to do list.

We understand that some homeowners may be weighing up what they should and shouldn’t get done around the home based on what they can reasonably manage themselves and jobs that would require a tradie’s expertise. Before you strap on a work belt and dust off your power tools, it’s important to know the limits of your capabilities. According to our research, Aussie homeowners spend $3.53 billion annually on hiring tradies to fix DIY gone awry.

My tip is to ask yourself the following questions before you tackle a DIY project:

  • Do I have the necessary tools and expertise? Always do your research upfront before you get started to ensure you have the right tools, materials or expertise required.
  • How risky is it? Projects involving plumbing, electrics or working at heights are risky. Aside from putting yourself in harm’s way, you may also cause costly damage to your home. Always assess the risk and err on the side of caution.
  • How much time and space will it take? Jobs like painting may seem like a great idea but consider how long the project will take from start to finish and the space required. If it’s going to cause an inconvenience, it’s best to delay till another time.

There are still a number of jobs both inside and outside the home that are great DIY projects.

Inside the home: Interior styling – consider what you don’t like about a room, or what isn’t ticking the boxes for you anymore. You can then look at simple, effective solutions to meet the functionality of the space or room. This could include bringing in new furniture or furnishings, like cushions and decorations, or changing up the room layout.

Outside the home: Gardening is something that can be tackled by a DIYer, from sprucing up existing garden beds or creating new and inviting spaces in your backyard. Though we may be spending more time indoors, it’s worth giving your outdoor area a makeover so you have an alternative space to relax in and enjoy.

With that said, there are a number of jobs that should never be DIY’d including plumbing, electrics and home extensions and renovations. A licensed professional should always be hired to complete these works:

Plumbing jobs Although simple plumbing jobs such as unclogging a drain or fixing a leaky tap can usually be tackled by an amateur handyman without any problems, larger repairs or installations should never be attempted without the help of a professional plumber.

Electrical jobs Electrical work should never be attempted without the help of a properly licensed electrician due to the high risks associated with DIY-ing electrical work. In fact, in some states you’re required to use a licensed tradie even to change your lightbulbs!

Home extensions and renovations When it comes to DIY projects, the onset of reality TV renovation shows has given people a false perception of the work involved and the potential for costly mistakes. Registered builders are well versed with the building process and understand how to keep a build on schedule with quality control in check, while maintaining safety standards.

Repairing property damage Property damage may range from clogged drains to leaky roofs and water damage, so when considering whether to tackle a job yourself or bring in a professional, you’ll need to look at the scale of the job, the risks involved, and what sort of time commitment would be required.

If you are looking to hire a tradie at this time, it is essential to follow the recommended advice of health authorities. This includes adhering to social distancing and limiting face-to-face contact. Utilising technology is the best way to do this, from quoting a job at the outset through to end of job payments.

Typically the quoting process would involve a tradie visiting your home so they’re able to see the space or job you want done. A great alternative is sharing photos or having a Facetime call with your tradie so they can virtually view the job and provide a quote before they arrive.

Technology can also aid with contactless payment at the end of a job, avoiding the need to handle cash on either end. The hipages platform allows you to make payments directly to your tradie at the completion of a job. Many tradies also have credit card payment facilities.

These are some simple ways that allow homeowners and tradies to continue getting jobs done around the home.

*Data according to LEK Research conducted in 2018

hipages provides a better, smarter way to connect tradies and consumers and get the job done well.

Categories
Decorating 101 Expert Tips RENO ADDICT

Renovation on a budget: where to spend & where to save

Save money, stay realistic and remain on budget in your home renovation with these top tips from Zou Build’s Christal Fysentzous.

Christal and Chris of Zou Build

While embarking on a home renovation is likely to be one of the more expensive investments you will make in life, it doesn’t have to be the most stressful. 38% of Australians reported to be starting renovations in 2020, a 14% increase from 2019, and in a market where every little bit counts, it is important to be practical in your approach. Going in with a firm understanding of your budget, a carefully thought out plan and a realistic view of your long-term objectives for the property will help you to effectively decide how best to utilise your funds.

With opportunities to add value, create a more comfortable daily living and give a stronger return on investment, where should you spend and where should you save in your home renovation or build? Christal, founder of Brisbane-based Zou Build, shares her key insights on what to consider when planning your new build or renovation.

SPEND

Invest in foundations
Research what products best suit your needs and invest in trusted brands for foundations like walls, floors, ceiling, electrical and plumbing. This adds an improved level of protection and value to the longevity of your property.

As Australian families hold onto their homes for longer, Zoubuild is focused on creating homes for the future, taking longevity and quality into key consideration when planning new projects. When it comes to the walls on our recent Brisbane 60s renovation, we needed a quality product that delivered great noise suppression and plenty of impact resistance for tiny feet running down hallways, or school bags being thrown against the walls. Gyprock Superchek was perfect for this. It is a much denser board than the standard sheets most commonly used, so a young family never needs to worry about potential dints and scrapes caused by little ones.

Spend on common values
Investing in aspects of your home that are most often seen as important or commonly used is both a smart and valuable decision. This includes timeless, quality benchtops, fixtures, fittings and tapware that won’t date, and specific living spaces, like rumpus rooms. The latest Zoubuild property was designed to meet the needs of any growing family. The property was centred around the open plan ground-floor living and dining space. Durable style was a driving factor behind the renovation. For example, the Queensland lifestyle is all about outdoor entertaining. Large format windows provided direct visual access to the outside area, which was appealing to buyers.

Lighten the mood
Access to natural light should never be compromised. Ideally, your first point of call in any renovation or build would be to maximise natural light available. This creates warmth, depth and space. We maximised outdoor visuals and light using oversized windows throughout the home.

We wanted to keep the look simple, so went with white coated aluminium frames that made the walls almost melt into the vista. If you’re unable to alter your windows, alternatively, you could look to update your doors. Swap traditional wooden doors for glass or French-style. This can make a hallway feel more open and brighten spaces.

Widening doorways will also increase light in a home. This can create more open plan formats, which, when complimented by an oversized mirror, can help to disperse natural light. Quality lighting features are also a must-spend. A chandelier or quality pendant light will add wow factor to any room.

SAVE

Sort-of do it yourself!
Whilst it is important you outsource the big jobs, one of the most effective ways to save money on a build or renovation is through doing things yourself. Whilst you may not be able to put up plasterboard or lay a tile, there are ways you can save time spent on paying tradies by the hour by preparing spaces in readiness for their arrival. Demolish areas yourself, clean up, prep surfaces and paint.

Small cosmetic fixes
Cosmetic fixes are quick, easy and cost-effective, and often one of the first things people notice in a home. Rather than paying to re-do your kitchen, change the door handles and paint the cupboard doors. A bathroom can be transformed by simply updating the tapware and shower screen, and a living room refreshed with a few new cushions and a set of curtains to frame your windows.

When flipping, you always need to keep the end buyer in mind, so it’s important to not put too much of your own personal style into design. I find it’s best to pare the aesthetic back to inspire the new owners to make it their own.

Source seconds, first
One of the biggest money savers on any renovation will be refurbishing the old or sourcing ex-demonstrator furniture, appliances and whitegoods. Melamine wood from old flatpack furniture can be reused to build shelves or storage units, and chairs can be easily reupholstered to reflect new interiors. Change the doors of cabinets instead of the framework. Ask stores about floor stock, factory seconds and previous season styles. You can often get good discounts on items with small mistakes.

CSR Gyprock has introduced an all-new, reformulated DIY product range, Gyprock Less Mess. Made for large repairs, like covering windows or doorways, Gyprock Multi-purpose Joint Compound can be used across all three coats of the plasterboard jointing system, with Gyprock Topping Compound formulated to finish the jointing. Semi-lightweight in formulation, it simplifies the jointing process and the mess that goes with it, reducing the effort required to sand the job and generating 80% less airborne dust in doing so. High-traffic areas, like living rooms, family rooms and hallways, are more susceptible to knocks and bumps.

Gyprock DIY Rapid Plaster Repair kit is perfect for both large and small repairs, like touching up unused electrical points, moving a light fitting or patching a dint in the wall from a stray door handle. It comes complete with sanding block, tape, broad knife and the Rapid Patch setting compound – everything you need in one bucket.

For more on Zou Build

Brisbane makeover: amazing backyard resort in burbs

Categories
DIY Expert Tips RENO ADDICT

DIY wall panelling ideas: create more cosy!

Sponsored by Intrim

I don’t think I’m alone in thinking home has never been more important. And it’s not just because we have no choice but to be spending a lot more time at home now, but because living somewhere that feels safe, comforting, cosy, and perhaps organised and with a sense of flow, is great for our mental health in uncertain times.

And while many are pressing pause on major renovations, for obvious reasons, there’s a whole world of DIY home improvements we can all be getting stuck into with more time on our hands. My friends have always told me the little things about my own place bother me more than most because I work here and notice them all the time. And I think they’re right! When you notice the same things day in, and day out, they get irritating and the sense of urgency to finish them ramps up!

This home is an amazing example of the difference the little things can make. The owner of this project home has taken it to a next level, expensive looking, character filled, unique residence. And much of that is due to simple timber moulding and paint (as well as a good splash of marble!). Expanses of blank white walls are not exactly cocooning, but panelled walls in contrasting colours, are a game changer, don’t you think?

BEFORE panelling

AFTER panelling (paint and marble!)

Wall panelling has been gaining popularity for quite a while now, whether that’s wainscoting, whole walls of VJ or super impactful, detailed, more traditional Hamptons looks. I can’t get enough and I personally installed (well, my carpenter did) wainscoting in our dining room when we renovated. It’s actually pretty easy to do these things yourself though, and the video below from Intrim shows you just how. If you don’t believe me, there’s also more of a guide here.

https://youtu.be/ZJqV4e1GXy8

Bear in mind there are two kinds of wainscoting you can install: recessed panel and raised panel. And it’s the latter that’s a plausible (and very cost-effective) DIY job. Raised panel wainscoting is where the inlay mould is fixed directly to the wall to create a multi ‘picture frame’ across the wall look. It’s relatively simple and excellent for homes where you are looking to add some more subtle detailing without a heavy, traditional Hamptons or American style influence. The video above explains it much better!

Intrim are an Australian-owned business so they’re not experiencing any issues with supply. You can get free samples sent to your door and they can even offer virtual meetings to make sure you’re making the right decisions, measuring up correctly, and to answer all your design questions.

Contact Intrim for more information.

Timber mouldings totally transform small 70s apartment

Roxy Jacenko’s swoon-worthy kitchen

Categories
DIY Expert Tips Outdoor & Exteriors

Backyard shed ideas: A simple DIY paint refresh

It’s been a while since I’ve swooned over a shed, but this backyard number, overhauled by the creative team at Dulux is really, rather gorgeous. And ‘gorgeous’ is not really a word typically associated with a shed, is it? A strongly utilitarian space, the humble shed is an oft-forgotten relic at the back of the garden, but that needn’t be the case.

Dulux
Tone on tone: That soft mint green is a beautiful complement to backyard greenery

“It’s easy to get excited about sprucing up a living area or bedroom, but the practical parts of our home are no less deserving of attention. What many people don’t realise is how big an impact they can have on your home’s overall look. For instance, a shed that’s seen better days can really bring down the look of your garden. It’s details like these that friends and family, as well as potential buyers really notice,” says Dulux colour expert Andrea Lucena-Orr.

But rather than stumping up for a full replacement, a lick of paint can work wonders on an unsightly shed or garage; but first you must declutter and prep. Start by clearing our the shed, or garage, and get rid of what you no longer need or use. Then organise the space, so that everything has its place, before prepping the exterior surface. “If it’s damaged or old, this stage will probably take longer than the actual painting,” says Andrea.

Dulux

“When it comes to choosing colour, think about what you’d like to achieve. Do you want your shed or garage to blend into the background or make a statement? Greens are trending for 2020 – from soft mint and sage green to earthy olive. Muted greens will add freshness to a tired exterior, and they harmonise beautifully with plants and foliage,” says Andrea.

This shed has been painted with a glorious mix of greens; the weatherboards are weather-resistant Dulux Weathershield ‘Gentle Calm Quarter,’ while the trims are Dulux ‘Natural White’ and the door is Dulux ‘Jungle Cloak.’

That gorgeous trolley is from GlobeWest
That chic green trolley is from GlobeWest

Garage & shed door refresh DIY steps

  1. Gather your painting supplies and ensure the surface has been properly prepared (sanded and washed) prior to starting to paint. Follow the label on the Dulux Weathershield can for more information.
  2. Once the surface is dry, apply Dulux Weathershield to the surface using long brush strokes, starting with the inner panels and working your way out.
  3. Smooth over the wet painted section with long brush strokes. Do not reload the brush when you do this, a few strokes should be enough to smooth the surface.
  4. Repeat this process for the second coat. Allow to dry, then give the surface a light sand with 400 grit sandpaper and repeat for a second coat.
  5. If painting bare timber a third coat will need to be applied.

Images: Dulux Australia | Photography: David Mitchener | Styling: Bree Leech

For more on Dulux | Green timber panels star in celebrated coastal home

Categories
DIY Interviews Shopping Styling

Preserved flowers: The latest floral trend!

Devoted readers of the site will know that we love a bit of trend-spotting around here and our latest find has got us rather excited indeed. From my Insta feed through to my real-life florist visits, it seems we are in the grip of a dried flower resurgence. Who would have thought?

A vast improvement in quality has seen the old-fashioned aesthetic replaced with a stylish new one that has sustainability and affordability going for it too. But unlike traditional techniques, the latest method preserves the colour and look of the original blooms. How fabulous!

A Floral Army arrangement made from preserved flowers
This arrangement, made by Floral Army, was created using preserved flowers

“People will remember naturally dried native Australian flowers and foliage – they would often all end up the same brown colour. We now have access to bleached and preserved product which is dyed vibrant colours or bleached to beautiful creams and whites,” says florist Alicia Zorn, of Perth’s Floral Army, who has noticed an increase in requests for the product which is usually referred to as ‘preserved’ or ‘dehydrated.’

My own preserved floral arrangement
My own preserved floral arrangement means I can indulge my love of hydrangea all year round. Don’t you adore that Lovestar vase?

And as with many floral trends, we may have weddings to credit for the resurgence – a cursory search on Pinterest reveals a plethora of inspiration. “A big trend for wedding flowers at the moment is a tonal and textured look with neutral colours and not much foliage. The bleached and preserved flowers are a beautiful addition to fresh blooms, sometimes as a replacement for green foliage to keep the look crisp and clean,” says Alicia who sources most of her preserved material from Japan.

Completed for an event, this arrangement combined a mix of fresh, preserved and dried flowers. Image: Assembly Yard
Created for an event, this Floral Army arrangement combined a mix of fresh, preserved and dried flowers. Image: Assembly Yard

Another obvious benefit of the preserved floral is that it lasts up to 12 months (provided it’s kept dry and out of the sun), meaning it gives serious bang for buck. And in some circles, the product is regarded as a more sustainable option than fresh flowers though whether it is remains unclear.

“Dried flowers are certainly a sustainable option and it’s nice that people like to keep their flowers for longer by drying them. But when it comes to the preserved product, we aren’t sure of the chemicals used, or the complete process however,” says Alicia.

Unlike dried flowers, preserved flowers maintain their colour and shape

For those wanting to attempt a bit of DIY at-home floral drying, Alicia says that Australian native blooms are ideal. “Native flowers like banksia, Australian daisy and Silver Dollar eucalyptus dry almost identical to how they look fresh. Alternatively, the South African king protea is super popular at the moment and they also dry a beautiful blush colour,” says Alicia.

Dried native blooms
Dried native blooms

“The best way to dry them is to watch them open fully in a vase of water then hang them upside down in a dry area away from the sun for 2-4 weeks until they are completely dry. You can then make a new arrangement in a beloved vase or keep them hanging as a wall piece.”

For more on Floral Army | Australian bathroom trends: February 2020 edition

Categories
DIY Interviews Styling

Christmas styling tips from DIY queen Annie Sloan

Chalk paint and DIY doyenne Annie Sloan is known for producing beautiful imagery, but this year’s Christmas pics stopped us in our tracks. Completely free of the usual Christmas tropes, Annie has a sophisticated and stylish take on the festive season. We caught up with her to tease out her best Christmas styling tips.

Annie Sloan
This dreamy sage green is such a beautiful alternative for Christmas

The role of colour at Christmas
Just like any other time of year, colour has an enormous impact on the way your home can feel at Christmas time. It pays to ask yourself, what is the holiday vibe you are going for? “Do you want your inside to reflect a winter wonderland in contrast to the warm summer outside? Or do you want to bring that warmth into your home too?” says Annie.

For instance, blues, silvers and whites can feel cold (which may be the frozen, stylish look you’re going for), while reds, golds and yellows will have a warmer feel.

Annie Sloan
Navy looks fabulous at Christmas time

Think beyond red, green & white
Many people have been thinking well beyond the usual red, green and white for a while now and it’s something that Annie encourages. “Any colour scheme can be made to feel like Christmas, especially in warmer climates such as Australia. Play on the red and green scheme and use a pastel pink or go deep and royal with purple and gold. The colour you use doesn’t really matter, it’s what you do with it,” says Annie.

Annie Sloan

And as for the key to pulling a diverse colour palette together, it’s all about metallics. “Whether gold, silver or even copper, metallics make a space feel more festive,” says Annie. We concur!

Annie Sloan

Easy DIY decorations
Christmas DIY projects are a great way to reuse old decorations and upcycle second-hand ones; both great options for minimising waste and environmental impact. I love painting ornaments for Christmas – it’s an amazingly therapeutic exercise and one you can do with all ages, from grandchildren to grand friends!” says Annie.

Try painting or gilding pinecones – they can be used as table name holders, tree baubles or even bunting.

Annie Sloan

Christmas styling 101
“I have frames dotted all over my walls in varying size and placement, as well as furniture and sculpture dressing every wall. This keeps the eye moving throughout a room and makes the most of vertical space as well as horizontal space,” says Annie who recommends translating this idea to the festive season by placing presents and candles around the room at different levels – not just on the floor.

“Also, how about a bar stool with a gilded wreath on it? Or baubles hanging from the ceiling?” says Annie.

For more on Annie Sloan | Christmas candles 2019: The most stylish & best scents

Categories
DIY RENO ADDICT

Barn door hardware: New paintable, DIY from Corinthian

Aside from being a fabulous space-saving option, the barn door has fabulous design versatility – it complements virtually any interior (from industrial to farmhouse) and works in almost any room. The barn door also happens to reign supreme in The Designory’s latest project, courtesy of Corinthian’s brand new ‘Moda Barn Door Collection’ which you can see pictured here.

Barn doors feature throughout The Designory's latest project
Barn doors feature throughout The Designory’s latest project

“The new designs are an extension of the popular Moda interior door range, which takes cues from the simple yet elegant shaker style. Acting as functional feature in both small apartments and more spacious houses, the Moda Barn Door Collection provides homeowners with a solution of a sliding door that is perfect for walls where there is no cavity pocket and can be used in a variety of applications, from kitchens to living rooms to bathrooms,” says Corinthian Doors Marketing Manager, Amy Ryan. (They must be nice because Jen has the MODA doors throughout her home too!)

The doors are crafted from sustainable solid timber, and available in two finishes; a light American white oak veneer that’s perfect for staining, or primed, which allows for a smooth paint finish. We’re rather excited about this feature, as we have a penchant for coloured doors!

The Corinthian barn doors come in a primed, paintable option

There are multiple designs across the range including a diagonal brace, centre brace and British brace and all of the designs are mirrored on both sides.

Obviously, hardware is vital to the barn door aesthetic with tracks and rollers left purposefully exposed. As such, the Moda range features a matte black face-mounted barn door track and hardware kit including a two-metre track, rollers and anti-jump stops for smooth gliding.

A barn door worked a treat in The Designory's recent project
A barn door worked a treat in the bedroom of The Designory’s recent project

Stability can be an issue when it comes to barn doors, but Corinthian have covered that too. “Poor anchoring can be a common pitfall for barn doors and results in them swinging away from and into walls, causing potential damage,” says Amy.

The range features two types of door guides to prevent this from happening, and they are both simple enough to DIY. The classic floor-mounted version secures doors discretely (and comes included in the barn door track and hardware kit). And for floors that are difficult to drill into (tiles, cement, stone, marble), there is a wall-mounted door guide (sold separately) that can be affixed to the adjacent skirting or wall.

Photography: The Designory & Andy Macpherson Studio

For more on Corinthian doors | Check out the coloured barn door in Jen’s kitchen

Categories
DIY Expert Tips Outdoor & Exteriors RENO ADDICT

Backyard ideas: 3 reno projects to get it summer-ready

With summer well and truly on its way, now is the perfect time to freshen up your backyard as it becomes one of the focal points for relaxing and entertaining during the summer months.

Outdoor spaces can become neglected during the cooler, wetter months of winter meaning that come spring, these areas often require some extra effort to spruce up. And whether you’re your pathway needs a refresh, or your patio is looking worn and tired, landscape expert and Adbri Masonry ambassador Jason Hodges, shares his top three renovation ideas that will have your backyard guest-ready in no time.

“Spring is the perfect time to be out with the cold and in with the new. By starting on one of these three DIY projects now, you can have a beautiful new outdoor room finished for Christmas, just in time to share with friends and family,” says Jason.

Adbri Masonry

Create an entertaining ‘canvas’
Summer entertaining remains the most popular use of the backyard for many Aussies. The outdoors brings an entirely different dynamic to enjoying time with family and friends – the freedom, natural light and open space creates an environment where conversation and socialising thrives

“When creating an entertaining area, it’s important to plan an area that promotes comfort and conversation. The comfort piece of the puzzle is building the essentials, the pavers that provide a flat, dry place for you to set up on. The other basics are the lighting and heating which allow you to use the space year-round,” says Jason.

To create comfort, the big focus is on selecting the right outdoor furniture. The key criteria are; using products that are made for the outdoors, creating connection between the pieces that stimulate conversation and togetherness, and lastly, selecting settings that are the right size for your space.

Adbri Masonry
An outdoor dining setting makes alfresco summer meals a breeze

“A great option for entertaining is blending formal tables and chairs with informal seating like garden walls with benches on top. It creates extra spaces and allows you to adjust your entertaining for the occasion. The other absolutely essential thing is that you don’t buy a setting for the one night a year you have the entire street over, but rather choose a setting that is the right size for how you will most often entertain,” says Jason.

Whether you’re looking to create a feature zone for dining or entertaining, building a garden path or completing a poolside area, concrete pavers are a clever and effective way to really make the best use of any space to be enjoyed day and night in summer.

Darker pavers are less likely to show stains, and are easier to maintain

When it comes to pavers, other things to consider include what colour to use (light pavers will make a small space look larger), textures, and the overall size and shape of the paver because this allows you to work with different paving patterns, depending on the look you want to achieve.

If your aim is to transform existing paved areas, try pressure cleaning. Not only is it a quick and easy way to improve its appearance, but you may also remove any oil or moss and restore the slip resistance of the surface.

Make the most of the space
Not all yards are created equal, in terms of available space, but where there’s a creative will, there’s a way to make the most of outdoor areas, big or small. “There are fewer constraints improving your outdoors than there are renovating indoors, and the key to unlocking the potential of your yard is creative thinking,” says Jason.

If your yard is sloped and you aren’t using every available square metre, you’re sitting on very valuable wasted space. Use retaining blocks to create terrace areas or install garden beds to bring a lively element into what would be otherwise dead space. If you don’t have lots of space in your backyard, you can always build up. Create a raised entertaining area out of nothing by framing the space with a freestanding, double-sided wall using concrete retaining wall blocks. This DIY project will define your backyard this summer, while doubling as an informal bench seating for unexpected guests.

Retaining blocks
Raised walls create garden beds and extra seating

Make a pathway unique
In times gone by, pathways have been a forced consideration to provide a stable thoroughfare to get from one side of the backyard to the other. In some instances, the side of the house has been completely forgotten, transforming this under-utilised part of your home into a mud pit in winter and dust patch in summer. Luckily, there are many great ideas to transform these areas into functional spaces that look great.

Pathway

A feature stepping stone path is not just aesthetically appealing, but it also activates a generally unused space and ensures that muddy floors, after a trip to the clothes line down the side, are a thing of the past. For added wow factor, lay the pavers offset in a stretcher bond pattern and fill the voids with decorative stones or greenery. Large format pavers are recommended to achieve the designer look.

What’s more, a stepping stone path leaves a gap between the stones allowing the water to infiltrate into the ground, as opposed to pooling and running toward the house or your fence. This makes it a great option for those narrow areas down the side of a home.

For more on Adbri Masonry | Need extra room? Rend a backyard shipping container!