Property stylist Justine Wilson shares her expert tips and tricks for her favourite season of the year. From colour palettes to adding some ambience, here’s how to create a cosy feel in every room of your home this autumn.
Colour palette
Autumn encompasses earthy and warm tones. Spruce up your interiors with colours such as rust, amber, mustard, brown, caramel, and deep greens. You can introduce colour through a variety of ways, such as artwork, accessories, florals, and soft furnishings. Or, go for rich colours like red, deep browns and tan across furniture, pillows and accessories. The trick is to not overdo it, rather work in small accents throughout your home.
Texture
Styling this season is all about layers. Think heavy coverlets and blankets on your bed, snuggly throws on your sofa, lots of plush cushions and warm rugs underfoot. You can also layer many textures together with materials such as velvet, wool, cashmere and flannel and thick natural linens, creating an inviting and cosy feel in your space.
“It is a time of year where there is the perfect mix of warm sun and cool breezes, coupled with the beautiful colours of the turning landscape,” Justine says. “When it comes to interiors, autumn is the perfect time to embrace this transitional feeling – and use it as a time to reset, refresh, and prepare your abode for the cooler months.”
Pattern
Expect lots of patterns in decoration trends; classics such as tweed and tartan will be back with force, especially as many embrace the ‘cottagecore’ aesthetic. More classic patterns such as gingham and check will make a comeback. As well as florals with more moody, muted colourways in dark emeralds, navy and warm rust tones. Try broadening your horizons and incorporating more woodland motifs and leather.
Ambience
There’s a number of ways you can represent autumn within. Lots of pumpkins and root vegetables displayed around the kitchen foster a feeling of abundance. Whilst pears in a bowl, jars of nuts and herb cuttings displayed in urns or vessels on your counters, and beautiful vases of greenery also set the natural fall mood. This time of year is all about feeling cosy and being prepared. As the light fades, use muted lighting with candles, and table and floor lamps to set the desired relaxed scene.
-Justine Wilson is owner of Vault Interiors and selected stylist for Space Invaders on channel 9.
Autumn bed linen latest: Navy, eucalyptus & cinnamon dominate
While it’s hard to think about any other weather event than the tragic floods that have hit the country of…
Matt Meinchelli, who Scotty dubs “the miracle worker”, is a familiar face on The Block, working as the builder for winning teams in both 2017 (Elyse and Josh) and 2019 (Tess and Luke). He understands the important role that a builder plays in any renovation, but especially on The Block, to bring a homeowner’s dream to life – whatever they may be.
Builder Matt Menichelli shares what he’d have scored the bedrooms
When it comes to master bedrooms, Matt says he’s a big advocate for functionality. “The layout of a master bedroom needs to be practical and versatile to cater to different couple’s needs. The owner of the home will typically occupy this room so a statement piece is always a good way to wow potential buyers.” He adds that when renovating your own master bedroom, it’s important to create a space you want to spend time in and feel comfortable in.
The ceiling skylight detail was a standout, along with the tactile feature wall. They also had a great colour scheme.
What did you not like about this room?
The overall height was overkill. The room was only 4mx4.5m so a 6m ceiling throws out the proportions. A 3.5m ceiling would have been perfect. I also think the walk-in robe was far too small – again, proportions were all wrong.
Did you agree or disagree with the judge’s feedback / scores?
I think the judging was a bit too harsh. I would have given them an 8/10.
House 2: Mitch & Mark
What did you like about this room?
It was a very cosy space with the ceiling coffer to complement the skylight. The walk in robe was also well designed. I did also like the oversized door leading outside.
What did you not like about this room?
I personally prefer slightly deeper tones – the colour scheme was a bit soft and light for me. Would have liked to see more space at the toe of the bed for a reading chair also.
Did you agree or disagree with the judge’s feedback / scores?
I think the scores were fair. I would have given them an 8/10.
House 3: Tanya & Vito
What did you like about this room?
They played into the mid century style well. They also had a really different bedhead which I like!
What did you not like about this room?
The entry nook. It was a waste of space and feels jarring when walking in. The walk-in robe was too bland as well.
Did you agree or disagree with the judge’s feedback / scores?
I would have given it a 7.5/10.
House 4: Josh & Luke
What did you like about this room?
It is a perfect sized space. It has a really good walk-in robe for functionality and style. The subtle polished render and great ceiling detail with commercial style linear lighting also adds to the room. The robe space sets you up for a very special ensuite.
What did you not like about this room?
I think the three series artwork needed a bit more punch as it was too washed out. I also think the bench seat and buffet table needed more bulk as the room felt a bit empty, and the mirror TV was overwhelming.
Did you agree or disagree with the judge’s feedback / scores?
I think the boys received a fair score. I would have given them 9/10.
House 5: Kirsty & Jesse
What did you like about this room?
The room has a great colour scheme and I really liked the raked ceiling detail, filling the space with natural light. Convex wall panelling is something really special as well that gives a modern twist on the old dado panels.
What did you not like about this room?
I don’t think the cornice details were necessary, and the walk-in robe was far too small. The bedside tables and chest of drawers also didn’t suit the room.
Did you agree or disagree with the judge’s feedback / scores?
I think they received fair scores. I would have given them 7.5/10.
–Matthew Menichelli is a builder and owner of Elevate Building Group and hipages tradie on The Block. hipages is the online platform that connects Australia with trusted tradies to simplify home improvement.
The Block 2021: master bedroom & walk-in robe reveals
This week didn’t see the faves as the obvious frontrunners. Ronnie and Georgia came fourth while Mitch and Mark came second. And Josh and Luke managed to pull first place…
The Block 2021 room reveals: guest en suite
Pretty damn good for week two, don’t we think? Mitch and Mark went from last place last week to win this week. Nice one! Although I must admit Ronnie and…
Laundry sinks have always had a mammoth task to uphold. From handwashing, pre-soaking to spot cleaning and rinsing, the humble trough is usually high in practical use, but does it have trendsetting qualities to transform your laundry from ordinary to extraordinary? It certainly does!
Vicki Gillingham, design manager for Henley Design, shares her top tips and tricks to help you achieve a laundry sink that’s beautiful, functional, and practical.
Size me up!
If you’re going for a single bowl sink in the laundry, ideally a sink that measures approximately 500mm x 400mm, and holds approximately 40 litres minimum, is a great size to go with, as this enables it to be practical without taking over too much of the benchtop space. We know how important benchtop space is after all!
Sinking into different materials
While stainless steel is commonly thought of as the go-to choice for laundry sinks, there are other options to select from that can completely change the look and feel of your space.
“Ceramic farmhouse or apron style sinks are perfect choices for those that are wanting more of a traditional country or Hamptons style look for their home,” says Vicky. “However, due to their oversized nature, it is important to consider if you have the space to make such a statement and also the room in the budget as they can be quite costly.”
Vicky also suggests Fragranite sinks as another alternative to the traditional stainless steel sink. Franke Fragranite Sinks are constructed from 80% quartz sand and 20% very hard acrylic resin, making them an ideal choice for active families. Available in moody Onyx or fresh Polar White, these sinks can be used seamlessly with a variety of different colour schemes and styles.
Trending tapware
According to Vicki, pull-out sink mixers are the best option for laundry as they make cleaning up so much easier.
“They are perfect if you use the laundry sink to bath your pets as you can keep one hand on your furry friend while the other controls the water and tap,” Vicki says, “the other thing to consider is high profiled taps that allow you to easily fit buckets, pots etc. under the spout to fill them up rather than having to manoeuvre them at awkward angels.”
One tub or two?
While one tub is sufficient for most, if you have enough space and room in the budget for two, just think of the possibilities!
“You can have stubborn stained clothes soaking in one while the other is still able to be utilised,” says Vicki. “Wash off dirty gardening tools in sink one while they dry off in sink two, fill them both up with your plant babies for their weekly water, or why not pour in a bag or two of ice when you are entertaining and chill alcoholic beverages in one side and pop the non-alcoholic or mixers into the other.”
Vicki’s fan favourite
Vicki’s fan favourite is the Kubus Fragranite Polar White Single Bowl Sink KBG 110-50 PW by Franke that offers a seamless fresh look while not compromising on the size of style.
“This sink looks gorgeous in a fresh Scandi or Australian coastal styled interior with light timbers, fresh whites and subtle hints of greenery,” says Vicki.
Small space design solution: A laundry under the stairs!
Part of a wider Sydney family home renovation, that involved both layout and material changes, this clever laundry relocation piqued our interest recently because it’s not something we’ve seen before.…
The old home on this site was poorly oriented. A new build remedied this.
Whether your family has grown in size, or your house is looking a little tired, you might be weighing up the pros and cons of renovating versus demolishing and starting afresh. It’s a quandary that Melbourne architect Anna Dutton, of Bower Architecture, sees all the time and she’d like to help our readers put some clarity around the issue.
“This week I chatted to some really lovely potential clients who had mid-century houses, and they were struggling with whether they should renovate or create a new home. It’s a question we get so often that I thought it might be worthwhile to share our thoughts with anyone else who is facing the same challenge,” says Anna.
This Bower Architecture new build sits atop a demolition site
While renovating can produce a great result from a design, sustainability and cost perspective, Anna stresses that a home must pass a simple three question test to figure out if it’s worthy of demolition or an overhaul.
Is your home structurally sound? Is the house or building in good structural condition? Answer with a ‘yes’ if it feels solidly built and there are no large cracks appearing, no springy squeaky floors, no damp on the walls (or on your nose!) and if the walls and floors are straight or level.
Are you happy with your home’s room sizes? Are the majority of the rooms a good size to be re-used? Answer ‘yes’ to this one if you could imagine re-purposing most of the spaces with a continued or new use. For example, in an existing house, are the bedrooms a size that you are happy with keeping? Are bathroom spaces large enough to be re-used?
The owners of this home decided to start afresh because the old one had small room sizes
Does your home have good bones? Finally, does the house or building have some architectural character and do you actually like it? It doesn’t have to be a masterpiece but if it has something interesting to you, and some charm, answer ‘yes’ to this question.
The old home on this site was poorly oriented – the new build remedied this.
“For the house or building to be an ideal candidate for a renovation, you need to have answered ‘yes’ to all three of these questions. If you have answered yes to only two you could have a renovator on your hands, but it may be similar in cost to a rebuild. If it is a ‘no’ to all, a new project will probably be your best option financially,” says Anna.
And while we love a one-size-fits-all approach (I mean, who doesn’t want this issue resolved in three simple steps?), there is one factor that completely nullifies the above. And that is a matter of the heart – are you emotionally attached to your existing home? Has your home been in the family for years or has it been the backdrop to many amazing memories? “If this is the case a renovation is the only way forward even if you have answered ‘no’ to all of the questions above.”
The kitchen is arguably one of the most important rooms in the home. It’s where you feed your family and entertain your guests, and it’s usually in a central location.…
Starting an interior design project can be both an exciting and an overwhelming venture. You have an array of ideas and want your design to come together, and you risk jumping in head first before you even have a plan.
To help Aussies looking to transform a space, Luke Davidson, interior designer and co-founder of online interior design platform Inscene, shares his top tips to translate your design dreams into reality.
1. Discover your personal style
The process of interior design is deeply personal. Not all design styles will work for everyone, so it is up to you to decide how you want the space to feel. One way to help figure this out is to look at your closet. You can spot the colours and patterns that work best for you, giving you an indicator as to what you should look for when designing.
2. Determine what you don’t like
It may go without saying, but another tip to help you find out what styles you like is to eradicate everything you don’t like! This can narrow your options considerably, giving you a smaller pool of design styles to choose from and keep you from being paralysed by having too many choices.
3. Understand your needs
Be sure to focus on the practicality of each space of your home. You’ll want to consider the location and surroundings of your property. This will help you figure out the appropriate styles and materials for your interior design. Additionally, accurate room measurements are vital to ensuring that what you buy fits in your space. Measuring each room ahead of time will prevent purchases being disproportionate to your design or the room itself.
Before and after of an Inscene project
4. Create a mood board and sample everything
Crafting a mood board can help you visualise what your space will look like and is a valuable resource in planning that can help you avoid costly design mistakes. It is also best to sample materials such as paint, flooring, and surfaces. Observing the paint in natural light both in the morning and at night can help you determine how the paint makes you feel when it’s on your walls and not on a little swatch. The same can be said for flooring and surface samples.
5. Quality doesn’t always mean expensive
Quality is always essential, especially when it comes to building materials. Skimping out by going with the cheapest option may save you money upfront, but it will cost you more in the long run when you need to redo or replace it. In saying this, though, quality doesn’t always translate to the most expensive. You can find durable materials that mimic the aesthetic of more expensive ones at a fraction of the cost. Don’t be afraid to mix high and low-price points, either. Filling the space with affordable and practical pieces can allow you to splurge on one or two hero items that will stand out even more.
6. Plan rooms one at a time
Breaking down your interior design process by planning one room at a time can help a larger project become more manageable. This can also help you focus on the individual room and its unique needs. For those worried about the final design not being cohesive or rooms clashing, don’t be. If you have a plan, you can keep on top of this. For those with an interior stylist, they will ensure everything looks seamless when the project is finished.
7. Hire a professional
We all appreciate input from our family and friends, but too many opinions can be overwhelming and confusing. By hiring a professional, you get the expert opinion and help of one qualified individual. You can avoid common interior design mistakes and be confident that the end result will match your original design dream, if not better.
Before & after: 90’s kitchen renovated on a budget using DIY
Originally built in the 90’s, this home’s original kitchen was in dire need of some love when Melbourne’s Haus of Cruze design studio began overhauling it recently. Completed as part…
Before & after: A fabulous $550 DIY bathroom makeover in Adelaide
When writer, stylist and former magazine editor Alexis Teasdale bought her 1920’s Tudor-style home in Adelaide a few years ago it was with a view to renovating it. But with…
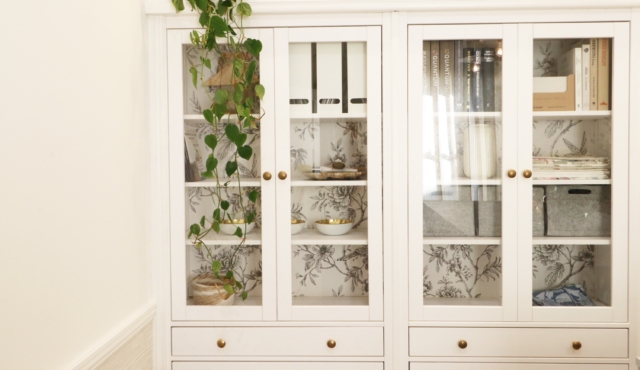
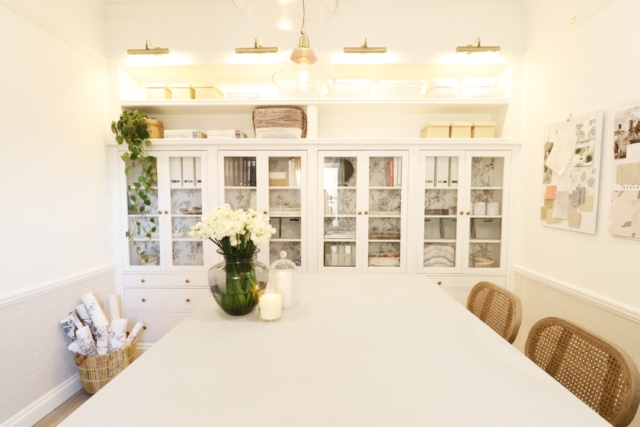
Would you love built-in cabinetry in your living room but balk at the cost? Well, you know we love an IKEA hack and this one, part of Naomi Findlay’s Carrington House reno, got us excited! So we asked her to share all the details!
Armed with some IKEA HEMNES glass door cabinets ($499 each), some trusty trades, pretty floral wallpaper and a whole lot of creativity, Naomi created a very expensive looking built-in cabinet in her design studio space for a fraction of the price of custom joinery. Here, she walks us through just how she did it (with a little help from her friends!).
BeforeDuringAfter
Naomi walks us through it with her builder Josh Ferris
Naomi’s detailed step-by-step:
1. First up you need to measure and then measure again. What is the width, height and depth of the space in which you want to install the cabinetry?
2. Find cabinetry you want to use and then look at how many units you can fit across the space. In my case, I didn’t have walls in place so had to account for all the extra centimetres that would be created before I could install the cabinetry.
3. Make sure to include a small amount of space (an extra 2cm onto the width of each unit) as you can always pack it out, but you cannot shrink your cabinets!
4. Prepare your walls. In this property, one wall was framed out and then gyprock was installed. For the wall on the other side, I had compressed cement sheeting direct stuck to the exposed brick. Why you ask? Well, I wanted four cabinets across the wall but wasn’t sure I had enough width. By direct sticking one of the walls it gave me the extra 30mm that I needed to get what I wanted. A great reminder that, when it comes to renovating, there is always a way around things.
Naomi with her builder
5. Get it wired. Light gives life to everything! And these cabinets were always going to be beautiful but functional too. So, I had our electrician wire up four library lights to sit above the top shelves and illuminate the cabinets.
I also wanted to minimise clutter in the rooms, so I had GPOS wires put into the locations where the bottom shelves are sitting. When the cabinets were installed, I was then able to pull these through the back wall of the cabinets. This is a great way to have charging docs and devices tucked away from sight, along with all the cords and mess.
6. Build the cabinets and set them in place along the wall.
7. Frame down the bulkhead from the ceiling to provide the support and opening needed for open shelves above the cabinets. Make sure you chat with your builder to check if you need a central support across the opening. You want to make sure that the shelves can support lots of your favourite heavy books and magazines.
8. Block out in between the legs of the cabinets (if they are on legs), with some simple framing timber to make sure you have something solid to fix your skirting board to.
9. Get the plasterers back to gyprock, set and sand the open shelving above the cabinets.
10. Attach the skirting board to the front of the cabinets and fix it into the framing timber blocks inserted as above. I used Intrim Primed FJ Pine 135mm x 18mm SK498 profile skirting board for this job.
11. Putty up the nail holes in the skirting to ready it for sanding and painting.
12. Get some gold metallic spray paint and spray each of the handles gold. Once they are dry fix them in place on the cabinets.
14. Next step is to deal with the small gaps between each of the units. To do this you have to make sure that whatever you use does not impede the doors opening and closing. I chose a simple D mould that was glued and tacked in place.
15. Paint, paint and paint! I used a low sheen option to match the walls on all the shelving, except for the timber trims where I used a semi-gloss oil-based paint. I find the latter takes the wear and tear of heavy use that little bit better.
16. Adding wallpaper is the final touch that will give that real wow factor and a truly personalised feel. Remove all the shelves from the inside of the unit, then following manufacturer’s instructions, apply your favourite wallpaper to the back surface of the glass door section. Replace the shelves and you are done!
Furniture hacks: the essential roundup of products to hack your IKEA pieces
Who doesn’t love IKEA’s budget-friendly, simple, timeless designs? But sometimes you’d like your piece to look a little less mainstream. Well, we have some great news! There are plenty of…
Stone cottage renovation that’ll blow your mind!
Most people would have run for the hills on seeing the rundown state of this 1880s stone cottage, but not our favourite renovator Naomi Findlay! Her years of experience and…
This week, Naomi Findlay shares the second finished room in the rundown 1880s stone cottage she is renovating. If you missed room one, check it out here. Over to you,…
In this instalment of our Ask The Stylist series with Alex Carter of Harlow + Willow, a reader writes in with a pendant light dilemma. Should she install one over her dining table, or not?
Stylist Alex Carter
Reader question: Do I need a pendant light over our dining table? We had one, which was removed after it was damaged. We have uplights and a lamp in the same room. Should I replace it?
Answer: As to whether you really need a pendant over a dining table, there are so many things that can impact this decision. I’ll go through a few general considerations to think about below.
Size of the dining area The size of the dining space and the dining table will greatly affect the decision as to whether to have a pendant light. I’m assuming in this case it’s a decent size (given there was a previous pendant), but did it feel comfortable or did it dominate when using the table?
I wouldn’t suggest a pendant light for anything smaller than a six seat table personally, unless it’s going to be quite small or hung high, but that defeats the purpose.
Is the spaced defined? A really nice way to design and style your home is to create zones for specific areas; this can be done in any home, even if it’s open plan. Areas can be defined by artwork, rugs or lights. If you have an open plan living and dining area, a pendant light can help to make the dining space feel like a discrete space, and create a focal point.
Photography: Stephanie Rooney | Styling: Harlow + Willow and Ali
Style of pendant Should you decide to go ahead, the style of the pendant is the next big decision! Keeping in mind the house and the rest of the decor, you could choose to go with a simple yet striking glass pendant, such as a long line design or an architectural light. Alternatively, you could go for a softer and more textural style and opt for either a fabric or paper pendant.
Also, taking into account what else is surrounding the dining table, if there is a large and dominating artwork or bold wallpaper, you may decide to opt for a more simple and transparent light. If the room is quite simple, make the pendant the feature!
Photography: Armelle Habib | Styling: Julia Green of Greenhouse Interiors and Harlow + Willow
Consider the surrounding lighting An important consideration is what other lighting exists in the space; is the pendant required to light the dining table or is it for decorative purposes only? This will also impact the style of pendant that you go for, and the spread of light you need (the amazing team at Lights Lights Lights talk a lot about this on their Instagram account, so head over there if you’re not sure about this). I would advise separate controls too, so that you can have just the pendant switched on for a moody effect!
Photography: Armelle Habib | Styling: Harlow + Willow and Julia Green of Greenhouse Interiors
In this next instalment of our Ask The Stylist series with Alex Carter of Harlow + Willow, a reader writes in unsure how to style a long hallway.
Our expert, stylist Alex Carter
Reader question: We have a townhouse and the hallway has a huge plain wall on one side with rooms on the other. It’s like a bowling alley. What can l do?
Answer: Long hallways can feel a bit daunting but are also an awesome opportunity to add some extra features to your home and to show people what you’re all about as soon as they walk in the door!
As this reader has said, it’s only one side of the hall that has a large blank wall. This can sometimes be intimidating, but below I am going to suggest what can be done to make it a fun and interesting part of the home.
Gallery style hanging art One option is to create a gallery style wall of art. This can be done with original paintings or prints; they can be by the same artist, pieces with similar colours, or you can go totally rogue and put up anything you love! There are no rules to this; the only condition that will determine the success or not, is commitment. For example, with the hanging style, if you go with a symmetrical and streamlined look this needs to be measured out and executed correctly. Similarly, if you decide to go for a more casual and mismatched look, make sure that none of the paintings match or line up. Commitment to any form of styling is the most important aspect – own your decision with pride!
Create a seating nook Depending on space and the width of the hallway, another idea is to create a small nook with a bench seat. If this can be near the entry point of the house, it could be used by people when they enter the house to sit down and take off their shoes. There are very slimline benches available, such as the below HK Living Retro Webbing Bench, that make a statement without being too space consuming. Pop a piece of statement art above, and a cushion or any other accessories that will practically suit the space, and you have a winning feature!
The console Another option is to put in an awesome console! Once again, there are plenty of slimline and space saving options so it doesn’t have to be a large cumbersome piece of furniture blocking the walkway. Consoles are great for displaying small interesting objects, such as ceramics, vases with florals, plants or even a pin board to house all your important messages and reminders. This can be your central spot for all of those pieces that seem to mysteriously go missing when you’re in a rush – wallets, keys and anything else you need to grab on your way out!
A pic from Greenhouse Interior's recent St Kilda trade fair
When stylist, curator and brand consultant Julia Green was looking to showcase the latest line-up of Greenhouse Interiors wares she chose a novel alternative to the traditional trade fair. Taking over an entire St Kilda home (including relocating the family that lives there), Julia set about creating the ultimate ‘Greenhouse Interiors’ abode – think texture, fun, beautiful art and a kaleidoscope of colour. By all accounts the immersive experience was wonderfully received and you can check it out yourself via the pictures in this story.
A pic from Greenhouse Interior’s recent immersive trade fair
“We dressed every bed in our linen, hung all of our new art collections, burnt our bespoke candles, put our hand soaps in the bathroom and encouraged all visitors to truly experience what it’s like to live in amongst our wares and by all accounts people loved it,” says Julia who squeezed extra promotional mileage out of the stint via the creation of a short video tour of the space and a lovely suite of still imagery. And according to Julia, the whole venture was produced for a fraction of the traditional trade fair costs.
Julia Green
With 10 years’ experience working on over 40 start-ups, Julia has become highly sought-after in the interiors industry – an industry that has changed monumentally with the advent of digital marketing, social media and online shopping. “I began my career in this industry just prior to the interiors explosion, excessive noise and competition, before ‘The Block’ rose to fame, and in era where things were done in a ‘certain’ way,” says Julia. With retail goal posts changing on the daily and more competition than ever before, the changing retail landscape means only the most nimble will survive.
“There is an increased number of people vying for their share of the market – it’s noisy. Also, the days of owning a store only, without an online presence, are gone. The savvy marketers all seem to have a bricks and mortar presence but are using it as a hub for a more active digital footprint,” says Julia who shares her top tips for brand success with us today.
Hobby vs full-time While most creatives don’t have the luxury of giving up their day job in the first instance, Julia believes it’s important to eventually make the jump to ensure your brand’s success. “You need to know when to tip the balance from hobby to full time maker/creator. Dabbling rarely works, but commitment usually does,” says Julia.
Creative vs salesperson Diametrically opposed in some respects, it’s no surprise to hear that creative people are often not that great at selling their wares. “I often refer people to outsource this part if it is not their skillset, so they can concentrate on making and not be distracted by customers!” says Julia.
Storytelling “Ensuring they take their fans on a journey is key. It’s like telling a story. People want to know WHO they are buying from,” says Julia. From static imagery to video content, embracing the digital realm is key to this aspect of winning the brand war. “Brands need to have a ‘face’ for the public and not just push their sales pitch. Brands must sell a lifestyle and not a product,” says Julia.
The power of pictures “In our industry, there is no denying the importance of the visual, and the tactile. People want to see inspirational imagery that promotes a lifestyle they wish to be a part of. Producing imagery and video is expensive, undoubtedly. But there are some economical ways to do it, that don’t all revolve around a crew of 20 with expensive equipment,” says Julia who has found that brands almost always get their ROI in this regard though the resulting imagery must end up in the right people’s hands – magazines, influential blogs and the like.
Social media “I’ve learned and have seen first-hand the power of social media, and the influence it has. I run an excellent workshop on this and teach people how to maximise their influence here,” says Julia.
When it comes to social media, Julia believes a brand must have a clearly defined point of difference that can be articulated in 30 seconds or less, must maintain authenticity at all times, provide outstanding customer service (nobody wants to wait anymore) while creating a ‘story’ (as mentioned above). “People want to know who you are out. Come out from behind the camera even if it pains you. Failing that, get a staff member to do the honours,” says Julia.
From a phone consult to a full day in person with an individual or company, Julia is now formally available for brand consulting. “This service is not a one size fits all, as I like to review each business, and find their strengths and weaknesses before delivering change on a platter. In short, after consulting to over 40 start-ups in a decade, many going on to become household names, I have a good idea of a recipe that is foolproof, and my recipe is up for sharing!”
Historically, the art world has been a rather highfalutin, impermeable space that seemed open to just a select few. But I believe that is changing – the online world now easily connects artists with buyers and the amount of affordable art seems be increasing by the year – and it’s a sentiment shared by the creators of the upcoming Affordable Art Fair.
“Here, at Affordable Art Fair we’re firm believers that anyone can collect art. But, for those of us who aren’t au fait with the ways of the art world, dipping your toe into the market can feel like a daunting experience,” says the fair’s Australian-based director Stephanie Kelly. A global expert in art procurement, we caught up with her recently to help demystify the process.
Art by Jasmine Mansbridge, courtesy of The Gallery by Fenton & Fenton and The Affordable Art Fair
Explore your options “Take some time to research and try and define your taste. Get to know galleries on Instagram, get behind the scenes of an artist studio on Facebook and brush up on art terms online,” says Stephanie who believes that exposure is key. Like any matter of personal taste, the more art you see, the more you will know what art you like (and don’t!).
A previous Affordable Art Fair
Get to know the artist and their inspiration “One of the most exciting parts of collecting contemporary art is learning about established artists or discovering rising stars,” says Stephanie. From their backgrounds to their inspirations, motivations, techniques and preferred materials it pays to do your research before you commit to purchasing a piece. Galleries should be able to provide all of this information and the upcoming Affordable Art Fair provides a unique opportunity to connect with a host of galleries and art advisors in the one place.
A previous Affordable Art Fair
Buy for love While research and due diligence should form the backdrop for a purchase, it’s best to proceed with a visceral approach when it comes to finally choosing a piece. “Buying art should be led by your heart, with your head taking care of the detail. It is good to have ideas of space, size, medium and concept in your mind but on many occasions, people arrive looking for something quite specific and leave with something completely different,” says Stephanie.
And when it comes to art, there’s nothing wrong with making an emotional purchase. Often kept forever, artworks can be some of the most meaningful purchases people make and often come to represent a significant time in a person’s life.
Art by Jasmine Mansbridge, courtesy of The Gallery by Fenton & Fenton and The Affordable Art Fair
Styling your piece at home From which room to specific location details, it pays to think about exactly where you will house a new art acquisition. From available light (natural or lit), to the size of the room, there are lots of practical things to consider before making a purchase and that’s before you even consider your specific interior style.
“When it comes to styling, are you hoping your piece will contrast with your existing furniture, or complement it? Remember that opposites attract. A bold, bright abstract work can look amazing in a clean, white space while similarly, a busy room can really benefit from a monochrome or minimal piece that oozes calm,” says Stephanie.
Art by Jasmine Mansbridge, courtesy of The Gallery by Fenton & Fenton and The Affordable Art Fair
Free tickets to the Affordable Art Fair
The Affordable Art Fair will be held at Melbourne’s Royal Exhibition Building from 5-to-8 September. Over 50 galleries, from Australia and abroad, will be exhibiting works ranging in price from $100 to $12,000. Many participating galleries will offer a ‘try before you buy’ scheme and the fair also partners with Art Money which allows art buyers to buy art with 10 payments over 10 months with no interest.
Whether you have carpet, timber or laminate floors, rugs in the home have so many practical benefits. Aside from framing and anchoring a space, rugs add warmth, a layer of style and are a fabulous finishing touch.
But as with many things, the sheer amount of choice can be overwhelming. From choosing a texture, weave, colour or size, how do you decide which rug is the perfect choice for your space? And once you’ve chosen it, how do go about placing it in the room?
We caught up with Henley colour design consultant Abby O’Connor who took us through how to choose the perfect rug, what styles are currently trending and how to avoid choosing the wrong rug for your home and lifestyle.
A rug helps to zone the lounge room in Henley’s Sahara display home
Which size and shape is right for your space? Before you measure what rug size you should purchase, position your furniture so you know where each piece will be placed. “Decide whether your furniture will sit on the rug, off the rug or half on/half off the rug and always leave 45cm between the rug and the wall. We want the room to be cosy, not claustrophobic,” says Abby who explains that there are different things to consider, depending on the room in which the rug is placed.
The lounge room There are three ways to place a rug in a lounge room and with no ‘right’ answer it comes down to personal preference. Firstly, while a little controversial, you can choose to have all of your furniture legs off the rug. “This was a popular style in the 90’s but is making a comeback as it works really well in small spaces such as apartment living,” says Abby.
All of the furniture legs are off the rug in this lounge room. Image: Early Settler
For those on the fence, having your furniture legs half on and half off is a great solution. “This is the most popular option that we see and it suits all spaces as well as usually being quite cost-effective,” says Abby. Given you don’t have to go down the custom route (because any size should work), this option is arguably the most forgiving and it’s easier on the hip pocket too.
All legs on the rug is also permissible, though bear in mind that you are paying for all that metreage that remains unseen. “This style is stunning! But it is only suited to spaces that have a vast amount of space to be able to take such a large rug. It’s really great for large open plan living or when there is minimal furniture in a room,” says Abby.
A burnt orange rug features in Henley’s ‘Marlo’ display home
The bedroom Like the lounge room, you have three options when it comes to rug placement in the bedroom. “Firstly, you can go for 1/3 of the bed on the rug where the rug only goes under the very end of the bed,” says Abby.
The next option is to put your rug under 1/3 to 2/3 of the bed. “This is the most popular option as you can see more detail of the rug and it’s a cost-effective alternative as you can purchase a slightly smaller rug,” says Abby.
The rug stops halfway up the bed in this child’s bedroom. Image: Early Settler
For larger bedrooms you can choose to put the whole bed on the rug. “With this option the bedside tables and bed are all on the rug with a significant amount overhanging so you can still see the pattern and detail of the rug underneath. Much like the lounge, this style requires a vast amount of open space and doesn’t work for a small area,” says Abby.
A rug can really soften a bedroom. Image: Oh Happy Home
The dining room “There is only one option when it comes to a dining table rug and that is having all chairs still on the rug when they are pushed out for someone to get out of their seat, otherwise you will struggle to see the rug,” says Abby though she’s not a fan of the look for practical reasons.
“Although rugs obviously add texture, warmth and pattern to a space, this is not a style I recommend to clients especially if they have young children as the rug does become dirty very quickly from dropped food or spilt drinks. If you do opt to do so, try to purchase an indoor/outdoor style rug which will be easier to clean,” says Abby.
Rugs can work under a dining table but beware the crumbs! Image: Early Settler
Rug trends “Both plain and patterned are on trend this winter. For patterned, I have found Moroccan style rugs in bright bold colors to still be very popular, especially for those wanting to add some colour into their living room whilst keeping the furniture very neutral,” says Abby.
But while patterned rugs are on trend, neutral plain ones always remain popular. “Neutral is still the most common trend and the one you will gain the most longevity out of. Thick looped rugs are very on trend and a raised pattern in the same material is also popular,” says Abby.
“Turkish, Moroccan and kilim rugs are definitely trending too. It’s hard to open a magazine without seeing a textured heirloom rug plus jute and wool rugs are still proving popular as they suit most interiors. Animal hides are making a strong resurgence as well as replica vintage rugs reworked with fading,” says Abby.
“However, my most favourite rug trend this season would have to be ‘double rugging,’ why settle for one when you can have two?! Or why settle for one large rug when all you really wanted was an animal hide but your space was too large. This creates so much unexpected drama and interest,” says Abby.
‘Double rugging’ features in this lounge room. Image: Early Settler
And while trends are worth considering, Abby thinks that other factors are more important in the first instance. “Keep in mind that you must first and foremost always work with your space before what’s on trend and remember that smaller patterns and light colours are always going to make a space feel larger,” says Abby.
To rug or not to rug? When assessing whether a room really needs a rug there are three key things to consider. “If you feel a room needs anchoring, if furniture feels like it’s floating in a room with no purpose, or the room feels cold, then a rug is a must,” says Abby.
And Abby encourages you to think outside the box when it comes to the way in which you use rugs. “A rug doesn’t have to be used on a floor! There are so many ways of using a rug – get creative. Why not use an animal hide instead of a traditional throw on your bed or chair? There is also nothing wrong with framing or hanging a rug on a wall as an alternative to traditional artwork. I have even seen bedheads upholstered into bedheads. Create the unexpected,” says Abby.
What to avoid Abby says that the biggest mistake she sees is when people have a rug purely for the sake of it and they don’t really ‘love’ it – she says it’s worth waiting until you find one that you adore.
“Not considering your lifestyle when selecting a rug is also a big mistake. For example, don’t invest in a large loop rug when you have pets or children that will pull at the fibers. Also, choosing a light coloured rug when you know it will be put in a high traffic area is also best avoided.”
When it comes to wallpaper applications, many people think the bathroom is a no-go zone but that’s far from true. From vinyl to more traditional options, wallpaper is not only possible in wet areas but it can actually be rather statement making. And unlike tiles, it’s a relatively low-cost proposition to replace it when you feel like redecorating.
And to help us navigate the often misunderstood world of bathroom wallpaper we caught up recently with wallpaper expert and Graham & Brown stylist and trend specialist Paula Taylor, who gave us the skinny.
Wallpaper vs. paint
“Like other rooms in the home, the bathroom is a blank canvas that can reflect our creative side with trendy patterns and prints. When you’re limited to a smaller space, quirky wallpaper designs and pops of bold colour are key to helping bring flair to an otherwise uninspiring room,” says Paula who says that wallpaper adds to the look and feel of a bathroom in a way that paint never could.
Can it get wet?
The most obvious concern people have regarding wallpaper in the bathroom is the issue of moisture but there are plenty of ways around this. “Vinyl wallpapers are more commonly used in bathrooms, especially if they are to be used in an area where they may get splashed. However, if your room is well ventilated to stop it steaming up every day, any wallpaper should be fine to use as long as it isn’t in direct contact with water,” says Paula who says there is one exception. “Any delicate papers that are likely to fall apart in the slightest humidity should be avoided.”
And as for what to do if it does get wet, the common sense approach is to dry it immediately. “It’s best to get it dry rather than let it remain wet over a prolonged period as with any materials in bathrooms it will become mouldy. To remove marks simply wipe it with a damp cloth,” says Paula.
Hanging concerns
While we’ve established that almost any wallpaper is suitable for a bathroom, provided there is sufficient ventilation, is there a specific way that it should be hung? “Bathroom wallpaper is exactly the same to hang as any other paper – it is even easier if it has a non-woven backing so you can paste the wall and not the paper. This is so handy when getting around tricky corners in bathrooms,” says Paula who explains that some wallpaper varieties are particularly great choices for DIY enthusiasts. “Paste-the-wall wallpaper is so easy to use that anyone can hang it, even in the trickiest areas.”
Small spaces
Often diminutive, the frequently forgotten powder room is an ideal spot for wallpaper and is the perfect place to experiment with pattern. “The best way to inject some personality into a powder room is to decorate with wallpaper! Dark, dramatic pattern can add depth to a room and make the wall recede especially when combined with some strategic mirrors and this works perfectly in a powder room,” says Paula.
Make a statement
“I’m more of a conversational kind of decorator. I like to create a space that has something to say for itself and will have people talking about it. Our ‘Kingdom Lion’ wallpaper, with its trendy yellow background and stunning animal sketches, looks great in small spaces like the bathroom as it really helps bring the room to life. Interestingly, Chromatherapy is set to be a big trend this year and we know that colours are about how you feel – warm yellow and rich green walls, for example, will help rejuvenate the bathroom space in a more contemporary way,” says Paula.
“Also there is something luxurious about pattern in a bathroom that makes the room feel decadent and inviting – perfect for a long soak at the end of a busy day!”
Many of you will be familiar with the formidable interior styling talents of Julia Green but few realise her glittering career has evolved to encompass art curation too. It’s a journey that was a little accidental but Julia’s savvy move to make original art accessible through her colourful and eclectic online store has certainly paid off.
Stylist and art curator Julia Green
“I found that when I started shooting, I was often asked to source artwork for empty walls to fill homes, and realised there was a gap. I started Greenhouse Interiors as a result, and have carved out a niche now for picking up emerging talent, and helping artists build their brands with solid marketing and PR assistance. Their work and my work is widely published, and a strong social media presence helps get the word out on the street,” says Julia who started with a select few and now represents over 40 brands.
And with over 100 submissions coming in every week, Julia has worked hard to cut through the noise and curate a spectacular line-up of Australian artists and homewares brands. “I look for a lot of different things. The first thing is I have to love the work myself, and see it as being on brand for my colour loving audience. The next thing is to talk to them, and understand them and what they want, and make sure our goals are aligned,” says Julia whose no-nonsense approach is refreshing in what can be a pretentious space.
“I think attitude is everything, and I don’t wear egos too well, so as long as they sound like they are on the same page, we make plans for the next steps. We are like a family and I am always keen to ensure that our collective brand name is held in high esteem,” says Julia whose commitment to demystifying the art buying scene is no doubt integral to her success.
“Many of our clients have told us that they are intimidated to shop in gallery spaces, or don’t feel like they will have budget to afford ‘original’ works, so we have tipped that on its head, and offer a broad range of work at different price points, and are very welcoming and non-intimidating to deal with,” says Julia.
“But the most important thing of course, is to have credibility with what you do, and with Greenhouse Interiors now powering into its tenth year, we have developed a very loyal clientele that love us almost as much as we love them!”
“The art world is always evolving, but I have noticed more artists moving away from galleries with the spread of online exposure. Sites like ours are highly credible, have excellent imagery and the work can be seen in every state of the country, rather than in one place alone,” says Julia who shares her top tips for buying and styling art below.
1. Where to begin?
“Just look for a pure love. Art is so subjective, and personal. It matters little what anyone else thinks – it just matters that you love it. Art should evoke emotion, make you feel something, and that’s when you know it has found the right home. There’s nothing high brow about that. It’s a simple connection,” says Julia.
1. There are no styling rules!
“The great thing about it is there are no rules! You can do as you please. I personally like to use the art to dictate the palette and inform other styling decisions in the house. For example, I have used a new Katie Wyatt piece in my home and pulled out lilacs and chartreuse colours in accessories for a considered look. I equally love a pattern clash or bold colour clash,” says Julia.
2. Hanging
“When it comes to hanging, just think about the height at which it hang – not too high! Also, play around with configurations on the floor before taking hammer and nail to wall. I also love a gallery hang that shares a horizon line, where they all hang at the same height from the top,” says Julia who recommends her site’s free 3D art app to really get a sense of how a piece will look in situ.
“It allows you to try the art on your own walls, to scale and with depth. Lots of people offer the ‘Photoshop it in’ thing but it’s only one dimensional. Our app makes it feel real, and really instils confidence to buy. We have had so many fab stories of purchases that have come as a result of our app,” says Julia.
3. Colour
If you had to describe the Greenhouse Interiors aesthetic, ‘colour’ is the first word that comes to mind and there’s no doubt its presence is fundamental to Julia’s styling. But just how important is colour when choosing art for the home?
“Colour is a language. You turn the volume up or down. So if you want bright bold colour, and it makes you feel happy, do it! On the contrary, if you want a quiet, peaceful space, you could dial it back and have a more softly hued space. Think about how you want to feel in each room of the house and choose the right colour for the mood.”
Photography: Armelle Habib | Styling: JuliaGreen for Greenhouse Interiors assisted by Aisha Chaudhry and Jessica Retallack
There’s arguably nothing more challenging for the house-proud than the arrival of a baby. It’s always astounded me just how much little ones accumulate and it only seems to get worse as they head into the toddler years and beyond. For me, whether your toy area is a dedicated room (lucky you!) or simply a corner of the living area, storage and organisation is key in maintaining some semblance of order in the home. And this is a sentiment shared by professional declutter Jo Carmichael of All Sorted Out who shares seven secrets for creating a clutter-free kids environment.
Storage “Getting the toys and games up off the floor is step one. If there isn’t a built in cupboard to use in this space, line book shelves or cube storage along one wall. The different shelf heights means you can easily see and find things. Also, placing a combination of clear plastic or cane baskets onto the shelves or into the cubes, keeps the toys from becoming jumbled,” says Jo who recommends using the top of the shelves to display the big chunky toys.
Like with like “Group the toys and games into the tubs as per a ‘like with like’ system. For example, you should put all the toy cars, figurines, blocks, animals and transport toys into their own separate tubs. If your kids play with cars and trucks together it makes sense to group them in one tub. If there’s volume, maybe separate transport into small and large pieces,” says Jo.
Zones “Create a ‘chill’ area with book shelving attached to the wall, from the ground level up. Have pillows, bean bags and a soft rug there for both kids and adults to lie on and read books or turn pages. This is where learning to read can start when they are only a baby,” says Jo.
Ages “Make a bench area – something like a toy box or chest at approximately 70 cm high would suffice. Pre-schoolers can stand at it to do a puzzle or construct something but it’s also just out of reach of a crawler or younger toddler. With a lid that opens, this bench can also provide storage for bulky toys or ones not in current rotation,” says Jo.
Create
If space allows, a low table and chair set is a great addition to the toy area and is a good spot to store stationery – try looking for one with built-in storage in the table top or drawers beneath. “This could even be a coffee table with chunky stools, which has pots of pencils, crayons, craft scissors, pads of paper and pots of Play-Doh at the ready. Keep messy paints out of reach until an adult can supervise. This is a place where they can learn to enjoy writing, scribbling and making,” says Jo.
Labels “Labels are key to keeping both the toys and the space organised. You can hand write or draw the words describing the contents of each container. Choose a large font so it’s easy to read, as this is a way to introduce reading to your little ones too. Labels remind young and old where to find something and where to put it back,” says Jo.
Pack away
“The secret to keeping the toy room a fun place is to introduce ‘pack away’ time. Make it as fun and musical as you can. Shake a tambourine or put on a favourite song to herald the time,” says Jo who recommends doing this before the next activity or meal to keep on top of the mess throughout the day.
“Keep snacks or meals as a reward for having returned the toys to the correct tubs.
If a construction or game isn’t completed and you know there is still time to play with it later, then put this aside to be finished. When we learn to put things back, we also teach our little ones life skills,” says Jo.
Like so many others, this play room makes great use of the IKEA Kallax storage units. Image source: Pinterest/12oaksblog.com
“If the toy room ends up in a crazy state after visitors or a busy play date, maybe the next play time could be spent resorting it all back into the tubs,” says Jo who recommends making a game of it by asking them what each toy is called and then helping them find the appropriate tub. “They can then toss the toys back into the tubs with a sense of achievement too. The less clutter the more fun!”
With the garden increasingly an extension of the inside of the home, we thought it was time to gather some expert tips and tricks for the outdoors as the summer holidays kick off. “Numerous plants burst into bloom or bear fruit at this time of year, but the hotter weather can also be tough on our plants,” says Tristan Eastaugh, product manager at garden tool company Cyclone.
“It’s important to take care of your garden in the summer months, and with some careful planning and the right tools, you can also promote healthy growth throughout the season,” says Tristan who shares his top five summer gardening tips with us.
Cyclone straight hedge shears
Mulch, mulch, mulch! “A fresh layer of mulch helps to conserve moisture and suppress weeds. In fact, mulch can reduce evaporation from the soil surface by as much as 70 per cent when applied correctly, so it’s a vital ingredient in obtaining a water-wise garden. It can also help to prevent soil erosion and even-out temperature variations,” says Tristan.
First up, it’s important to give the area a good weed and soak, then spread a five centimetre layer of mulch evenly over the soil with a shovel. “Organic mulches such as straw and bark break down over time, helping to nourish and improve the soil. Just avoid placing them too close to the stems of plants to avoid rotting,” says Tristan.
Fruit trees Some of us are lucky enough to have fruit-bearing trees in our garden and for them Tristan has plenty of summer gardening advice. “Deciduous trees that bear summer fruit benefit from a good prune as soon as the crop is harvested. Plants that bear new wood this season, such as peaches and nectarines, are also good candidates for a summer prune. Summer cuts heal quicker, so there’s less chance of disease entering the plant. It also helps promote a bumper crop for the following season, as it gives the plant plenty of time to develop lots of new fruit-producing growth instead,” says Tristan.
“Start by removing any dead, damaged or diseased limbs, then tackle any structural flaws like crossing or rubbing limbs and branches that grow inwards. Finally, cut back one third to one half of all growth made since spring,” says Tristan who advises using a pruner for thinner stems and a lopper for thicker branches.
Cyclone multi-purpose shovel
Roses “Most of us think of rose pruning as a winter job, but if you want to get the best out of repeat-flowering varieties, such as Autumn Damask or Gypsy Boy roses, then summer pruning is a must. After each flush of flowers simply prune off a third of the growth in a rounded shape using a pair of Cyclone straight hedge shears. Yes hedge shears! It’s that easy,” says Tristan who explains that the straight blades are perfect for precise pruning, while the stem cutter (known as a notched blade) on the shear is ideal for managing larger stems.
And the effort will way off. “You’ll be rewarded with another flourish of blooms six to eight weeks later. A great idea is to time your pruning ready for them to re-flower for a special event or garden party,” says Tristan.
Cyclone aluminium bypass pruner
Soil
Not only is composting a great way to use your kitchen and garden waste but it’s fabulous for your garden’s soil too. “Adding compost to your garden beds helps nourish and enrich the soil by encouraging healthy microbial activity, as well as improve its structure, drainage and moisture holding ability. Add a good balance of ‘green’ matter, like vegetable peelings and lawn clippings, and ‘brown’ matter like dry leaves, shredded newspaper and straw to the compost mix,” says Tristan.
“For the best quality compost turn your heap every three to four days – air is important to the decomposition process and turning re-heats the pile to keep it in an aerobic state, as well as eliminate odours,” says Tristan who recommends the Cyclone garden fork for the task. “The tines help create additional passageways for air and moisture in the pile while turning it, compared to a spade. The four tines are also forged from a single piece of steel, so they’re super tough and versatile,” says Tristan.
If you’ve an interest in children’s interior design, you’ve no doubt perused the charming spaces created by Nicole Rosenberg of Little Liberty. The interior decorator found business inspiration after having three children but today we’re taking a look at one of her more adult spaces – her beloved coffee table.
Nicole with her Globewest marble coffee table
“I purchased the coffee table because at just over a metre it was the perfect size for the space and I wanted something round. The look of the table is simple and elegant and fits in perfectly with the marble fire place in the room,” says Nicole who has some sage advice when choosing a coffee table.
“You definitely need to consider style and function when purchasing a coffee table! I always see coffee tables that are not the correct scale against the couch and I think that it can often make the space look smaller,” says Nicole who recommends buying your coffee table after the rug and couch is in place.
“When styling a coffee table you need to be mindful of the practicalities of everyday living as well as having items that can be easily removed. One of the main things I always have on my coffee table is flowers or a plant. I absolutely love the Angus and Celeste ‘Raw’ plant stands and at the moment I have a beautiful peace lily in there which is the perfect indoor plant with its ever blooming white flowers which just keep on giving!” says Nicole.
Plant aside, Nicole’s coffee table also houses her favourite tomes – a mixed bag that give some insight into her design inspirations. “A coffee table is never complete without a stack of books and three of my absolute favorites, for their content and exterior sleeves, are Kate Moss, The Kinfolk Home and The Flowers by Dr Lisa Cooper which has the most amazing floral photography!” says Nicole.
The coffee table’s other most notable item is a white monkey lamp. “I love adding in a bit of tongue and cheek with my interiors and the monkey lamp from Fenton and Fenton made by Seletti says just that!” says Nicole. Other items include a Mud Australia porcelain bowl and a Cocolux Australia marble candle. “Cocolux in my favorite candle brand with its eco-friendly coconut wax and fragrances inspired by nature all wrapped up in the most luxe fashion forward vessels,” says Nicole.
Nicole’s top coffee table styling tips
I always have either three or five items on the coffee table – always go for odd numbers when styling!
You can’t go wrong with a stack of books – either all the same size or different sizes.
Make sure all items are at different height levels to create extra interest for the eyes.
Always go green or add flowers! If you don’t want to keep spending money each week on fresh flowers go for an indoor plant or find some realistic looking fake flowers.
Add a little humour and a touch of fun!
Add in one of your favourite candles.
Mix your textures from marble, to ceramic, to books, to florals!
While property investing is one of Australia’s favourite pastimes, it doesn’t mean it’s always an easy ride. There are ups and down and certainly rewards to reap, but you do have to put in some groundwork and planning to become a successful investor.
While this can seem overwhelming at times – especially for first time investors – the good news is that you don’t have to go it alone. There are professionals whose very job it is to help you along the way. In fact, it is recommended you have a property investment team of sorts – each player with a different role to help you towards investing success.
As the team captain you get to pick the players, but there are the nine experts you should consider including on your team:
Image: Business2Community
Accountant and/or Financial Advisor
A common goal of property investing is financial reward, but you need to use your money wisely. An accountant will help you manage your money and advise on any tax changes you should know about, as well as help you claim everything you’re entitled to. A financial advisor is slightly different and looks at your financial situation more holistically. They can help you determine your financial goals and set a realistic plan to achieve them. Ideally, your accountant and financial advisor may be one in the same, but both of these services are incredibly useful.
Real Estate Agent or Buyer’s Agent
When you’re searching for your first or next investment property, it’s good to have a real estate agent or buyer’s agent you can trust. Their commission should be transparent, they should have a thorough knowledge of the local market, have a deep understanding of your requirements and be proactive in helping you find your ideal investment.
Property Manager
While some investors may be tempted to self-manage their property, there are a lot of risks involved in this approach if you don’t have the knowledge or time to manage this effectively. A good property manager will help you secure quality tenants, be on top of any damage, will save you time, tell you of any requirements and will help take some of the emotion away from the process. As their fees are tax deductible this shouldn’t be looked at as an unnecessary expense.
Mortgage Broker
In the past year, mortgage brokers have been gaining market share in Australia. The 2017 Property Investment Professionals of Australia (PIPA) investor confidence survey revealed that 83 per cent of respondents are hoping to finance their next loan via a mortgage broker, up from 71 per cent last year. If you’re looking to purchase a new investment property, it may be worth speaking with a mortgage broker to help you find the best product to suit your situation and your finances.
Conveyancer
There’s a lot of complicated paperwork involved in purchasing a property including the contract of sale, mortgage documents and other paperwork related to the transaction. It’s best to enlist the help of a qualified and reputable conveyancer to do this legal legwork for you. They’ll help decipher any complicated terms and conditions and translate the legal jargon. While you’re not legally obliged to hire a conveyancer, it should help you reach settlement sooner and with a lot less stress.
Quantity Surveyor
Ensure you get a quantity surveyor that specialises in property depreciation to prepare your tax depreciation schedule. A specialist quantity surveyor is worth having on your team as they will ensure you’re claiming everything you are legally entitled to. A specialist will also keep on top of any tax changes so you don’t get on the wrong side of the Australian Taxation Office (ATO). The ATO recognises quantity surveyors as one of only a few professions which possess the required construction costing skills to calculate the cost of items for the purposes of depreciation.
Building Inspector
It’s essential that you get a building and pest inspection carried out before you buy a property. The last thing you want is to buy a property only to later find it’s actually riddled with termites or structurally unsound. A trusted building inspector will help you determine if you have a quality property on your hands and can save you from forking out thousands on surprise repairs and maintenance after the time of purchase.
A mentor
It’s great to have someone who is an experienced investor who you can turn to for advice and learn from their real life experiences. Investing in property has its ups and downs so it’s nice to have an investor friend on your side to help, even if it’s just to chat about your situation and investing plans.
Yourself
While you don’t need to be an expert to invest in property, it’s important to arm yourself with some basic knowledge of the market to keep on track of how your investment is performing. It will also give you more confidence when dealing with other professionals to ensure you’re not being taken for a ride. There are many resources out there you could use to improve your investing knowledge from books, blogs, magazines and online resources to information nights and investing courses.
–Bradley Beer (B. Con. Mgt, AAIQS, MRICS, AVAA) is the Chief Executive Officer of BMT Tax Depreciation. Please contact 1300 728 726 or visit www.bmtqs.com.au for an Australia-wide service
Introducing white to your interior walls creates an immediate ambience of sophistication, freshness and timeless style. However, as any former home renovator knows, the choices of shades of white are endless and to make matters more complicated, often the shade of white selected can appear to look different when painted on the wall itself.
For guidance on nailing the white wall, we chatted to Henley Design’s Colour and Design Consultant Heidi Schwieters on how to select the right shade for your home.
Keep it cool
Cool whites, which are perfect for more contemporary and open plan settings, have a hint of grey, blue, blue-pink, green or even black undertones.
“When neutralising bright light, cool whites can work extremely well in rooms that have big windows and receive a lot of sun coming through,” says Heidi. “Timber and concrete floors are well suited to cool whites and can create the feeling of more energy within the room.”
Consider: Dulux Vivid White TM, Dulux White on White, Dulux Lexicon Quarter and Dulux Lexicon.
Warm whites
With yellow, brown or red undertones, warm whites are used to inject a cosy feel in a room and complement furniture and fixtures which have warmer hues including timbers.
“Warm whites tend to suit more traditional homes and are perfect for smaller rooms with less natural light such as bedrooms,” says Heidi. “Avoid cooler whites in these smaller rooms as it tends to make the room feel a little cold.”
Consider: Dulux Natural White, Dulux Snowy Mountains, Dulux Whisper White and Dulux Grand Piano Quarter.
Getting the lowdown on the undertone
The undertone is the subtle colour appearing through the main mass colour. It can often be quite distinguishable, however in whites, the undertone is often subtle. Sometimes until it is paired with other colours or in certain lighting, it is not apparent.
The undertone is how we separate cool or warm colour tones and is the secret to creating an effective and harmonious colour scheme. Comparing whites with other whites is the easiest way to distinguish undertones.
Test out a patch
Heidi’s top tip for determining your preference of cool white or warm whites is to trial a test patch on a decent part of the wall or to paint a narrowed down selection of chosen paint colours on a piece of board to compare whites. Give it time to dry well before you decide and ensure you have done two good coats. You will find the shade of white appears to change depending on the time of day, the amount of natural light coming in and with surrounding colour such as floors, furniture and accessories.
The expert team at Henley Design can guide you through the array of white hues on offer for your interior walls. Head on over to the Henley Design page for more inspiration and to make an appointment with the Henley Design interior experts.


 Ages
Ages


